Elevator Hardware
Elevator List and Create Elevator
Screen Overview
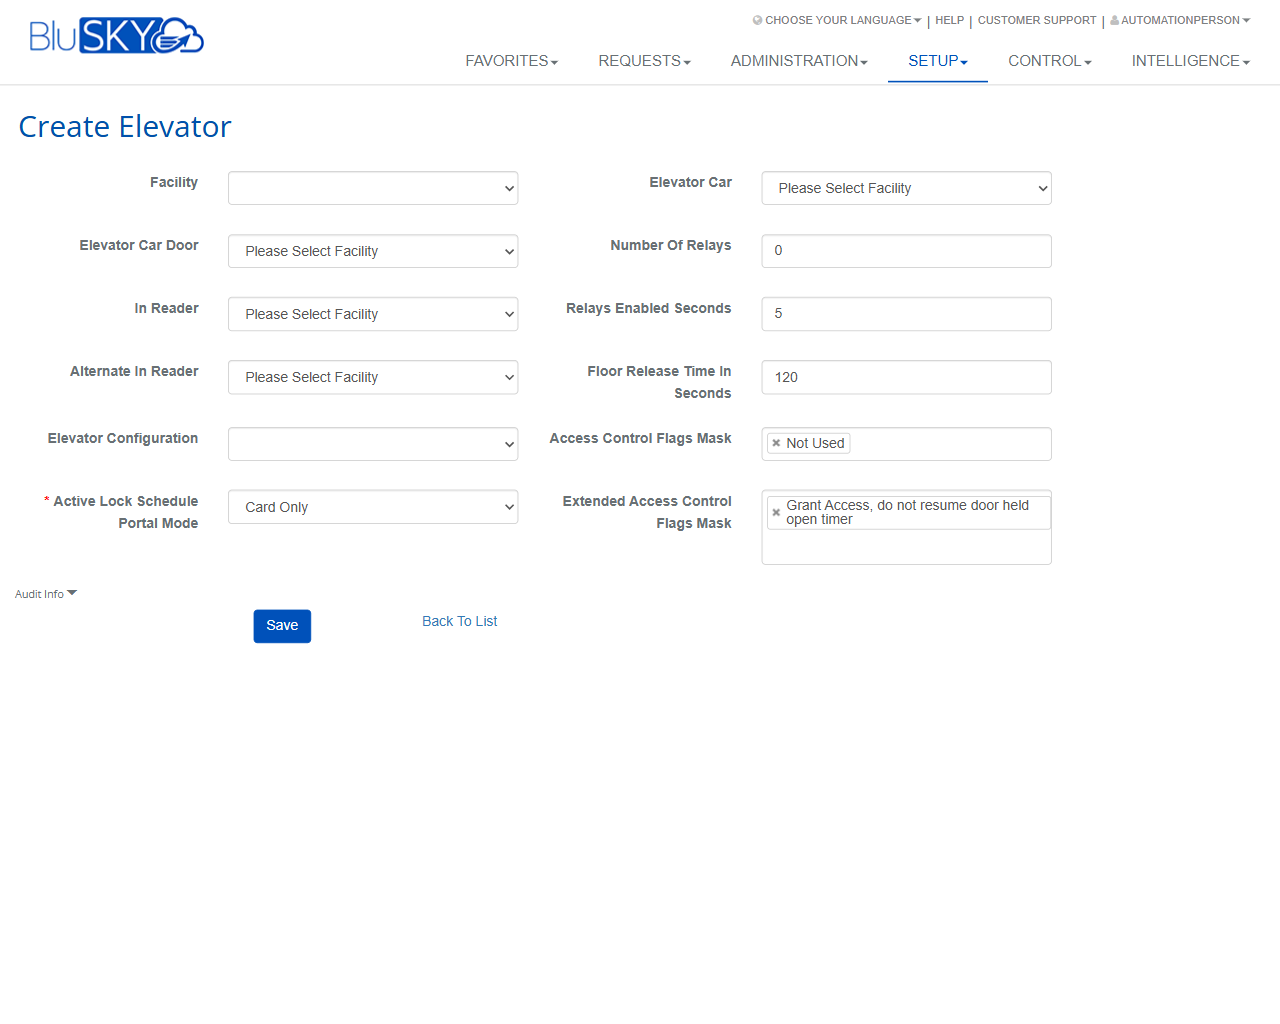
The Elevator List and Create Elevator screens in BluSKY are used to manage elevator car objects and their access-control behavior. From the Elevator List, administrators can create new elevator records and view counts. The Create Elevator form defines the elevator’s facility context, car and door associations, reader inputs, relay quantities, timing parameters, and access-control flags.
Field Definitions
| Field Label | Definition | Notes |
|---|---|---|
| Criteria | Collapsible filter area for narrowing the elevator list. | Appears on the Elevator List page. May include facility or other filters depending on configuration. |
| Elevators Count | Displays the total number of elevator records returned by the current criteria. | Read-only. Updates after results load. |
| Facility | The site/building where the elevator resides. | Required. Other drop-downs filter to this facility after selection. |
| Elevator Car | The specific elevator car object to be controlled. | Required. Populated by the selected Facility. |
| Elevator Car Door | The door/portal associated to the elevator car for access events. | Optional or required per site design. Filtered by Facility. |
| In Reader | Primary input reader used to authenticate elevator access (e.g., cab reader). | Filtered by Facility. Select the reader wired to the elevator controller. |
| Alternate In Reader | Secondary reader used as an alternate authentication source. | Optional. Use when the cab has multiple readers. |
| Number Of Relays | The number of output relays used to control floor selection. | Integer. Typically corresponds to the number of controlled floors or groups. |
| Relays Enabled Seconds | Duration each relay remains energized after access is granted. | Integer (seconds). Affects how long a floor selection signal is active. |
| Floor Release Time In Seconds | Time window after a valid credential during which floor selections are permitted. | Integer (seconds). Commonly called “access window” in the cab. |
| Elevator Configuration | A predefined configuration profile applied to the elevator. | Optional. Can standardize mapping and behaviors across cars. |
| Access Control Flags Mask | Optional bitmask to apply additional access-control behaviors. | Default “Not Used.” Advanced/rarely changed. |
| Active Lock Schedule Portal Mode | How the portal behaves during active lock schedules (e.g., Card Only). | Required. Determines allowable access mode when schedules are active. |
| Extended Access Control Flags Mask | Additional advanced flags to modify behavior (multi-select). | Example shown: “Grant Access, do not resume door held open timer.” Optional. |
| Audit Info | Expandable section displaying audit metadata for the record. | Read-only system data; visible after save or when editing. |
Screen Actions and Functions
- Create – Opens the Create Elevator form from the Elevator List.
- Expand – Expands the results area on the Elevator List for easier viewing.
- Save – Commits the elevator configuration on the Create Elevator form.
- Back To List – Returns to the Elevator List without saving further changes.
- Audit Info (toggle) – Expands/collapses audit metadata on the form.
Usage Instructions & Examples
How to Create a New Elevator
- Go to Setup > Elevator List and click Create.
- Select Facility. Wait for dependent fields to load.
- Select Elevator Car and (if required) Elevator Car Door.
- Choose In Reader and, if used, Alternate In Reader.
- Enter Number Of Relays.
- Set Relays Enabled Seconds (how long a floor relay stays energized).
- Set Floor Release Time In Seconds (how long the rider can select a floor after presenting a credential).
- Optionally select an Elevator Configuration.
- Leave Access Control Flags Mask as Not Used, or choose the advanced behavior required by your site.
- Choose an Active Lock Schedule Portal Mode (e.g., Card Only).
- Optionally select items under Extended Access Control Flags Mask.
- Click Save. Use Back To List to return to the summary.
Example: Standard Office Cab
- Facility: Headquarters.
- Elevator Car: Car 3.
- In Reader: Cab Reader 3.
- Number Of Relays: 16.
- Relays Enabled Seconds: 5.
- Floor Release Time In Seconds: 120.
- Active Lock Schedule Portal Mode: Card Only.
- Save. Verify Elevators Count increases on the Elevator List.
How to View Counts
- Open Setup > Elevator List.
- Wait for the page to load; review Elevators Count.
- Click Expand to maximize the results area if more detail is present.
System Behaviors and Edge Cases
- Changing Facility refreshes dependent drop-downs (Elevator Car, Door, Readers). Prior selections may clear.
- Numeric fields (Number Of Relays, Relays Enabled Seconds, Floor Release Time In Seconds) must be non-negative integers; invalid entries are rejected on save.
- Active Lock Schedule Portal Mode is required; the Save action is blocked until provided.
- Access Control Flags Mask and Extended Access Control Flags Mask are advanced options; leaving defaults applies standard behavior.
- Very low Relays Enabled Seconds values can cause unreliable floor selection on some controllers.
- Extremely long Floor Release Time may increase the chance of unintended floor selections; set to operational needs.
- Audit Info appears only after the record exists (post-save) or when editing an existing elevator.
Permissions
- Available to users with administrative setup privileges, typically:
- Global Administrators
- Tenant/Facility Administrators with Elevator Management rights
- Create and Save actions require the permission to add or modify elevator configurations.
- Read-only users can view the Elevator List (including Elevators Count) but cannot Create or Save.
Linked Workflows
- After creating an elevator, map relays to floors in your elevator controller configuration workflow.
- Assign Access Levels and schedules so users can select authorized floors.
- Associate cab readers with credential formats and validation rules under Reader/Device setup.
- Use Reporting/Audit views to verify elevator access events after deployment.
Reference Image Links