Cameras
Camera Screen
Screen Overview
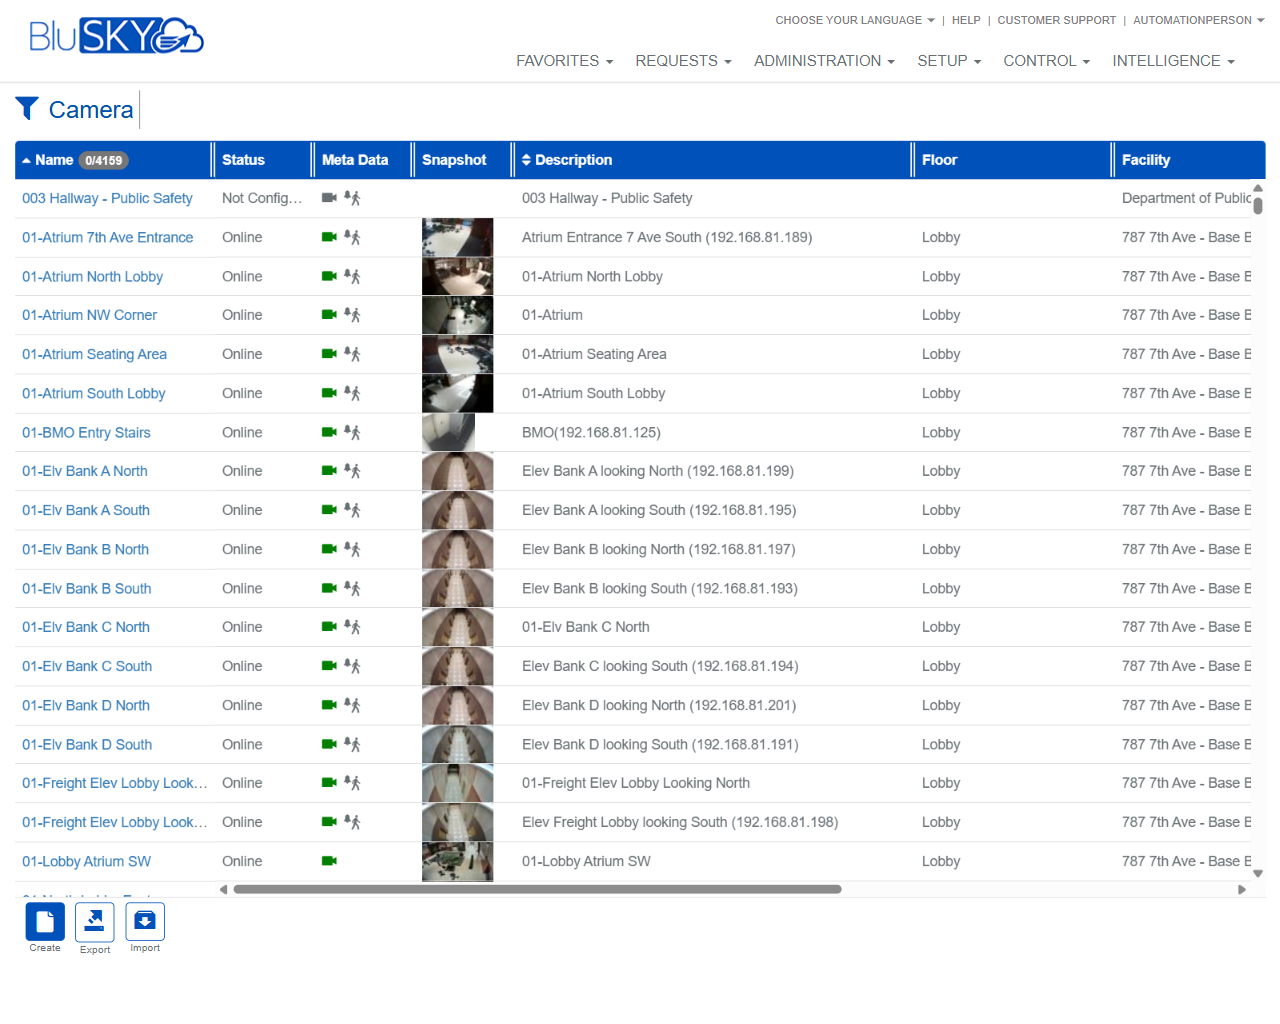
The Camera screen allows administrators to search, view, and manage all video cameras integrated with BluSKY. It provides powerful filters (system, facility, floor, recorder, device identifiers, and associations to portals/readers/points) and a results grid showing camera status, snapshot, and location. From this screen you can create cameras, import/export records, and refine results using the filter panel.
Field Definitions
| Field Label | Definition | Notes |
|---|---|---|
| System Group | Filters cameras by the enterprise/system-group scope. | Dropdown; click the refresh icon to reload available groups. |
| System | Limits results to a specific access/video system. | Dropdown; refresh icon reloads systems. |
| Facility | Filters by site or building. | Dropdown; refresh icon reloads facilities. |
| Floors | Filters cameras assigned to a selected floor. | Dropdown; refresh icon reloads floors for the chosen facility. |
| Recorder | Filters cameras by NVR/recorder hosting them. | Dropdown; refresh icon reloads recorders. |
| Search Text | Free-text search across Name, NVR Camera ID, IP Address, and MAC. | Text field; case-insensitive; use the X to clear; ? opens field help. |
| Camera Status | Filters by camera online state (e.g., Online, Offline, Not Configured). | Dropdown. |
| Search | Filters by record state (Active/Inactive/All). | Defaults to Active. |
| Portal Forced | Returns cameras linked to the selected portal for “Forced” events. | Dropdown; refresh icon reloads portals. |
| Portal Held | Returns cameras linked to the selected portal for “Held” events. | Dropdown; refresh icon reloads portals. |
| Portal Other | Returns cameras linked to the selected portal for other portal events. | Dropdown; refresh icon reloads portals. |
| Video Motion | Filters by cameras with motion/analytics mapping. | Dropdown. |
| Reader | Filters cameras associated to a specific reader. | Dropdown; refresh icon reloads readers. |
| Monitoring Point | Filters cameras associated to a monitoring/input point. | Dropdown; refresh icon reloads points. |
| Device Name | Searches by the underlying device name reported by hardware. | Text field; ? opens field help; X clears. |
| Name | Display name of the camera in the results grid. | Click to open the camera record. The header shows the result count (e.g., Name (4159)). |
| Status | Current communication/configuration state of the camera. | Examples: Online, Offline, Not Configured. Read-only. |
| Meta Data | Icon indicators showing available metadata streams/associations. | Read-only; hover in-app for legend (motion/analytics/links). |
| Snapshot | Thumbnail image from the camera. | Read-only; may be blank if not available. |
| Description | Text description of the camera/location. | Often includes location or IP details. |
| Floor | Floor to which the camera is assigned. | Read-only in list; editable within the record. |
| Facility | Facility (site/building) where the camera resides. | Read-only in list; editable within the record. |
Screen Actions and Functions
- Create – Opens the camera creation form.
- Import – Bulk import camera records from file.
- Export – Exports the current camera list to CSV/Excel.
- Submit – Applies the selected filters and updates the grid.
- Reset – Clears all filters to their defaults.
- Refresh (circular arrow beside dropdowns) – Reloads the choices for that specific field.
- Clear (X in text fields) – Clears the current text entry.
- Help (?) – Displays inline help for the field.
- Open Record – Click a camera Name in the grid to view/edit details.
Usage Instructions & Examples
How to find a camera by IP or MAC
- In Search Text, enter the IP address or MAC (partial is allowed).
- Optionally set System/Facility/Floor to narrow results.
- Click Submit to display matching cameras.
How to view cameras on a specific recorder and floor
- Select the desired Recorder.
- Select the Facility and Floors.
- Ensure Search = Active and click Submit.
How to create a new camera
- Click Create.
- Complete required details (e.g., Name, Recorder, Facility/Floor, network identifiers).
- Save. The new camera appears in the grid after Submit.
How to export a filtered list
- Apply filters (e.g., Camera Status = Online, Facility = your site).
- Click Submit to confirm the result set.
- Click Export and choose the desired format.
How to list cameras linked to a specific door event
- In Portal Forced (or Portal Held/Portal Other), select the portal (door).
- Click Submit to view all cameras mapped to that event context.
System Behaviors and Edge Cases
- The Search field defaults to Active; resetting returns the filter panel to this default.
- The result count appears in the Name column header (e.g., Name (4159)).
- Snapshot may be empty if the recorder is unreachable or snapshots are disabled.
- Camera Status derives from recorder communication; transient network issues can show Offline temporarily.
- Text searches are case-insensitive and match substrings across Name, NVR Camera ID, IP, and MAC.
- Using multiple association filters (Portal/Reader/Monitoring Point) together will narrow results to cameras matching all selected associations.
- Refresh icons next to dropdowns reload only that field’s choices; use Submit to refresh the grid.
- Large result sets use horizontal/vertical scrolling; performance depends on filter breadth.
- Import validates key identifiers (e.g., Camera ID/IP/MAC) and may reject duplicates; review the import log for details.
- If no records match, the grid displays an empty result set; adjust filters or click Reset.
Permissions
- Accessible to Global Administrators and Tenant Administrators.
- Operators require explicit permissions such as ViewCameras; editing/creating requires ManageCameras.
- Import and Export actions require ImportCameras and ExportCameras respectively.
- Users only see cameras within their assigned System Group/System/Facility scope.
Linked Workflows
- Associate cameras with Portals (Forced/Held/Other) for event video.
- Map cameras to Readers or Monitoring Points for context in access or alarm events.
- Configure Recorders/NVRs prior to camera creation to ensure selection in Recorder filter.
- Maintain location metadata (Facility/Floor) to enable floor-based monitoring and reporting.
- Use Control pages (e.g., Live/Playback) to view streams for cameras configured here.
Reference Image Links