Customers
Customer List Screen
Screen Overview
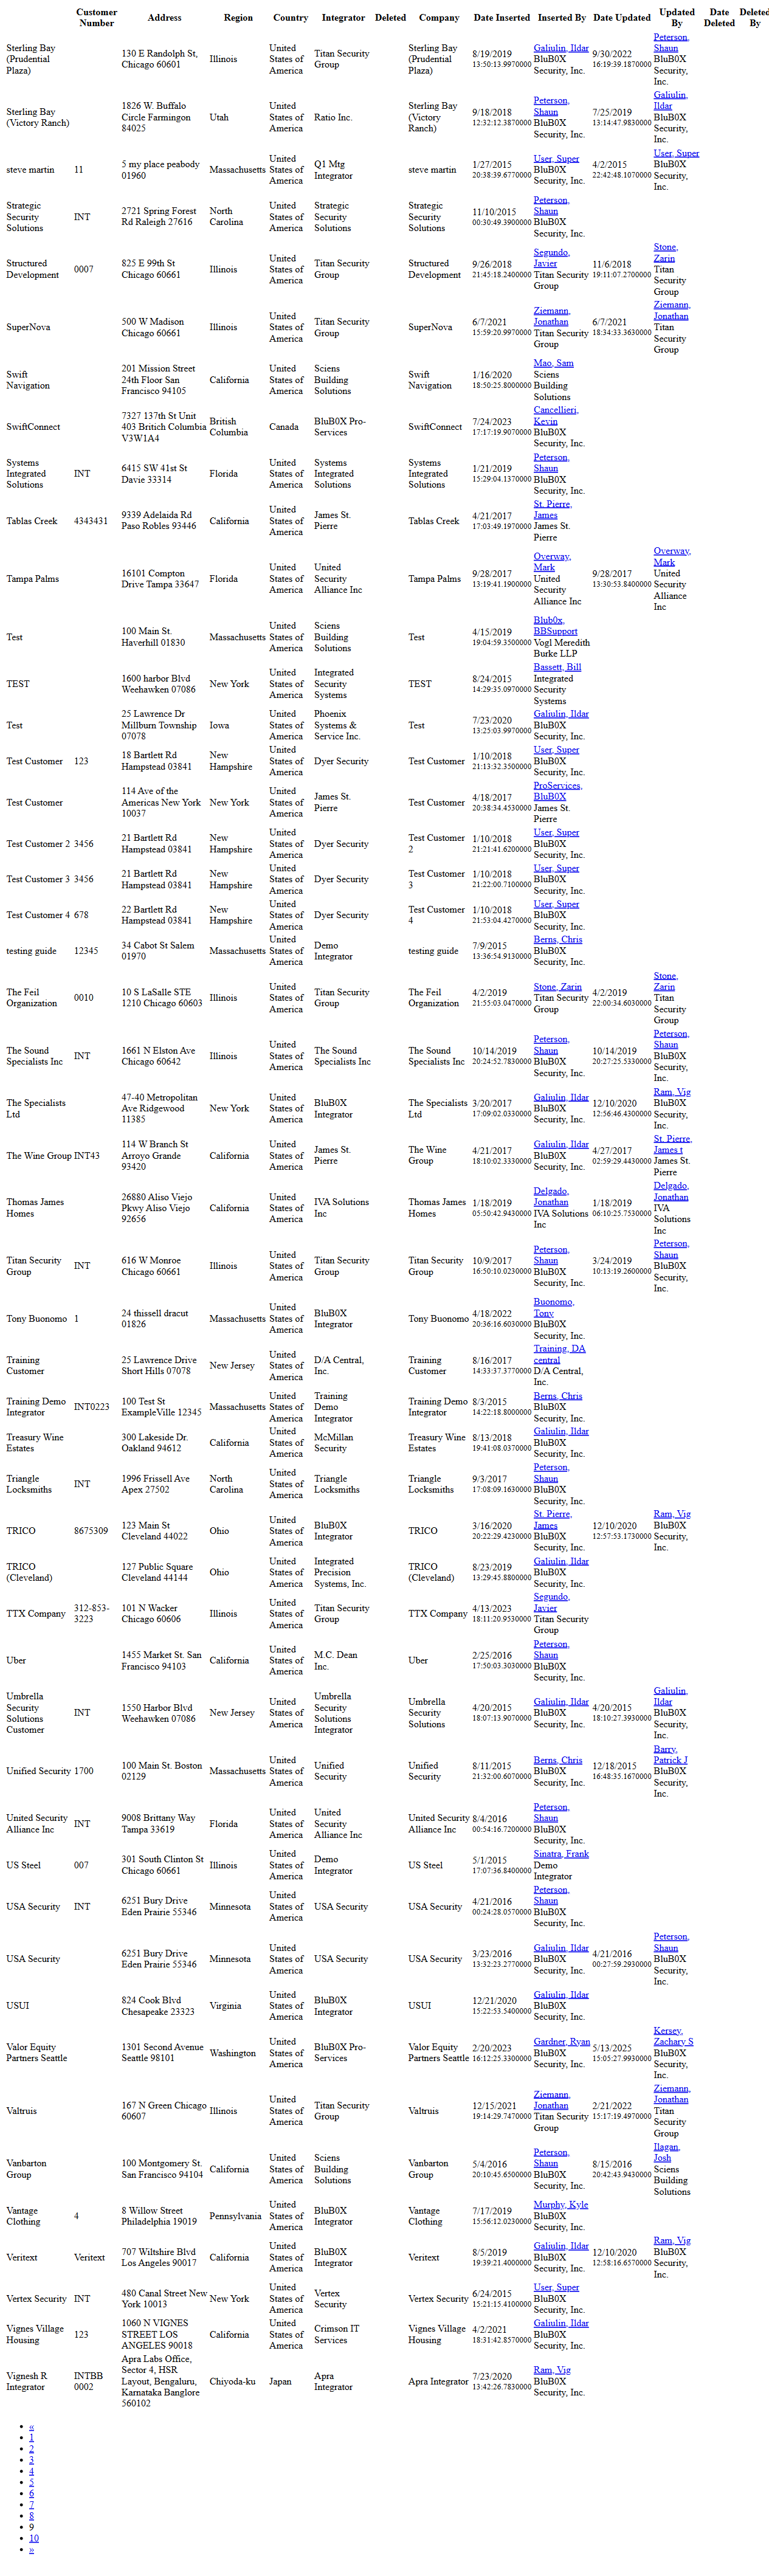
The Customer List screen provides a searchable, filterable directory of all customers in the BluSKY system. It enables users to quickly locate customers, open their records, and perform management actions such as create, edit, delete, or print-friendly expansion. The screen displays a concise grid by default and can show an expanded, audit-focused view for detailed review.
Field Definitions
| Field Label | Definition | Notes |
|---|---|---|
| Search Text | Free-text search entry used to find customers by name or partial name. | Not case-sensitive. Leave blank to return results based on the View filter only. |
| View | Drop-down filter for record scope (e.g., All Active). | Default is All Active; available options depend on permissions and system configuration. |
| Customer Count | Read-only indicator of the number of customer records returned by the current filter. | Updates after Submit. Shows “0” if no matches. |
| Selection Counter | Read-only indicator showing how many rows are selected in the current page (e.g., “1/50 selected”). | Appears when row selection is enabled; some actions require a selection. |
| Customer | Customer name shown as a link in the grid. | Click to open the selected customer’s record. |
| Customer Number | Customer’s unique identifier or reference number. | May include numeric or alphanumeric values (e.g., “INT”). |
| Address | Primary address for the customer. | Displayed as a single formatted line. |
| Region | Geographic region associated with the address. | Read-only. |
| Country | Country associated with the address. | Read-only. |
| Integrator | Service provider or integrator associated with the customer. | Read-only. |
| Row Selector | Checkbox used to select one or more rows for actions. | Needed for View, Edit, and Delete toolbar actions. |
| Pagination | Navigation control displayed at the bottom of expanded lists to move between pages. | Shown in the Expanded view; page size is system defined. |
| Company (Expanded) | Company name associated with the customer (appears in Expanded view). | Read-only; included for audit/summary purposes. |
| Deleted (Expanded) | Flag indicating whether the customer is marked as deleted (appears in Expanded view). | Read-only. |
| Date Inserted (Expanded) | Timestamp when the customer record was created (appears in Expanded view). | System-generated, read-only. |
| Inserted By (Expanded) | User who created the customer record (appears in Expanded view). | Hyperlink to user/person record when available. |
| Date Updated (Expanded) | Timestamp of the most recent update (appears in Expanded view). | System-generated, read-only. |
| Updated By (Expanded) | User who last updated the record (appears in Expanded view). | Hyperlink to user/person record when available. |
| Date Deleted (Expanded) | Timestamp when the record was deleted, if applicable (appears in Expanded view). | Blank for active records. |
| Deleted By (Expanded) | User who deleted the record, if applicable (appears in Expanded view). | Blank for active records. |
Screen Actions and Functions
- Submit – Executes search using Search Text and View filter.
- Reset – Clears Search Text and returns View to its default (e.g., All Active).
- Create – Opens the customer creation form.
- View – Opens the selected customer’s record in read-only mode.
- Edit – Opens the selected customer for modification.
- Delete – Soft-deletes the selected customer(s) when permitted.
- Expand – Displays a print-friendly, audit-focused list with additional columns and pagination.
- Open by Link – Click a value in the Customer column to open that customer’s record.
Usage Instructions & Examples
How to Find a Customer
- Enter part or all of the customer name in Search Text.
- Choose a View filter (e.g., All Active).
- Click Submit. Review the results and the Customer Count.
How to Open a Customer
- Locate the customer in the grid.
- Click the Customer link, or select the row and click View.
How to Create a New Customer
- Click Create.
- Complete the required fields in the customer form.
- Save. The new customer appears in the list and the Customer Count increases.
How to Edit or Delete a Customer
- Select exactly one customer row for Edit or one or more rows for Delete.
- Click Edit to modify and save changes, or click Delete to soft-delete the selection.
How to Review an Audit-Friendly List
- Apply search/filter criteria as needed.
- Click Expand to open the print-friendly, paginated list with audit columns.
- Use pagination links at the bottom to navigate between pages.
System Behaviors and Edge Cases
- The grid is read-only; modifications occur via Edit or through the linked customer record.
- If no records match the criteria, the grid displays no rows and Customer Count = 0.
- View/Edit require exactly one selected row; Delete may allow multi-select based on permissions.
- Expand shows additional columns (Company, Deleted, Date/By audit fields) and provides page navigation links.
- Reset clears Search Text and reverts the View filter to its default.
- Clicking a Customer name navigates to that record; browser back returns to the list with prior filters retained.
- Deleted records (when visible via filter) are non-editable and marked by the Deleted flag in the Expanded view.
Permissions
- View access to the Customer List is typically granted to Global Administrators, Integrator Administrators, and authorized Tenant Administrators.
- Create and Edit require a customer management permission (e.g., ManageCustomers).
- Delete requires a higher-level delete permission (e.g., DeleteCustomers) and may be restricted to integrator/global roles.
- Expand is available to any role that can view the list.
Linked Workflows
- From an opened customer record, administrators commonly proceed to manage related entities such as Sites/Facilities, People/Users, and hardware or service configurations.
- Customer records may also be referenced in reporting and audit workflows.
Reference Image Links