Network Configuration for Controllers
Overview
This article explains the initial network configuration of a Mercury Intelligent Controller. When you complete all the steps, the controller will be able to communicate with BluSKY over a standard internet connection.
Before getting started please ensure that the physical devices are configured properly. A complete guide on configuring and connecting the controller boards can be found in Controller Hardware Configuration.
Instructions
- Connect a computer to the network and set its IP address to 192.168.0.250. This computer will serve to confirm connectivity.
- 1.1 Best way is to connect the controller to PC via network cable directly and setting up IP range of 192.168.0.xxx
- Enable the factory default network & user settings of the Controller using the dip switches as follows
- Set all the board's dip switches to OFF,
- Then set dip switch 2 to ON. You will need to restart the controller by removing, then re-adding power or pushing the black button on the controller.
- After the board has reset, set dip switch 2 to OFF and set dip switch 1 to ON. This enables the board's default user name and password (i.e. admin/password). Note: Once you set the dip switch to ON, you have 5 minutes to login, otherwise you timeout and have to reset the dip switch off and then on again.
- Check for the batter, make sure there is a battery installed on the controller. If there is not a battery, please install one before proceeding.
- Make sure for LP and MP controllers the jumpers for the batter or set to on. See Enable On Board Battery for Mercury LP Controllers
- Ping 192.168.0.251, the default IP address, to confirm the device is connected.
- Enter 192.168.0.251 in the address bar of your computer's browser.
- Push past any browser alerts; (these are only warnings from your browser).
- NOTE: When trying to load older EP controller UI page using modern browsers you may find that you get TLS errors. Refer to the following article for suggestions on how to work around that issue: How To Avoid TLS Errors When Logging Into EP Controllers
- Log-in using the default user name and password (admin/password)

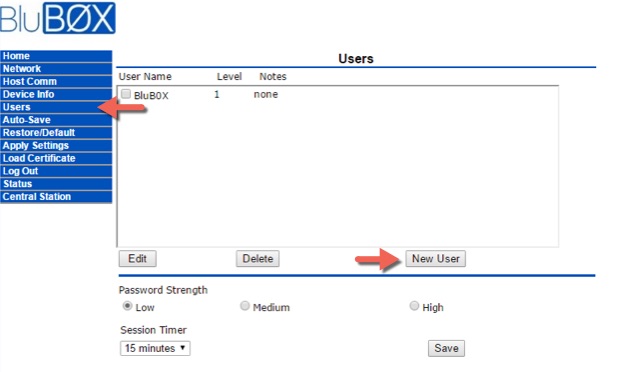
- Add your own administrative user.
- Click Users in the leftmost menu.
- Add an administrative user by filling in the required fields.
- Select "Apply Settings" from the menu on the left side of the screen.
- Set dip switch 1 to OFF to disable the default login.
- Login again using the browser on your computer and the login credentials you just created.
- Configure the controller to communicate on the host network.
- Click "Network" on the left side of the screen.
- Configure the IP address, Subnet, Default Gateway and DNS Server, as required by the local network.
- Note: This configuration is dependent on the local network's parameters. If needed, request an acceptable local network configuration for your controller from the IT department that supports.the network.
- Click "Accept".
- Reconfigure your computer to connect to the local network.
- Ping the new controller's IP Address to ensure connectivity.
- Login to the controller again using the browser on your computer (At this point, they should both be devices on the local network).
- Push past any browser alerts.
- Log-in using the newly created administrative user.
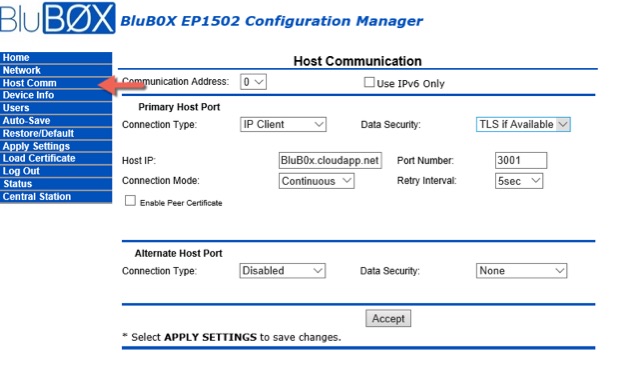
- Now, connect the controller to the BluSKY service through the "Host
 Comm" menu.
 - Enter the following data exactly unless specified otherwise.
- Connection Type: IP Client
- Data Security: "TLS Required" or "TLS if Available" MUST match controller configuration in BluSKY.
- Host IP: "blub0x.cloudapp.net" - This URL may need to be white-listed depending on the local network configuration.
- Port #: <number>
- Note: Get the Port # from BluSky Controller settings (3010-3017)
- Note: If you are connecting a BluBØX demo kit the Port # should be 3002. Also set the Data Security field to TLS Required
- Note: The local firewall must not filter the port you are using.
- Connection Mode: Continuous
- Retry Interval: 5 sec
- Update the Auto Save
- Apply Settings and Reboot to complete the setup.
- Reminder: If step 1.1 was followed, disconnect the controller from PC (which we connected in step 1.1 via network cable) and connect it to the site network.