Milestone Video Configuration Best Practices
When configuring a Milestone NVR, BluSKY recommends the following camera settings:
In addition to setting up the NVR and its associated cameras, there are 8 steps that are recommended when setting up cameras in Milestone:
- Configure 2 streams. One for streaming and one for recording
- Change settings for each camera in Milestone
- Remove Key Frames from Cameras in Milestone
- Configure Motion Detection
- For some Cameras you might need to login to the camera to make some adjustments
- Setup a 24x7 Rule
NVR Setup
- Use different streams for Live and Recorded playback only if the customer wants to have a higher resolution for review/investigation etc.
- Make sure to set up the NVR for recording always (or continuous recording.) It should never be set up for motion-triggered recording. These steps are different for all NVRs
- continuous recording on Milestone => setting up a rule for record always
- continuous recording on exacq => changing schedule tab
- continuous recording on Aviglon => ?
- continuous recording on Salient => ?
- Storage configuration should make sure that the maximum storage size is smaller than the disk size. e.g if the disk has 930GB space available specify 900GB as the maximum storage size.
- Salient Complete View does not allow changing camera resolution in NVR. So always use the camera page and change the first video stream to have desired settings and resolution and then add the camera to Salient. If you want to change the resolution of a camera that is already added... you will have to restart the Salient services for it to pick up new camera settings.
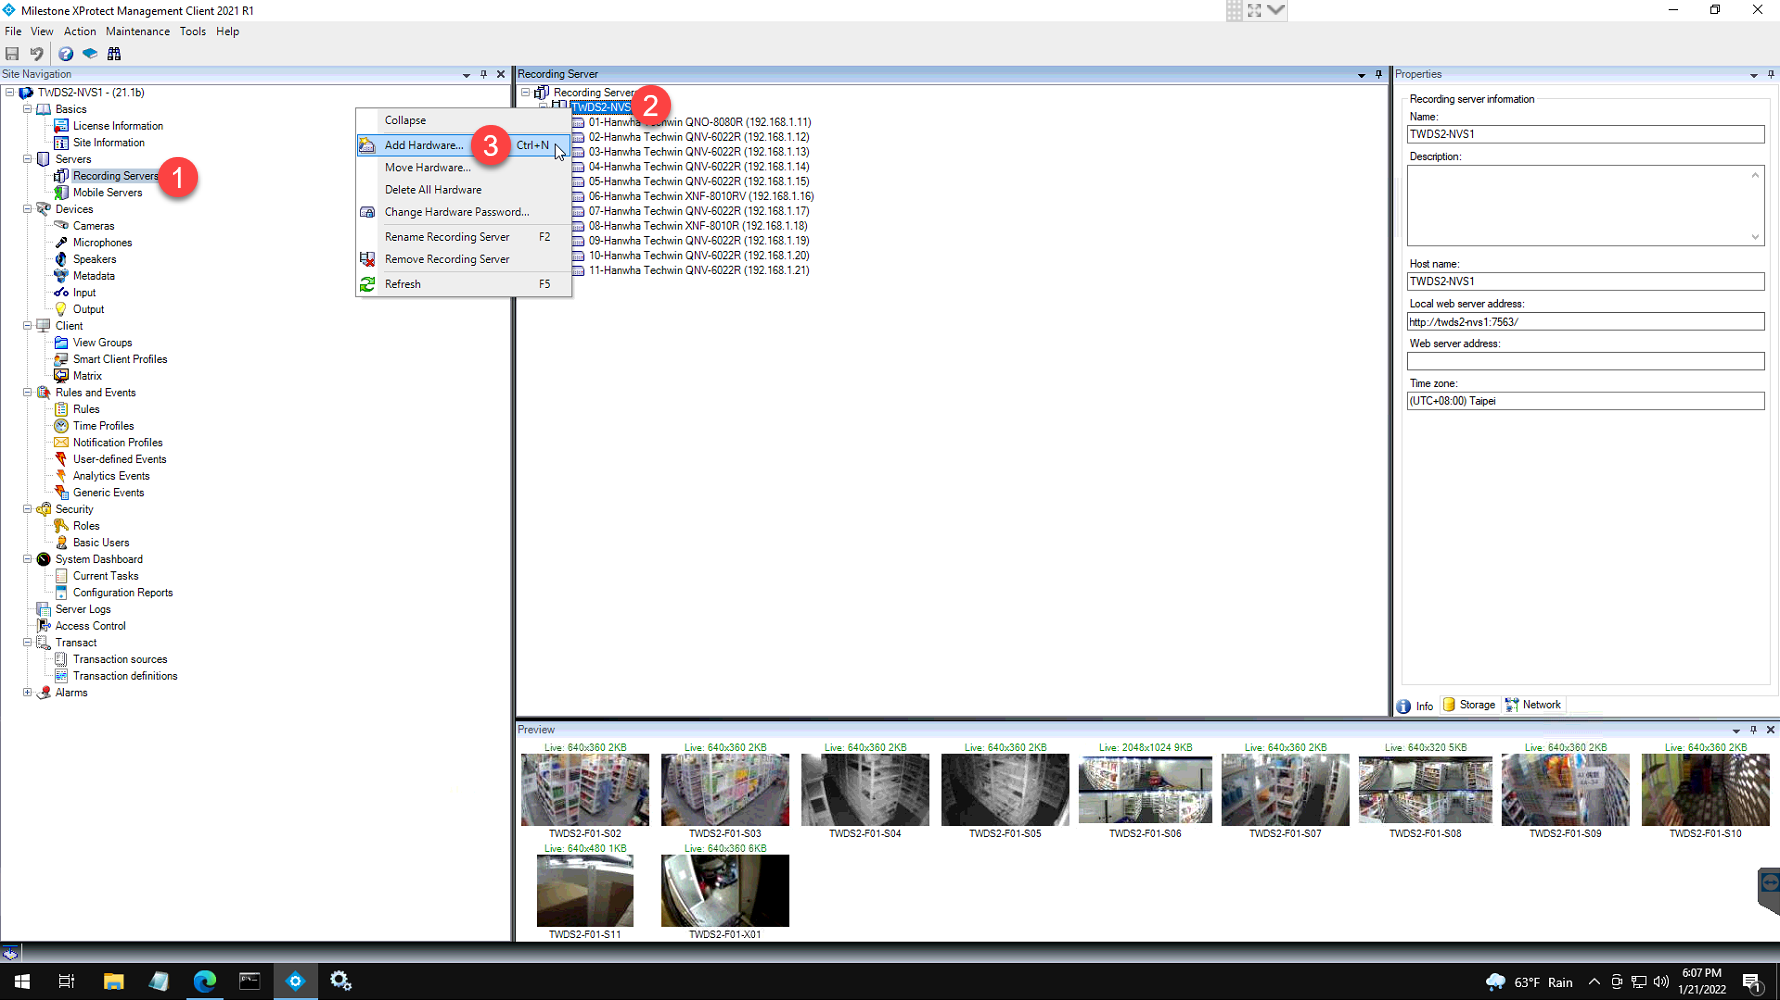
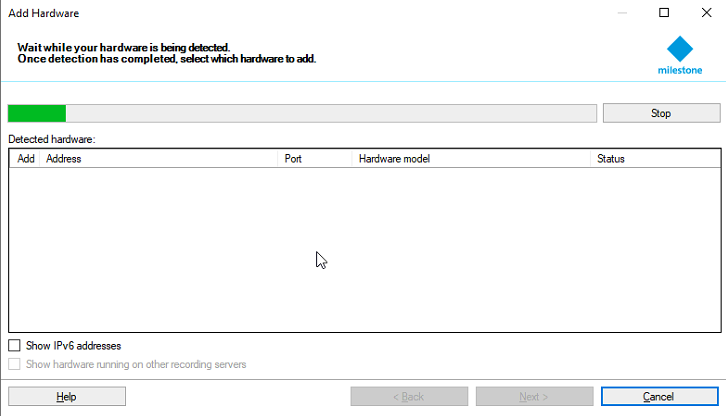
Add Camera to Milestone
- Select the Recording Servers under the servers.
- Right click the NVR name right below the recording server.
- Select the add hardware button.
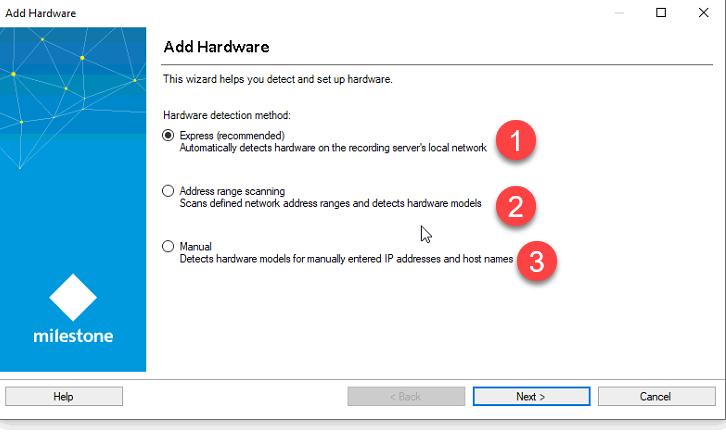
- Express (Recommended) - This mode automatically detects the camera and adds the camera to BluSKY.
- Address Range Scanning -
- Manual
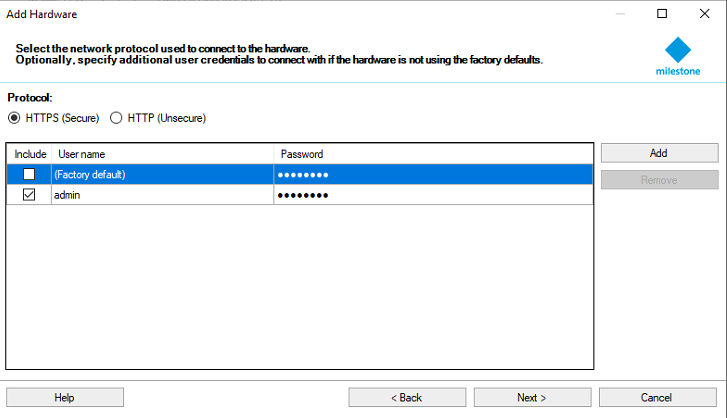
To add a camera a login is needed. It is advised that the same login and password added here is used in the LVSM site manager configuration file.
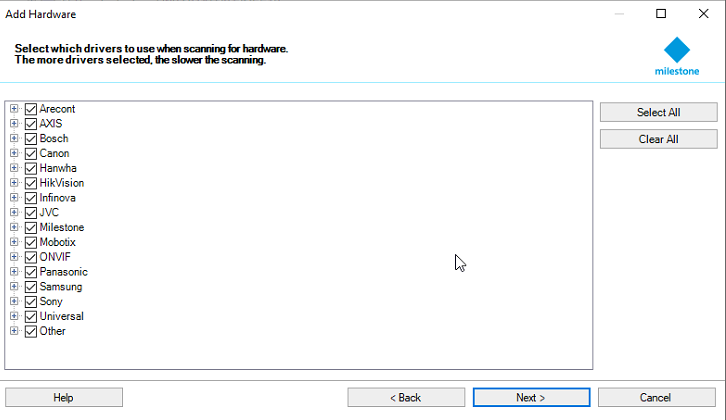
When using address range scanning or manually adding cameras, the next page allows the user to filter the type of cameras.
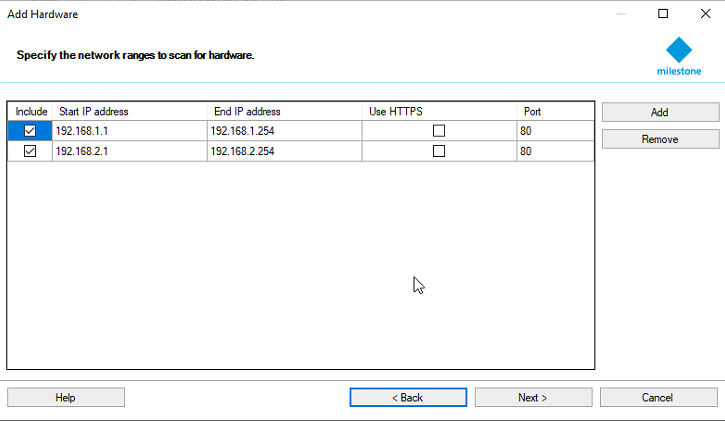
The user can manually search the range of IP address for the camera.
Camera Setup
General Rule of Thumb for Resolution, FPS and Max Bit Rate
The following is recommended for minimum setting for Max Bit Rate (or Target Bit Rate) based on your resolution and FPS settings. This has been determined from testing looking at compression results from a given Resolution/FPS.
| Resolution | FPS | Use at least this value for Maximum Bit Rate (Target Bit Rate) |
| 1080P (1920x1080) | 30 FPS | 4096 kb/s |
| 1080P (1920x1080) | 15 FPS | 2048 kb/s |
| 720P (1280x720) | 30 FPS | 2048 kb/s |
| 720P (1280x720) | 15 FPS | 1024 kb/s |
Aspect Ratio
Aspect ratio defines the relationship between the width and height of the captured image. It plays a crucial role in determining the field of view and the level of detail captured by the camera. By understanding the differences between 16:9, 16:10, and 4:3aspect ratios, security professionals can tailor their camera setups to meet specific security needs, ensuring comprehensive coverage and reliable monitoring capabilities.
Common Aspect Ratios:
- 16:9 (Widescreen):
- Widely adopted in modern security camera systems.
- Offers a broader field of view, suitable for monitoring wide areas such as parking lots or building exteriors.
- Higher resolutions, such as those in 16:9, offer enhanced clarity and detail, crucial for identifying objects or individuals at a distance.
- Resolutions include 1280x720 (HD), 1920x1080 (Full HD), and 3840x2160 (4K UHD).
- 16:10:
- Slightly taller aspect ratio compared to 16:9.
- Provides a balance between width and height, suitable for areas where a vertical field of view is essential, such as corridors or hallways.
- Resolutions include 1280x800 (WXGA), 1920x1200 (WUXGA), and 2560x1600 (WQXGA).
- 4:3 (Standard):
- Less common but still relevant in some security camera setups.
- Offers a squarer aspect ratio, suitable for capturing detail in environments where vertical coverage is prioritized over width.
- May be preferred for areas requiring detailed monitoring, such as entranceways or storage rooms.
- Resolutions include 1024x768 (XGA), 1600x1200 (UXGA), and 2048x1536 (QXGA).
1. Ideal camera settings for Live Stream :
-
Resolution: 1280 x 720 (16:9), 1280 x 800 (16:10), 1024 x 768 (4:3)
-
Frame rate: 15 fps
-
Encoder H.264 (Never use H.265, MJPEG, MPEG etc.)
-
H264 Profile: Baseline or Main ( do not use high)
-
Bit rate: 1024 kbps
-
Live Stream Compression Rate : 50
-
GOP: 30 (or 1 second)
#####
2. Ideal camera settings for a recorded stream should be the same as Live Stream, however, if the customer really wants a higher resolution
- Resolution: 1920 x 1080 (16:9), 1920 x 1200 (16:10), 1600 x 1200 (4:3)
- Frame rate: 15 fps
- Encoder H.264 (Never use H.265, MJPEG, MPEG etc.)
- Control Mode: VBR - Variable Bit Rate
- H264 Profile: Baseline or Main ( do not use high)
- Bit rate: 2048 kbps
- Record Stream Compression Rate : 70
- GOP: 30 (or 1 second)
Always make "max frames between key frames" = "Frame per second".

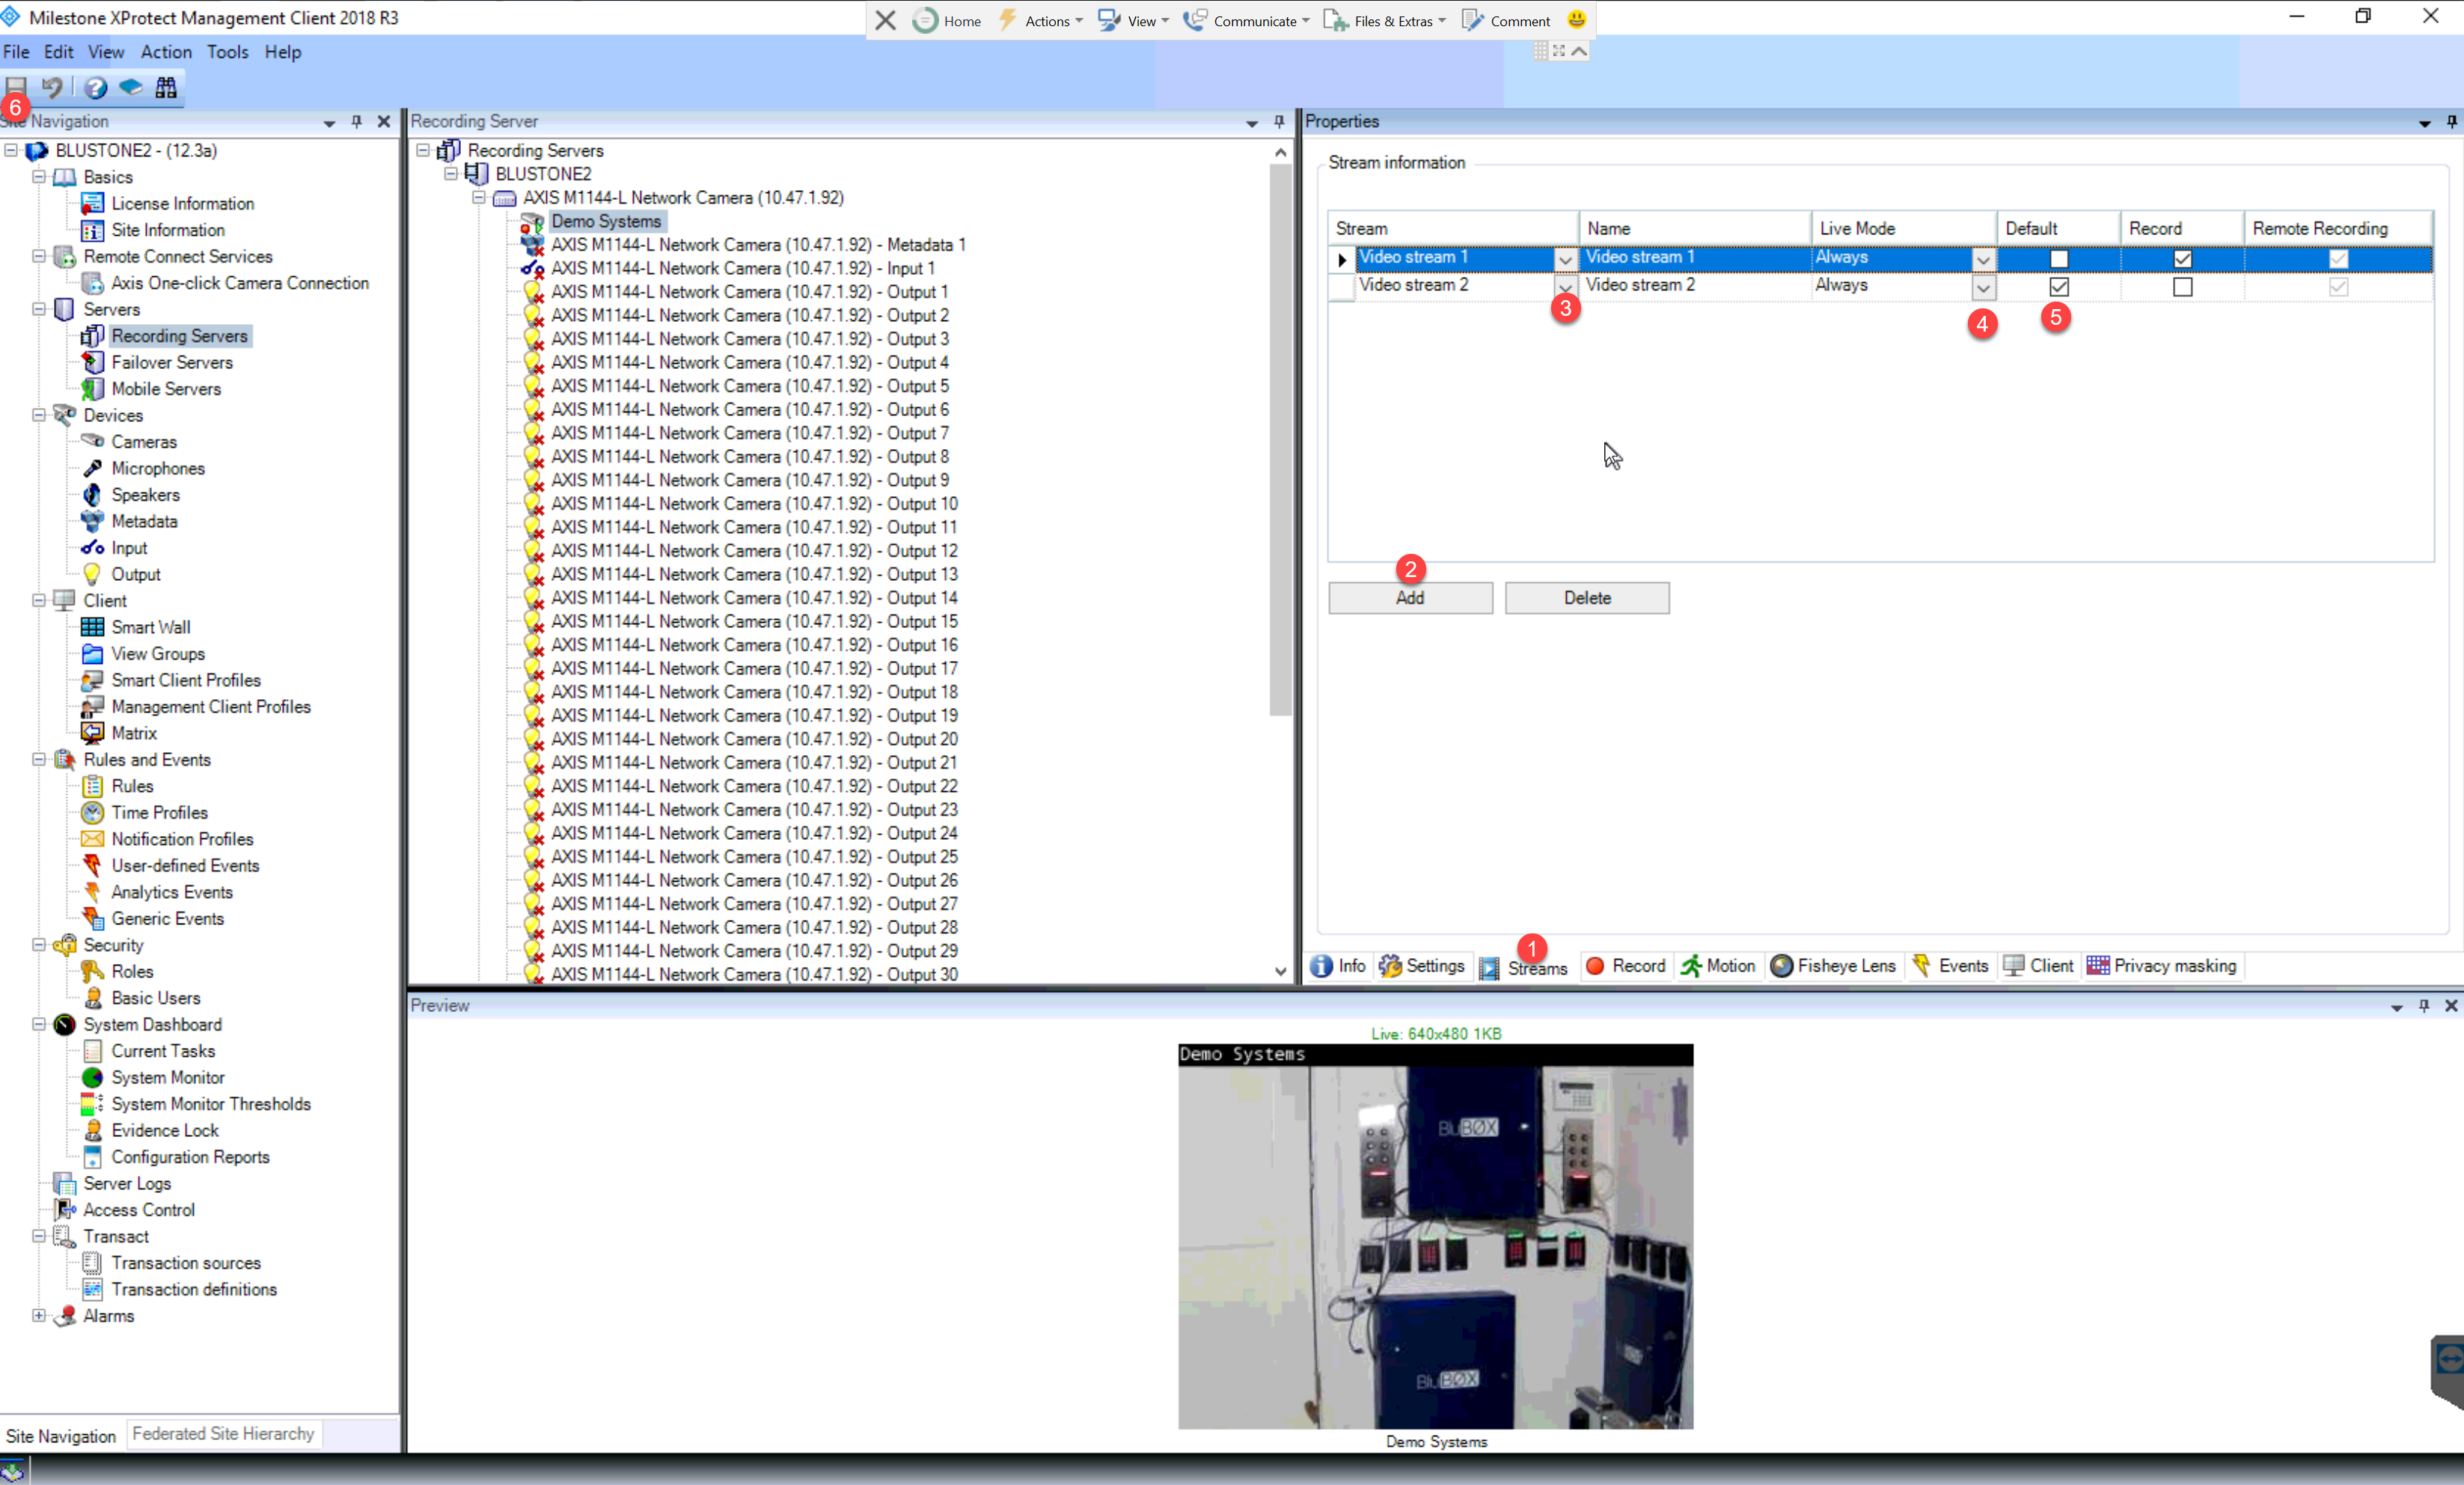
Set Camera Stream
- Go to the Streams page.
- Select the Add Stream button.
- Set Video Stream 2.
- Change the Live Mode to always.
- Set Video Stream 2 as default.
- Select the Play button for Video Stream 1 and Save.
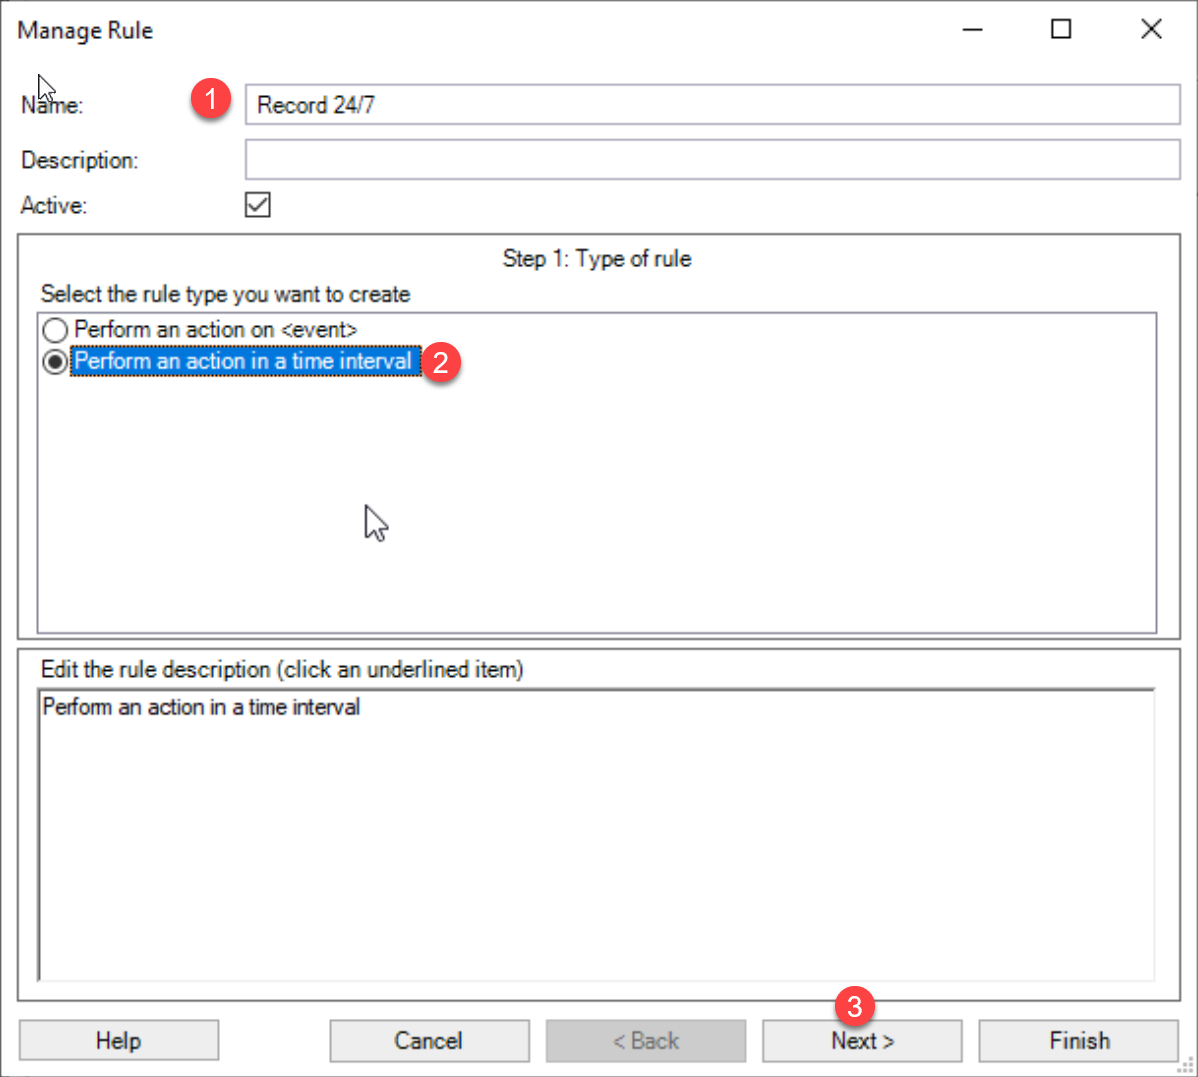
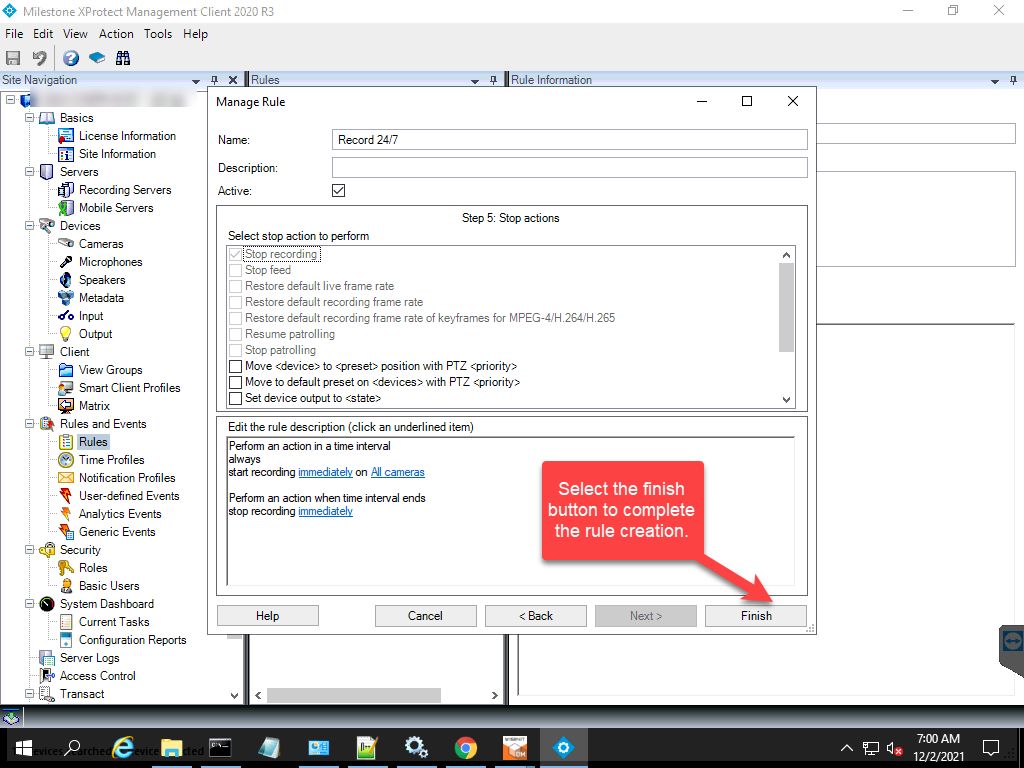
Setting up a 24/7 Rule
1 On the Navigation Tab (left side of the screen), go to the Rules page. 2. Right-click on the empty section and a pop-up should appear. 3. Select the Add Rule button. (Can also press Ctrl+N)
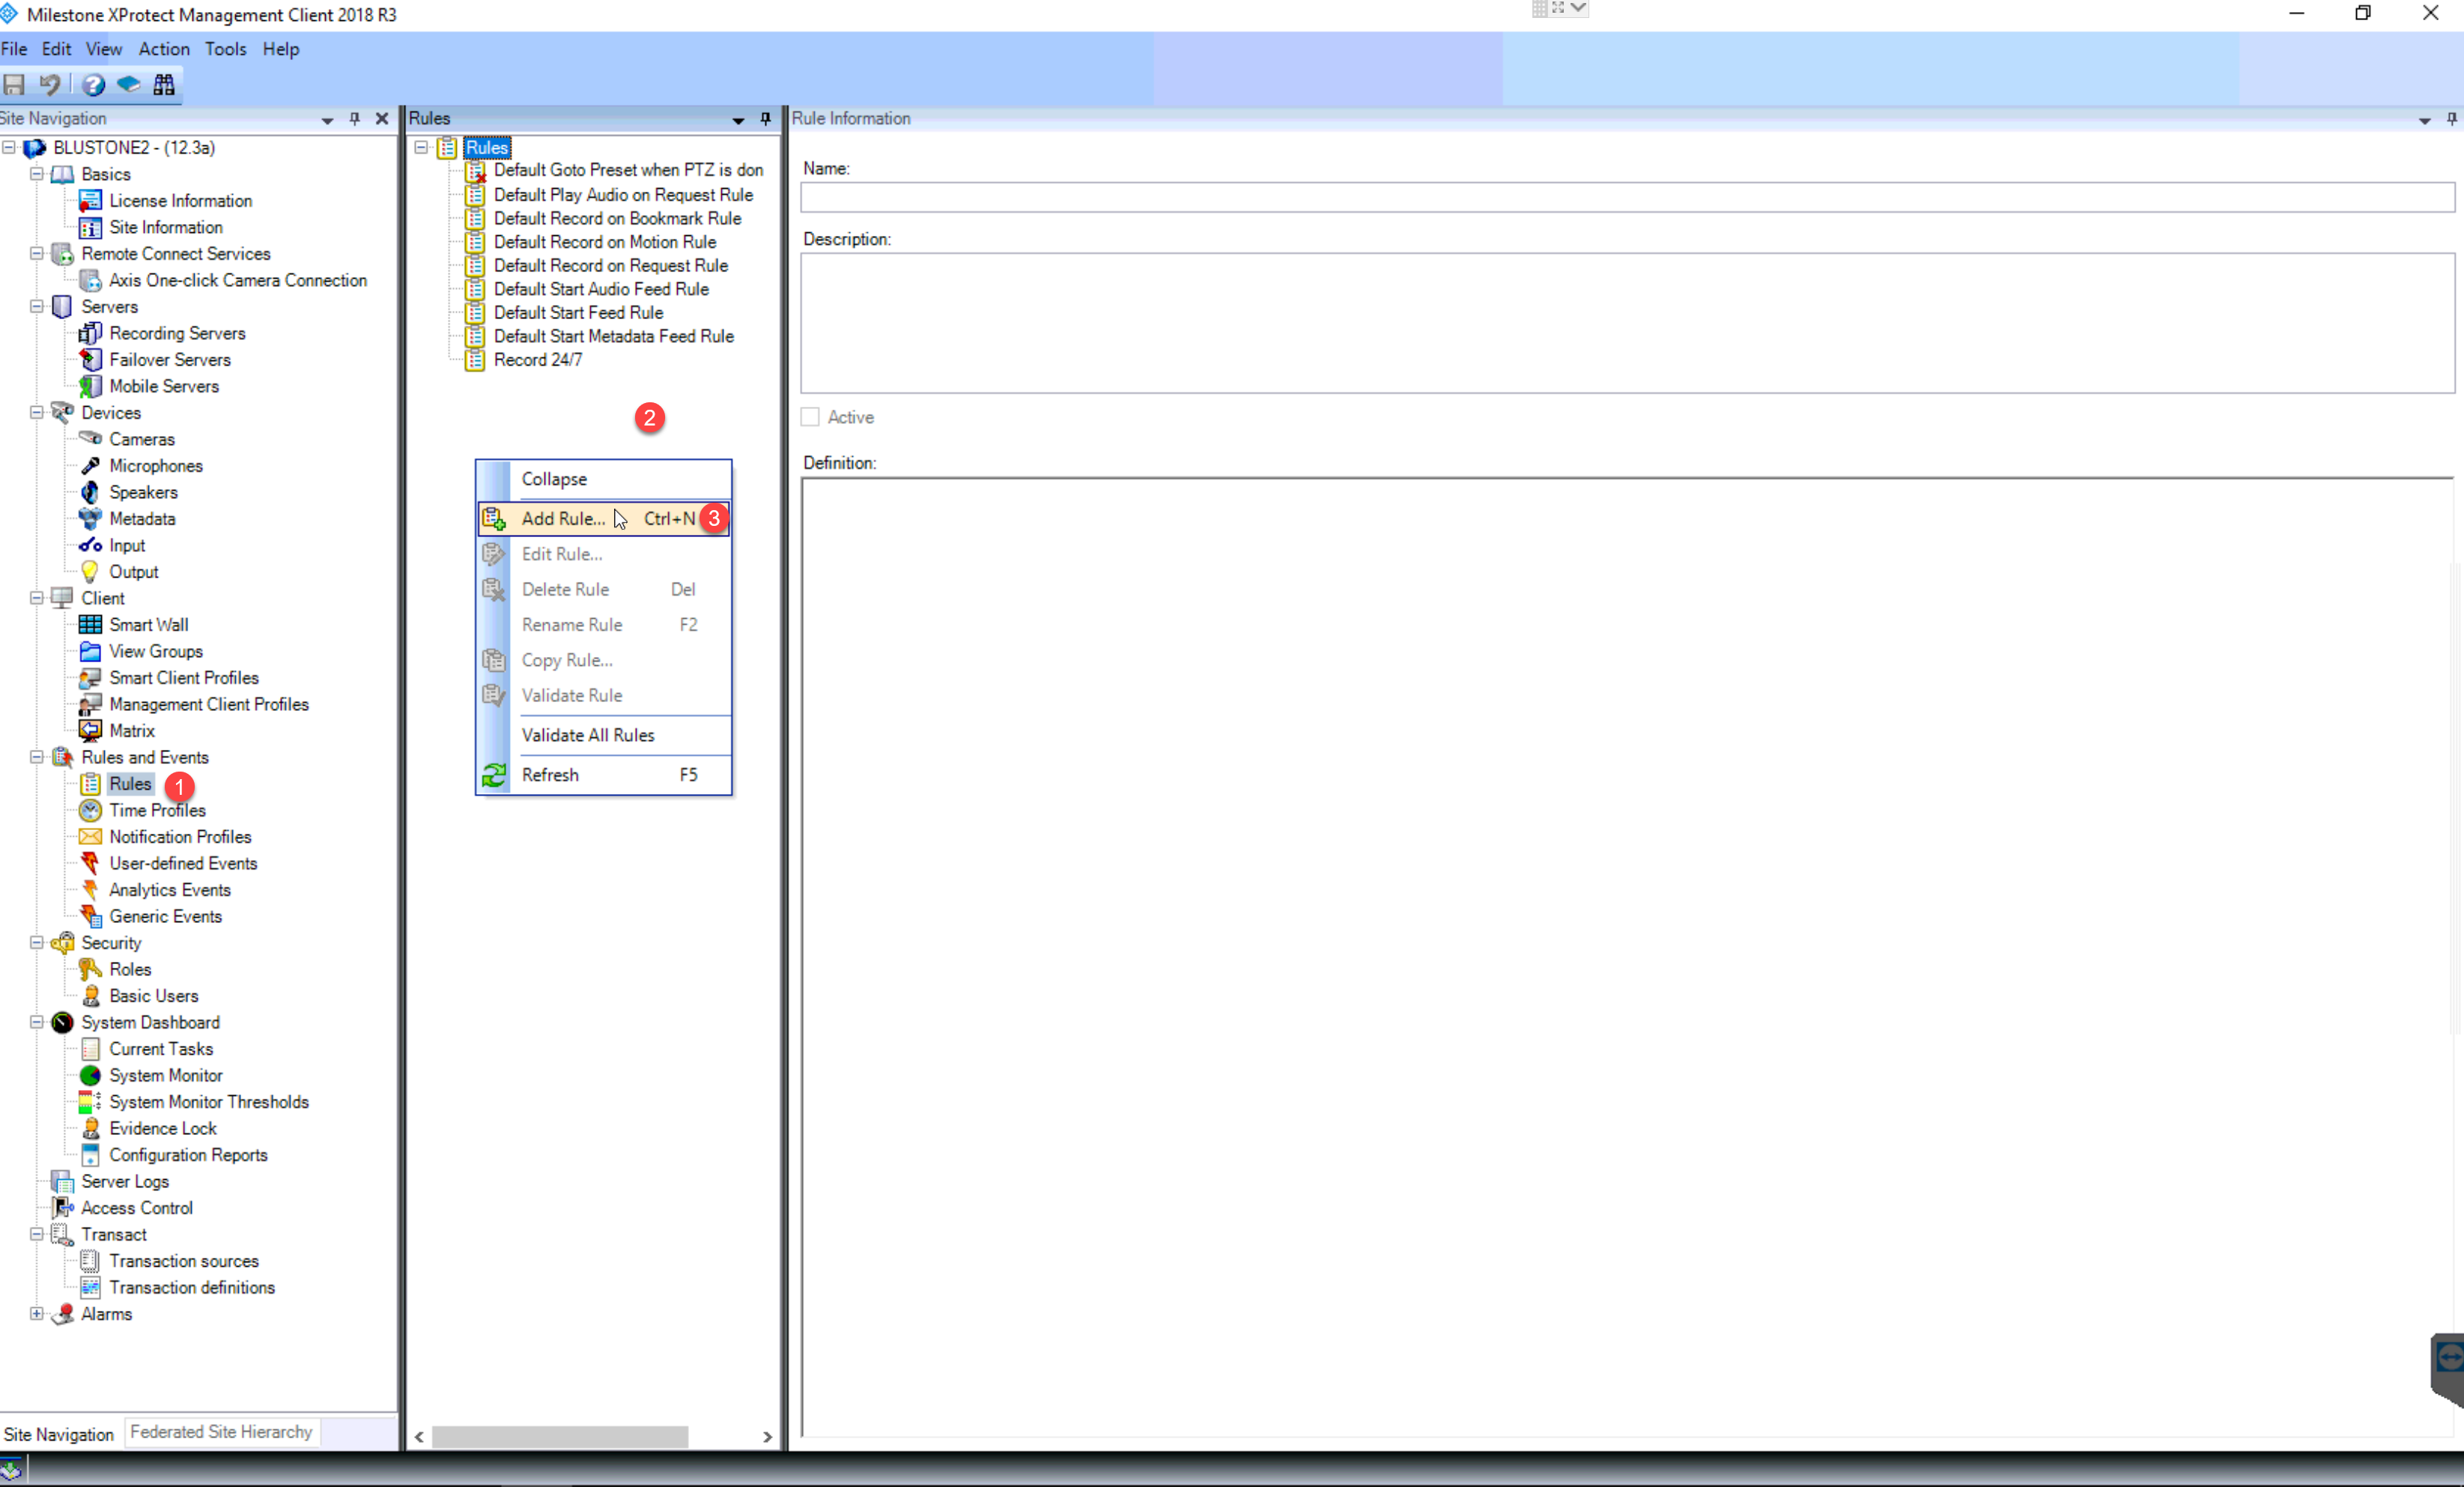
Step 1 - Type of Rule
- Set the Name to "Record 24/7"
- Select "Perform an action in a time interval"
- Click Next to proceed.
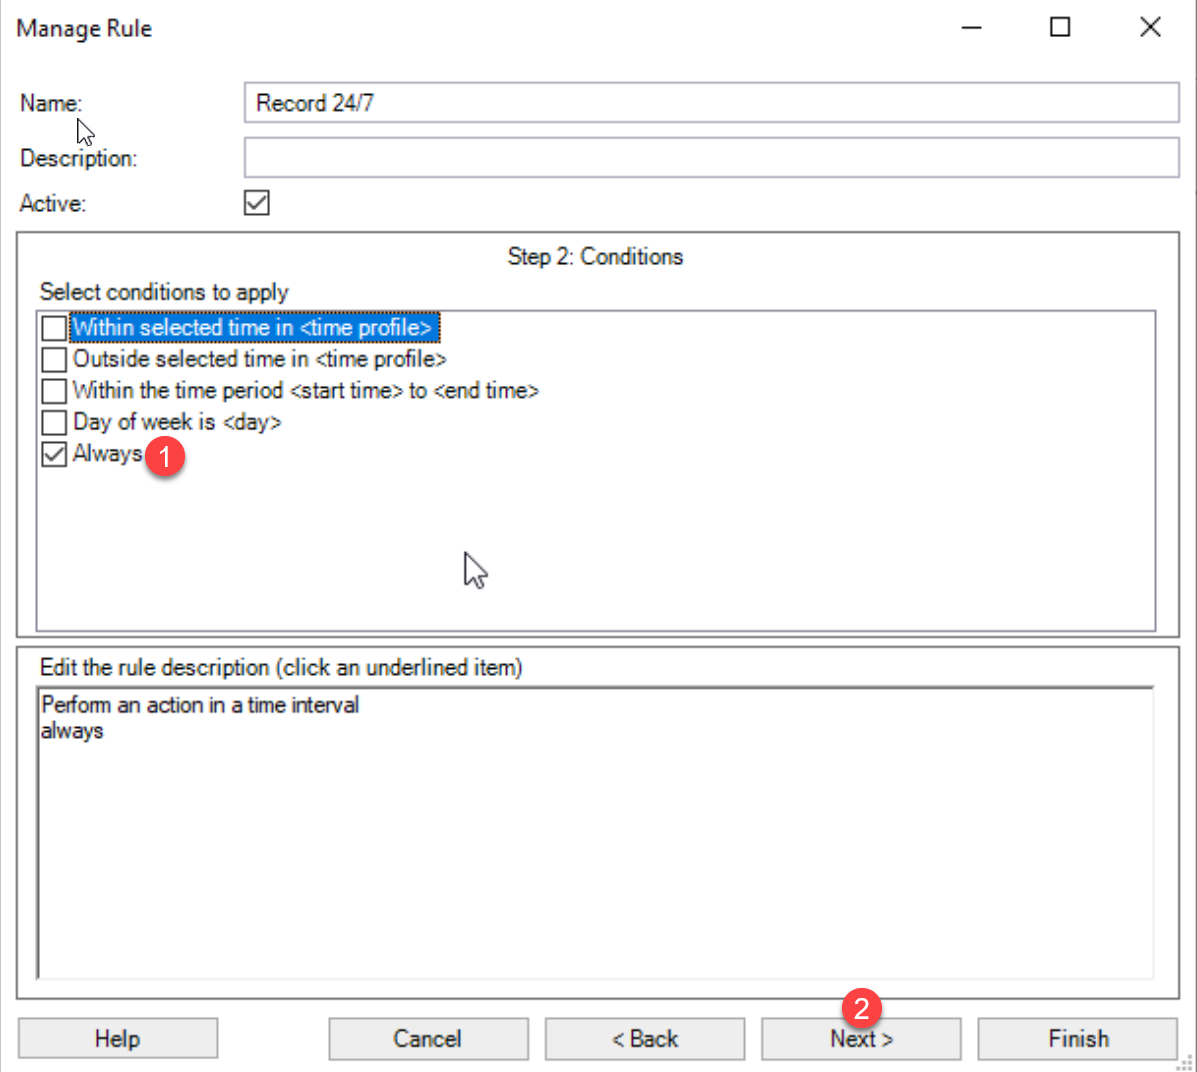
Step 2 - Conditions
- Select "Always" on this page.
- Click Next to proceed.
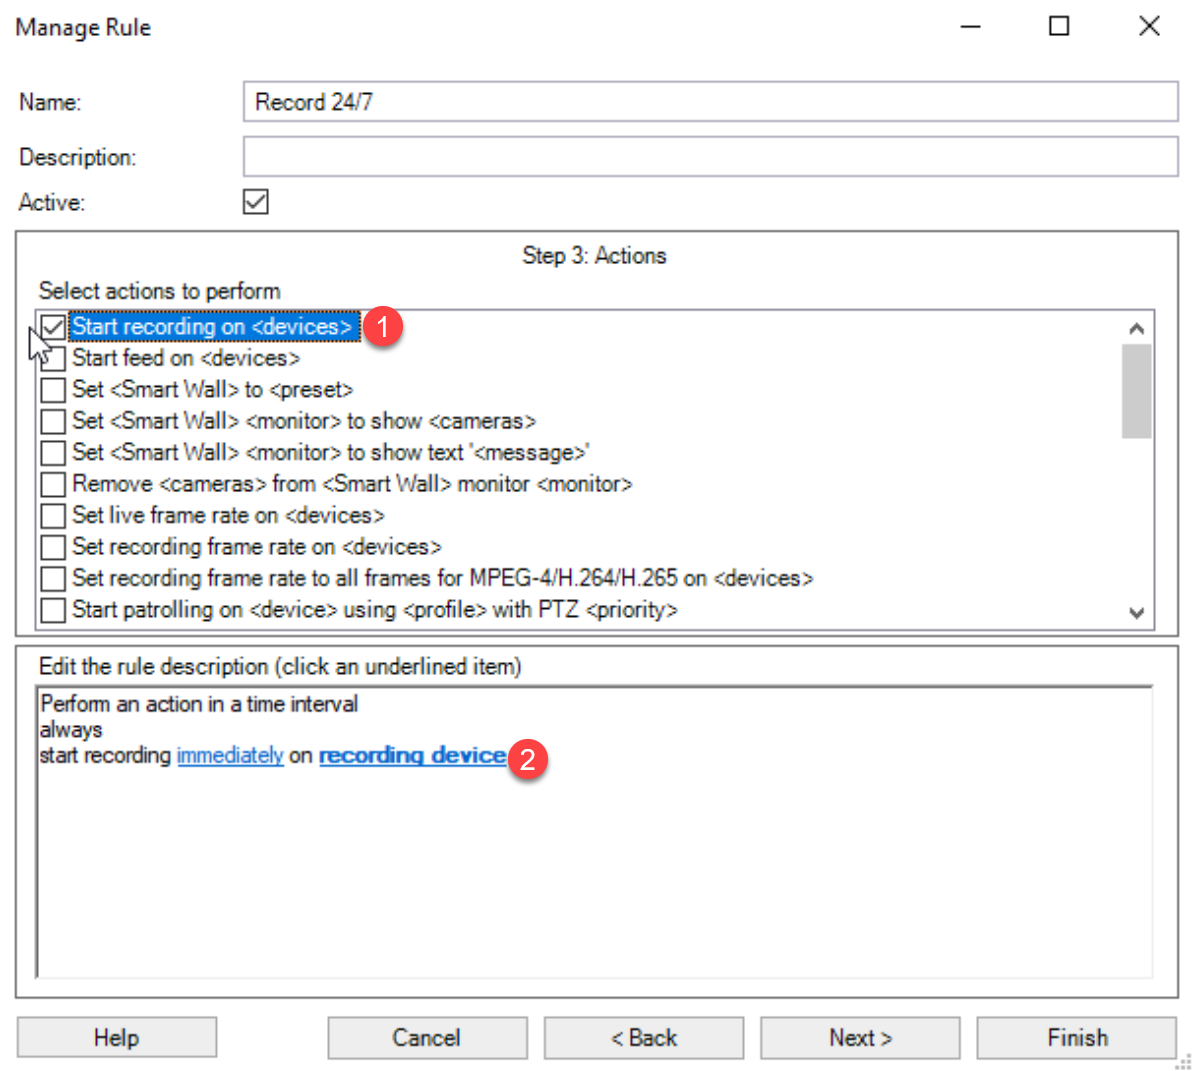
Step 3 - Actions
- Select "Start recording on <devices>"
- In the below section, select the highlighted recording device button.
Step 4 - Completion
- Select the All Cameras icon.
- Select the Add button.
- Select the OK button and select the Finish button.
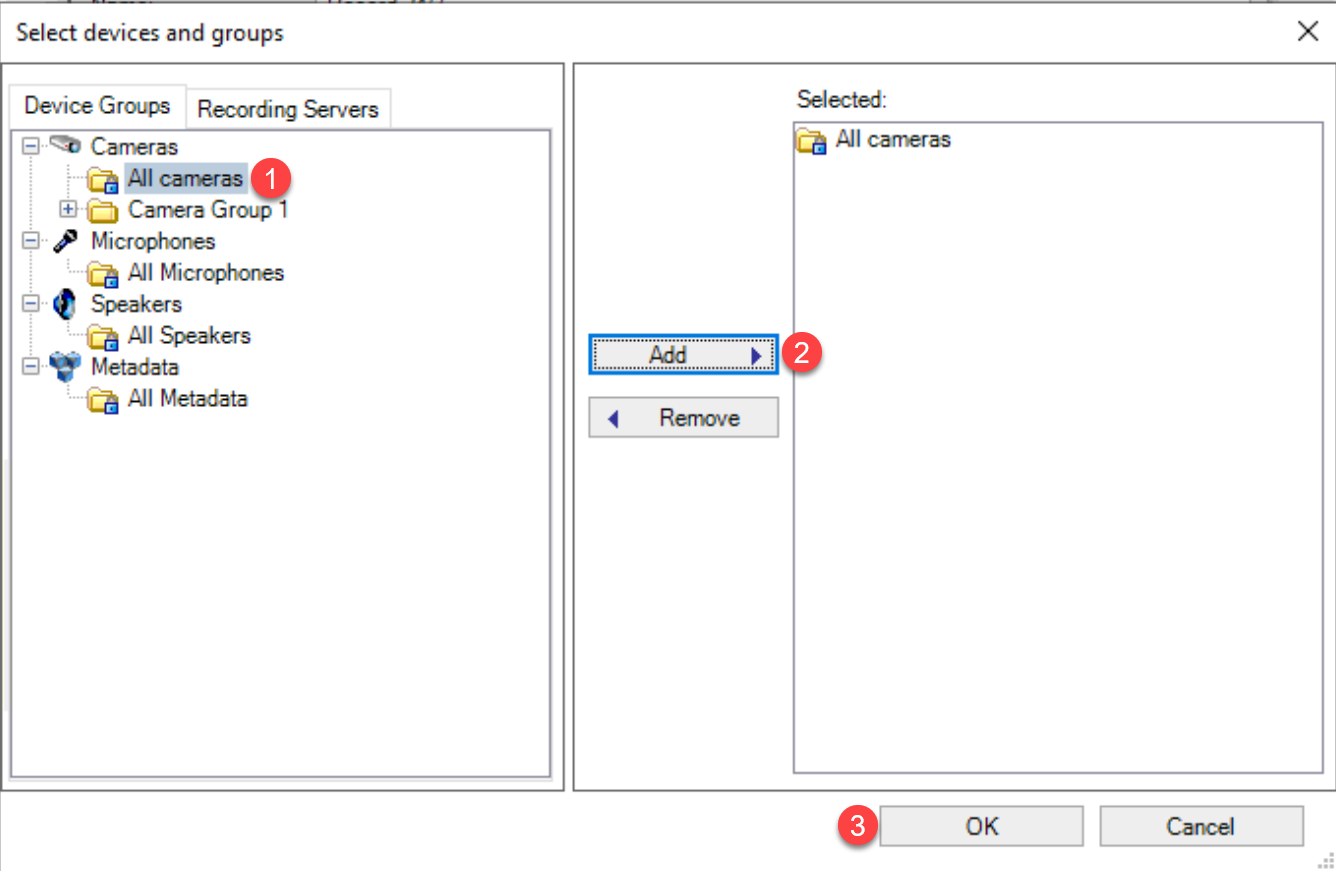
- Select the Finish button to complete the creation of the rule.
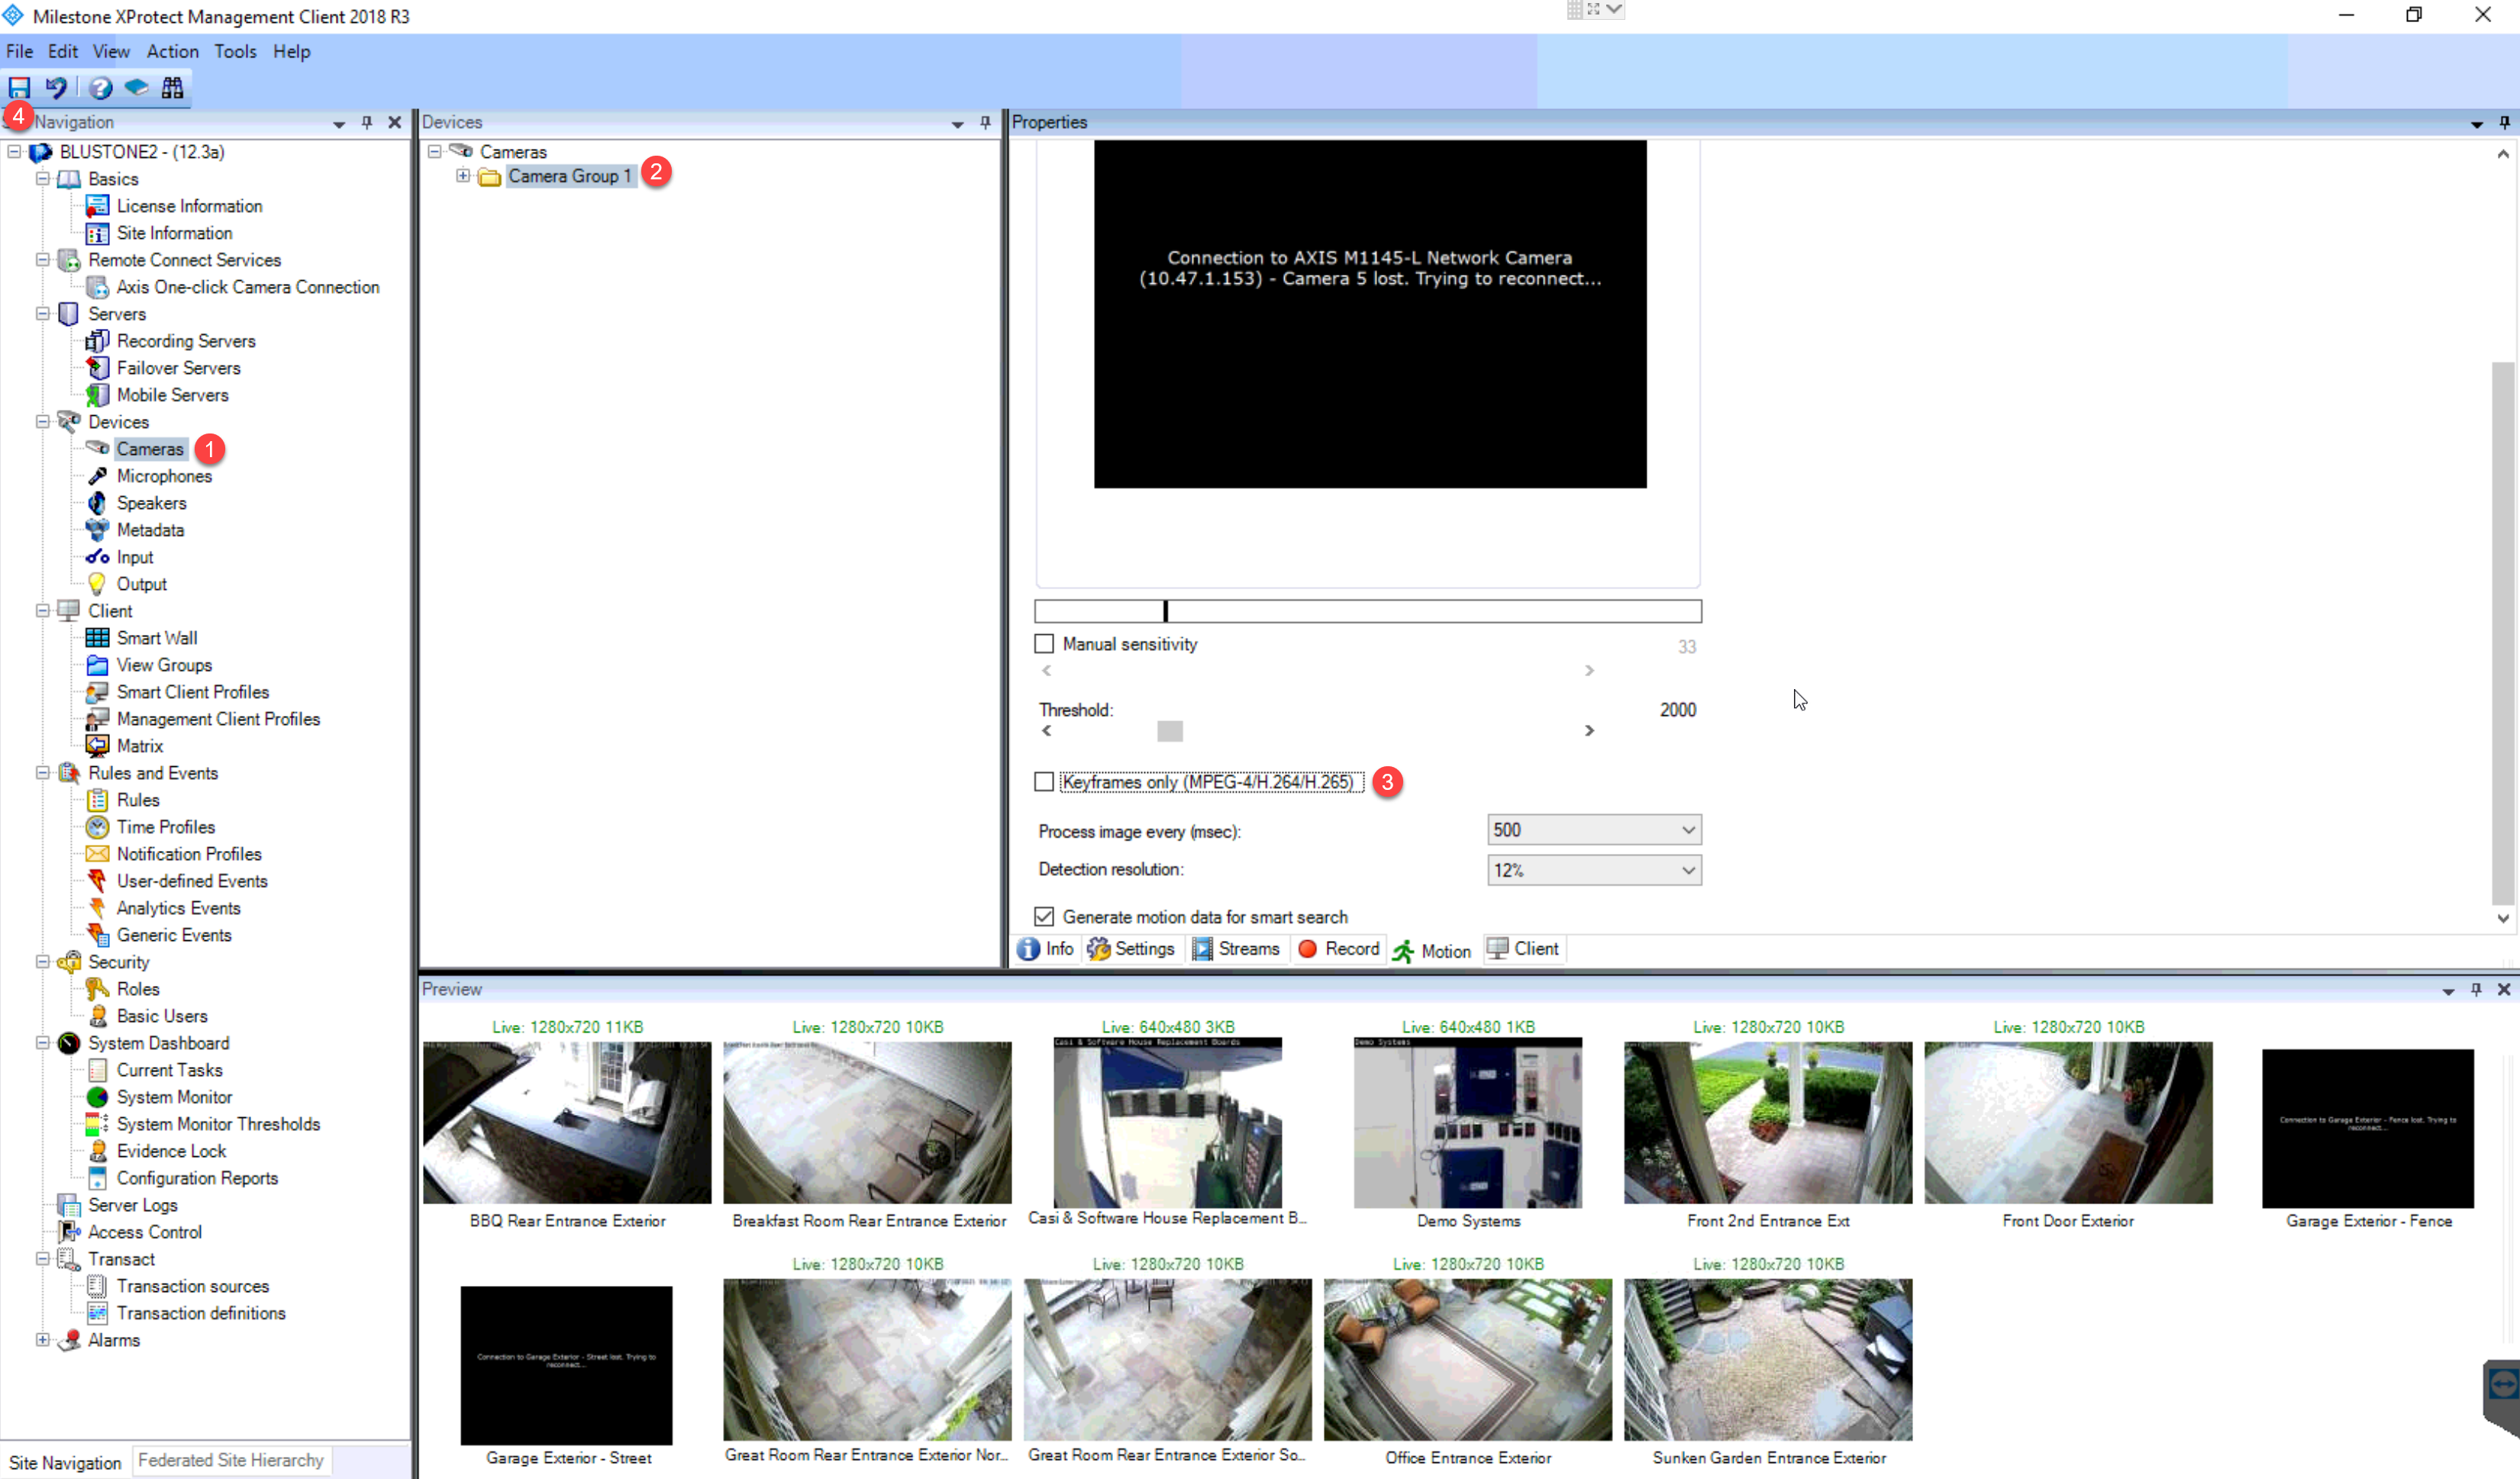
Removing Keyframes in Camera Settings
- On the Navigation Tab (Left side of the screen), go to the Cameras page.
- Under Cameras, select the folder with all the cameras.
- On the Properties page, select the Motion button (with a green man icon) and disable the keyframes only toggle.
- Select the Save button.
Timezone Correction.
It is advised to configure the timezone for the NVR system to match the system timezone. Ex: If the client system is from EST then the timezone should have **UTC -5.**This changes can be made manually in the system timezone settings.
Motion Detection Settings
Motion detection is a key element in most surveillance systems. Depending on your configuration, motion detection settings may determine when the video is recorded (saved on the surveillance system server), when notifications are sent when output (a light or siren) is triggered, and more.
It is important that you find the best possible motion detection settings for each camera to avoid unnecessary recordings, notifications, and more. Depending on the physical location of your cameras, it is a good idea to test settings under different physical conditions (day/night, windy/calm weather, and similar conditions).
You can configure motion detection settings for each camera, or for several cameras at once. Use the list in the left pane to select cameras. To select several cameras at a time, press CTRL or SHIFT while you select. When you select a camera, you see a preview from that camera. If you select several cameras, you see a preview from the last camera you select. A green area in the preview indicates motion.
!
| Name | Description |
| Sensitivity | Adjust the Sensitivity slider so that irrelevant background noise is filtered out, and only real motion is shown in green. Alternatively, specify a value between 0 and 256 in the field next to the slider to control the sensitivity setting. The slider determines how much each pixel must change before it is regarded as motion. With high sensitivity, very little change in a pixel is required before it is regarded as motion. The more you drag the slider to the left, the more of the preview becomes green. This is because, with high sensitivity, even the slightest pixel change is regarded as motion. |
| Motion | Adjust the Motion slider so that motion detection is only triggered by the required level of motion. The selected motion level is indicated by the black vertical line in the Levelbar above the sliders. The black vertical line serves as a threshold. When motion is above (to the right of) the selected level, the bar changes color from green to red, indicating a positive motion detection. Alternatively, specify a value between 0 and 10000 in the field on the left to control the motion setting. The more you drag the slider to the left, the more positive motion detections you see because less change will be needed to trigger positive motion detection. The number of positive motion detections may also affect the amount of video you record, the amount of notifications you receive, and more. |
| Detection Interval | Specify how often motion detection analysis is carried out on video from the camera. The default is every 240 milliseconds (close to once a quarter of a second). The interval is applied regardless of your cameras' frame rate settings. Adjusting this setting can help lower the amount of system resources used on motion detection. |
| Detection Resolution | Specify whether the full image or a selected percentage of the image should be analyzed. For example, by specifying 25%, every fourth pixel is analyzed instead of all pixels, reducing the system resources used but also offering less accurate motion detection. |
| Keyframe Only | Select Keyframe only if you want motion detection to take place only on keyframes of the video stream to reduce the system resources used on motion detection. |
Video Motion Guidance.
Motion detection is an important part of a video system and time should be spent during the deployment phase of a new system to properly configure it to optimize CPU, memory, and hard drive of the NVR as well as optimize the interaction between the NVR and BluSKY. Motion is often configured “on” by default, so making sure it’s right is important. Motion detection can determine when video is recorded, and also when the system generates motion events.
Video Motion is broken up into 2 parts:
- Technical
- How to setup motion detection, How to hide areas, How to schedule...
- Site and Camera Specific Application of the Technical Features.
- Do you need motion detection for this camera?
- What is the camera looking at?
- Is their significant motion during some times of the day and nothing the rest of the day? Ex. Main Hall way during the day, but at night no activity.
- Are their hotspots in the camera were there is activity you do not care about. Ex. training passing by, a flashing light on the next building,
Whether to record on motion
Recording 100% of video or only when a camera sees motion is a decision based on many factors. CPU, memory and storage of the NVR and also the related clips sent to BluSKY are all effected by this choice. If the cameras scene is typically void of anything worth recording, one should consider only recording on motion. Rooms with little activity are a good example. If the room has activity rarely, recording on motion would be a good choice.
Best Practices - When To Use:
- Low traffic or sporadic areas
- High Security Areas
- Areas that should have no or limited activity during certain hours. Ex. Loading dock when closed at night, allies that are not used at night
- Areas not used during off hours
- When you want to index into a camera to find specific events
Best Practices - When Not To Use:
- When Camera is outside the building. There is to much motion of people,cars, lights, wind blowing trees and papers...
- Any scene that has constant motion. Ex. Lobbies, high traffic hallways, loading docks, factory floors, moving machinery like conveyor belts, fans, blinking lights.
- Any scene that has many reflections and changes in light. Ex. Light switches, Exit signes, TV's, Monitors.
- Areas that do not generate meaning for motion detection. Ex. Large Parking lots, people walking into the office, cars driving by.
- Split or quad screens camera
- Overview cameras - Ex. Courtyards, parking lots.
Best Practices - How to Limit Motion Detection In Active Environments.
-
People traffic is low, but there is motion from other sources. Ex. Train in camera frame, a light blinks during the day, tree's moving in wind
-
Use masking in Milestone to shield the camera from seeing the motion of the train or the blinking of the light
-
If the motion is from a small part of the screen ex. a blinking light in the distance, then you can use Sensitivity to raise the threshold of the motion to only react when the motion consumes a larger part of the screen.
-
You have a high use area during the day, but at night there is little motion, so you would like to capture motion during after hours.
-
Put the motion detection on a schedule, so it does not fire during the day, but does fire after business hours.
-
The camera covers a wide area, but you are only interested in motion for a certain area. Ex. You have a machine that is moving boxes, but you are interested in seeing people that are walking by the machine.
-
You can use masking to mask out the moving areas of the machine, but keep the walkway next to the machine un-masked to catch people walking along the machine.
Whether to create motion events
Creating motion events is another consideration that effects system performance. For environments where constant motion is the norm, you must look at whether logging events perpetually makes sense. Office lobbies, wide views of warehouses with people moving every which way, etc.... often have constant motion, but the meaning of that motion may not justify the recording of a motion-based event and the related cost in CPU, memory, and hard drive.
Time spent to determine the motion detection and whether to record a clip because of it will help you to avoid unnecessary recordings.
-
Technical
-
How to set it up and configuring different settings
-
Turning Motion detection on/off
-
Tuning of motion configuration
-
Using motion detection is as much art as it is science. Developing a site specific plan is important and highly dependent on what is being recorded. The high level idea is to identify only what’s record-worthy.
-
Masking
-
Many views have attributes that will trigger motion events that have zero value. This would include a tree in the background moving in the breeze, or even a light flickering in a hallway. Masking is used to exclude these items, reducing where motion is calculated to the key area(s). One should examine each camera’s view, and reduce the field examined for motion to remove false triggers.
-
Examples:
-
Best Practice:
-
Consideration 1
-
Consideration 2
-
Sensitivity
-
How much motion is seen and for what duration it is seen moving are two key aspects of sensitivity. Multiple settings are available to tune sensitivity to limit false triggers. There is a dynamic sensitivity option which handles these items automatically, and is recommended for many circumstances. Please check to determine if the automatic setting provide the correct sensitivity given your particular circumstances.
-
Scheduling
-
Video has the ability to change its behavior based on schedule. This helps to tune the configuration to best suit your needs. You may wish to have 100% recording during the day, and event-based recording at night as an example.
Camera Guidance by Manufacturer
Milesight Cameras
Adding Milesight cameras into Milestone can be tricky:
- Make sure you have the latest Milestone device pack installed from here
- Make sure that the Milesight camera firmware matches with the supported level with milestone... don't just go with the latest. (as of March 2021, Milestone supports 40.7.0.73 but not later)
- Normally, Milesight cameras are added to Milestone as a ONVIF device with 2-16 channels. Select Manual option while adding device, enter username password, enter http://<cameraIP> for address...
- However, if the above does not work Milestone has suggested using "Universal 1 channel driver"
- Always setup a OSD (onscreen display) of the current time. This should be done both for live and recorded streams if different streams are being used
- Make sure the cameras use an NTP server (typically ntp.pool.org ), or else the above time will not be reliable.