How to Create a Customized Email for Visiting Guests
Overview
This article converse how to create a customized email template for visitors or vendors that is sent when a visitor/vendor invitation is sent. This enable the building or occupants to be able to have customized directions and graphics for their visitors.
Instructions
Best practice is to create 3 notifications.
Visitor Invitation Added
This is the email template that is sent to guests when the initial visitor invitation is created.
Visitor Invitation Updated
This is the email template that is sent to a guest when the visitor invitation is updated.
Visitor Instance Updated
This is the email template used when the visitor invitation instance is updated. Visitor invitation instance is the invitation seen in Visitor Admissions.
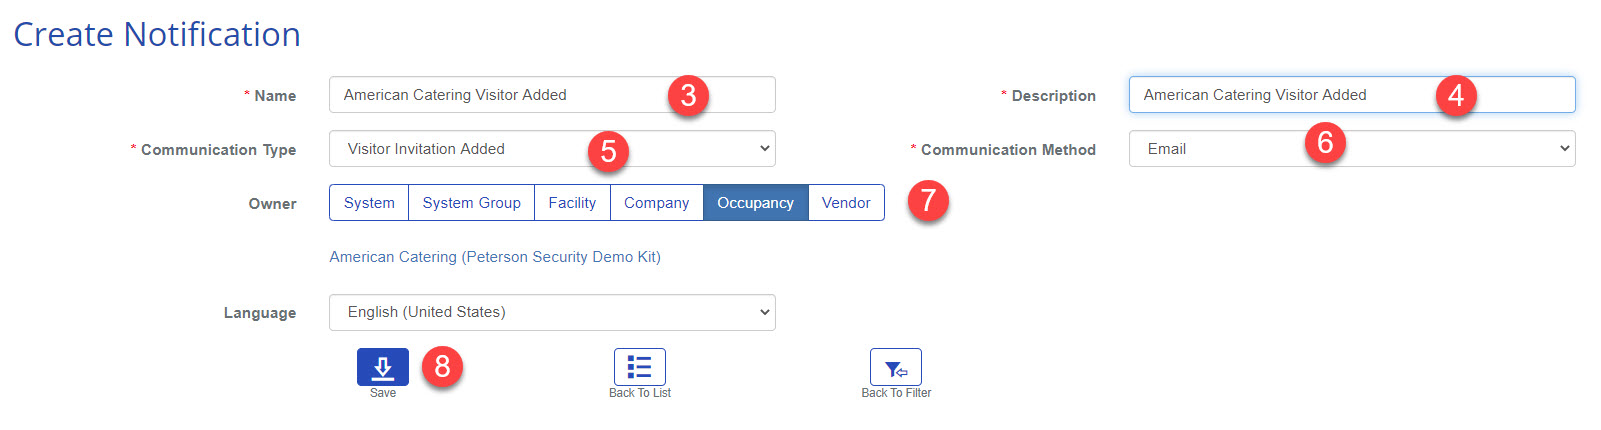
Visitor Invitation Added
- Log in and navigate to Administration->Notifications
- Select

- Name: Enter the Name of the Owner of this notification template. In the example this is going to be for the American Catering Occupancy, please put "Added" in the name so it is easier to see which use scenario this is being used for.
- Description: Add details for what this template is going used for.
- Communication Type: This must be "Visitor Invitation Added"
- Leave Communication Method with the default "Email"
- Owner: This sets who is going to use this Notification Template. In this example it is being used by the Occupancy "American Catering". Set this to what level you require. Typically this is set at the System, Facility, or Occupancy level.
- Select

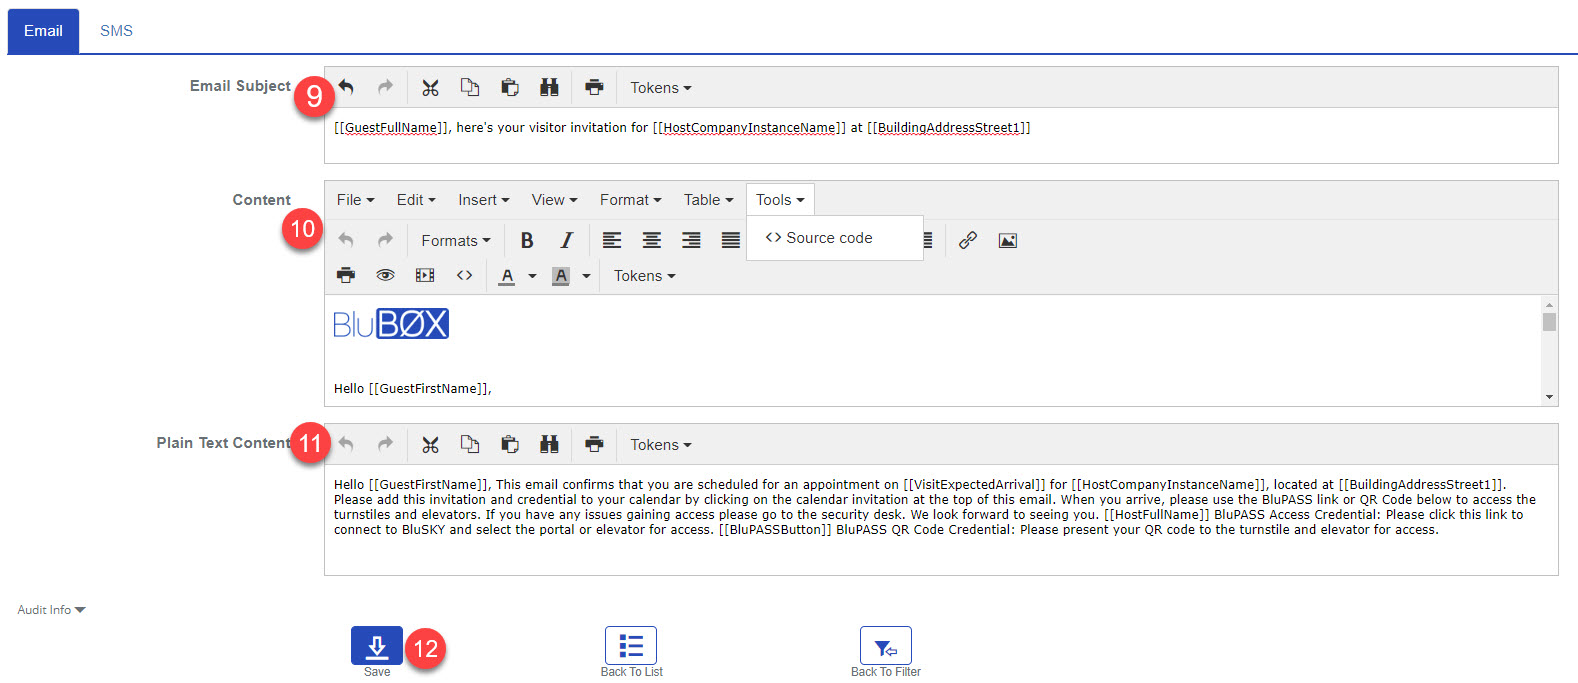
- Populate the "Email Subject"
- You will see a "Tokens" button. This will let you add tags to the subject line. A tag is a variable that you can insert to display certain date, like Guest Full name.
- Ex.
[[GuestFullName]], here's your visitor invitation for [[HostCompanyInstanceName]] at [[BuildingAddressStreet1]]
- Populate Content.
- You will see a "Tokens" button. This will let you add tags to the subject line. A tag is a variable that you can insert to display certain date, like Guest Full name
- You will see a "Tools" -> Source button. This will let you see the SVG source for this content. You can copy and past content from another Visitor Invitation to speed up creating the content. Below is example source you can use to give you a quick jump on content.
<p><img src="https://a.mtstatic.com/@public/production/site_7070/1474034426-logo.png" alt="BluB0X Knowledge Base" width="105" height="28" /></p>
<p> </p>
<p>Hello [[GuestFirstName]],</p>
<p>This email confirms that you are scheduled for an appointment on [[VisitExpectedArrival]] for [[HostCompanyInstanceName]], located at [[BuildingAddressStreet1]].</p>
<p>Please add this invitation and credential to your calendar by clicking on the calendar invitation at the top of this email.</p>
<p>When you arrive, please use the BluPASS link or QR Code below to access the turnstiles and elevators.</p>
<p>If you have any issues gaining access please go to the security desk.</p>
<p>We look forward to seeing you. </p>
<p>[[HostFullName]]</p>
<p> </p>
<p><strong><em><u>BluPASS Access Credential:</u></em></strong></p>
<p>Please click this link to connect to BluSKY and select the portal or elevator for access. [[BluPASSButton]]</p>
<p> </p>
<p><strong><em><u>BluPASS QR Code Credential:</u></em></strong></p>
<p>Please present your QR code to the turnstile and elevator for access</p>
<p>[[VisitorQRCode]]</p>
- Populate Plain Text Content
- This section is what a guest would see if they did not have a rich email to display graphics.
- Typically copy the content from above to this area, but remove any parts that need graphics, like bar codes and QR codes.
- When finished use the button to finish.
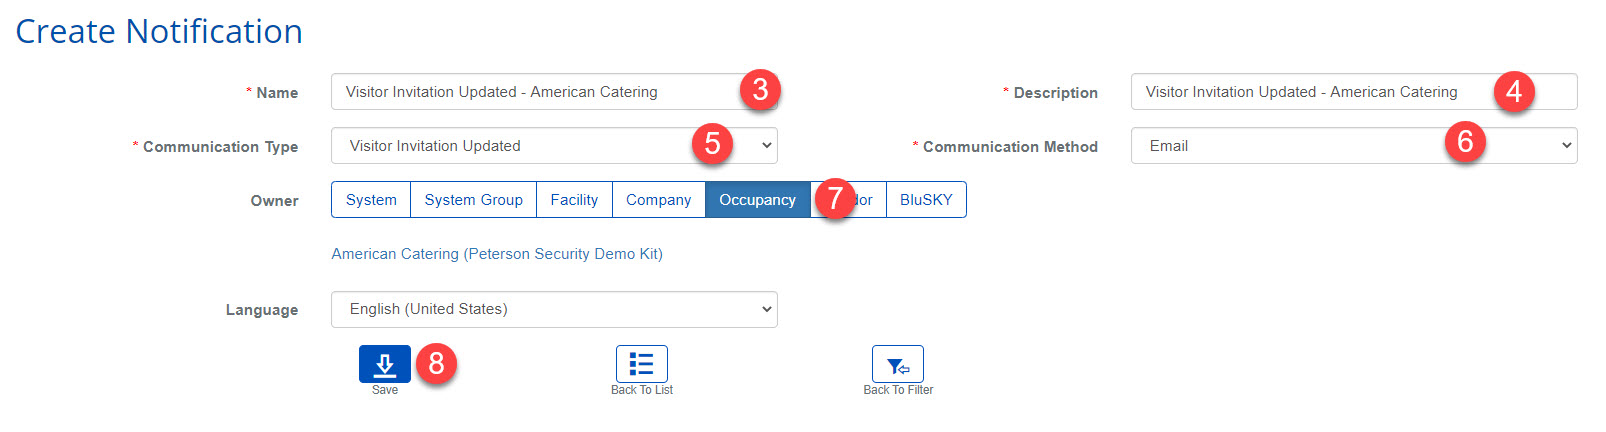
Visitor Invitation Updated
!
- Log in and navigate to Administration->Notifications
- Select
- Name: Enter the Name of the Owner of this notification template. In the example this is going to be for the American Catering Occupancy, please put "Updated" in the name so it is easier to see which use scenario this is being used for.
- Description: Add details for what this template is going used for.
- Communication Type: This must be "Visitor Invitation Updated"
- Leave Communication Method with the default "Email"
- Owner: This sets who is going to use this Notification Template. In this example it is being used by the Occupancy "American Catering". Set this to what level you require. Typically this is set at the System, Facility, or Occupancy level.
- Select

- Populate the "Email Subject"
- You will see a "Tokens" button. This will let you add tags to the subject line. A tag is a variable that you can insert to display certain date, like Guest Full name.
- Ex.
Updated Visitor Request for [[GuestFullName]] at [[BuildingAddressStreet1]], [[BuildingAddressCity]]
- Populate Content.
- You will see a "Tokens" button. This will let you add tags to the subject line. A tag is a variable that you can insert to display certain date, like Guest Full name
- You will see a "Tools" -> Source button. This will let you see the SVG source for this content. You can copy and past content from another Visitor Invitation to speed up creating the content. Below is example source you can use to give you a quick jump on content.
<p>Hello,</p>
<p>[[HostFullName]] <span style="display: inline !important; float: none; background-color: transparent; color: #000000; font-family: Verdana,Arial,Helvetica,sans-serif; font-size: 11px; font-style: normal; font-variant: normal; font-weight: 400; letter-spacing: normal; orphans: 2; text-align: left; text-decoration: none; text-indent: 0px; text-transform: none; -webkit-text-stroke-width: 0px; white-space: normal; word-spacing: 0px;">at [[HostCompanyInstanceName]] just updated a visitor request for [[GuestFullName]] at [[BuildingAddressStreet1]], [[BuildingAddressCity]] for [[VisitExpectedArrival]].</span></p>
<p> </p>
<p><span style="display: inline !important; float: none; background-color: transparent; color: #000000; font-family: Verdana,Arial,Helvetica,sans-serif; font-size: 11px; font-style: normal; font-variant: normal; font-weight: 400; letter-spacing: normal; orphans: 2; text-align: left; text-decoration: none; text-indent: 0px; text-transform: none; -webkit-text-stroke-width: 0px; white-space: normal; word-spacing: 0px;">Please select this link to connect to BluSKY and select the portal or Elevator you wish to access.[[BluPASSButton]]</span></p>
<p><span style="display: inline !important; float: none; background-color: transparent; color: #000000; font-family: Verdana,Arial,Helvetica,sans-serif; font-size: 11px; font-style: normal; font-variant: normal; font-weight: 400; letter-spacing: normal; orphans: 2; text-align: left; text-decoration: none; text-indent: 0px; text-transform: none; -webkit-text-stroke-width: 0px; white-space: normal; word-spacing: 0px;"><strong>Note: </strong> This link will only work for the time of your visit. You will get a "Bad Request" message if you try to use it any other time.</span></p>
<p> </p>
- Populate Plain Text Content
- This section is what a guest would see if they did not have a rich email to display graphics.
- Typically, copy the content from above to this area, but remove any parts that need graphics, like bar codes and QR codes.
- When finished use the button to finish.
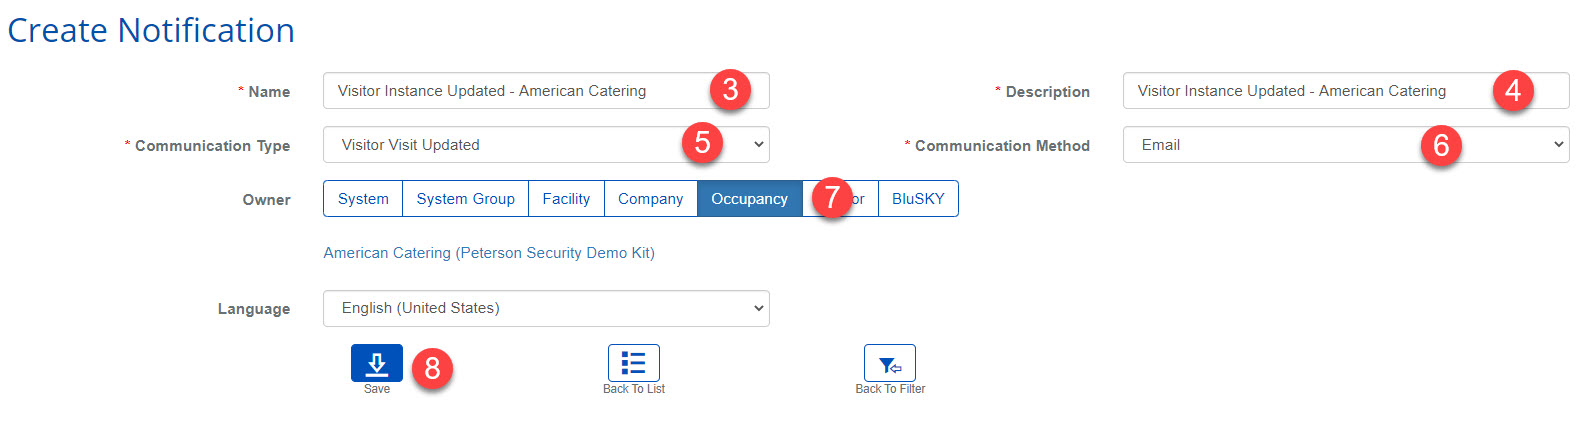
Visitor Instance Updated
- Log in and navigate to Administration->Notifications
- Select
- Name: Enter the Name of the Owner of this notification template. In the example this is going to be for the American Catering Occupancy, please put "Instance" in the name so it is easier to see which use scenario this is being used for.
- Description: Add details for what this template is going used for.
- Communication Type: This must be "Visitor Instance Updated"
- Leave Communication Method with the default "Email"
- Owner: This sets who is going to use this Notification Template. In this example it is being used by the Occupancy "American Catering". Set this to what level you require. Typically this is set at the System, Facility, or Occupancy level.
- Select
- Populate the "Email Subject"
- You will see a "Tokens" button. This will let you add tags to the subject line. A tag is a variable that you can insert to display certain date, like Guest Full name.
- Ex.
Visitor Instance Updated for [[GuestFullName]] Visiting [[HostFullName]] at [[BuildingAddressStreet1]]
- Populate Content.
- You will see a "Tokens" button. This will let you add tags to the subject line. A tag is a variable that you can insert to display certain date, like Guest Full name
- You will see a "Tools" -> Source button. This will let you see the SVG source for this content. You can copy and past content from another Visitor Invitation to speed up creating the content. Below is example source you can use to give you a quick jump on content.
<p><img src="https://a.mtstatic.com/@public/production/site_7070/1474034426-logo.png" alt="BluB0X Knowledge Base" width="105" height="28" /></p>
<p> </p>
<p>Hello,</p>
<p>[[HostFullName]] <span style="display: inline !important; float: none; background-color: transparent; color: #000000; font-family: Verdana,Arial,Helvetica,sans-serif; font-size: 11px; font-style: normal; font-variant: normal; font-weight: 400; letter-spacing: normal; orphans: 2; text-align: left; text-decoration: none; text-indent: 0px; text-transform: none; -webkit-text-stroke-width: 0px; white-space: normal; word-spacing: 0px;">at [[HostCompanyInstanceName]] just updated a visitor instance for [[GuestFullName]] at [[BuildingAddressStreet1]], [[BuildingAddressCity]] for [[VisitExpectedArrival]].</span></p>
<p> </p>
<p><span style="display: inline !important; float: none; background-color: transparent; color: #000000; font-family: Verdana,Arial,Helvetica,sans-serif; font-size: 11px; font-style: normal; font-variant: normal; font-weight: 400; letter-spacing: normal; orphans: 2; text-align: left; text-decoration: none; text-indent: 0px; text-transform: none; -webkit-text-stroke-width: 0px; white-space: normal; word-spacing: 0px;">Please select this link to connect to BluSKY and select the portal or Elevator you wish to access.[[BluPASSButton]]</span></p>
<p><span style="display: inline !important; float: none; background-color: transparent; color: #000000; font-family: Verdana,Arial,Helvetica,sans-serif; font-size: 11px; font-style: normal; font-variant: normal; font-weight: 400; letter-spacing: normal; orphans: 2; text-align: left; text-decoration: none; text-indent: 0px; text-transform: none; -webkit-text-stroke-width: 0px; white-space: normal; word-spacing: 0px;"><strong>Note: </strong> This link will only work for the time of your visit. You will get a "Bad Request" message if you try to use it any other time.</span></p>
<p> </p>
- Populate Plain Text Content
- This section is what a guest would see if they did not have a rich email to display graphics.
- Typically, copy the content from above to this area, but remove any parts that need graphics, like bar codes and QR codes.
- When finished use the button to finish.