How to Setup Allegion Gateways and Locks in BluSKY
General Overview
This article will help you setup your Allegion/Schlage wireless locks and gateway devices. One gateway device can be configured to manage up to 10 wireless locks. In order to interface with the gateway and locks we will need to create and configure a Controller and SIO board in BluSky for each gateway, as well as a reader and portal for each wireless lock. Included also are steps to upgrade firmware for the gateway and lock hardware.
Prerequisites
- Must have a log-in account to BluSKY
- System must exist
- Facility must exist
- Occupancy must exist
- Install Engage App on phone and create an account
Allegion setup is divided into two parts:
Hardware Setup
- Create A Server In BluSky
- Install BluB0X Allegion Application On Server
- Create A Site in BluSky
- Add Operators To The Site
- Add Controller, SIO Board, Reader and Portal In BluSky
- Add Gateway And Locks To The Site (in Engage App and in BluSKY) "How to Setup Allegion Gateways and Locks in BluSKY")
Person/Cards/Access Setup
- Create Schedules
- Create Access Level
- Create a Person in the Occupancy and assign a Card and Access Level
Upgrade Hardware Firmware
Hardware Setup
Create A Server In BluSky
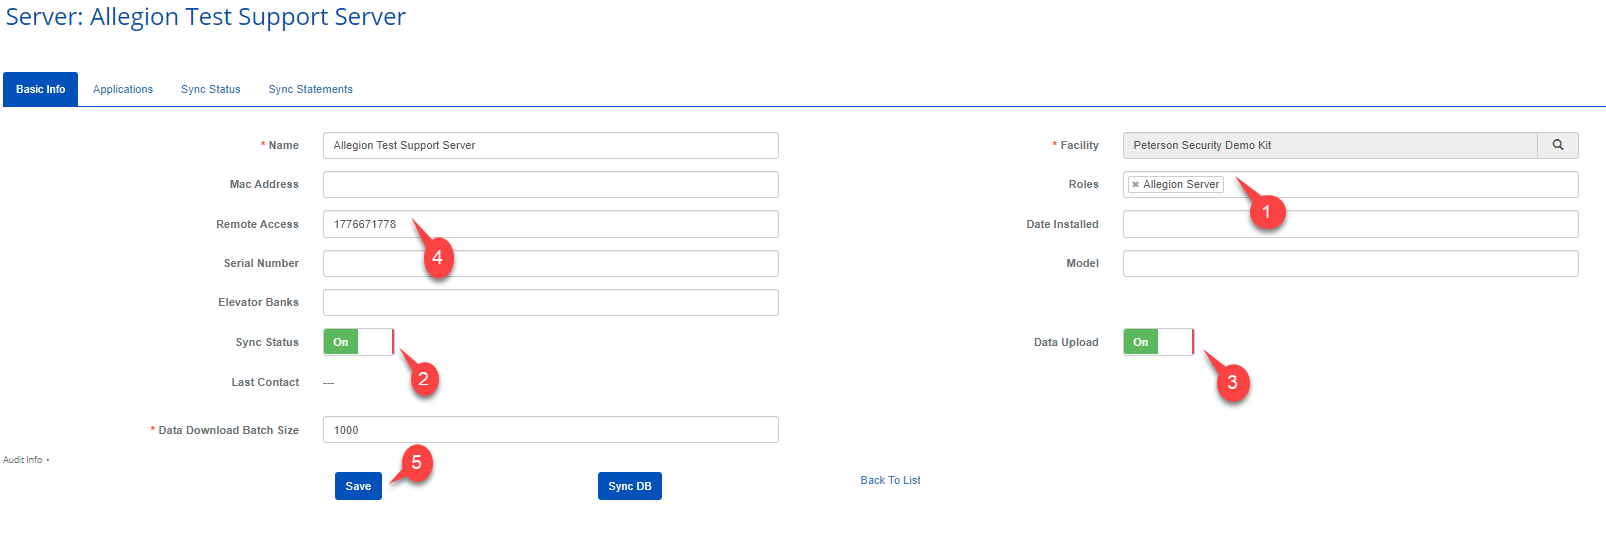
- Create a Server

- Goto To "Basic Info" Tab
- Roles: Select "Allegion Server"
- Sync Status: "On"
- Data Upload: "On"
- Remote Access: Add TeamView Number if you have it.
- Select "Save"
- Make note of the GUID for the server as you will need it in config file edits next.
Install BluB0X Allegion Application On Server
Install BluB0X Allegion App on local server and edit configuration files
- Install BluB0X Allegion application on server
- https://www.dropbox.com/s/t1m36xlc9a...3_0_0.msi?dl=0
- NOTE: When prompted for username/password during installation remember to enter username with the "." prefix...example: ".\BluB0X"
- Edit Allegion Interface Config File
- Navigate to C:/ProgramFile (x86)/BluB0X/BluB0XAllegionInterface and edit AllegionInterface.exe.config
- Edit "
- Use the BluSky Server GUID from section.
- For QA installation ONLY
-
- Edit Local Sync Config File
- Navigate to C:/ProgramFile (x86)/BluB0X/BluB0X_LocalSync and edit Blub0x_LocalSync.exe.config
- Edit
<add key="RemoteServerId" value="PLACE SERVERID HERE"/> - Use the BluSky Server GUID from section.
- For QA installation ONLY
-
<add key="AzureSyncBaseUrl" value="[https://qa-azuresync.azurewebsites.net/azuresyncservice/"/>](https://qa-azuresync.azurewebsites.net/azuresyncservice/%2522/%3E "https://qa-azuresync.azurewebsites.net/azuresyncservice/%22/>")
NOTE: In the ReadMe file in the Allegion installation folder you will see notes regarding the settings that are used while the server is physically in the production lab being built and tested. Just prior to shipping the device (or check it when it arrives) there are 5 lines of the configuration that get commented out and 5 similar lines that need to be uncommented. Make sure you remove/add BOTH the beginning and end comment delimiters around these statements.
Create A Site in BluSky
Create a Site in the Allegion environment that will be visible from the Engage App
- From 'Setup' menu navigate to NDE/LE/BE/FE Diagnostics page
- From the 'Systems' selector chose the system you want to place the site. In the 'Site Name' specify the name of the site you want to add. Press ‘Add Site’ button.
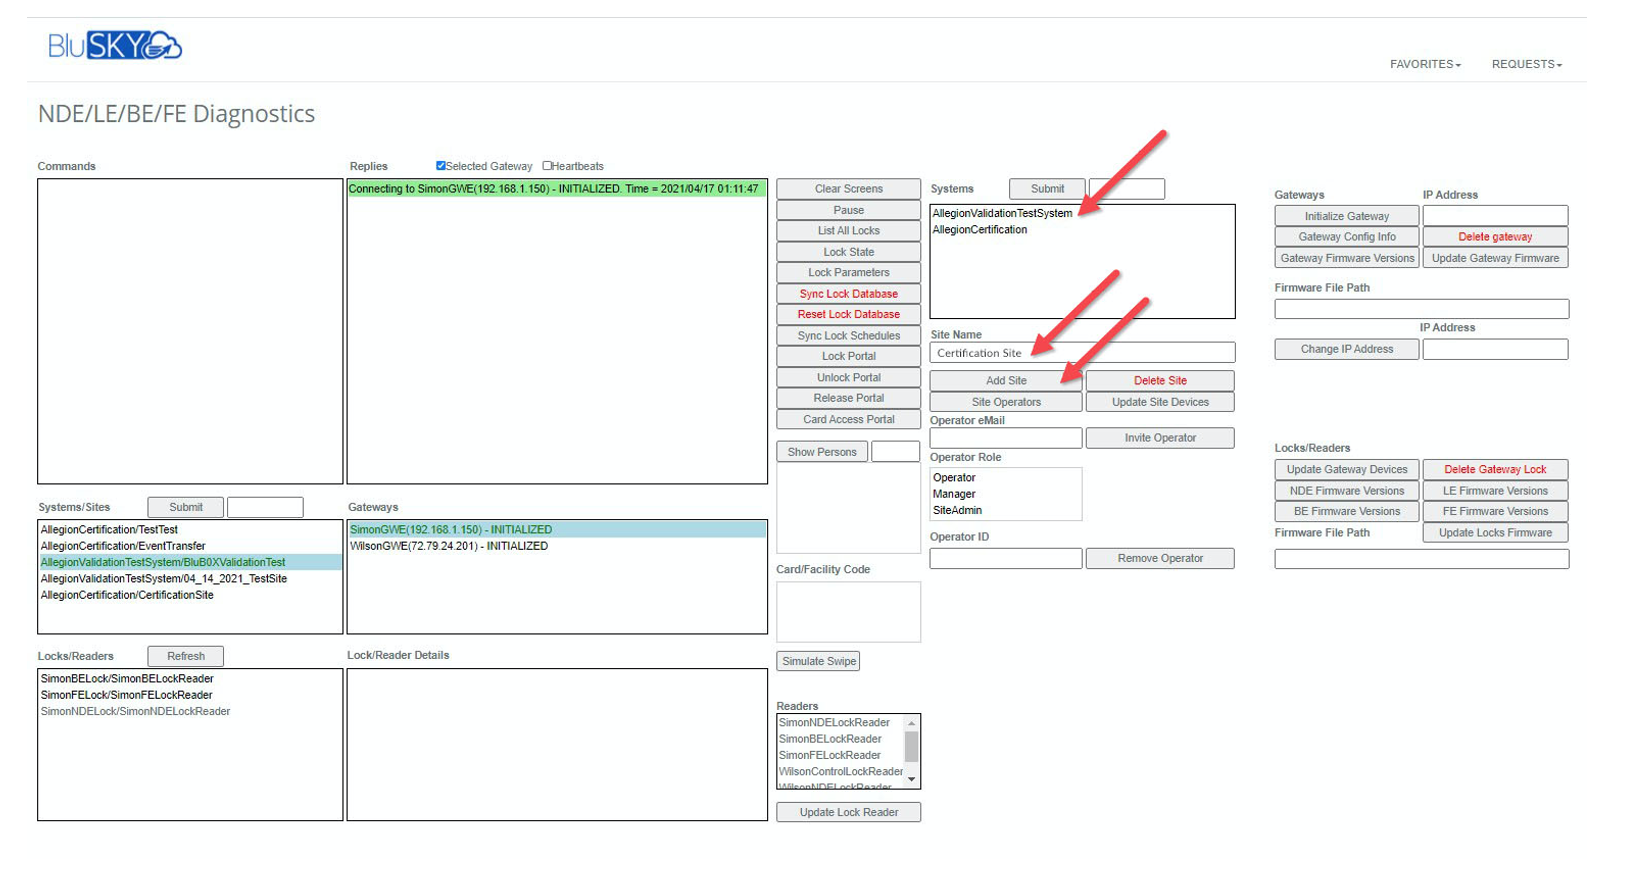
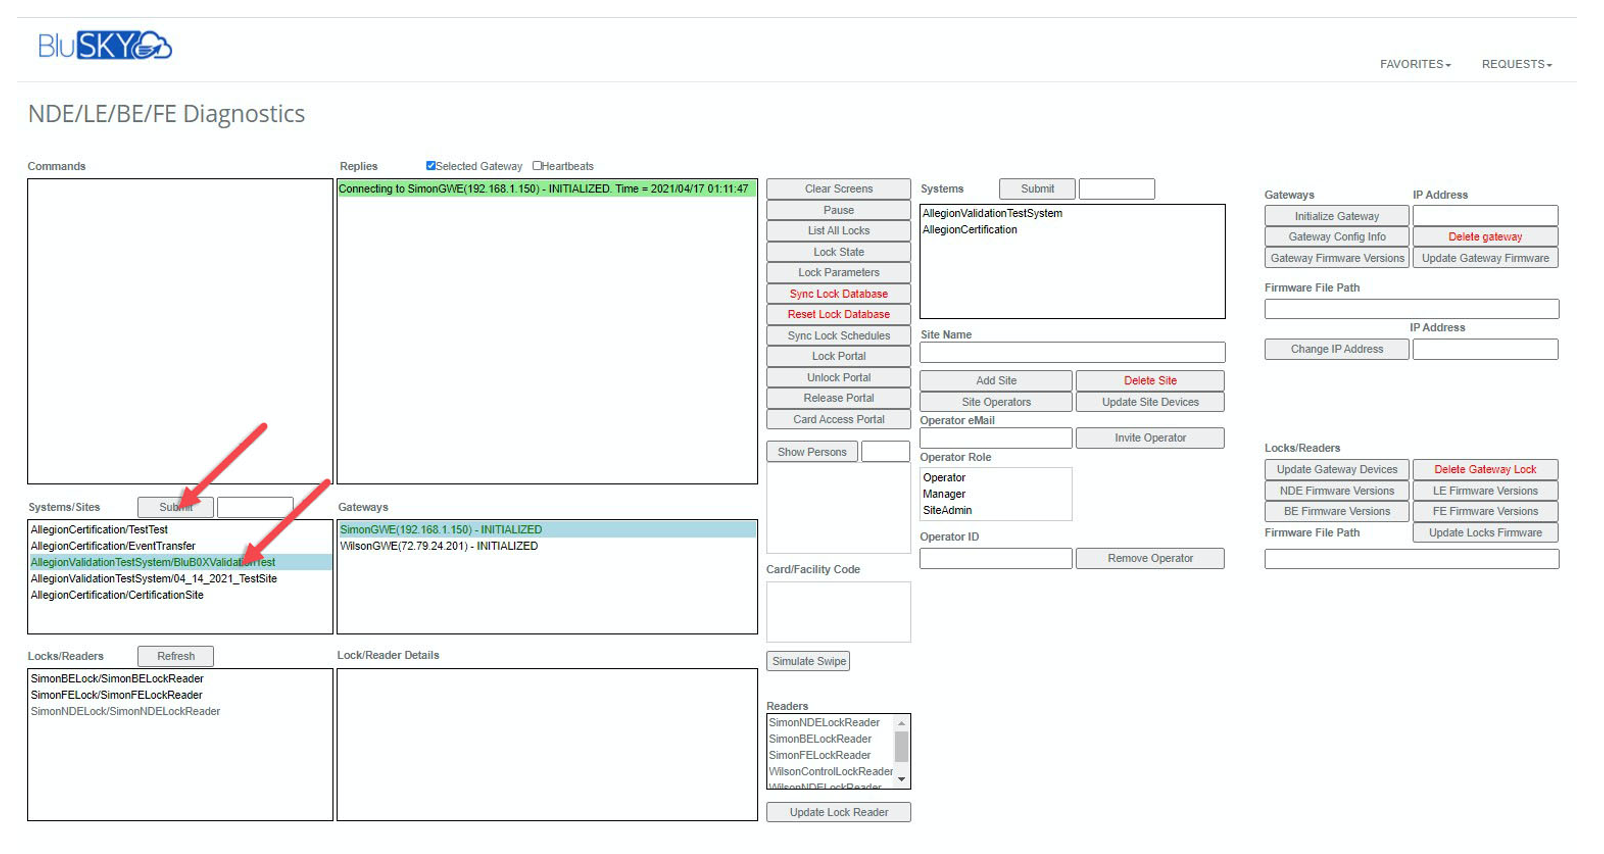
- Press ‘Submit’ button or reload the web page to see the selected 'System/Site' pair in the 'Systems/Sites' selector window.
Add Operators To The Site
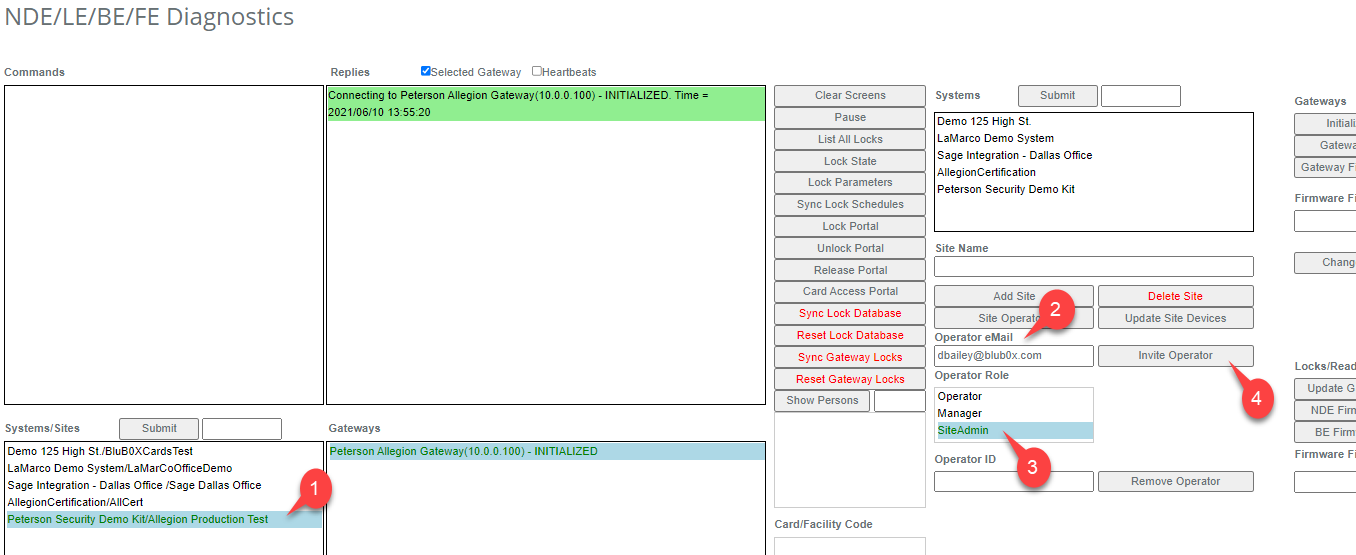
- Continue on the NDE/LE/BE/FE Diagnostics page and select the appropriate System/Sites entry.
- Fill in an Email address for yourself or other person you wish to add as an Admin in "Operator eMail" field.
- Select "SiteAdmin" or other appropriate role for the Operator Role. Refer to Appendix A below for chart that explains the capabilities of each role.
- Click "Invite Operator" button.
- Ask invited person to check their email for "Allegion ENGAGE Invitation" and click the "Accept This Invite" link. They will also be asked to sign in to complete the process or create a new account if applicable.
Add Controller, SIO Board, Reader and Portal In BluSky
In order to assign access rights to the locks they must be linked to the hardware structure in BluSKY. It requires the creation of several hardware and logical objects. Here is the list of hardware objects in order of their creation:
-
Controller
-
SIO Board
-
Card Reader
-
Portal
-
Create a Controller from 'Setup' menu, select the Controllers page.
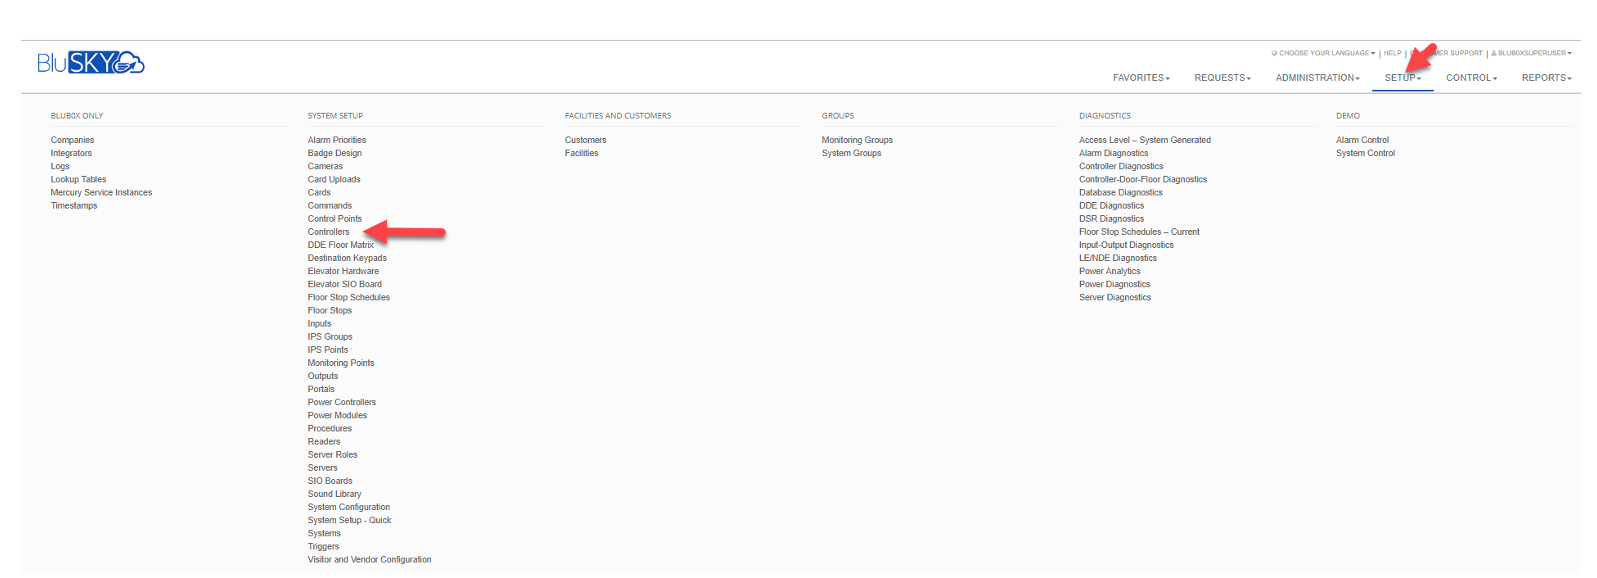
-
From the 'Controller List' page press ‘Create Button’
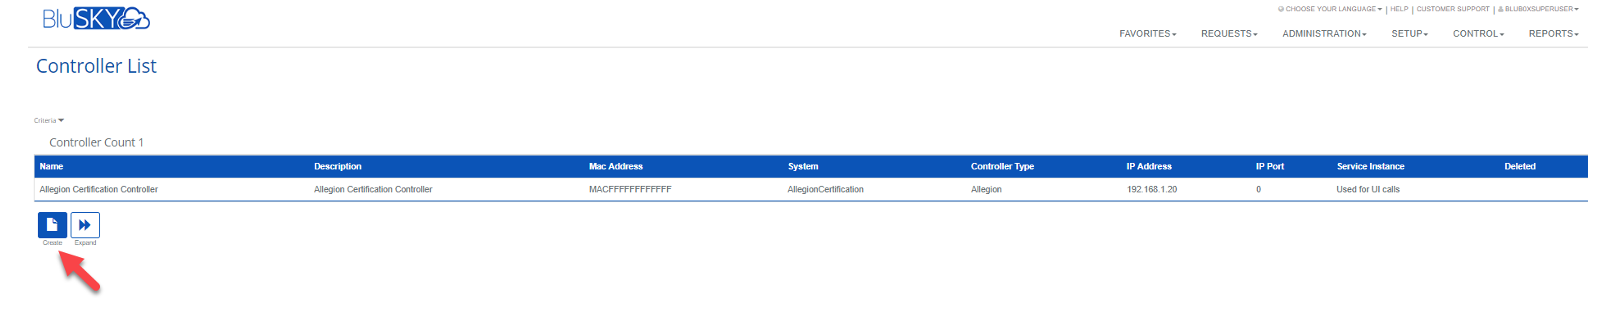
-
In ‘Edit Controller’ page give your controller a name, description, select the correct system, facility, select the 'Controller Type' and the above created 'Server.' Press ‘Save’ button
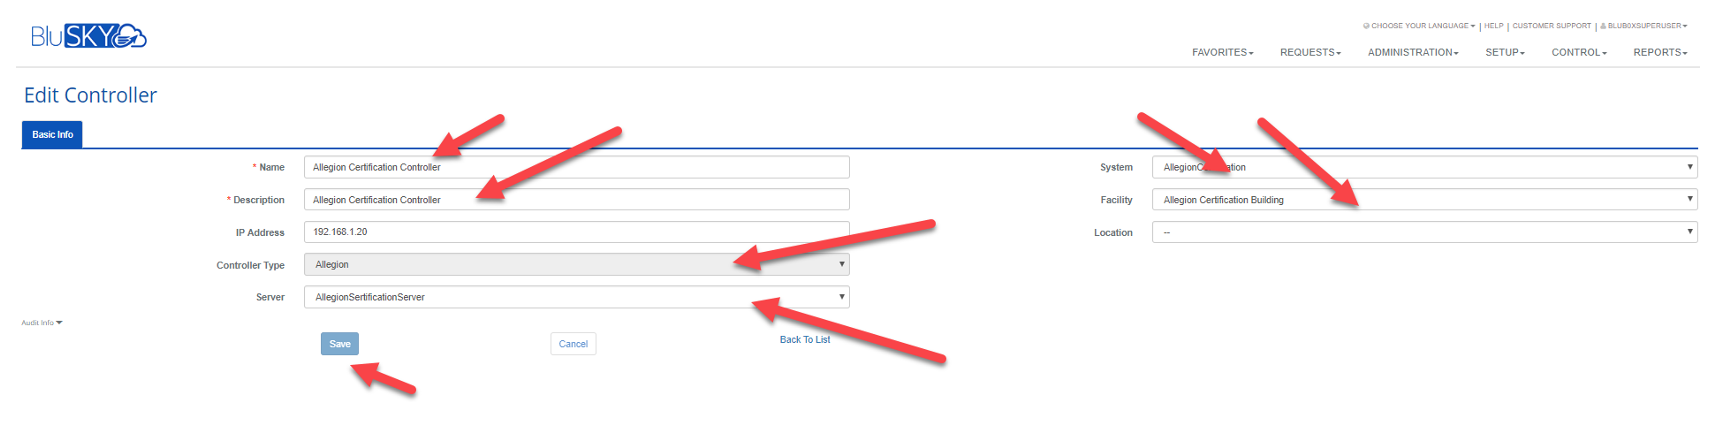
-
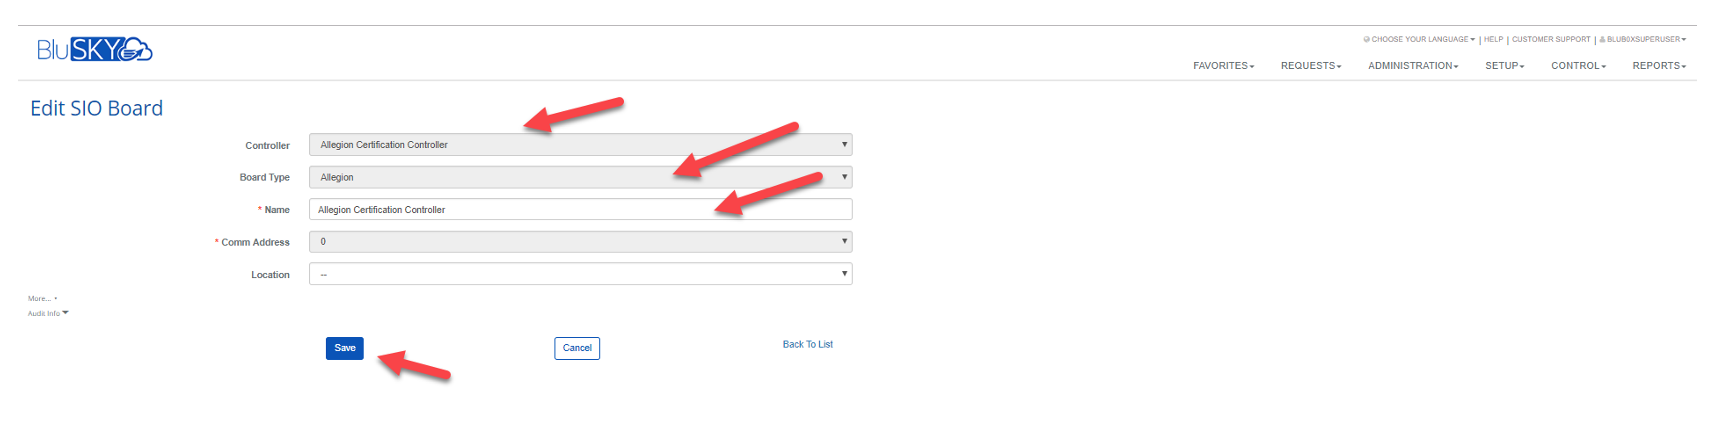
Next step is to Create SIO Board. From 'Setup' menu select ‘SIO Boards’ and from ‘SIO Board’ List press the ‘Create’ button.
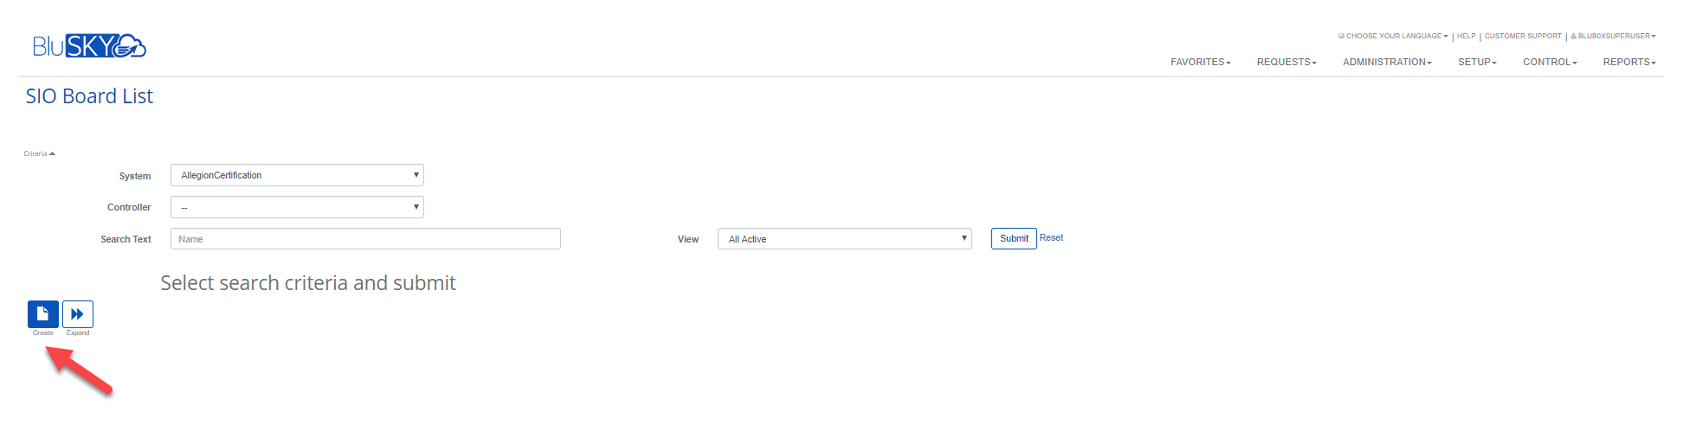
-
On the 'Edit SIO Board' page, select the controller above, select 'Board Type' as Allegion, and give the board a name. Press ‘Save’ button. Create an SIO board for each Gateway you have on this site.
-
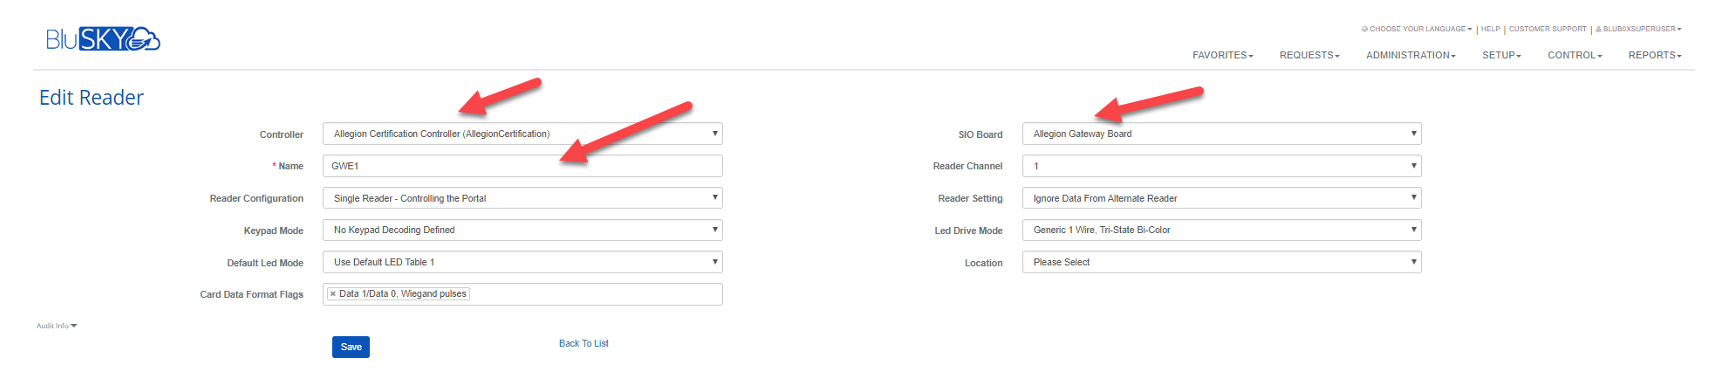
Create a Reader. From the Setup menu select Readers and from the Reader list press ‘Create’ button. On 'Edit Reader' page, Select the Controller, SIO Board. Give the Reader a name. All other settings on this page are irrelevant to Allegion. Press ‘Save’ button. Create a Reader for each SIO Board equal to the number of locks connected to the Gateway that is represented by this SIO Board.
-
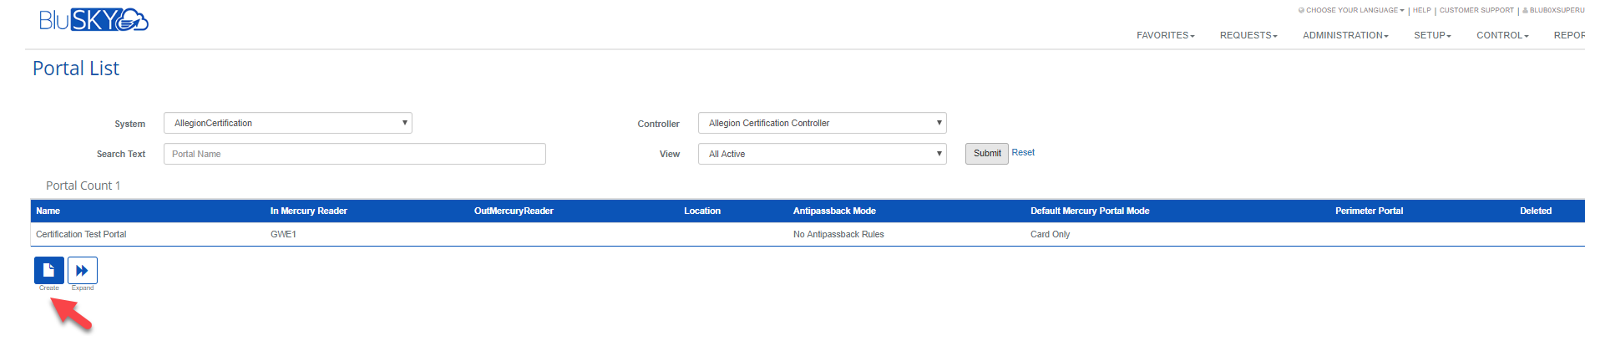
Create a Portal. Portal allows to assign auto-unlock schedule to each lock. From the 'Setup' menu select portals and press ‘Create’ button.
-
On the Edit portal page select the correct System, Controller, and give this portal a name (as a good practice, it should correspond to the Engage lock name). Also, select in 'Readers' that was created above. Select a global or custom schedule to specify the auto-unlock schedule.
Add Gateway and Locks To The Site (in Engage App and in BluSky)
Reset Hardware To Factory Defaults If Necessary
Please note that if your gateway or locks have been used on a previous site, you will need to perform steps to Factory Default Reset them before you will be able to add them to the new site. See Allegion FDR article for steps to do this.
NOTE: Using the Engage App I have noticed times when I had difficulty getting the app to recognize devices to add to the site or in locating locks to link to the gateways. I've found that sometime exiting the Engage App and restarting it helps this issue.
Add Gateway To Site In Engage App
- Log into the Engage App on your mobile device. If you accepted the Admin Invite previously you should now see the new site listed under the Sites page in the Engage App.
- Select the Site and then the Devices page will load.
- On the Devices page, click the "+" icon on lower right.
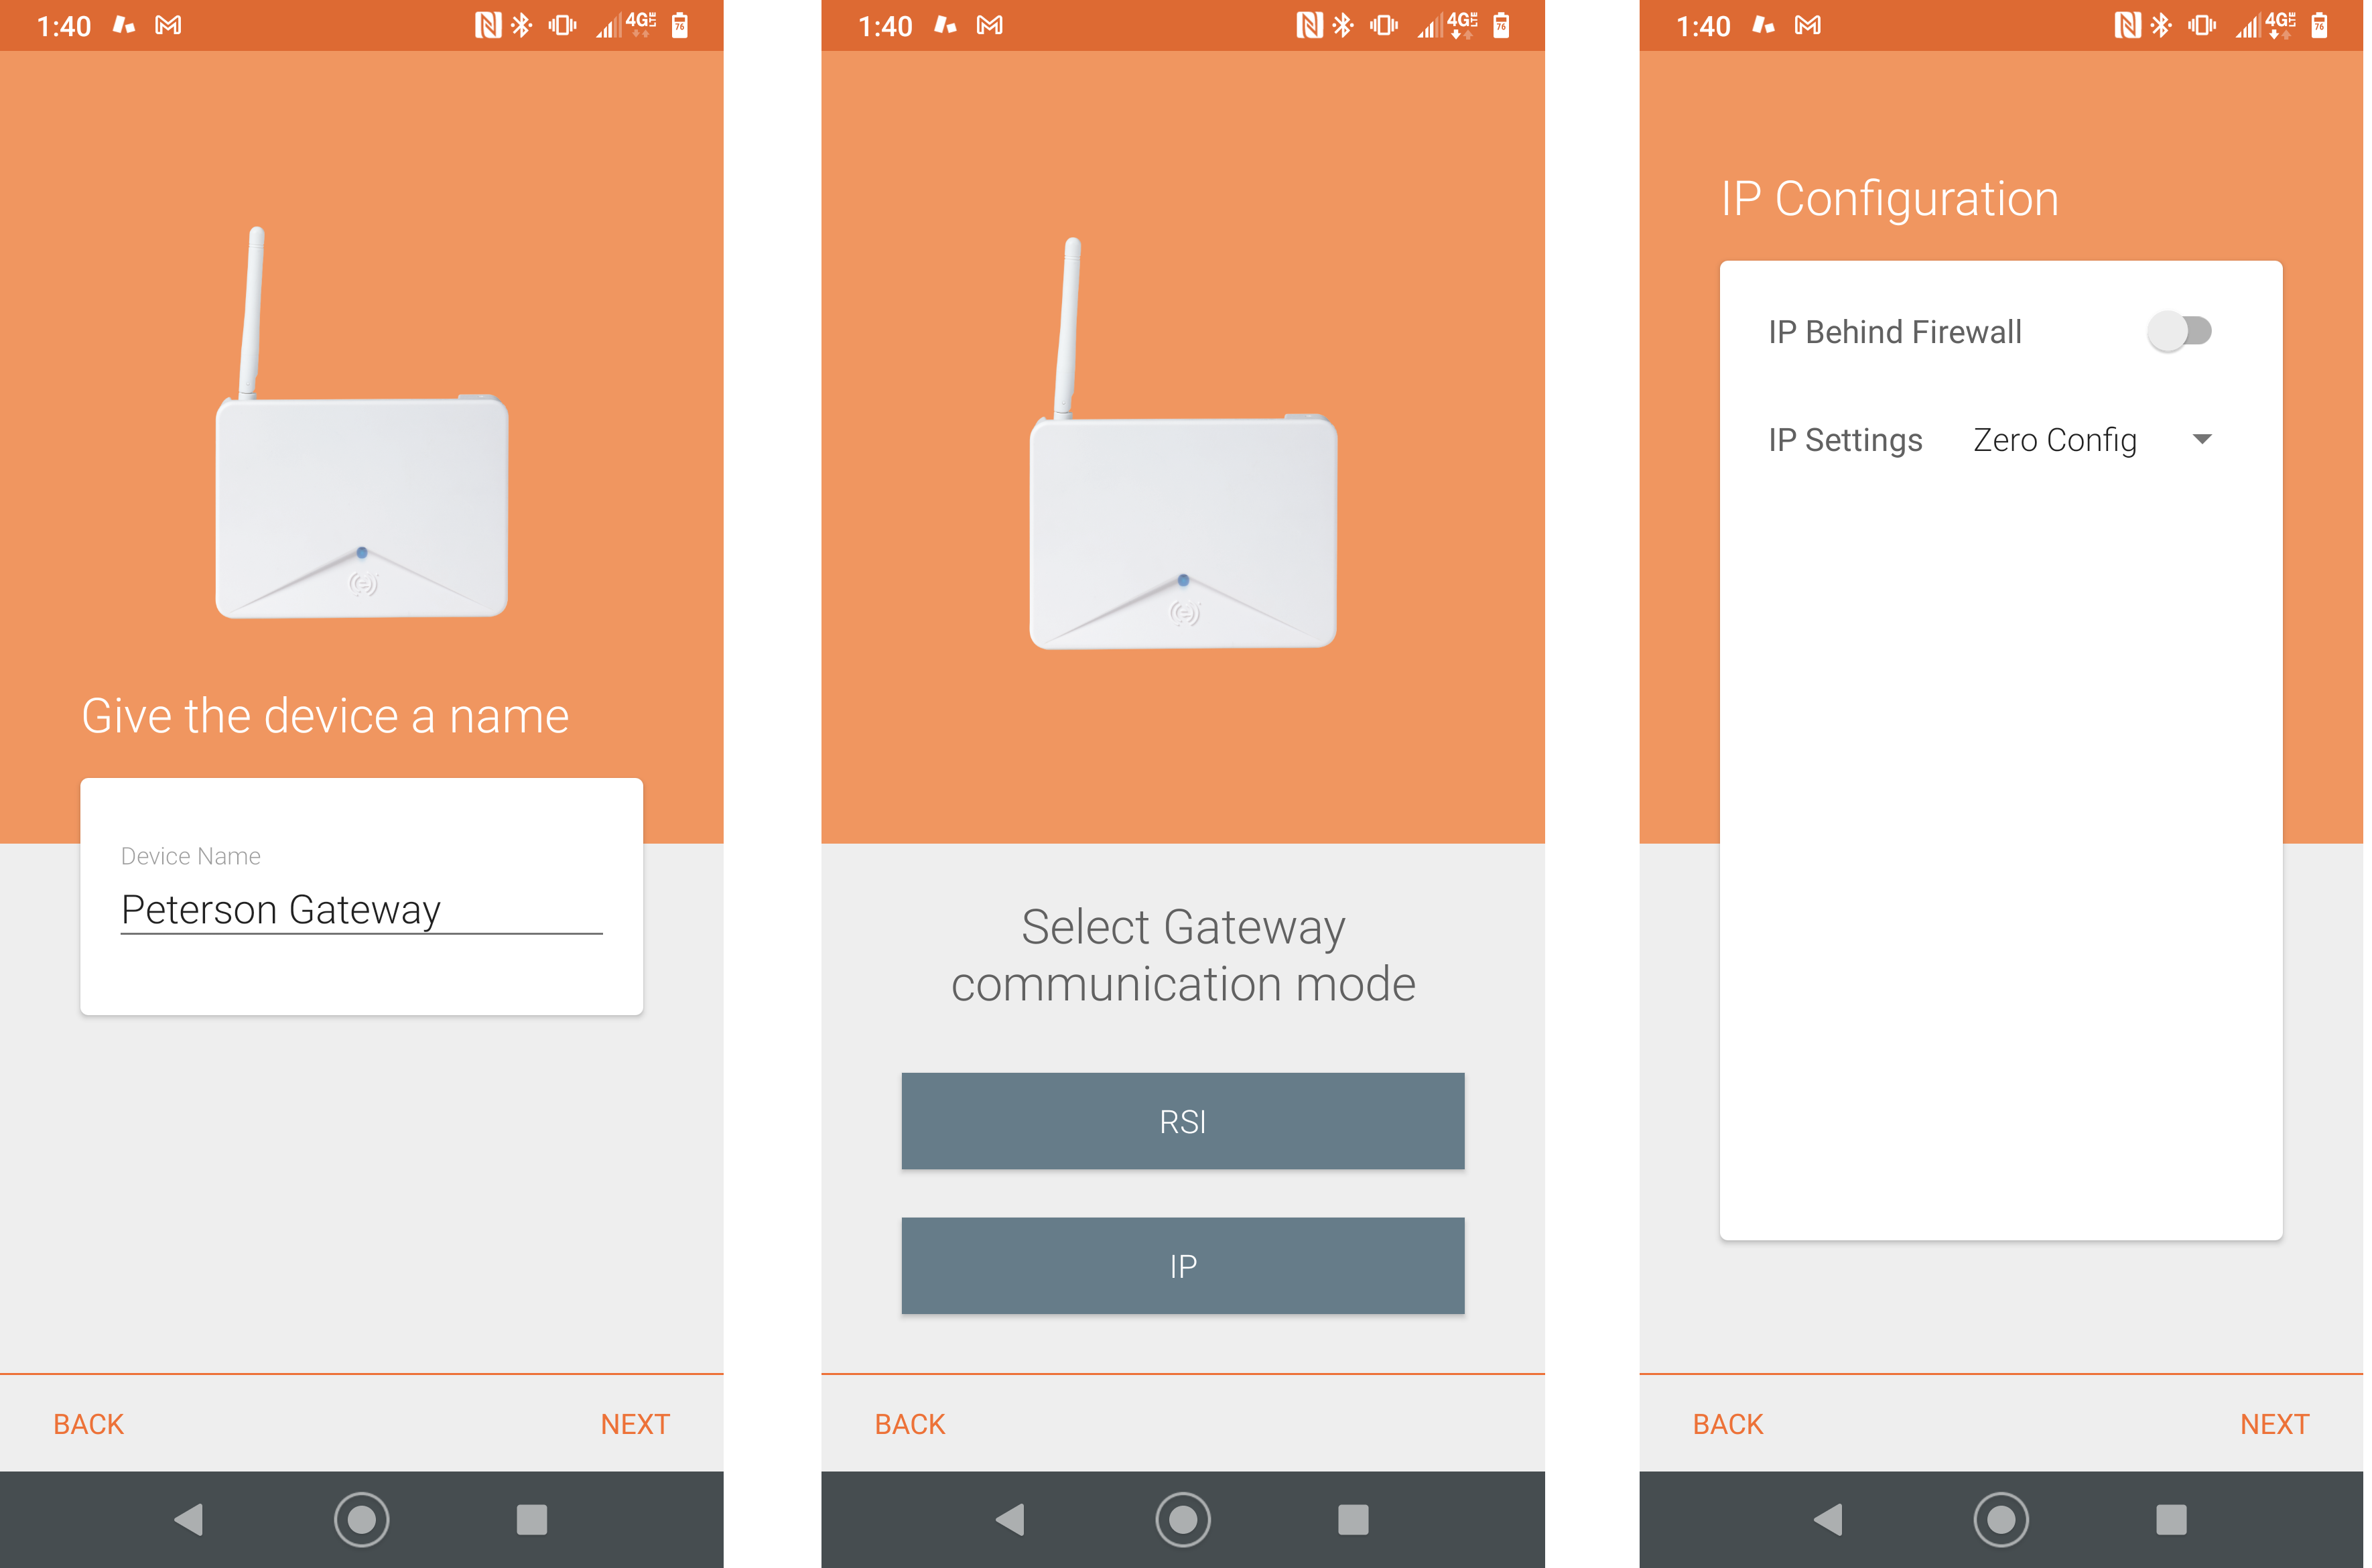
- On Select A Device Type page, click Gateway.
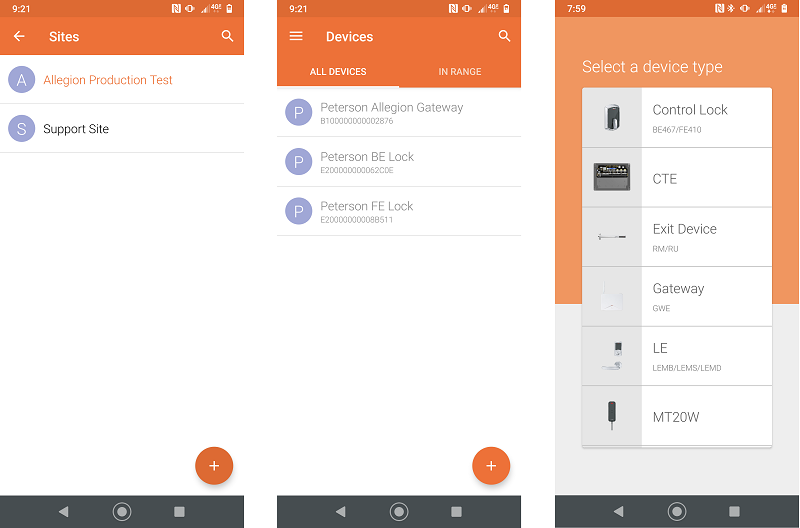
- The app will scan for a gateway device in range and display it. Once selected, the gateway LED will start blinking blue and you will be prompted to verify this. Click Yes if gateway LED is blinking blue.
- Assign a name, click Next.
- Select IP and select/assign the appropriate network settings. In our example we are using Static IP address, we set the Schlage Gateway address to an available address on our network, as well as settings for gateway, mask and DNS settings. Click Next
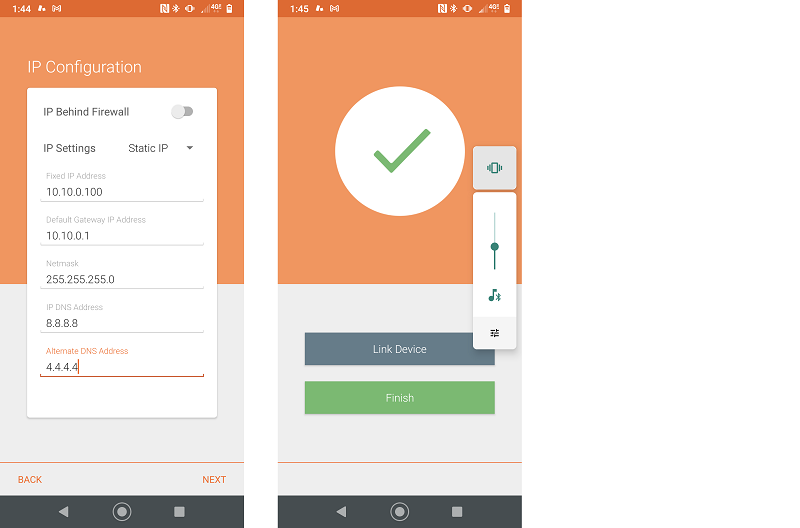
- Click Finish on next page.
Add Locks To Site In Engage App
- From the Devices page, click the "+" icon on the lower right.
- On Select A Device page, click the appropriate lock type, "Control Lock" for BE/FE locks or "LE" for LE locks.
- The app will scan for locks in range and display them. Click on one lock at a time to add. You will be prompted to confirm the lock LED is blinking.
- On the following screen you can continue to add other locks or click Finish to return to the Devices page.
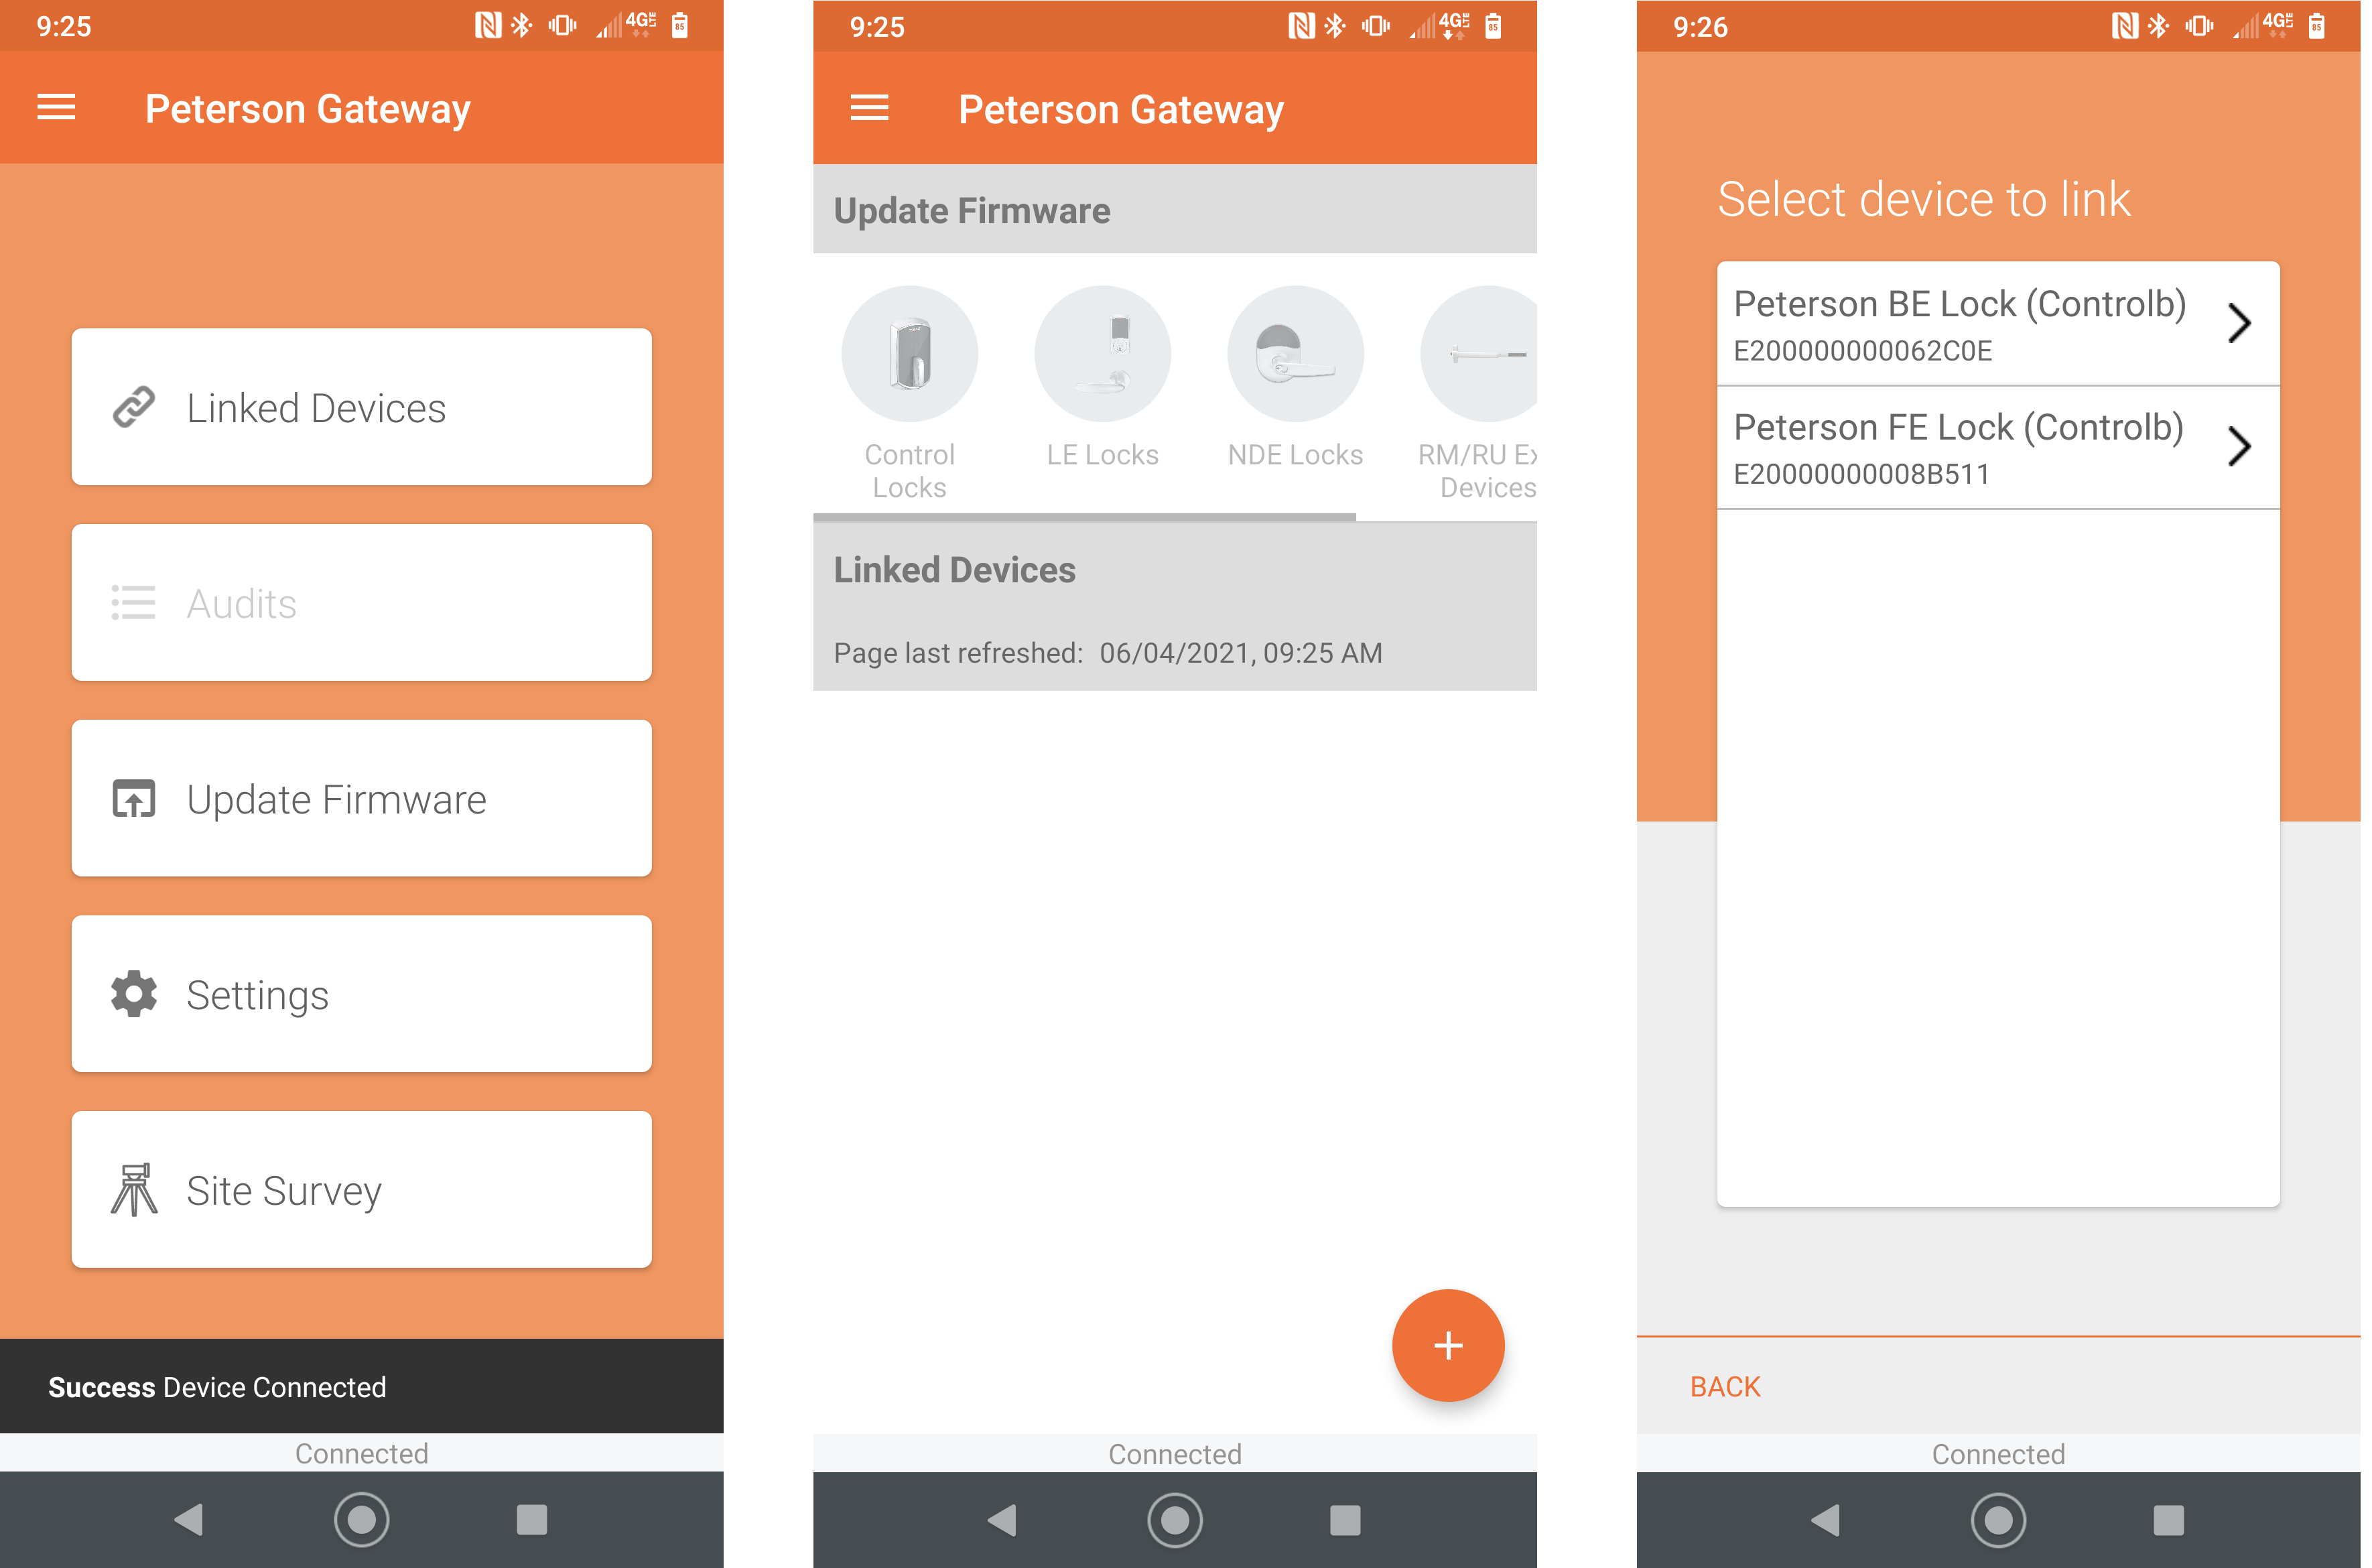
Link Locks To The Gateway
- On the Devices page, select the Gateway and it will open the Gateway page. Click the "+" icon in lower right to show the list of locks that can be linked.
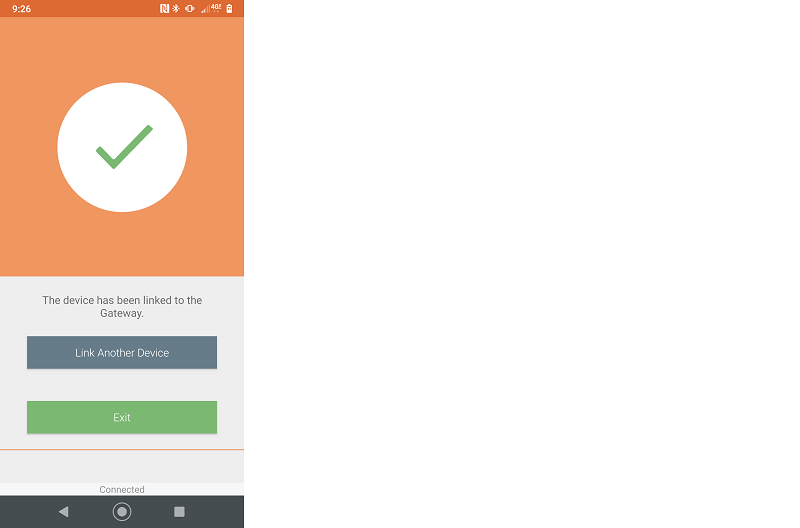
- Select each lock one at a time and follow prompts to link.
Update Site Devices And Initialize Gateways In BluSky
- Make sure you are at least back to the Devices page in the Engage App. If you go in to look at settings for example in the app, the gateway will be offline and you will not be able to do the following steps. Also make sure your Allegion server is configured properly and running the Allegion Interface and Local Sync services.
- After the gateways and locks are added to site in Engage app use ‘Update Site Devices’ button on the NDE/LE/BE/FE Diagnostic page in BluSky to download the devices into BluSKY database. Press 'Submit' button again to see the gateways in the Gateways selector window. At this point, the Gateways are not initialized in BluSKY and new credentials to communicate with them are not created yet.
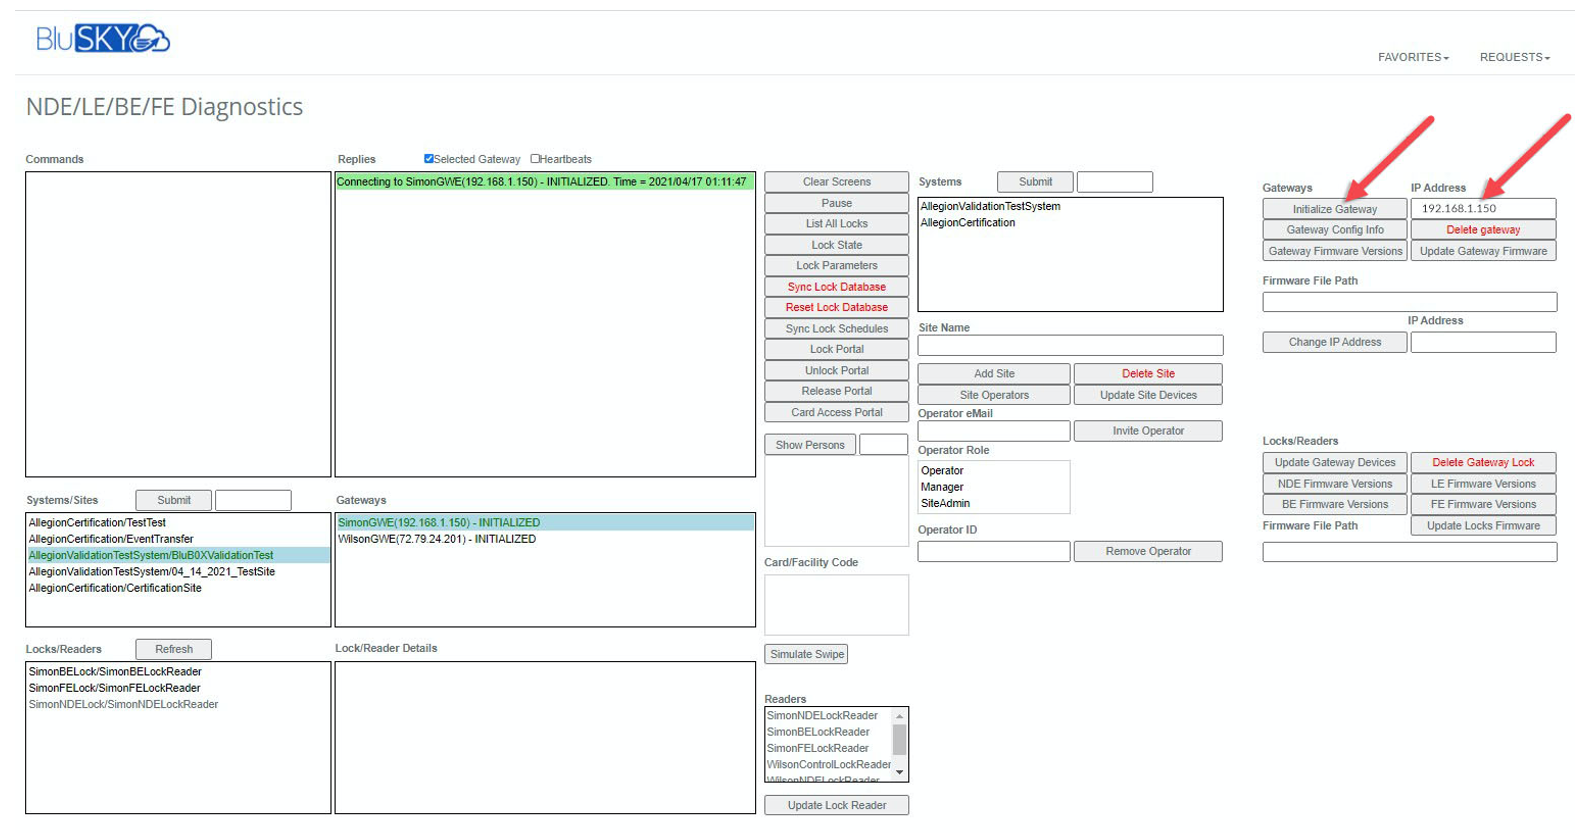
- MAKE SURE YOU SELECT THE NEW "NOT INITIALIZED" GATEWAY IN THE GATEWAY BOX...WHATEVER IS SELECTED HERE WILL BE INITIALIZED WITH THE NEW IP ADDRESS.
- For each Gateway, type the IP address into IP Address text box and press ‘Initialize Gateway’ button.
- Press the ‘Submit’ button for 'System/Sites' to verify that all Gateways are initialized.
- Press 'Update Gateway Devices' button.
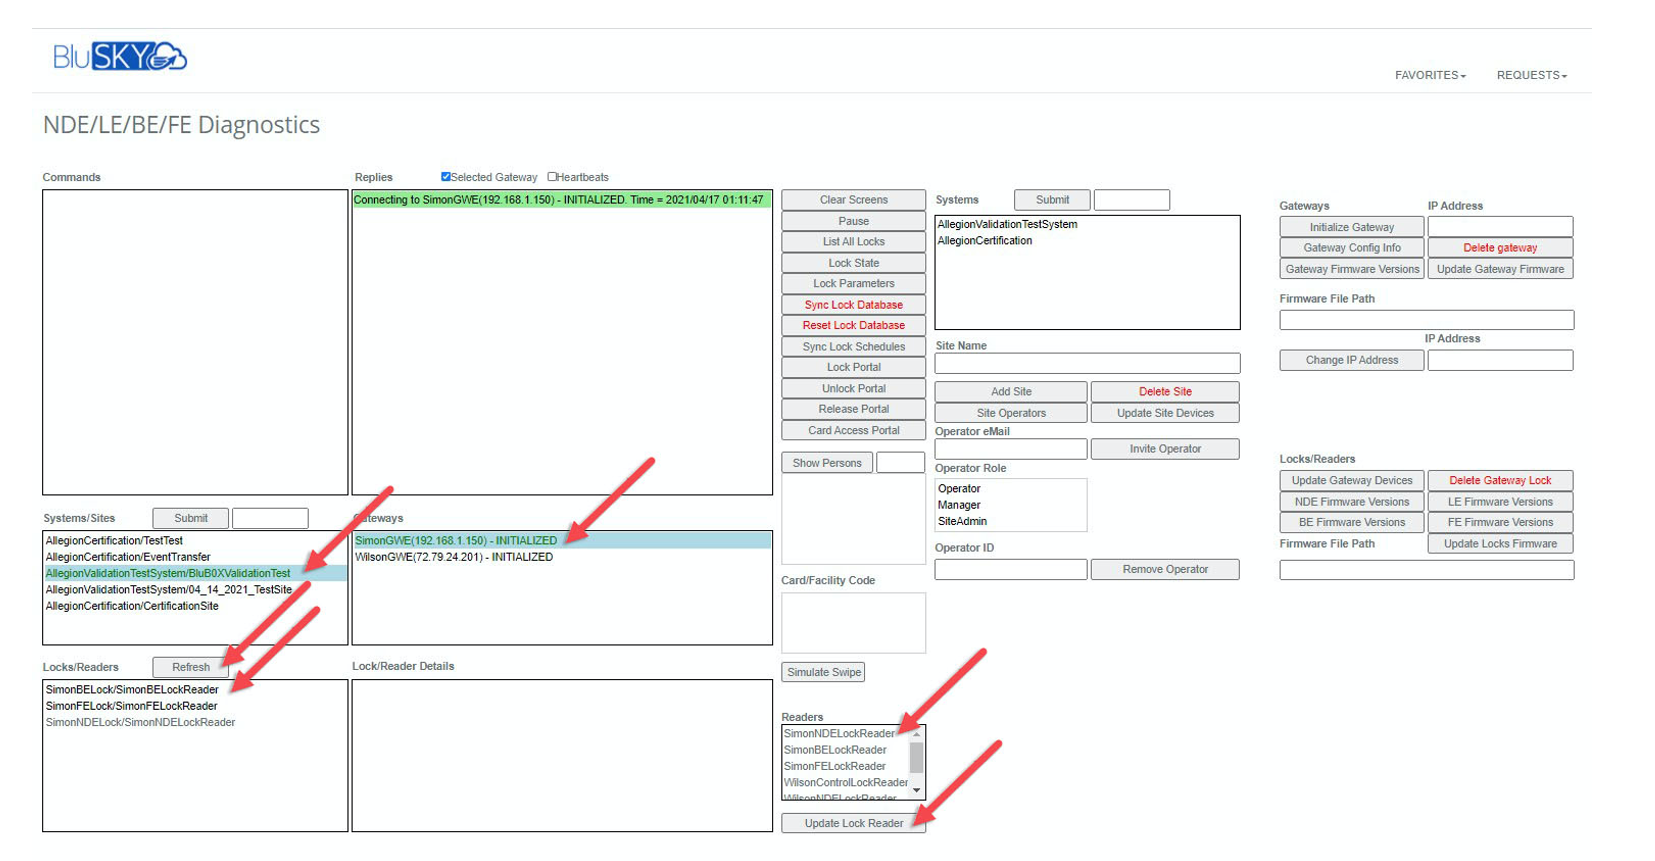
- Select a Gateway in the 'Gateways' selector box and verify that the locks linked to this gateway are visible in the lock selector window.

- Pair the reader to the lock. From Setup Menu select NDE/LE/BE/FE Diagnostics. On this page, select the correct System/Site, Gateway and Lock. In the 'Readers' selector screen, select the Reader that was created for that lock and press 'Map Lock to Reader’ button. Press the‘ Refresh’ button to see the Lock/Reader pairs. Repeat the process for each lock.
Person/Card/Access Level Setup
You can setup all the typical access and schedule control in BluSky that you would for any other lock. All of this information will be relayed to the wireless locks via the gateway rather than Mercury controllers.
Device Schedule - setup in the same way as for Mercury controlled locks and assigned in Portal setup page.
Access Schedule - setup as usual, used in conjunction with readers in Access Levels.
Person/Card - setup as usual, assign Access Levels for desired portals and assign card(s) via the Person setup tabs. Please note that Control locks, BE & FE locks require use of the Schlage cards. They do not support standard HID cards. NDE Locks do support some other vendor cards, but you will need to test which ones. They of course work with the Schlage cards as well.
Create Schedules
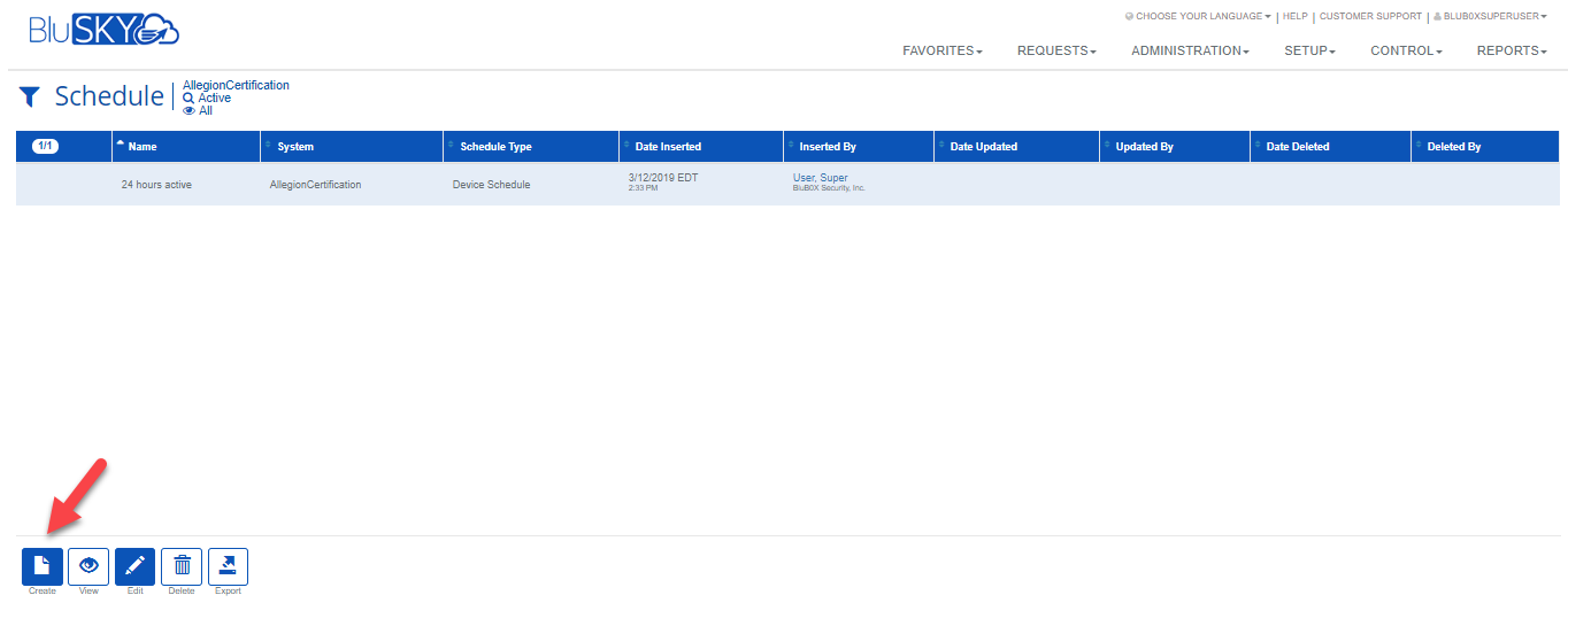
- Create a Schedule. From Administration Menu select Schedules and press ‘Create’ button.
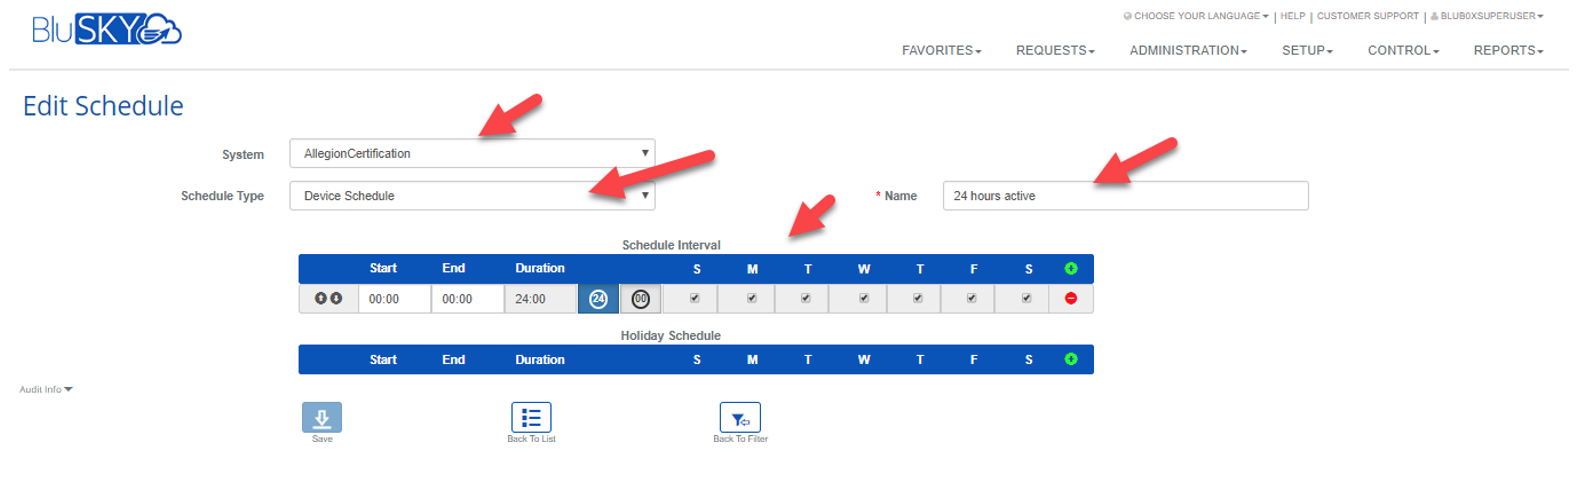
- In 'Create' or 'Edit Schedule' page select your system, schedule type (device for locks and access for people), give this schedule a name and select the days and hours when you want to have this schedule to be active.
Create Access Level
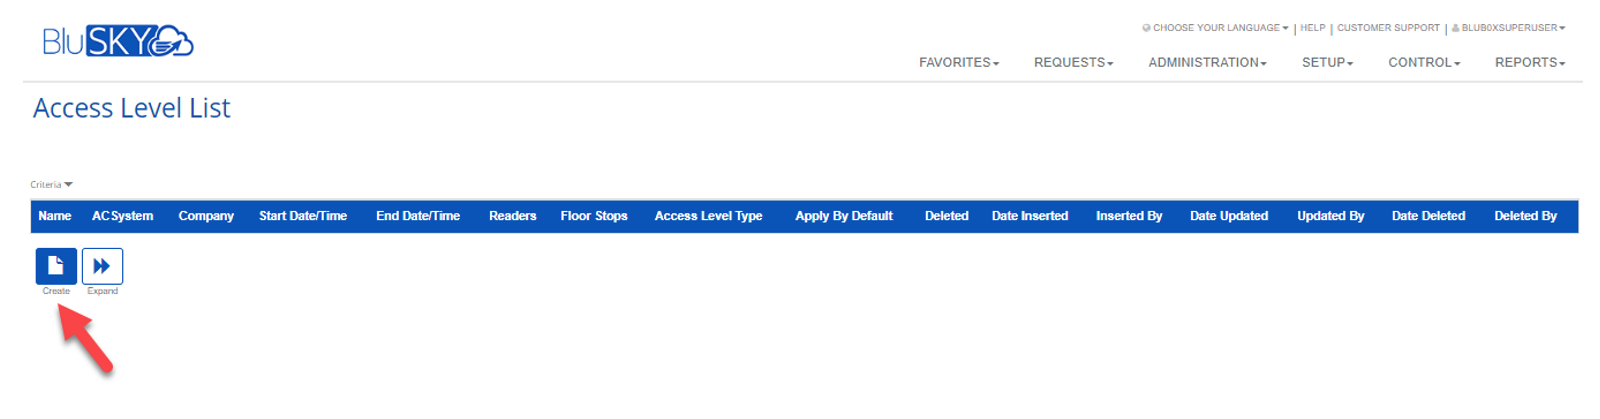
- From 'Administration' menu select Access Level. From the 'Access Level' list page, press Create button.
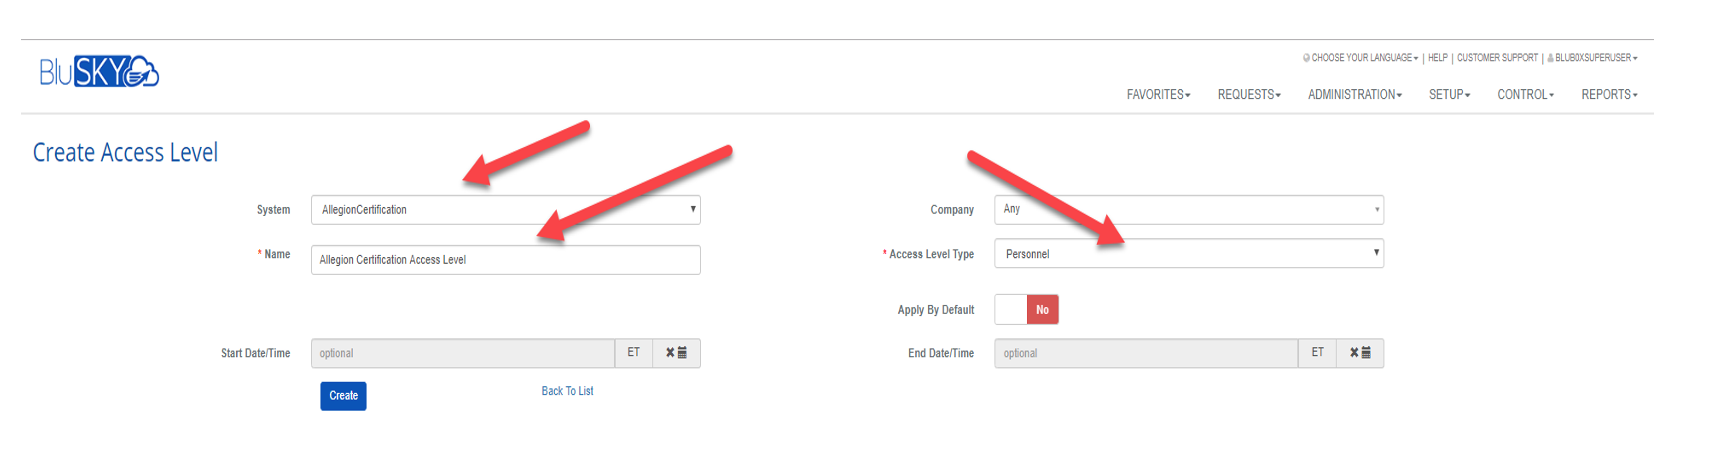
- From 'Create Access Level' page, select your System, and give 'Access Level' a name and select 'Personnel' as 'Access Level Type.' Press 'Create' (or Save) button.
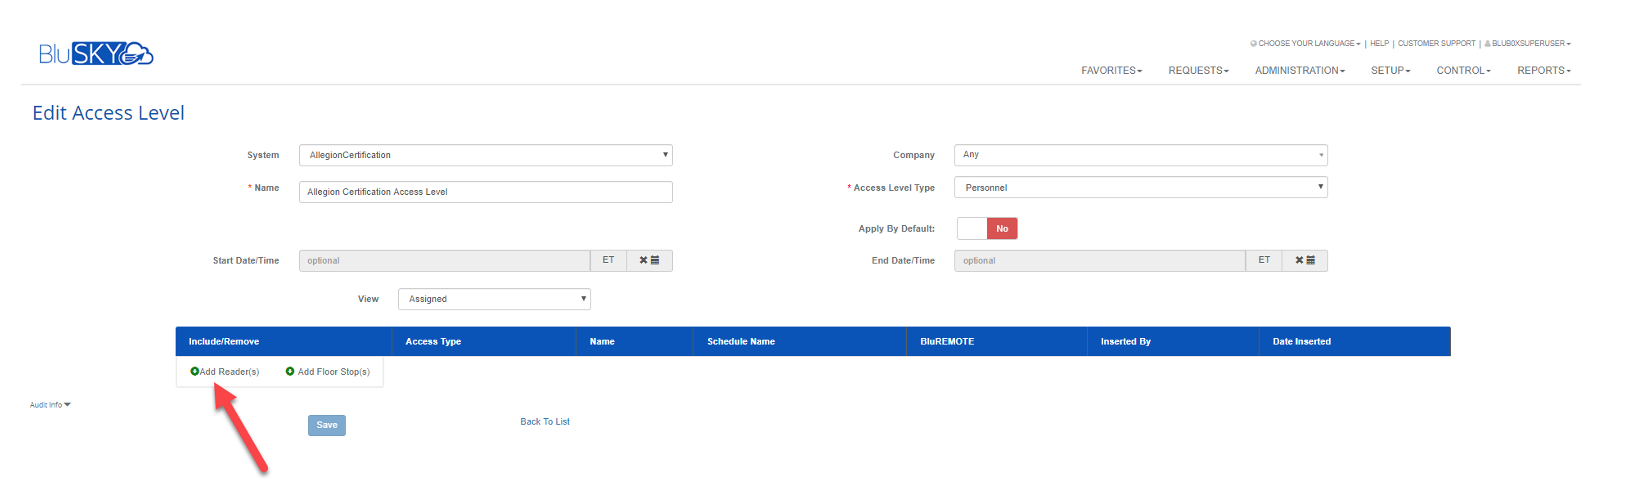
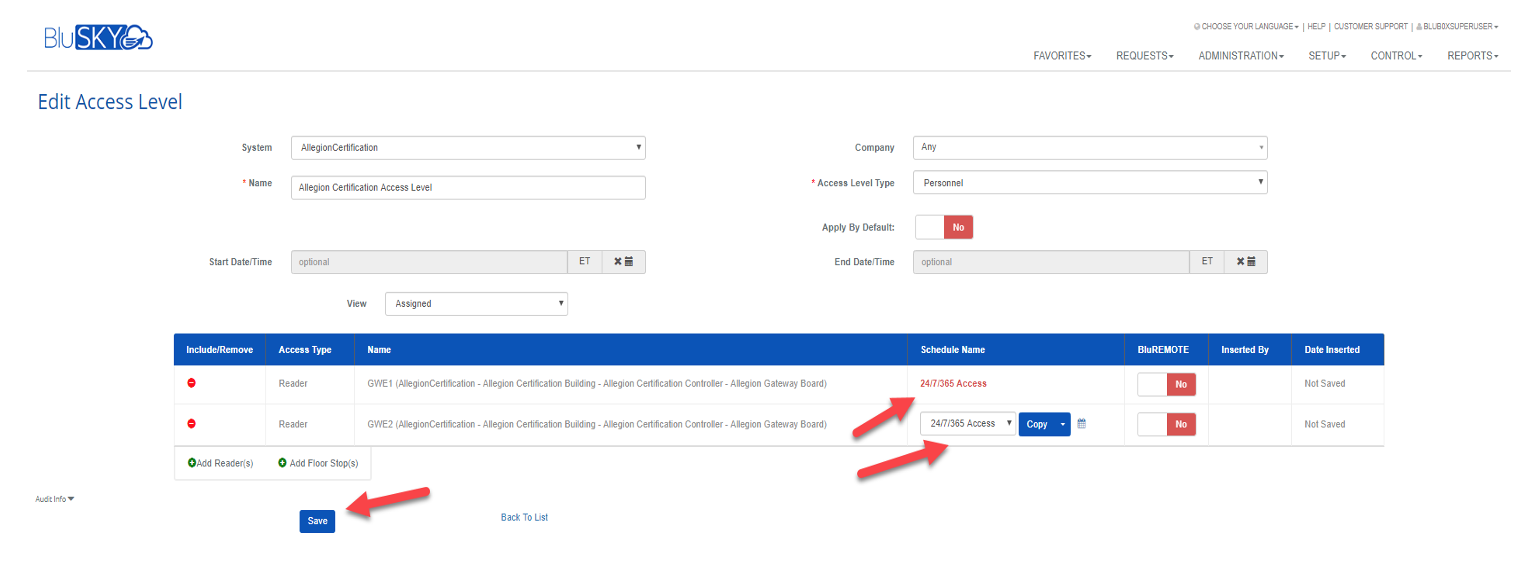
- Add 'Readers with Schedules to created Access Level. On the 'Edit Access Level' screen press 'Add Reader(s)' button.
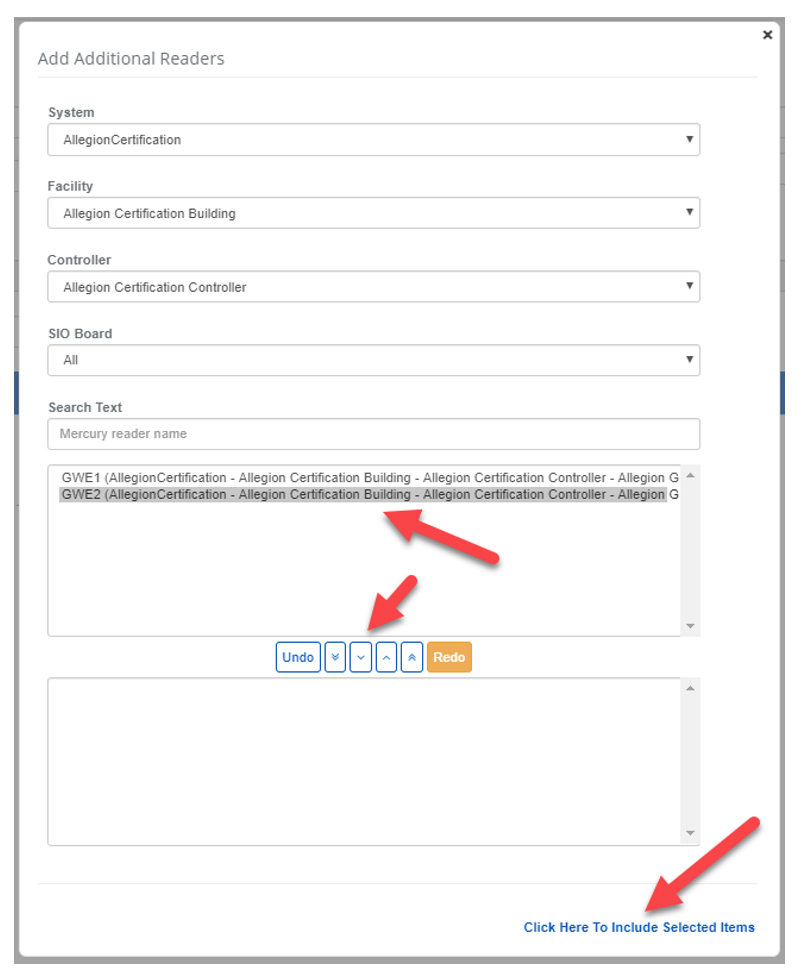
- Select the Readers you want to add to the Access Level as shown below.
- On the 'Edit Access Level' page select the Schedule for each added Reader and click the 'Save' button.
Create a Person in the Occupancy and assign a Card and Access Level
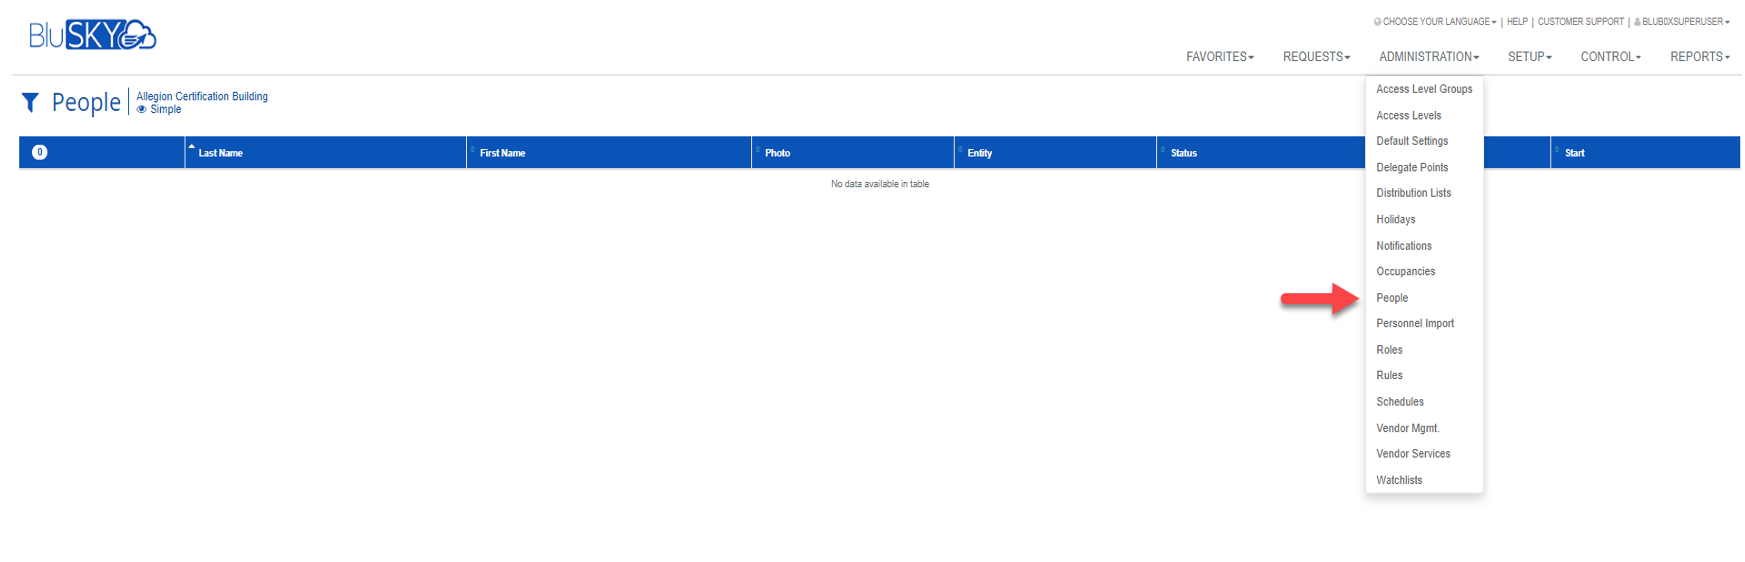
- Add a person to the Occupancy from the 'Administration' menu select 'People.'
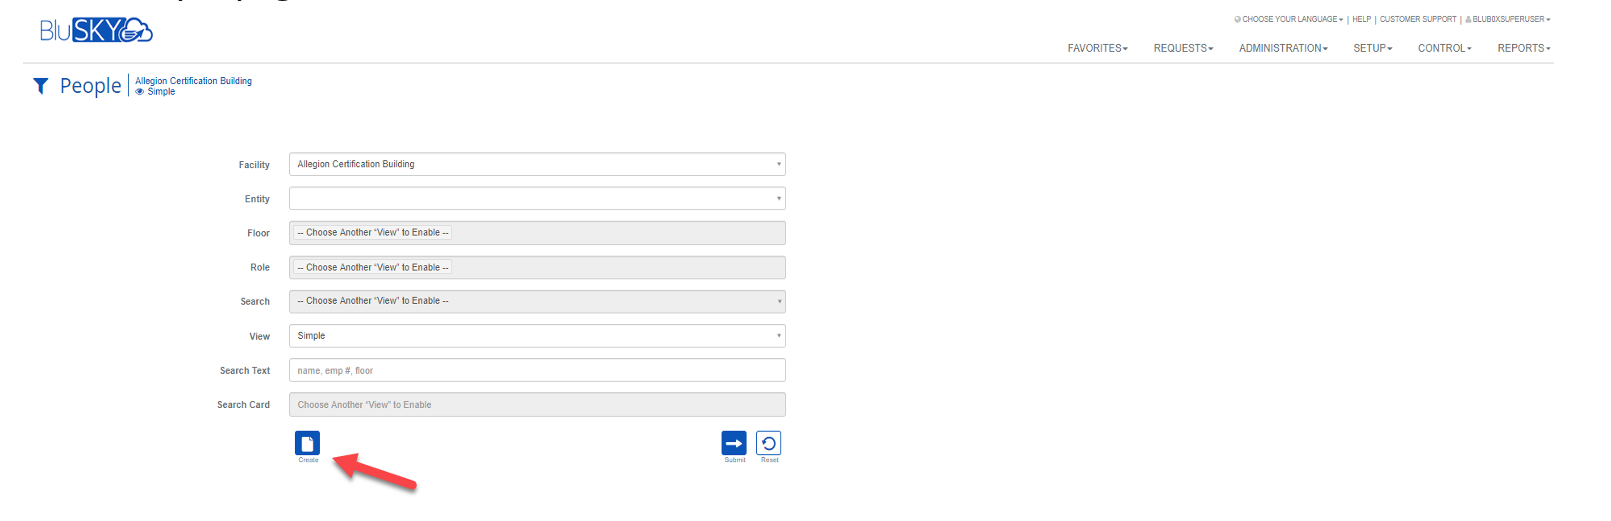
- From the 'People' page, select the 'Create' button.
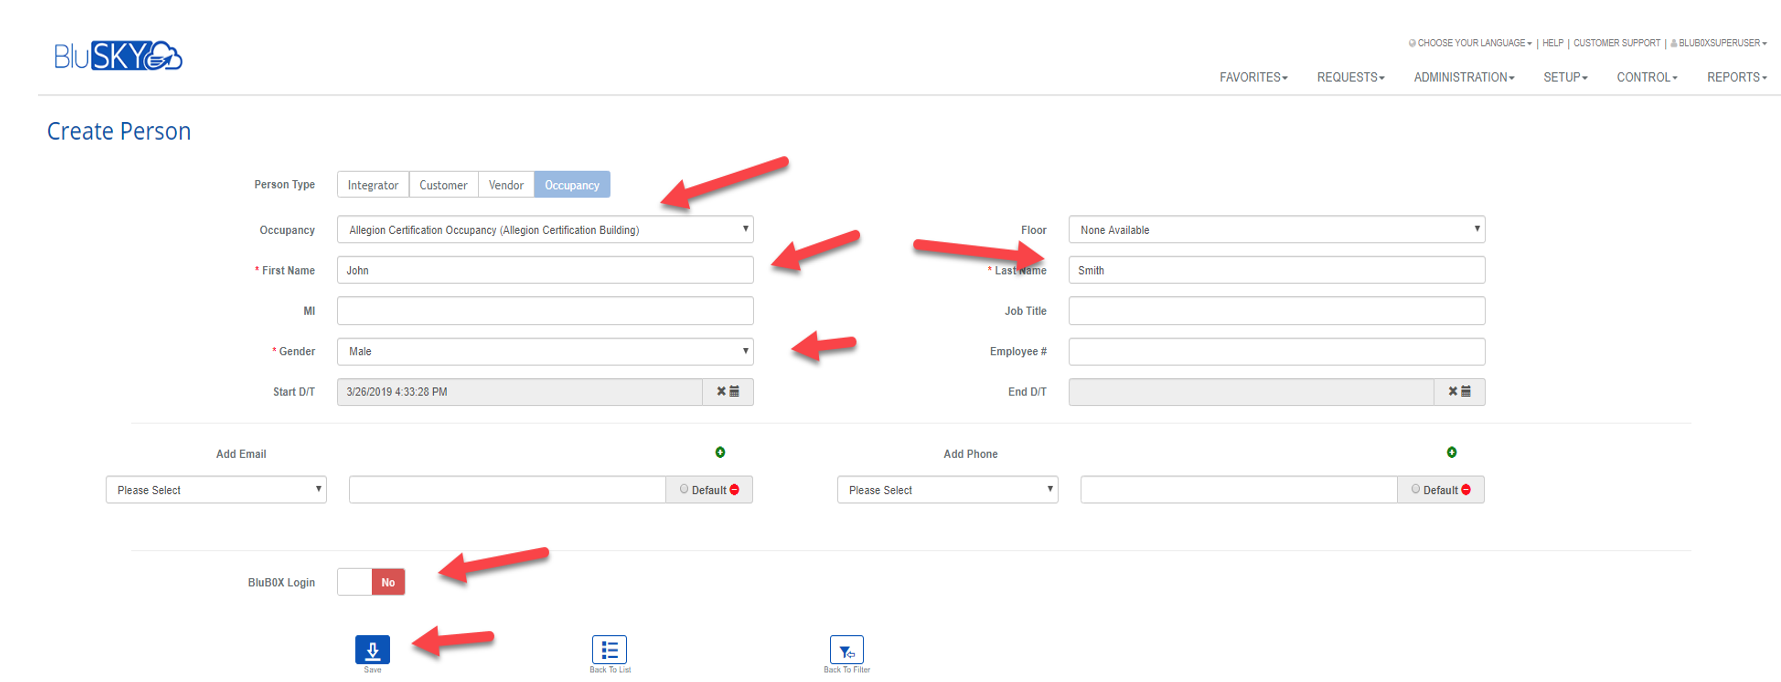
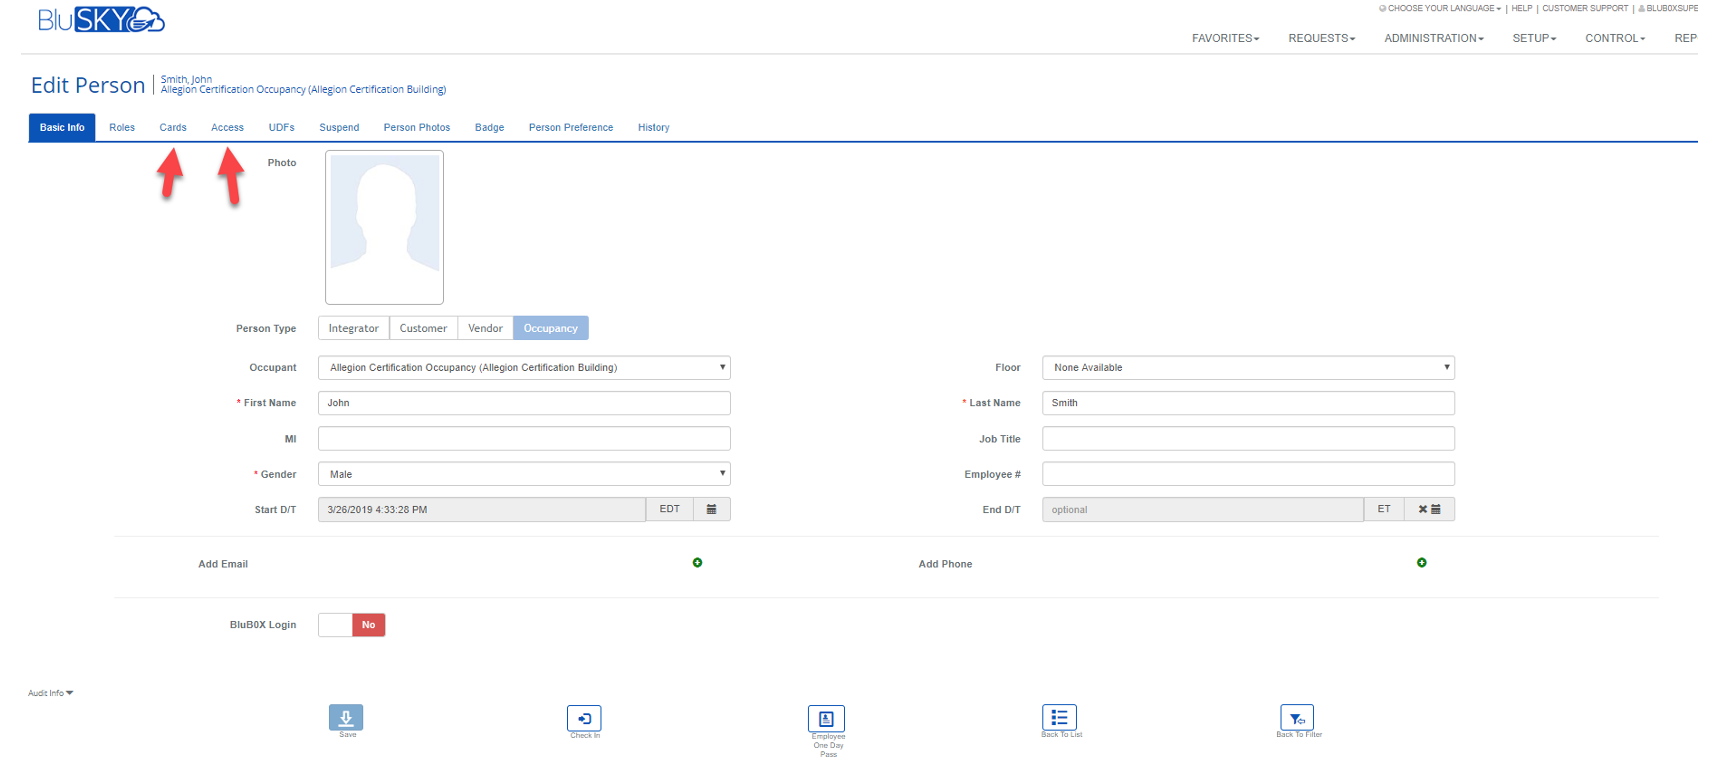
- On 'Create Person' screen, provide first and last name, and gender. If this just a regular user, and is not going to have any activity in BluSKY set BluB0X Login switch to ‘No”. Click Save Button.
- 'Edit Person' screen will appear. The two tabs you must fill in order for the person card to work in the lock are 'Cards' and 'Access.'
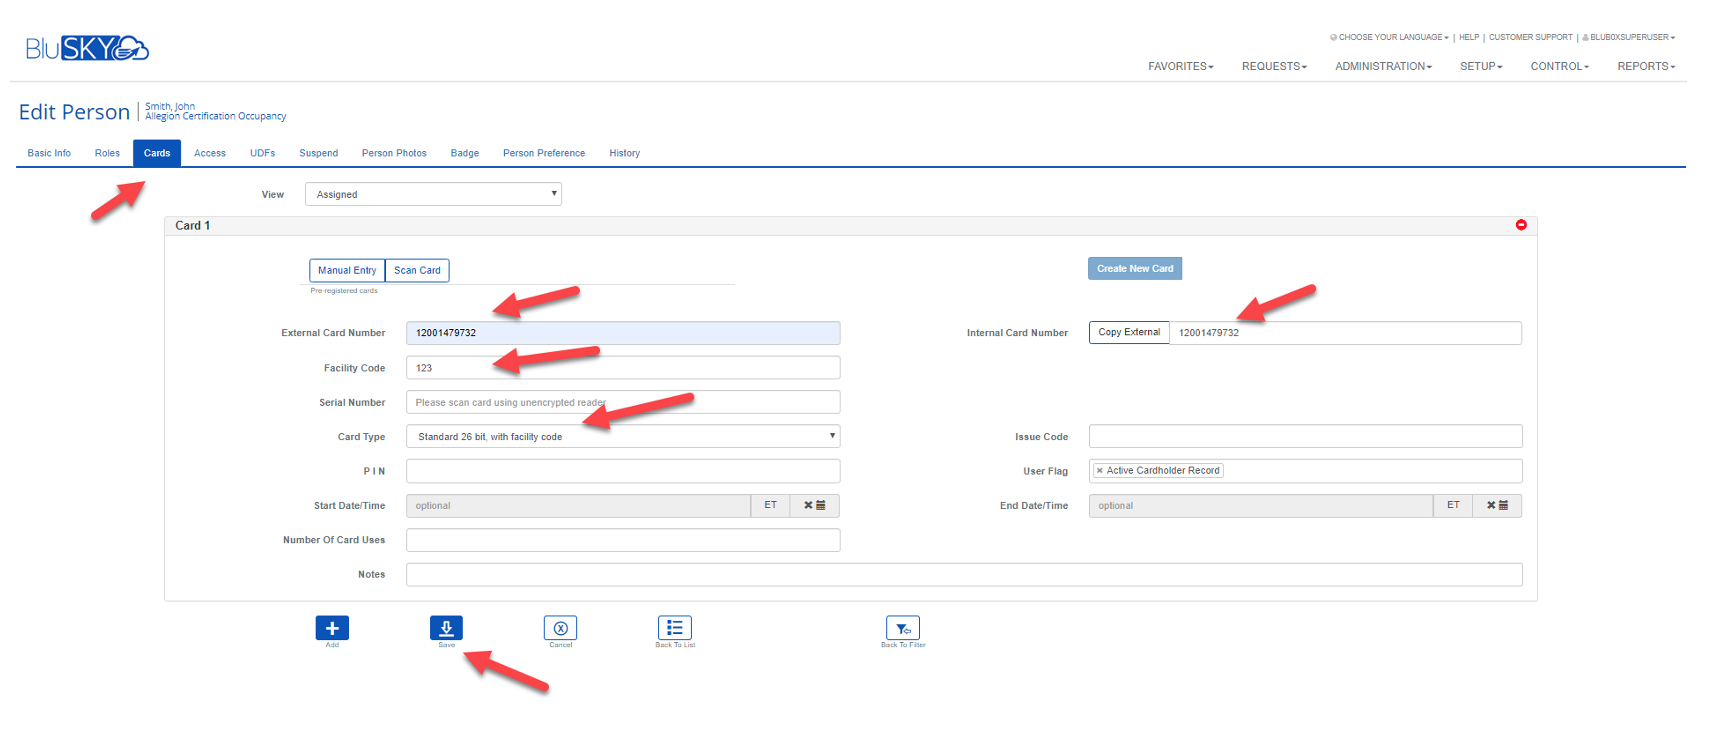
- From 'Cards' tab fill in the External Card Number, Internal Card Number, Facility Code, Card type, and click the 'Save' button.
- From 'Access' tab of the 'Edit Person' page 'Add Access Level(s)' that was prepared earlier, then click ‘Save' button.
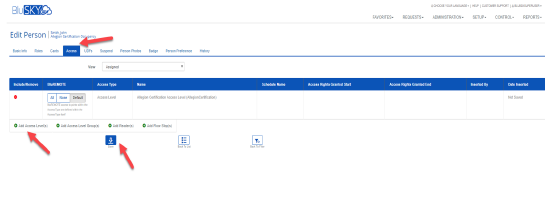
- This action will trigger the database update for the Locks that have Readers selected in the Access Level(s) assigned to the above person. His card will be loaded into those locks and should start working.
Upgrade Firmware on Gateway and Locks
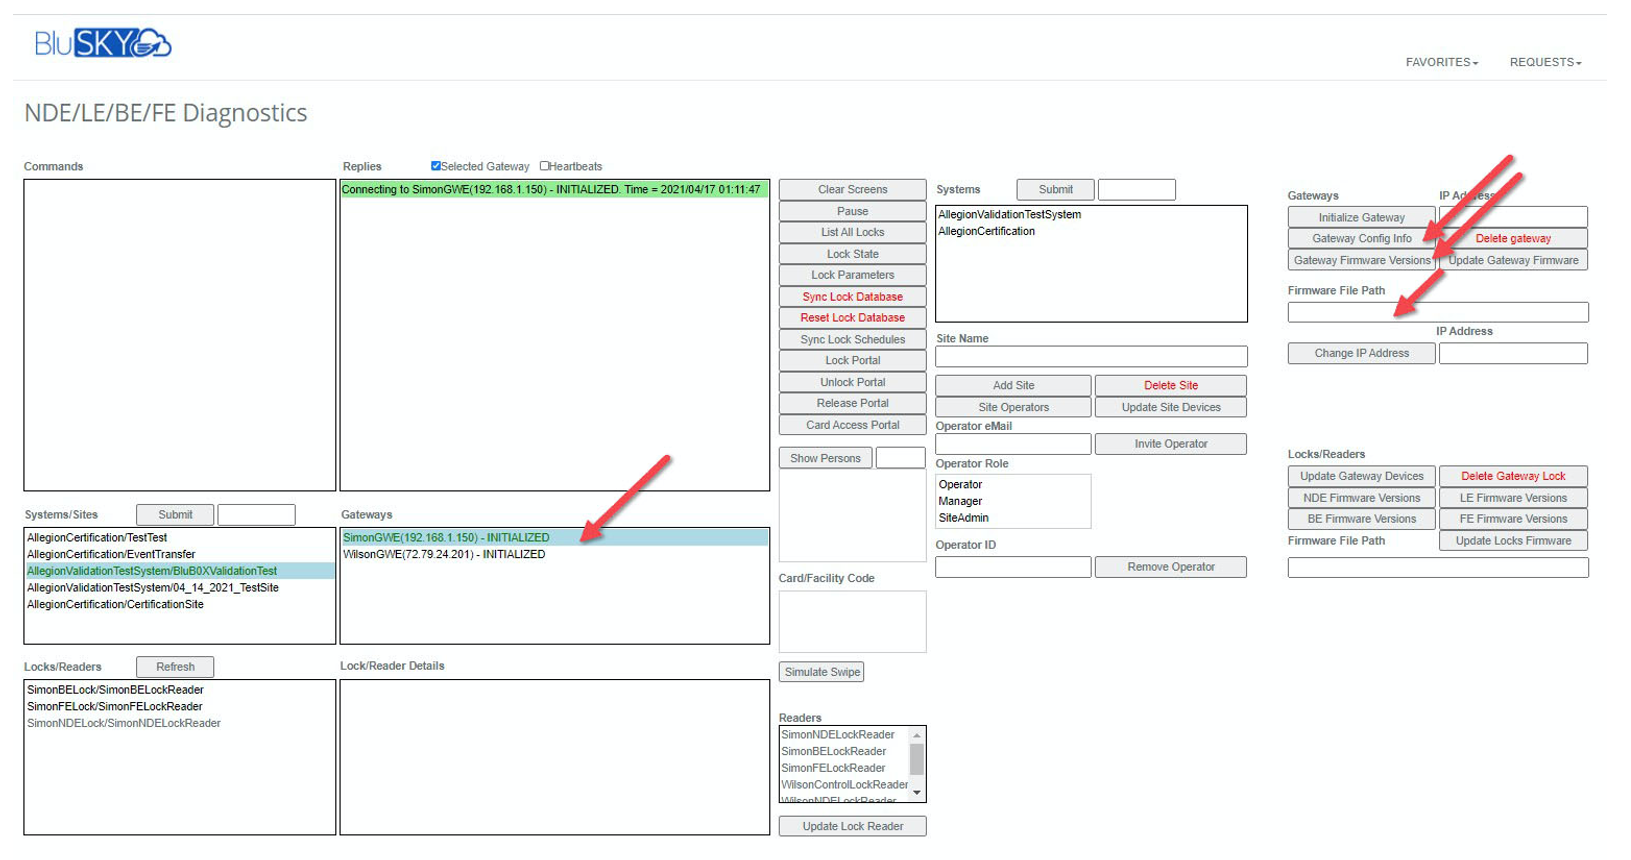
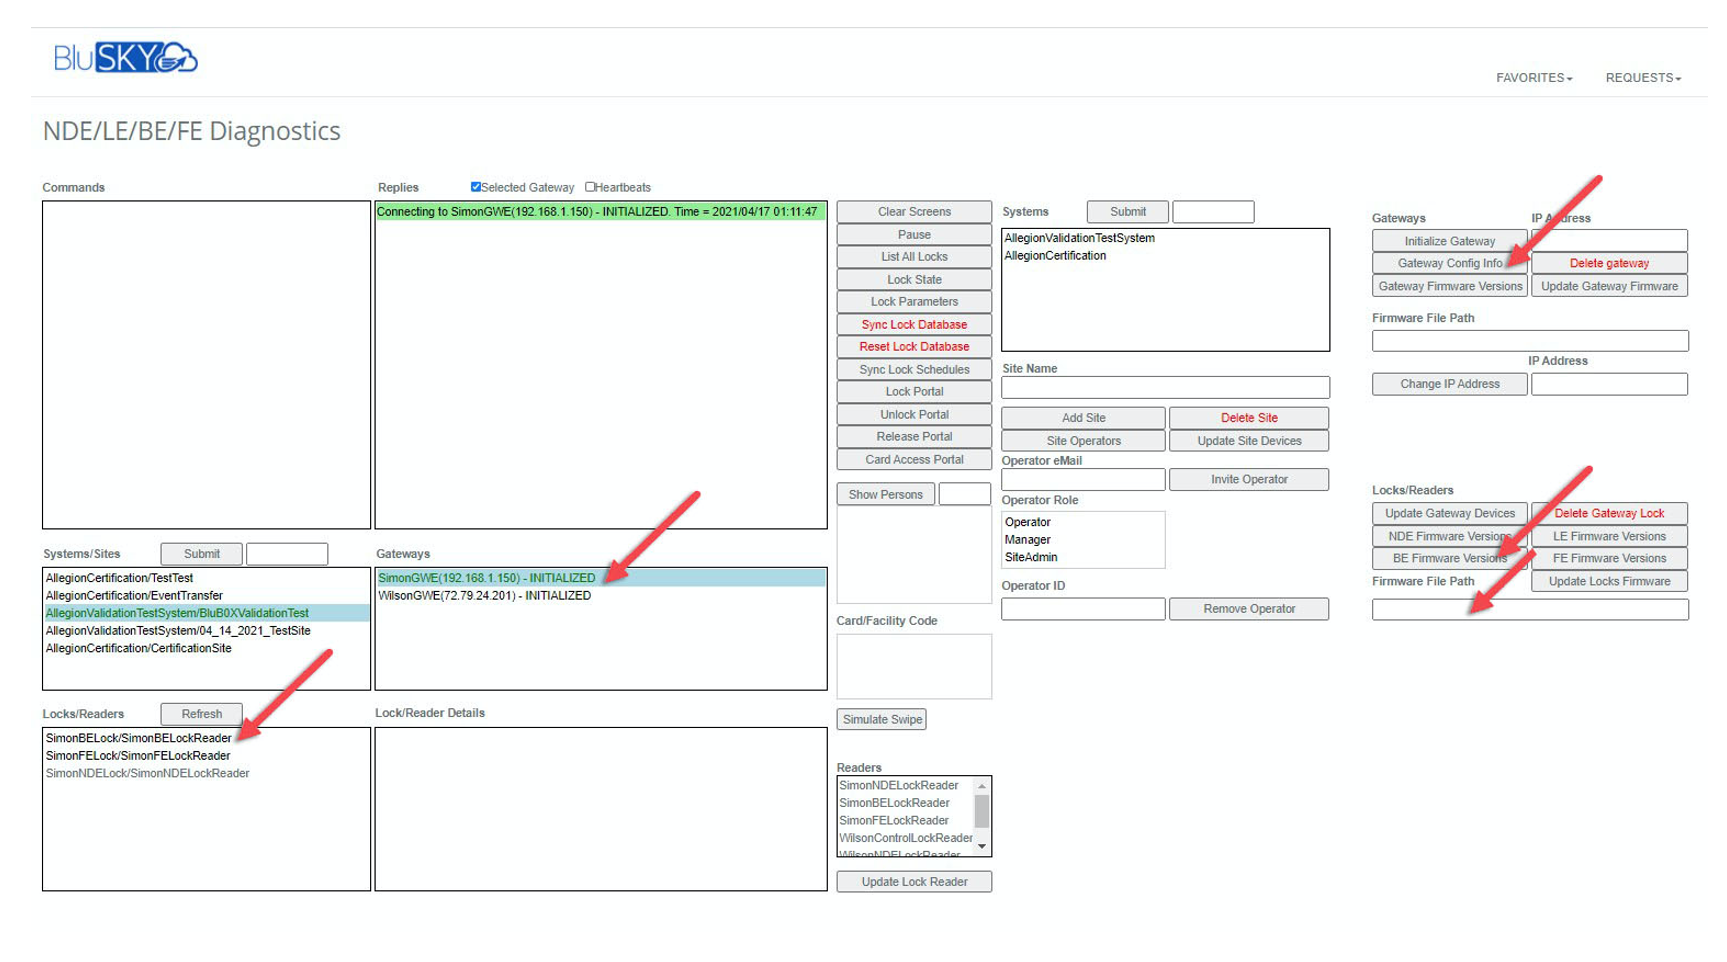
1. Upgrading the firmware of the Gateways and Locks. When a new firmware version is available from Allegion, it's possible to update the firmware from the NDE/LE/BE/FE Diagnostics page.
2. Upgrading the Gateway firmware. In the 'Gateways' selector select the Gateway that you want to Upgrade. Press the 'Gateway Firmware Versions' button to download from Allegion server the links for all current gateway firmware versions. In the 'Firmware File Path' dropdown box select the version you want to use for the upgrade. Press 'Update Gateway Firmware' button. It takes several minutes to upgrade the Gateway. Using 'Gateway Config Info' button you can verify the current firmware version of the selected Gateway.
3. Upgrading the Lock firmware. Highlight the Lock you want to upgrade. Using one of NDE/LE/BE/FE Firmware buttons download the links for all current firmware versions for the selected lock type. From the 'Firmware File Path' dropdown box select the firmware version you want to use. Press 'Update Locks Firmware' button to start the upgrade. This can take a while. You can check the upgrade progress and final firmware version of the locks by pressing the 'Gateway Config Info' button.
Appendix A
Jump back to Add Operator To Site
