Video Old
Live Video Viewer Screen
Screen Overview
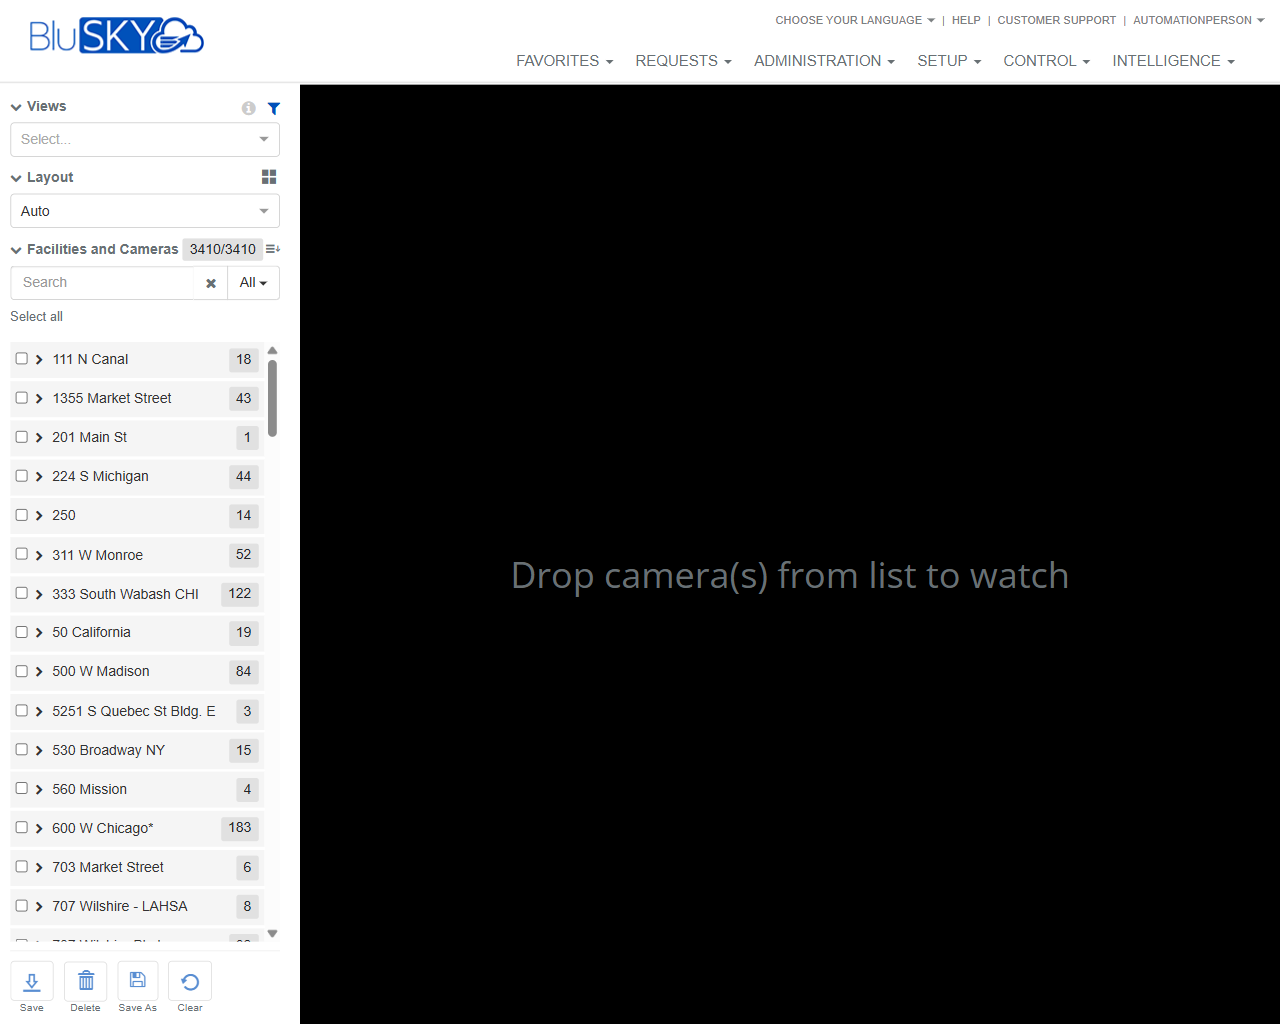
The Live Video Viewer screen allows users to assemble and watch live camera feeds by dragging cameras from a facility list onto a viewing canvas. Users can quickly apply saved Views, choose a tile Layout, search and filter large camera inventories, and save or delete custom Views for future use.
Field Definitions
| Field Label | Definition | Notes |
|---|---|---|
| Views | Dropdown to load a previously saved collection of cameras and layout. | Selecting a view immediately populates the canvas. If none is selected, the canvas is empty until cameras are added. |
| Layout | Dropdown to choose the viewing grid (e.g., Auto or fixed tile counts). | Auto fits the grid to the number of cameras on the canvas. Fixed layouts restrict the number of visible tiles. |
| Facilities and Cameras | Hierarchical list of sites/buildings/floors and their cameras. | Expand nodes to reveal cameras. The header shows a count of displayed/total items (e.g., 3410/3410). |
| Search | Text box to filter the Facilities and Cameras list by name. | Filters as you type. Matches facility and camera names. |
| All (Filter) | Dropdown filter for the camera list (e.g., status or attributes). | Common options include All, Online, Offline; exact choices depend on system configuration. |
| Select all | Checkbox to select all currently visible cameras in the list. | Respects current search and filters. Useful for bulk drag-and-drop. |
| Facility/Location Row | An entry in the list representing a site/building/floor, with an expand arrow. | Click the arrow to expand/collapse. Clicking the row may select/deselect all cameras under that node. |
| Camera Count Badge | Numeric badge on each node showing how many cameras are contained. | Updates as filters/search are applied. |
| Viewing Canvas | Central black canvas where live video tiles appear. | Drag one or more cameras onto this area to begin streaming. Displays “Drop camera(s) from list to watch” when empty. |
| Save | Button to save the current arrangement to the selected View. | Overwrites the currently loaded View. Disabled if no View is selected or you lack permissions. |
| Delete | Button to remove the currently loaded View from the system. | Confirmation is required. Only available when a saved View is loaded and you have permission. |
| Save As | Button to create a new View from the current canvas and layout. | Prompts for a unique View name. Saves without altering the original View. |
| Clear | Button to remove all cameras from the canvas and reset the layout. | Does not delete any saved View. Useful for starting over. |
Screen Actions and Functions
- Load a saved View from the Views dropdown.
- Drag and drop one or more cameras from the list onto the Viewing Canvas to start live video.
- Change the Layout to Auto or a fixed grid.
- Use Search and the All filter to narrow the camera list.
- Expand facilities to reveal nested cameras and use Select all for bulk actions.
- Save to update the currently loaded View with the current layout and camera set.
- Save As to create a new, named View.
- Delete to remove the currently loaded View.
- Clear to empty the canvas and reset.
Usage Instructions & Examples
-
Watch a live camera
- In Facilities and Cameras, expand a location until cameras are visible.
- Drag a camera onto the Viewing Canvas.
- Repeat to add more cameras. Adjust Layout if needed.
-
Build and save a custom multi-camera View
- Set Layout to the grid you want (or leave as Auto).
- Use Search to find cameras (e.g., “Market”).
- Drag all desired cameras onto the canvas.
- Click Save As, provide a unique name, and confirm. Your View will appear in the Views dropdown.
-
Load and modify an existing View
- Choose a View from the Views dropdown.
- Add, remove, or rearrange cameras and adjust Layout.
- Click Save to update the View, or Save As to keep both versions.
-
Quickly populate with many cameras
- Apply Search or the All filter to narrow the list.
- Click Select all.
- Drag the selection to the Viewing Canvas. Set Layout to Auto to fit all cameras.
-
Reset the screen
- Click Clear to remove all cameras from the canvas.
- Optionally select a different View or begin a new arrangement.
System Behaviors and Edge Cases
- Loading a View replaces the current canvas contents.
- In Auto layout, the grid resizes to fit the number of cameras on the canvas; fixed layouts limit visible tiles.
- If you drop more cameras than available tiles in a fixed layout, excess cameras will not be placed until you change the layout or remove tiles.
- Cameras that are offline or unavailable may display a placeholder or error message instead of live video.
- The list only shows cameras the user is authorized to see; unauthorized cameras are hidden.
- Save overwrites the currently loaded View name; Save As always creates a new View.
- Deleting a View requires confirmation and cannot be undone.
- Search and filters apply to the camera list only; they do not affect cameras already on the canvas.
- If no matching items are found in Search, the list shows no results and bulk actions are disabled.
Permissions
- View access requires a role with permission to view live video and at least one entitled camera.
- Creating, updating, or deleting Views requires Manage Views (or equivalent) permission.
- Users without edit permissions can load Views and watch live video but cannot Save, Save As, or Delete.
- Access to specific facilities/cameras is restricted by tenant, site, and camera entitlements.
Linked Workflows
- Configure cameras and locations under Setup > Video > Cameras and Setup > Facilities.
- Grant user camera entitlements under Administration > Roles/Permissions.
- Use video playback or investigation tools (if licensed) to review recorded footage from selected cameras.
- Add commonly used Views to Favorites for quick access.
Reference Image Links