Vendor Admission
Vendor Admission
Screen Overview
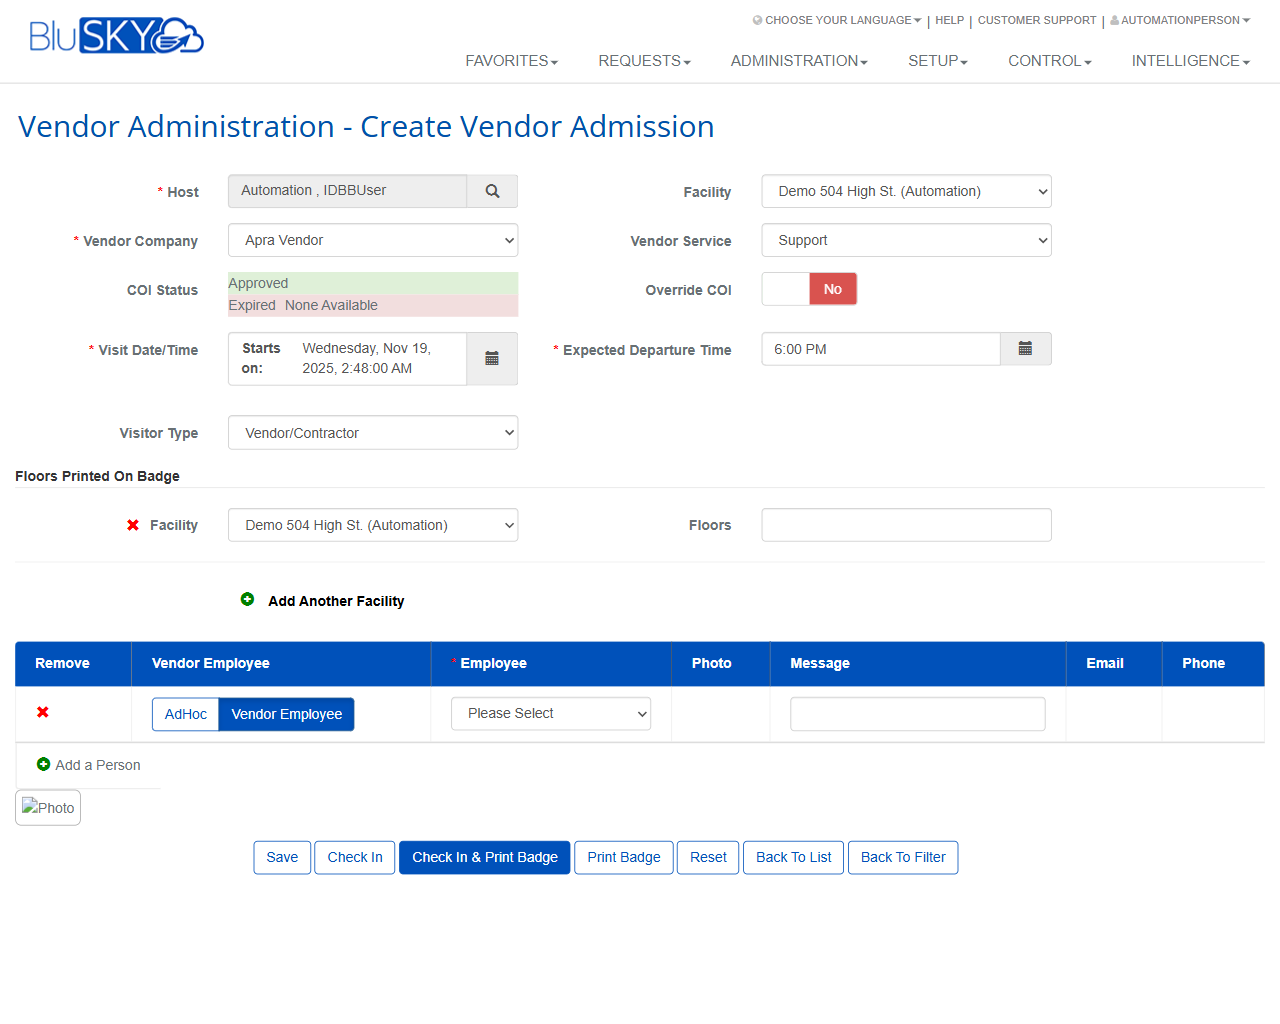
The Vendor Admission screens allow authorized users to search, create, and manage vendor/contractor visits. The List view provides filters and a sortable grid of admissions; the Create view captures visit details, enforces Certificate of Insurance (COI) policy, assigns host and facilities/floors, and supports check-in and badge printing.
Field Definitions
| Field Label | Definition | Notes |
|---|---|---|
| Facilities | One or more facilities used to filter results or to indicate where the visit occurs. | In List Filter it limits search; in Create it defines where the admission applies and where floors can be printed on the badge. Facility choices are limited by the user’s scope. |
| Occupancy | Visit occupancy status used for filtering or shown in the grid (e.g., Onsite/Checked In/Checked Out). | In the grid it reflects live status; in filters select “-- All --” to see every status. |
| Visitor Type | Category of visitor (e.g., Vendor/Contractor). | Filterable in List; selectable on Create. Site administrators control available types. |
| From (Midnight) | Start of the date range for List results. | Defaults to Today at 00:00. Uses the site time zone. |
| To (Midnight) | End of the date range for List results. | Defaults to Today at 23:59:59. Use with From to narrow results. |
| Group Name | Optional grouping field for List results. | Typically groups by Name; leave blank for no grouping. |
| Search | Status filter for List (e.g., Active). | “Active” is the default. |
| View | List visibility scope (e.g., All). | Controls which admissions are shown per role/scope. |
| Search Text | Free‑text search box for List. | Placeholder “Name”; matches across guest name and related fields depending on configuration. |
| Photo | Thumbnail/photo column in the grid and optional photo in Create person row. | Read‑only in List; optional capture/display per person on Create. |
| Guest Name | The name of the visiting vendor employee. | Appears in the grid once a person is added to the visit. |
| Vendor Company | The vendor firm associated with the admission. | Populated on Create and displayed in the grid. |
| Vendor Service | The service being performed by the vendor. | Dropdown on Create (e.g., Support, Maintenance). |
| Badge Printed | Indicates if a badge has been printed for the admission. | Updates to Yes after a successful print. |
| Host | The employee responsible for the visit. | Required on Create; searchable pick‑list. Appears in the grid. |
| Facility | Selected facility for the admission and for badge floor printing. | The UI shows Facility at the header and again within “Floors Printed On Badge.” Both refer to the visit’s facility context. |
| COI Status | Current Certificate of Insurance state for the vendor (e.g., Approved, Expired, None Available). | Read‑only indicator on Create; may gate Check‑In/Print per site policy. |
| Override COI | Allows bypass of COI enforcement for this visit. | Toggle on Create; requires appropriate permission when enabled. |
| Visit Date/Time (Starts on) | Start date and time of the visit. | Defaults to “now” when creating; must be on/after the current time per policy. |
| Expected Departure Time | Anticipated time the vendor leaves. | Time picker; used for occupancy and badge information. |
| Floors Printed On Badge | Section where floors to be printed on the badge are managed. | Section header; floors are informational on the badge and can be multi‑facility. |
| Floors | Text field listing floors to print on the badge for the selected facility. | Accepts comma‑separated values (e.g., “12, 14–16”) per site formatting rules. |
| Access Level | Temporary access assignment shown in the grid (if configured). | Read‑only in List; assignment managed elsewhere or by workflow. |
| Status | Overall admission status (e.g., Scheduled, Checked In, Checked Out, Canceled). | Displayed in the List grid. |
| Status Date | Timestamp of the last status change. | Read‑only in List; system‑generated. |
| Vendor Employee Type | Selector to add either an AdHoc person or an existing Vendor Employee. | Buttons: “AdHoc” or “Vendor Employee.” Determines source of the Employee picker. |
| Employee | The person being admitted under the vendor company. | Required when adding a row; dropdown/search depending on Vendor Employee Type. |
| Message | Optional note for the person’s badge or visit. | Printed on the badge depending on template. |
| Email address for the visiting person. | Used for notifications if enabled. | |
| Phone | Phone number for the visiting person. | Optional; used by reception/security as needed. |
Screen Actions and Functions
-
List and Filter
- Create – Opens the Create Vendor Admission form.
- Submit – Applies the selected filters and refreshes the grid.
- Reset – Clears all filter criteria back to defaults.
- Sort – Click any column header (e.g., Status Date) to sort ascending/descending.
- Open Admission – Click a row to view/edit the admission.
-
Create Vendor Admission
- Save – Saves the admission without changing occupancy.
- Check In – Sets the admission and listed people to Onsite without printing.
- Check In & Print Badge – Checks in and immediately prints badge(s).
- Print Badge – Prints badge(s) without changing status if already checked in.
- Reset – Clears unsaved changes on the form.
- Back To List – Returns to the grid with the current filter results.
- Back To Filter – Returns to the filter panel for adjustments.
- Add Another Facility – Adds another Facility + Floors row to print on the badge.
- Add a Person – Inserts a new person row into the visit.
- Remove (row) – Deletes a person row from the visit.
- Vendor Employee / AdHoc – Toggle the source of the Employee selector for each person row.
Usage Instructions & Examples
-
Find all vendor admissions occurring today
- Open Vendor Admission – List.
- Click the filter icon to reveal filters (if hidden).
- Set From (Midnight) = Today and To (Midnight) = Today.
- Leave Search = Active and View = All.
- Click Submit. Use column headers (e.g., Status Date) to sort results.
-
Create and check in a vendor, then print a badge
- From the List screen, click Create.
- Select Host and confirm Facility and Vendor Company.
- Verify COI Status. If policy allows and you have permission, set Override COI only when necessary.
- Set Visit Date/Time (Starts on) and Expected Departure Time.
- In the person grid, choose Vendor Employee Type (Vendor Employee or AdHoc), then select/enter the Employee. Optionally add Message, Email, and Phone.
- Under Floors Printed On Badge, confirm Facility and enter Floors (e.g., “12, 14”).
- Click Check In & Print Badge to admit and print immediately, or click Save if you are pre-registering.
-
Add multiple facilities for badge floor printing
- On Create, in Floors Printed On Badge, click Add Another Facility.
- Choose the second Facility and enter its Floors.
- Save or proceed with Check In/Print as required.
-
Print a badge for an existing scheduled admission
- In the List, locate the admission and open it.
- Review Host, COI Status, and person details.
- Click Check In (if not already onsite) and then Print Badge.
System Behaviors and Edge Cases
-
COI enforcement
- If COI Status is Expired or None Available and Override COI = No, Check In and/or Print actions may be disabled or blocked depending on site policy.
- Enabling Override COI is audited and may require elevated permission.
-
Date/time handling
- From/To filters evaluate from midnight in the site time zone.
- Starts on cannot be after Expected Departure Time; an error is shown if invalid.
- Multi‑day visits display across the entire range in the List.
-
List grid and counts
- The numeric badge beside the grid header shows the number of returned records.
- Badge Printed updates to Yes only after a successful print event is recorded.
-
People rows
- At least one Employee row is required to Check In or Print.
- AdHoc entries create a visit‑only person; Vendor Employee entries reference the vendor directory.
-
Facilities and floors
- Users only see/select facilities within their assigned scope.
- Floors accept text; formatting rules are enforced by badge templates. Invalid formatting may truncate on the printed badge.
-
Occupancy/status
- Check In sets Status to Checked In (Onsite) and records Status Date.
- Printing without Check In does not alter occupancy unless configured by policy.
-
Sorting and filtering
- Filters persist for the session. Reset restores defaults.
- Sorting on Status Date is descending by default when selected.
Permissions
- Access to Vendor Admission screens is limited to roles authorized for visitor/vendor management (e.g., Global Administrators, Property/Facility Administrators, Front Desk/Reception, Security Operators).
- Create/Edit admissions requires create/edit permissions for Vendor Admissions.
- Check In and Print Badge require check‑in and print permissions.
- Override COI requires a dedicated override permission and is typically restricted to administrators or security leads.
- Facility visibility and actions are constrained by the user’s assigned facility scope.
Linked Workflows
- Vendor Company and Vendor Employee management under Administration/People and Companies feeds the Vendor Company and Employee selectors.
- COI Management: COI documents are uploaded/managed in the vendor profile; their status drives COI Status on the Create screen.
- Access Levels: Temporary access for vendors may be assigned via Access Levels and is reflected in the List grid.
- Badge Templates: Badge layout controls which fields (e.g., Floors, Message, Photo) are printed.
- Host Notifications: Optional email/SMS alerts to hosts on check‑in/check‑out if enabled in system settings.
- Reporting: Admissions roll up into activity/occupancy reports within Intelligence/Reports.
Reference Image Links