Vendors
Vendor Screen
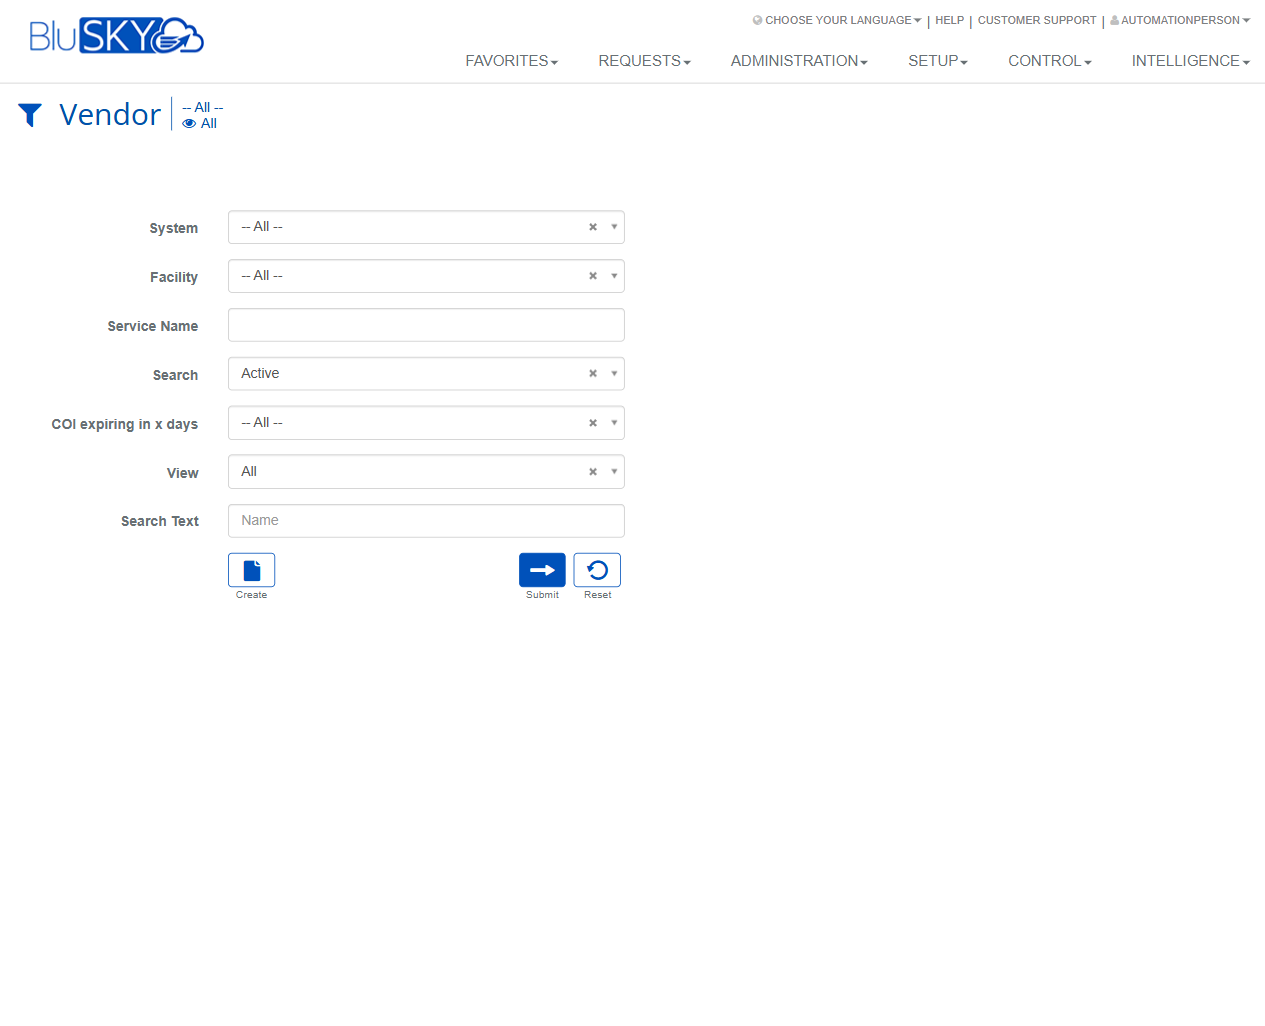
Screen Overview
The Vendor screens let administrators and property teams manage companies that provide services to facilities. From here you can search and filter vendors, review approval status and primary services, create or update vendor records, track Certificate of Insurance (COI) dates and notifications, maintain addresses and contact information, and export vendor lists.
Field Definitions
| Field Label | Definition | Notes |
|---|---|---|
| Vendor Name | Legal or trading name of the vendor. | Required on Create/Edit. Must be unique within your organization. |
| System | The BluSKY system the vendor belongs to. | Appears on both Filter and Create/Edit pages. Selection controls visibility across facilities. |
| Parent Company | The owning or umbrella company for the vendor. | Defaults to “New Non-Global.” Choose an existing parent or keep the default. |
| Vendor Status | The vendor’s lifecycle state (e.g., Pending, Approved). | Drives list filtering and some actions; may be controlled by COI validity policies. |
| Vendor Number | Internal identifier used for accounting or reference. | Optional free text. |
| COI Notification List | Distribution list that receives COI reminder/expiry emails. | Select an existing list or click “Create New” to build one. |
| COI Start Datetime | Start of the vendor’s active COI coverage. | Must be before COI End Datetime. Uses local time zone shown beside the field. |
| COI End Datetime | Expiration of the vendor’s COI coverage. | Used by filters and notifications; cannot be earlier than Start. |
| Public Notes | Free‑form notes visible to authorized users. | Optional. |
| Email Address Formula | Pattern to auto-generate contact emails plus domain entry. | Choose a format (e.g., first.last) and enter the domain to the right of “@”. |
| Address 1 | Primary street address line. | Required. |
| Address 2 | Additional address line (suite, floor, etc.). | Optional. |
| City | City of the vendor address. | Required. |
| Postal Code | ZIP/postal code. | Required. |
| Country | Country for the address. | Required; dropdown. |
| Region | State/Province/Region. | Required; options depend on Country. |
| Time Zone | Time zone associated with the vendor location. | Required; used for COI time fields and notifications. |
| Website | Vendor website URL. | Optional. |
| Map (Show Map) | Displays a map preview of the entered address. | Read-only utility; assists with validation. |
| Name (List Column) | Vendor name shown in the result grid. | Click a row to select for actions such as View/Edit. |
| Approval Status (List Column) | Current approval state of the vendor. | Mirrors “Vendor Status.” |
| Primary Service (List Column) | The vendor’s main service category. | May be blank if no service is assigned. |
| Facility | Filter for one or more facilities. | Multi-select; limits the result grid to chosen facilities. |
| Service Name | Filter for vendors by service category. | Optional; narrows to vendors providing a specific service. |
| Search | Quick status filter (e.g., Active, Inactive, All). | Defaults to Active. |
| COI expiring in x days | Shows vendors with COI expiring within the chosen window. | Useful for compliance follow-up. |
| View | Result view scope (e.g., All). | Availability depends on role; determines which vendor set you see. |
| Search Text | Free-text search across vendor Name. | Enter part or full name, then Submit. |
Screen Actions and Functions
- Create – Opens the Create Vendor form from the list or filter pages.
- View – Opens the selected vendor in read-only mode.
- Edit – Opens the selected vendor for modification.
- Delete – Removes the selected vendor record from active use. May be a soft delete depending on policy.
- Export – Exports the current list (with filters applied) to a downloadable file.
- Submit – Applies the selected filter criteria and refreshes the vendor grid.
- Reset – Clears all filter criteria back to defaults.
- Save – Saves changes on Create/Edit.
- Back To List – Returns from Create/Edit to the vendor list.
- Back To Filter – Returns from Create/Edit to the filter screen.
- Show Map – Displays a map preview of the entered address.
- Add Email / Add Phone / Add Intercom – Adds contact methods for the vendor record.
- Create New (within COI Notification List) – Launches distribution list creation and links it to the vendor.
Usage Instructions & Examples
- Find active vendors with expiring COI and export
- Go to the Vendor filter screen.
- Set Facility to the desired location(s).
- Set Search to Active.
- Set COI expiring in x days to the needed window (e.g., 30).
- Click Submit to refresh results.
- Click Export to download the filtered list.
- Create a new vendor
- From the Vendor list or filter screen, click Create.
- Enter Vendor Name.
- Select System and, if applicable, Parent Company.
- Choose Vendor Status (leave as Pending if awaiting approval).
- (Optional) Enter Vendor Number and Public Notes.
- Set COI Start Datetime and COI End Datetime.
- Select a COI Notification List or click Create New to build one.
- Complete Address 1, City, Postal Code, Country, Region, and Time Zone; add Website if available. Use Show Map to verify the address.
- Choose an Email Address Formula and enter the domain part to the right of “@”.
- Click Add Email/Phone/Intercom to capture contact details as needed.
- Click Save. Use Back To List to return to the grid.
- Approve an existing vendor
- On the Vendor list, select the vendor row and click Edit.
- Verify that COI Start/End Datetime are valid and not expired.
- Change Vendor Status to Approved.
- Save. The Approval Status column will show Approved.
System Behaviors and Edge Cases
- Required fields are marked with a red asterisk; Save is blocked until all required fields are completed.
- COI Start Datetime must be earlier than COI End Datetime. If not, the system prevents saving.
- Some organizations prevent setting Vendor Status to Approved when COI End Datetime is in the past.
- The Show Map function is read-only; it does not save or geocode the address automatically.
- Filters are sticky during the session; Export respects the currently applied filters.
- List actions (View, Edit, Delete) enable only when exactly one row is selected and the user has permission.
- The action bar may show fewer buttons based on role or selection state (e.g., only Create and Export if you lack edit rights).
- Multi-select filters display selected values with an “x” to remove each item.
- Primary Service may display blank if the vendor has no service category assigned.
- Email Address Formula requires both a selected pattern and a domain. If either is missing, auto-generated emails will not be created.
Permissions
- View vendor records: users with VendorView (or equivalent read) permission.
- Create vendors: VendorCreate permission.
- Edit vendors: VendorEdit permission.
- Delete vendors: VendorDelete permission.
- Export list: VendorExport or DataExport permission.
- Manage COI notification lists: DistributionListManage (or equivalent) permission.
- Access to specific Systems/Facilities is further constrained by the user’s scope assignments.
Linked Workflows
- Service management: Vendors can be tied to service categories used in work orders or service call requests.
- COI compliance: COI dates feed notification workflows to the assigned distribution list for upcoming expirations.
- Contact management: Added vendor contacts can be referenced in communication templates and request routing.
Reference Image Links