Vendor Invitation
Vendor Invitation – Create
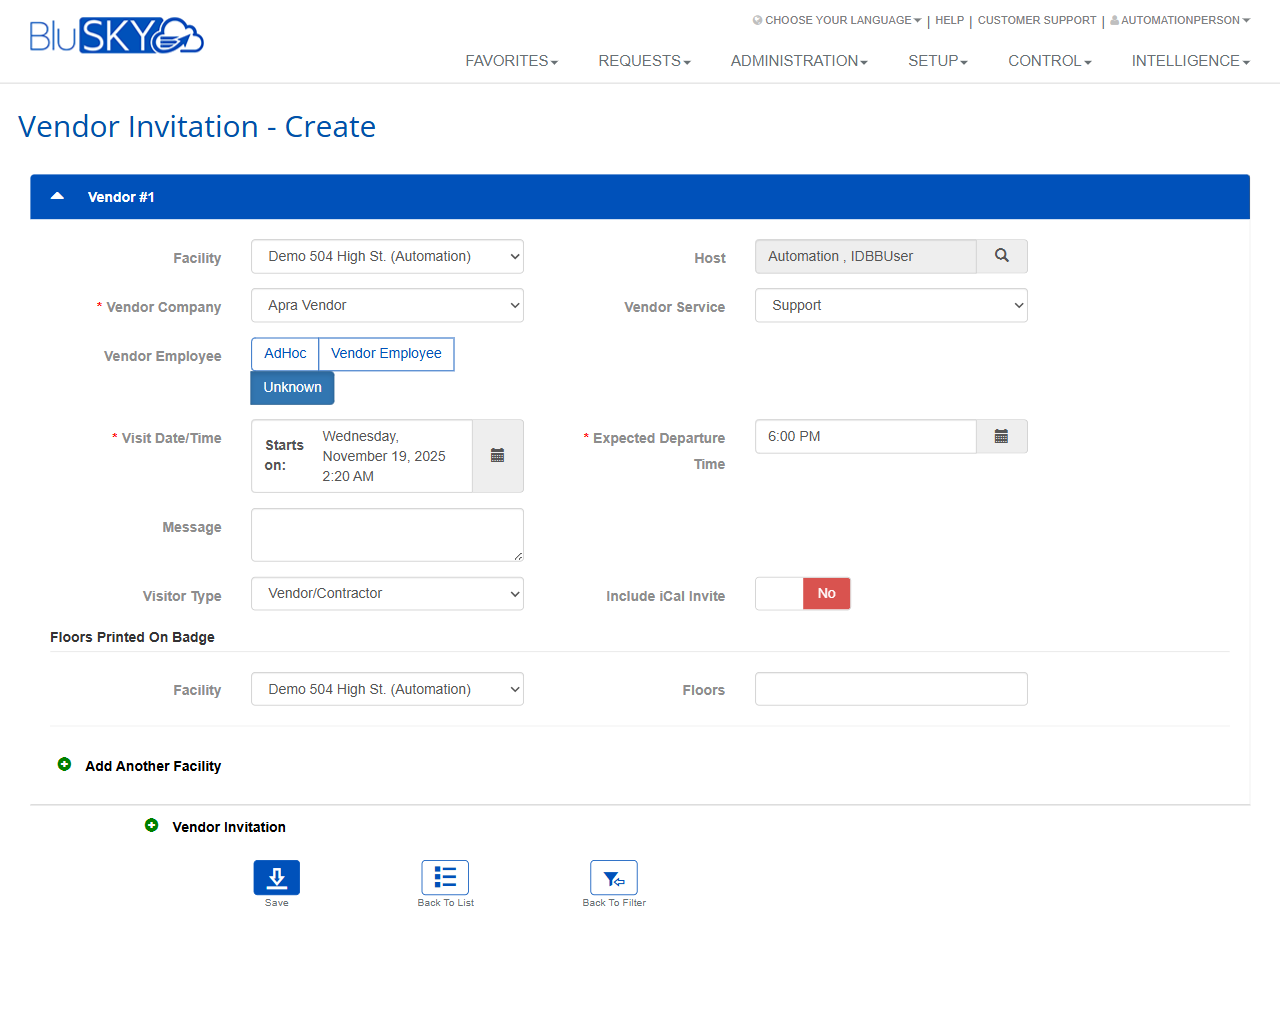
Screen Overview
The Vendor Invitation – Create screen lets authorized users create and send invitations for vendor or contractor visits to a facility. Users define visit details (host, company, service, dates/times), optional messaging, badge floor printing, and whether to include an iCal calendar invite. Multiple facilities and multiple vendor invitations can be added in a single session.
Field Definitions
| Field Label | Definition | Notes |
|---|---|---|
| Facility | Facility where the vendor will visit. | Dropdown. Sets the location context for the invitation. |
| Host | Person within the organization who is hosting the vendor. | Lookup field with search icon to find/select a host. |
| Vendor Company | The company name of the visiting vendor. | Required (marked with “*”). Dropdown or selectable list. |
| Vendor Service | The service or purpose provided by the vendor. | Dropdown (e.g., Support). Used for reporting/notifications. |
| Vendor Employee | Classification/selection method for the visiting vendor employee. | Options visible: AdHoc, Vendor Employee, Unknown. Selection may influence downstream data capture. |
| Visit Date/Time | Start date and time of the visit. | Required (marked with “*”). Date/time picker. |
| Expected Departure Time | Planned time the vendor will depart. | Required (marked with “*”). Time-only picker for the same visit date. |
| Message | Optional note included with the invitation. | Multiline text. Appears in notifications where configured. |
| Visitor Type | Type of visitor associated with the invitation. | Displays Vendor/Contractor. Typically a dropdown; defaults may be tenant-defined. |
| Include iCal Invite | Toggles inclusion of a calendar (iCal) invite with notifications. | Yes/No switch. Set to No by default in the screenshot. |
| Facility (Badge Floors) | Facility context for floors to print on the visitor badge. | Located in the “Floors Printed On Badge” section. |
| Floors (Badge Floors) | Floor numbers to print on the visitor’s badge. | Free text; enter floor numbers (e.g., “5, 7, 9”). Located in the “Floors Printed On Badge” section. |
Screen Actions and Functions
- Save – Saves the invitation(s).
- Back To List – Returns to the Vendor Invitation list view without saving changes.
- Back To Filter – Returns to the previous filtered result set.
- Add Another Facility – Adds another Facility + Floors pair for badge printing.
- Vendor Invitation (Add) – Adds a new vendor block (e.g., Vendor #2) to include multiple invitations in one operation.
- Host Search (magnifier) – Opens a lookup dialog to find/select a host.
Usage Instructions & Examples
- Create a single vendor invitation
- Select Facility.
- Use Host search to choose the host.
- Choose Vendor Company and Vendor Service.
- Select Vendor Employee option as appropriate.
- Set Visit Date/Time (start) and Expected Departure Time.
- (Optional) Enter a Message and adjust Visitor Type.
- Toggle Include iCal Invite to Yes if you want recipients to receive a calendar invite.
- Click Save.
- Print specific floors on the visitor badge
- In Floors Printed On Badge, confirm the Facility.
- Enter Floors to print (e.g., 3, 12).
- (Optional) Click Add Another Facility to add floor lists for additional facilities.
- Click Save.
- Add multiple vendor invitations in one session
- Click Vendor Invitation (Add) to create Vendor #2 (and more as needed).
- Complete the fields for each vendor block.
- Click Save to create all invitations together.
System Behaviors and Edge Cases
- Fields marked with “*” are required; Save is blocked until they are completed.
- Expected Departure Time cannot be earlier than the start time on the selected date; the system will prompt for correction.
- Include iCal Invite = Yes adds an iCal attachment to invitation notifications (subject to tenant notification settings).
- Adding multiple facilities under Floors Printed On Badge affects only what is printed on badges; it does not change the invitation Facility at the top of the form.
- Using Vendor Invitation (Add) creates additional vendor blocks (Vendor #2, #3, etc.); all are saved together.
- Leaving Floors blank results in no floors printed on the badge for that facility entry.
Permissions
- Access typically granted to Tenant Administrators, Reception/Front Desk users, Security Operators, and designated Hosts as configured by the tenant.
- Create/edit rights required to save invitations.
- Some tenants may restrict Host lookup to the user’s facility or organization.
- iCal/notification delivery depends on the user’s notification permissions and tenant email settings.
Linked Workflows
- Visitor Check-In: Saved invitations can be used at kiosks or security desks to check in vendor/contractor visitors.
- Badge Printing: Floor data entered in Floors Printed On Badge prints on the visitor’s badge during check-in.
- Invitation Management: After saving, manage or track invitations from the Vendor Invitation list (Back To List) or refine searches from the filter page (Back To Filter).
Reference Image Links