People
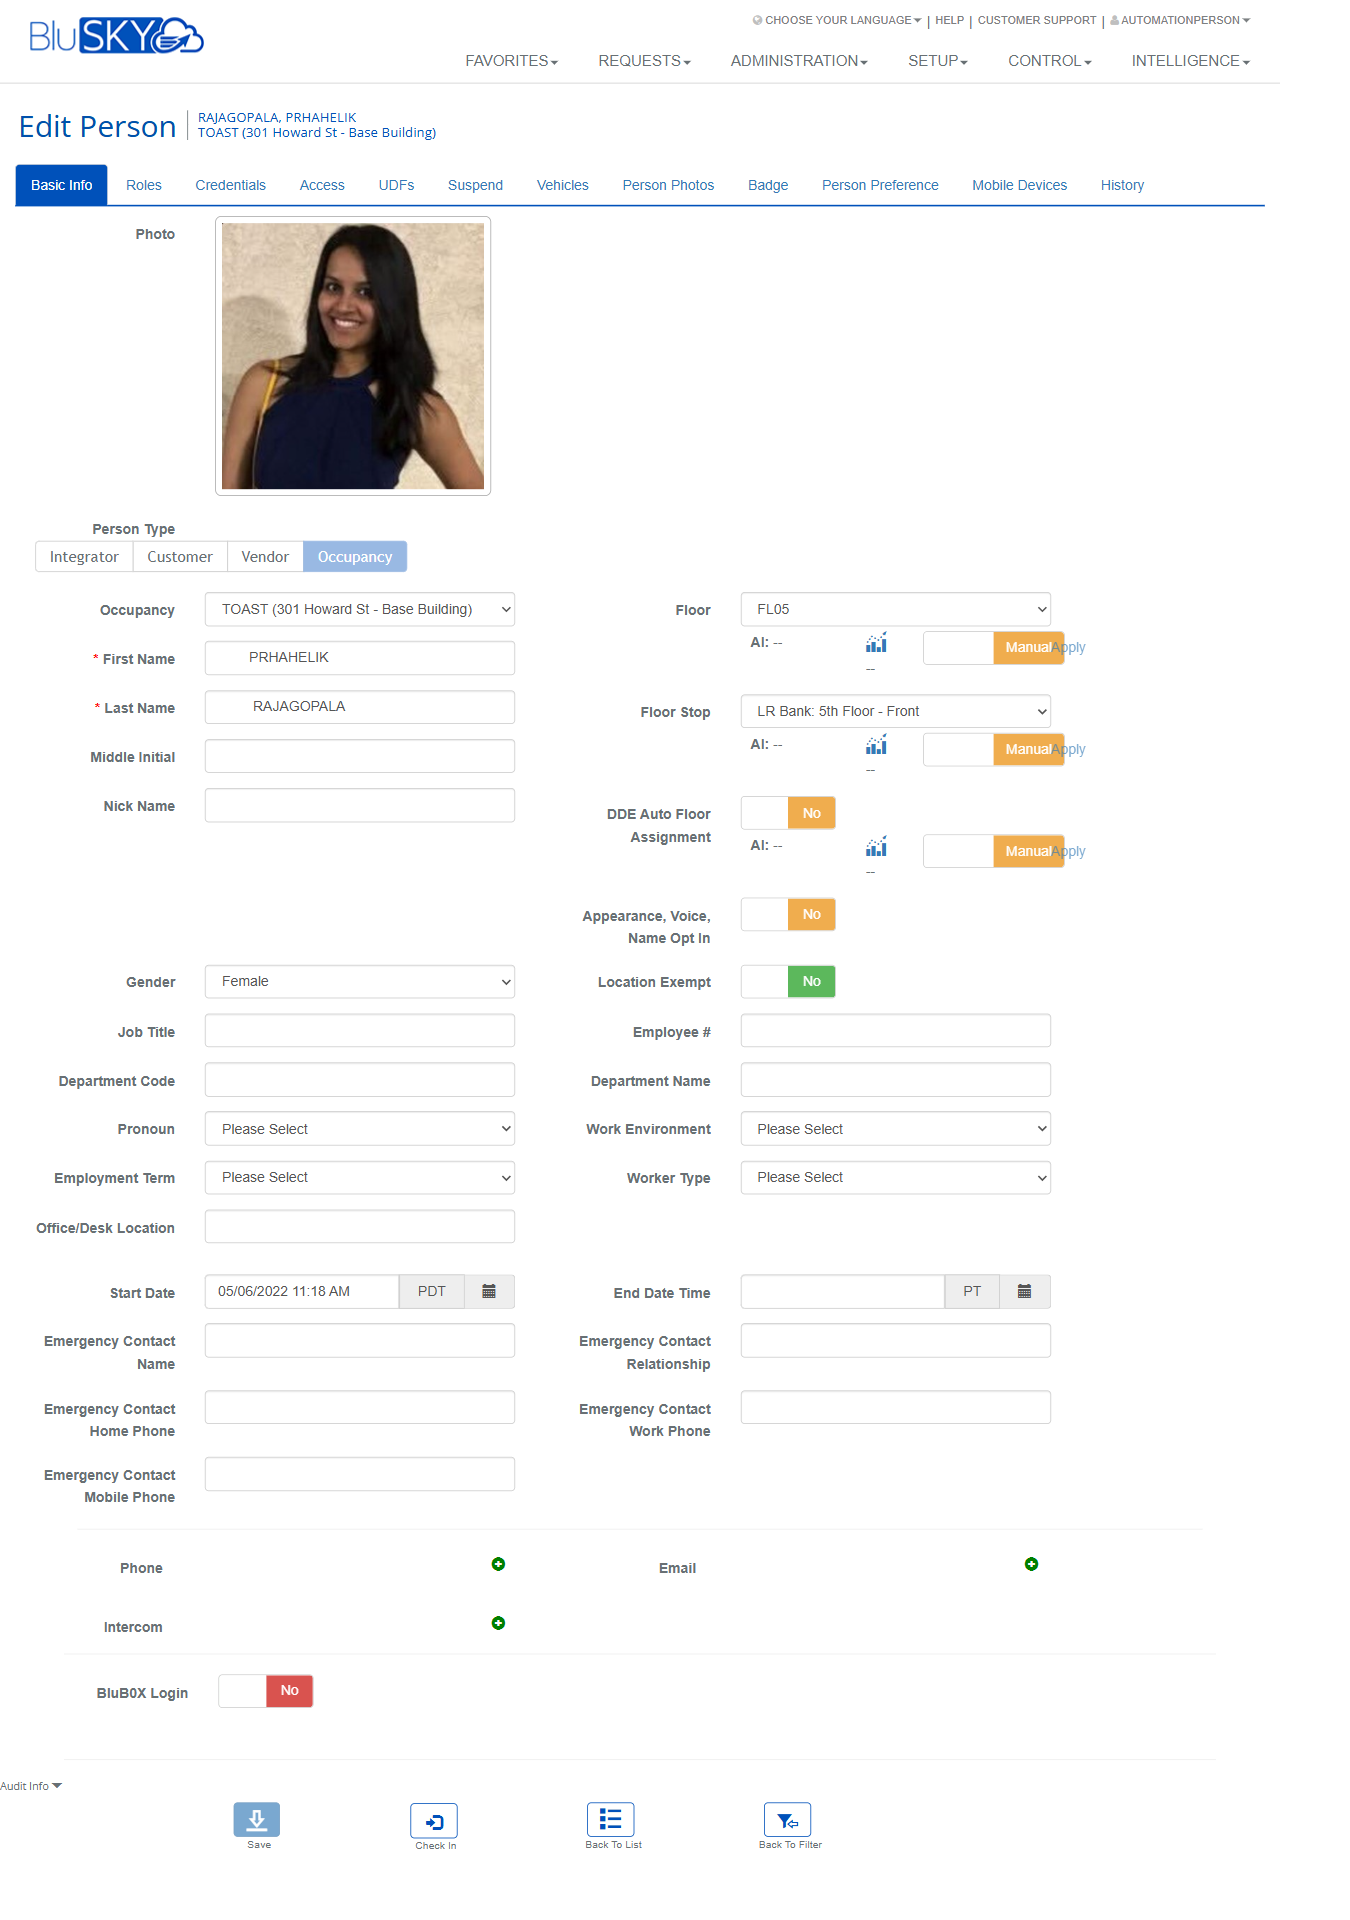
Edit Person
Screen Overview
The Edit Person screen is the central workspace for viewing and maintaining a single person’s record in BluSKY. From here, administrators can update core profile information, assign roles, issue physical and mobile credentials, grant or revoke access levels, upload photos, print badges, manage preferences, register mobile devices, apply suspensions, associate vehicles, and review full audit history.
Field Definitions
| Field Label | Definition | Notes |
|---|---|---|
| Photo | Current profile image displayed on the Basic Info tab. | Used on badges, directories, and UI. |
| Person Type | Categorization tabs: Integrator, Customer, Vendor, Occupancy. | Determines available fields and defaults. |
| Occupancy | Company/site the person belongs to. | Drives default floors, access, and templates. |
| First Name | Person’s legal first name. | Required. |
| Last Name | Person’s legal last name. | Required. |
| Middle Initial | Middle initial. | Optional. |
| Nick Name | Preferred display name. | Optional; may appear on badge depending on template. |
| Floor | Default floor associated to the person. | Used by elevator/floor features. |
| Floor Stop | Default elevator floor stop. | Works with Destination Dispatch Elevator (DDE). |
| DDE Auto Floor Assignment | Enables automatic floor assignment for DDE. | Yes/No; supports AI and Manual apply. |
| Appearance, Voice, Name Opt In | Consent to use appearance/voice/name. | Yes/No toggle. |
| Location Exempt | Excludes the person from location-based features/reporting. | Yes/No toggle. |
| Gender | Gender selection. | Optional; for reporting/personalization. |
| Job Title | Person’s title. | Optional. |
| Department Code | Code for department. | Optional. |
| Department Name | Department name. | Optional. |
| Pronoun | Preferred pronoun. | Optional. |
| Employee # | Internal employee identifier. | Used in search and integrations. |
| Work Environment | Work arrangement (e.g., onsite, hybrid). | Optional. |
| Employment Term | Employment type or term. | Optional. |
| Worker Type | Worker classification. | Optional. |
| Office/Desk Location | Desk or office details. | Optional. |
| Start Date | Employment/start date and time. | May drive access activation. |
| End Date Time | End date/time for record. | Past dates may trigger deactivation. |
| Emergency Contact Name | Primary emergency contact. | Optional. |
| Emergency Contact Relationship | Relationship to the person. | Optional. |
| Emergency Contact Home Phone | Home phone for emergency contact. | Optional. |
| Emergency Contact Work Phone | Work phone for emergency contact. | Optional. |
| Emergency Contact Mobile Phone | Mobile phone for emergency contact. | Optional. |
| Phone | Contact phone entry. | Type selector, number, and Default toggle (on Create). |
| Contact email entry. | Type selector, address, and Default toggle (on Create). | |
| Intercom | Intercom/door phone credentials. | Extension, User Name, Password. |
| BluB0X Login | Enables a BluSKY login account. | Yes/No; shows User Name, Password, Confirm Password on Create. |
| Roles (tab) | Role membership for the person. | Use Add Role to assign. |
| Credentials: View | Filter for credential view (e.g., Assigned). | Affects the credential panel list. |
| Allow BluID | Allows BluID mobile credential issuance. | Requires BluID service. |
| Allow HIDMobile | Allows HID Mobile Access. | Requires HID integration. |
| Allow Apple Wallet | Allows Apple Wallet credential. | Requires supported readers/tenants. |
| Allow Google Wallet | Allows Google Wallet credential. | Requires supported readers/tenants. |
| Card [n] | Credential container panel. | Each card has the fields below. |
| Credential Type | Technology type (e.g., Proximity). | Pick correct technology for card. |
| Card Type | Specific format (e.g., 37 bit with Facility Code). | Must match card format. |
| Issue Code | Card issue number. | Often “0” unless using incremental issues. |
| External Card Number | Printed/external number on the card. | Typically entered/scanned. |
| Internal Card Number | Calculated/used by system. | Copy External button can mirror External value. |
| Facility Code | Site/facility code associated with the card. | Required for many proximity formats. |
| Serial Number | Card serial as read by an unencrypted reader. | Prompts: “Please scan card using unencrypted reader.” |
| PIN # | Numeric PIN associated with the person/card. | Optional; for keypad readers. |
| Start Date Time (Card) | Activation date/time for this credential. | Leave blank for immediate activation. |
| End Date Time (Card) | Expiration date/time for this credential. | Required for temporary cards. |
| Number Of Card Uses | Usage limit before credential deactivates. | Blank = unlimited. |
| Public Notes | Free-form notes about the credential. | Visible to authorized users. |
| User Flag | Status flag (e.g., Active Cardholder Record). | Controls usage and reporting. |
| Allow Access To Locked Door | Overrides for locked doors. | Yes/No; use with caution. |
| Remove From Database | Deletes the specific credential record. | Button within each card panel. |
| Add (Credentials) | Adds another credential panel. | Button at the bottom of Credentials tab. |
| Access: View | Filter for the access grid (e.g., Assigned). | Controls which grants are shown. |
| Include/Remove | Row selector to include or remove an access item. | Red minus indicates removable. |
| BLUREMOTE | Remote control defaults per access row. | All/None/Default per item. |
| Access Type | Type of grant (Access Level or Access Level Group). | Display-only in grid. |
| Name (Access) | Name of the level or group. | Display-only in grid. |
| Schedule Name | Schedule associated to the grant. | Display-only in grid. |
| Access Rights Granted Start | Grant start timestamp. | Display-only unless editing the grant. |
| Access Rights Granted End | Grant end timestamp. | Display-only unless editing the grant. |
| Inserted By | User who granted access. | Read-only. |
| Date Inserted | When grant was created. | Read-only. |
| Add Access Level(s) | Opens selector to add one or more access levels. | Button under grid. |
| Add Access Level Group(s) | Opens selector to add groups. | Button under grid. |
| UDFs | User Defined Fields area. | Content varies per tenant; may be empty. |
| Suspend Access Rights: Start Date Time | Start of access suspension. | Temporarily disables physical access. |
| Suspend Access Rights: End Date Time | End of access suspension. | Access auto-restores after this time. |
| Suspend BluB0X Website Access: Start Date Time | Start of portal login suspension. | Blocks application login. |
| Suspend BluB0X Website Access: End Date Time | End of portal login suspension. | Login auto-restores after this time. |
| Vehicles | Person-associated vehicles. | Use Add to create new vehicle entries. |
| Available Photos | Thumbnails of existing photos. | Click to select default if supported. |
| Upload Via File | Photo upload method from file. | Radio option. |
| Upload Via Camera | Photo capture method via camera. | Radio option (browser permissions required). |
| File | File picker for photo upload. | Accepts common image formats. |
| Auto ID | System-generated image identifier. | Read-only after upload. |
| MFA ID | Multi-factor image identifier. | Read-only after upload. |
| Upload | Commits selected photo to the profile. | Button on Person Photos tab. |
| Badge Design | Template dropdown used to render the badge. | Choose an available badge template. |
| Set Badge Template | Applies the selected badge template. | Updates preview below. |
| Badge Preview | Live rendering of the person’s badge. | Reflects template, name, and photo. |
| Send To Printer | Sends current badge to the configured printer. | Requires badge printer integration. |
| Preferences: Time Zone | Preferred time zone for this person. | Impacts time displays/notifications. |
| Preferences: DDE Auto Floor Assignment | DDE auto-assignment toggle with AI/Manual. | Apply to commit changes. |
| Preferences: Inactivity seconds after video switches to live | Delay before UI returns after live video. | Numeric seconds. |
| Mobile Devices: Device Model | Registered device model. | Populates when device is enrolled. |
| Bluetooth MAC Address | Device Bluetooth MAC. | Read-only. |
| Bluetooth Version | Device Bluetooth version. | Read-only. |
| Mobile OS | Device operating system. | Read-only. |
| OS Version | Mobile OS version. | Read-only. |
| Date Inserted (Device) | When the device was first seen/added. | Read-only. |
| Date Updated (Device) | Last update time for device info. | Read-only. |
| Delete (Device) | Removes selected mobile device record. | Button at bottom of Mobile Devices tab. |
| History Entry Type | Filter for history entries. | Dropdown above the audit grid. |
| History: Action | Action category (e.g., Access, Card, Photo). | Read-only. |
| History: Description | Detailed description of the event. | Read-only. |
| History: Action Performed By Person | User who performed the action. | Read-only. |
| People List: Last Name | Column on People list. | Sortable. |
| People List: First Name | Column on People list. | Sortable. |
| People List: Nick Name | Column on People list. | Sortable. |
| People List: Photo | Column showing photo indicator. | Click to view profile. |
| People List: Email | Column showing email. | Clickable when present. |
| People List: Entity | Column showing organization. | Sortable. |
| People List: Status | Active/Inactive/Unknown. | Sortable; search filter available. |
| People List: Type | Person type classification. | Sortable. |
| People Filter: Facility | Filter by facility. | Multi-select with “-- All --”. |
| People Filter: Entity | Filter by entity. | Multi-select. |
| People Filter: Floor | Filter by floor. | Multi-select with “-- All --”. |
| People Filter: Role | Filter by role. | Multi-select with “-- All --”. |
| People Filter: Search | Status filter (Active/Inactive/etc.). | Dropdown. |
| People Filter: View | Result layout (Simple, etc.). | Dropdown. |
| People Filter: Search Text | Free text search (e.g., name, floor). | Text box. |
| People Filter: Search Card | Search by internal/external card number. | Text box. |
| People Filter: Search Employee # | Search by employee number. | Text box. |
| People Filter: Search Email | Search by email address. | Text box. |
Screen Actions and Functions
- Save – Commits all changes on the current tab.
- Cancel – Reverts unsaved changes on the current tab.
- Back To List – Returns to the People list while preserving the selected person context.
- Back To Filter – Returns to the last-used People filter.
- Add Role – Opens selector to assign a role to the person.
- Credentials: Add – Adds a new credential panel to issue another card.
- Credentials: Remove From Database – Deletes the specific credential record.
- Send To Printer – Prints the current badge using the selected badge design.
- Upload – Uploads the selected/captured photo to the profile.
- Add Access Level(s) – Assigns one or more access levels to the person.
- Add Access Level Group(s) – Assigns one or more access level groups.
- Delete (Mobile Device) – Removes a selected device from the Mobile Devices tab.
- Suspend: Save – Applies suspensions for physical access and/or website access.
- People List: Create – Opens Create Person.
- People List: View / Edit – Opens view or edit for the selected person.
- People List: Assign / Revoke – Shortcuts to grant or revoke access.
- People List: Check In – Initiates check-in workflow for the selected person.
- People List: Delete – Removes a person record (subject to permissions).
- People List: Access – Opens Access tab for the selected person.
- People List: Login – Manages login for the selected person.
- People List: Export – Exports the current People list view.
- People Filter: Submit – Runs the search with current criteria.
- People Filter: Reset – Clears all filters to defaults.
- People Filter: Employee One Day Pass – Launches one-day pass workflow.
Usage Instructions & Examples
- Update Basic Information
- From People list, select a person and click Edit.
- On the Basic Info tab, update fields such as Occupancy, Floor, Job Title, and contact details.
- Optionally toggle BluB0X Login and set credentials (on Create) or leave as No.
- Click Save.
- Issue a Physical Card
- Go to the Credentials tab.
- Verify Allow BluID/HIDMobile/Wallet toggles as needed for this person.
- In Card 1, choose Credential Type and Card Type.
- Enter External Card Number and Facility Code. Click Copy External to populate Internal Card Number, or scan to fill Serial Number.
- Set Start/End Date Time if needed and optionally set PIN #.
- Click Save.
- Assign Access Levels
- Open the Access tab (View = Assigned by default).
- Click Add Access Level(s) or Add Access Level Group(s).
- Select desired items and confirm.
- Optionally adjust BLUREMOTE defaults per row.
- Click Save.
- Suspend a Person’s Access
- Open the Suspend tab.
- Under Suspend Access Rights, set Start Date Time and End Date Time.
- Optionally suspend BluB0X Website Access for the same or different period.
- Click Save.
- Upload a Photo and Print a Badge
- Go to Person Photos tab.
- Choose Upload Via File (or Upload Via Camera), select a File, then click Upload.
- Open the Badge tab, choose a Badge Design, click Set Badge Template.
- Review the Badge Preview, then click Send To Printer.
- Add a Role
- Open the Roles tab.
- Click Add Role and select the appropriate role.
- Click Save.
- Review History
- Open the History tab.
- Optionally filter by History Entry Type.
- Review Action, Description, and who performed the change.
System Behaviors and Edge Cases
- Required fields: First Name and Last Name are required to save a person. Additional required fields may appear based on tenant configuration.
- Card number handling: Internal Card Number can be auto-set via Copy External; formats must match the selected Card Type and Facility Code or saving will fail.
- Serial Number scanning: For certain technologies, Serial Number requires an unencrypted reader; otherwise the field remains empty.
- Activation/expiration: Card and Access grant Start/End Date Times control effective permissions. Expired credentials remain listed but will not grant access.
- Suspensions: Access Rights suspension overrides otherwise valid credentials and access levels within the suspension window. Website Access suspension blocks portal login only.
- Digital wallets: Allow BluID/HIDMobile/Apple Wallet/Google Wallet toggles appear only if the integration is enabled for the tenant/facility. Provisioning may occur asynchronously after Save.
- BLUREMOTE defaults: All/None/Default buttons affect remote-point permissions tied to the selected access item; settings are defined by the access type and may not be editable per point.
- Badge preview: Uses the selected Badge Design and current photo; if photo is missing, preview may show a placeholder or fail to print depending on template rules.
- UDFs: The UDFs tab may be empty if no user-defined fields are configured for the tenant.
- Mobile Devices: The grid typically populates automatically when the person enrolls or signs in with a supported mobile credential app; manual entry is not supported.
- History: Every create, update, role change, access change, credential action, and photo upload is logged with timestamp and actor for full auditability.
- Navigation state: Back To Filter returns to the last-applied People filters; Reset on the filter page clears them.
- End Date Time on Basic Info: Setting a past end date may change the person’s Status to Inactive after save, based on tenant rules.
- Deletion: Removing a credential via Remove From Database immediately revokes its use; deleting a person may be soft-delete and restricted by permissions.
Permissions
- Access to Edit Person requires a role with PeopleView and PeopleEdit privileges.
- Issuing or modifying credentials requires CredentialManage permission.
- Assigning access levels or groups requires AssignAccess permission.
- Printing badges requires BadgePrint permission and a configured printer.
- Uploading photos requires PhotoUpload permission.
- Managing roles requires RoleAssign permission.
- Applying suspensions requires SuspendAccess permission.
- Viewing/clearing mobile devices requires DeviceManage permission.
- Viewing History requires AuditView permission.
- Deleting people or credentials requires corresponding Delete permissions.
Linked Workflows
- People List and Filter – Search for, create, and select people before editing.
- Employee One Day Pass – Temporary visitor/employee pass issuance from the filter page.
- Access Levels / Access Level Groups – Define reusable access grants assigned on the Access tab.
- Badge Templates – Configure designs selectable on the Badge tab.
- Credential Types and Formats – System setup that controls available Card Types and validation.
- Roles Management – Create and maintain roles assignable on the Roles tab.
- Digital Wallet Provisioning – BluID/HID/Wallet services enabled in tenant/facility integrations.
- Destination Dispatch Elevator (DDE) – Auto floor assignment preferences and floor stops.
Reference Image Links