Create a Vendor Invitation
Overview
Vendor Invitations ensure that any workers on premise are accounted for. BluSKY's Vendor Management software provides functionality to pre-register Vendors, manage their Certificate of Insurances and other important tools for managing Vendors effectively. In this article, we detail the process for creating Vendor Invitations.
Instructions
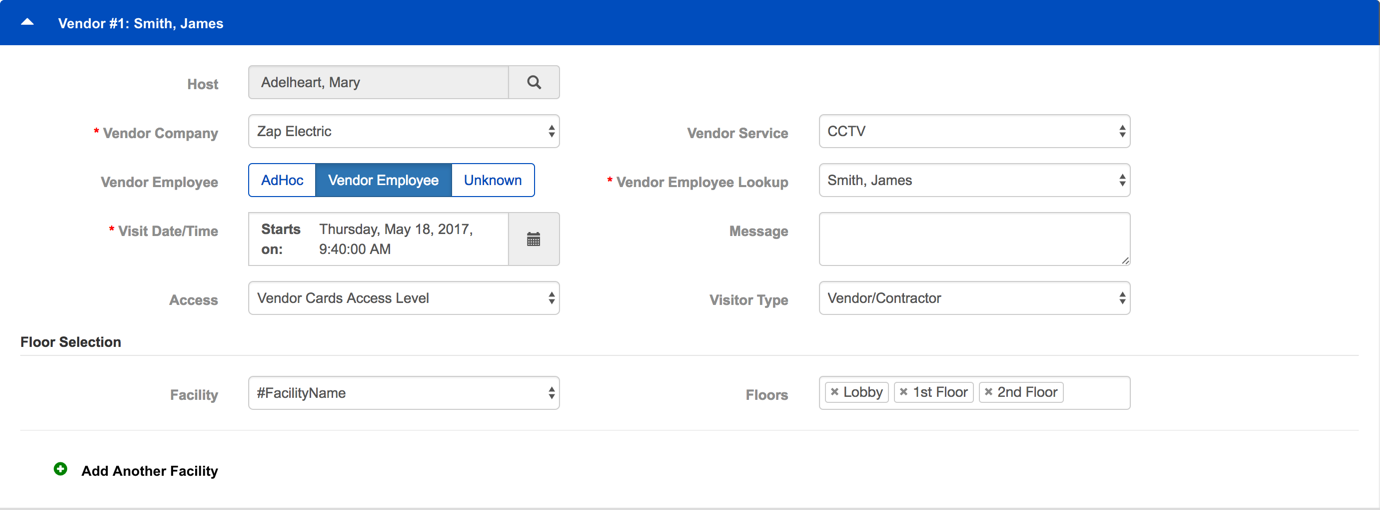
- Select the Host if needed. This will default to your login but can be changed by click on the magnifying glass.
- Permission to make a request on behalf of another is a separate permission and may or may not be available. Check you Role or consult your administrator for more information.
- Select the Vendor Company.
- If there is no Vendor Company available for the Vendor Employee, please Create the Vendor first.
- Select the Vendor Service.
- Each Vendor company has services that it can provide for the building. If you do not have the correct Vendor Service option, please create the Vendor Service and associate it with the Vendor.
- Use the Vendor Employee button group to set it to one of the following, then fill in the new fields by either selecting from the drop-down menus or creating a new Vendor Employee.
- AdHoc - The name of the Vendor is available but not already in the system.
- Vendor Employee - Allows you to select a Vendor employee already in the system.
- Unknown - The name of the Vendor employee is unknown or not needed
- Visit Date/Time. (is pre-populated with the current date and time). You can change this if necessary: Click the
 calendar icon. Also, check out the guide for creating recurring Vendor Invitations here.
- ***Time Zones:***The time zone of the request is always based on the location of the Facility being visited. So, if you are on the east coast, and you are creating an invitation to a west coast property, you need to express the expected time of arrival in Pacific Time (i.e. 3 hours earlier than your local time).
- Select from the Access drop-down menu the Access Level the Vendor Employee should have from the list.
- Only Visitor Access Levels may be used by Vendors.
- Use the Visitor Type drop-down menu to indicate whether the Vendor is performing work on site (Vendor/Contractor) or just making a delivery.
- If needed, select the Facility and Floors options. This does not have any bearing on the access the Vendor will receive but can be important for badging.
- Use the
 Add Another Facility to add additional Floors and Facilities for larger campus style installations.
- Click
 at the bottom of the screen to save your new invitation.
More than one Vendor? You can save work by clicking ![]() Vendor Invitation and adding the next Vendor before you click Save.
Vendor Invitation and adding the next Vendor before you click Save.
Definitions
| Name | Description |
|---|---|
| Host | The name of the person who is expecting the Vendor. With the Vendor Invitations For Others permission you are able to make a request for another person. |
| Vendor Company | The name of the Vendor's company. |
| Vendor Service | The type of service the Vendor provides. |
| COI Information | Information on the status of the Certificate of Insurance (COI) for the Vendor. |
| Vendor Employee | This selection provides three options: - AdHoc - The name of the Vendor is available but not already in the system. - Vendor Employee - Allows you to select a Vendor employee already in the system. - Unknown - The name of the Vendor employee is unknown or not needed |
| Employee First Name | The first name of the visiting Vendor employee. |
| Employee Last Name | The last name of the visiting Vendor employee. |
| Employee Email | The email of the visiting Vendor. |
| Employee Phone | The phone number of the visiting Vendor. |
| Visit Date/Time | The time and date of the Vendor's visit. |
| Message | A blank text field to provide a message to the person admitting the Vendor. |
| Access | The Access Level the Vendor will be given when they arrive. |
| Visitor Type | Indicates whether the Vendor is making a Delivery or performing work in the building. |
| Floor Selection | |
| Facility | The Facility where Vendor has permission to work. |
| Floors | The Floors to be printed on the badge of Vendor. This does not effect access to that floor in any way. |