Vendor Admission
Typically, the process of granting access to Vendors (who are usually companies that use the dock and the freight elevators) should be handled differently than Visitors to the building. Vendors have additional requirements when it comes to performing authorized work on site, for this reason, BluSKY has several modules that cover specifically the admission of Vendors to a secured property.
- Topic
- How To
Search Criteria
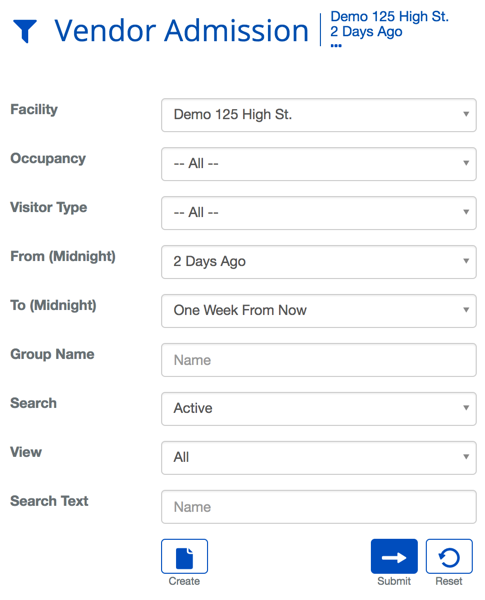
| Name | Description |
|---|---|
| Facility | This will narrow search results to a particular Facility. |
| Occupancy | This will narrow search results to a particular Occupant. |
| Visitor Type | Type of Visitor expected. |
| From | How many days in the past the Visitor was expected. |
| To | How many days in the future the Visitor is expected. |
| Group Name | This will narrow search results to a particular Group. |
| Search | The view setting allows you to select different ways to view the list. |
| View | This option toggle whether deleted entries are included in results. |
| Search Text | This field is used to limit the number of rows listed in the list box below. To use simply type a string of characters or words. |
| Create | Will bring you to the create screen. Use this if the entity does not exist in the BluSKY database. Be extremely careful not to create duplicates with slightly different names. |
| Submit | This button performs a search based on the criteria selected in the filter. |
| Reset | This button clears all fields in order to start a new search. |
Vendor Admission List Definitions
| Name | Description |
|---|---|
| Photo | This field displays the image of the Vendor employee, if available. |
| Guest Name | The name of the Vendor employee. Last name first. |
| Vendor Company | The Vendor Company that has the Vendor Invitation. |
| Badged Printed | This field displays a check mark if the Vendor's badge has already been printed. |
| Host | The name of the Person, who is expecting the Vendor. |
| Occupancy | The Occupancy of the Host, who made the Vendor invitation. |
| Floor | The default floor assignment. This field is only used to indicate the default floor on the printed badge. All access rights are derived from the Visitor Access Level assigned to the Visitor. |
| Access Level | This is the Visitor Access Level being used to grant access to the system. |
| Status | What is the status of the visitor. There are three status's "Expected", "In", "Out" |
| Status Date | The date and time of the current status. |
Vendor Invitation Definitions
| Name | Description |
|---|---|
| Host | The name of the person who is expecting the Vendor. With the Vendor Invitations For Others permission you are able to make a request for another person. |
| Vendor Company | The name of the Vendor's company. |
| Vendor Service | The type of service the Vendor provides. |
| COI Information | Information on the status of the Certificate of Insurance (COI) for the Vendor. |
| Vendor Employee | This selection provides three options: - AdHoc - The name of the Vendor is available but not already in the system. - Vendor Employee - Allows you to select a Vendor employee already in the system. - Unknown - The name of the Vendor employee is unknown or not needed |
| Employee First Name | The first name of the visiting Vendor employee. |
| Employee Last Name | The last name of the visiting Vendor employee. |
| Employee Email | The email of the visiting Vendor. |
| Employee Phone | The phone number of the visiting Vendor. |
| Visit Date/Time | The time and date of the Vendor's visit. |
| Message | A blank text field to provide a message to the person admitting the Vendor. |
| Access | The Access Level the Vendor will be given when they arrive. |
| Visitor Type | Indicates whether the Vendor is making a Delivery or performing work in the building. |
| Floor Selection | |
| Facility | The Facility where Vendor has permission to work. |
| Floors | The Floors to be printed on the badge of Vendor. This does not effect access to that floor in any way. |
Vendor Admission Actions
| Will bring you to the create screen. Use this if the entity does not exist in the BluSKY database. Be extremely careful not to create duplicates with slightly different names. | |
| View will bring you to the view screen. Use this to look up information on existing entities and access Audit Info. | |
| Edit will enable you to edit the selection you chose. | |
| Visitors and Vendors are checked in to indicate that they are currently in the building. | |
| Visitors and Vendors are checked out when they depart the building. | |
| This option will print a Badge for the selected Vendor. Please note: a default Badge Template must be assigned to the Vendor prior to being able to print one. | |
 | This option will print a Badge & Check In the selected Vendor. Please note: a default Badge Template must be assigned to the Vendor prior to being able to print one. |
| Delete allows for removal of the entity from the BluSKY database. | |
| Export will save the information from the view list into one of three file formats, a printable form or copying to your computers clipboard. Read more here. |