Simple Mercury Elevator Configuration Demo
Overview
The Simple Elevator Configuration Demo is a quick demonstration of how a simple elevator system can be assembled and configured with less than an hour of work. BluBØX customers and prospects can take their own hardware (EP1502, MR16Out, MR16In) and quickly create the BluSKY environment to have a live fully functioning security system with elevator control.
This article is targeted at integrators that are familiar with security systems, but not BluySKY. With this focus it will not go into detail in some areas, but gets to basic steps needed to quickly build the system. For additional information, please consult our formal documentation found in our knowledge base. If you are following along with the knowledge base and you come across a term you do not fully understand we have provided a dictionary of terms, available via the footer section or by pressing F2 on the keyboard.
We hope you get a feeling of just how quickly a two door demo can be assembled and deployed. Good Luck!!!
Prerequisite
Before you begin, log in as an Integrator with full permissions. If you do not have an Integrator account please create one using the Integrator account supplied by BluBØX or contact support@blub0x.com for a new Integrator Account.
Material List:
- 1x EP1502.
- 1x 12 VDC Power Supply (FPO75 if available)
- 2x Wiegand Card Readers
- 2x Door Contact Sensors
- 2x Release Buttons
**Optional:**Add physical locks to the system. We must configure Outputs for the locks in BluSKY, but this does not require them to be part of the actual demo. If you want to have physical locks you may do so.
- 2x Locking outputs - This demo assumes electromagnetic locks in the database configuration
- 1x Lock power - C8P or similar
Optional: Before continuing fill in the form below. It will auto populate the directions below with your desired names and make creating your environment even easier.
Integrator's Name
Controller Name System Name
Facility Name
Customer Name Domain Name ( usually @example.com )
Instructions
When following along, please be aware that we use the Retain and Save + New feature to cut down on some of the repetitive steps. The images supplied can be hovered over or expanded for a better view of the fields and their values. We have modified some of them slightly, but we were careful to preserve all relevant fields.
If you have questions, remember our knowledge base is a great resource. There is also a help button for page-level help in BluSKY. Simply, click, the Help link located in the top right of the screen in the BluSKY page you are working on. This will launch a pop-up with focused information on the BluSKY page you are launching from.

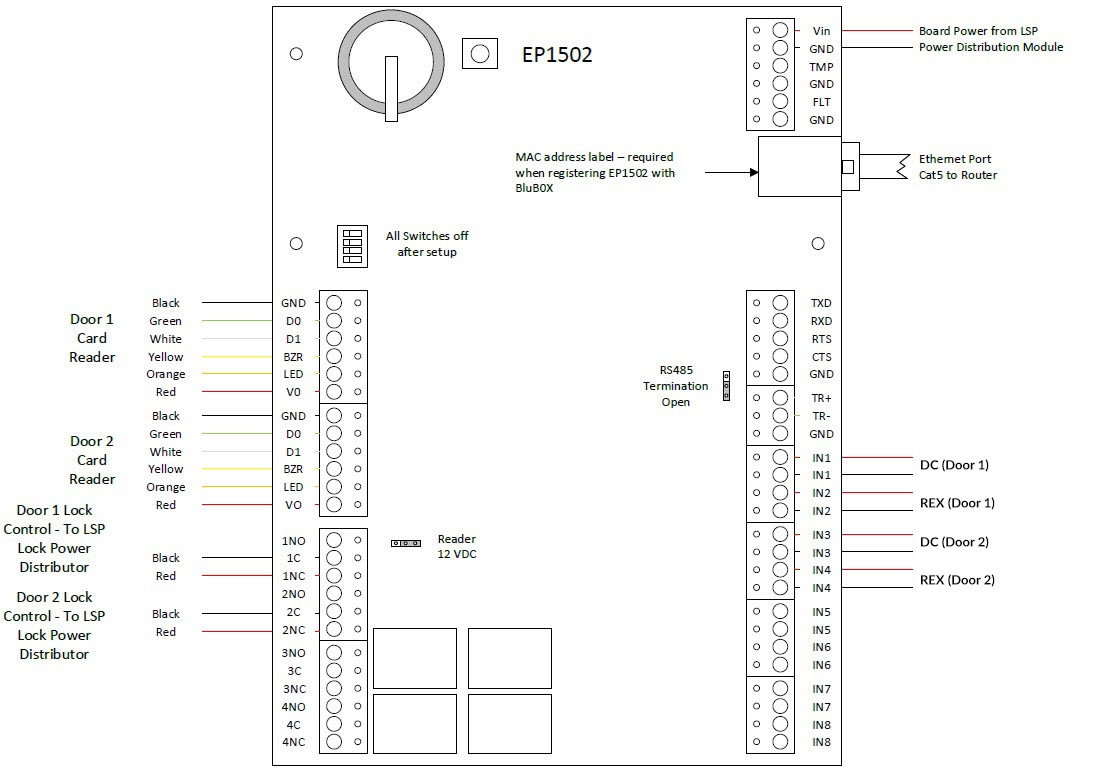
Wiring the Two Door Demo
Wiring the demo should be fairly straight forward for experienced Integrators. If this is your first time, we have supplied instructions below and a wiring diagram. It will be very important that you follow our directions exactly if you plan on using the line by line instructions included in this demo.
 Click to Enlarge
- Mount the EP1502 and the power supply.
- Connect the EP1502 to the power supply.
- Ensure that the EP1502 is set to 12V , if not, set the jumper at J7 to the rightmost two pins. (The standard orientation is with the battery at the top left.)
- ***Note:***Setting the jumper to PT(pass through) can seriously damage equipment, please consult card reader specifications to ensure that the card reader and/or other devices can handle the power being supplied.
- Wire two door contact sensors (DPS) to Input 1 and 2 on the EP1502.
- Wire the two switches that will be used as Request to Exits (REX) Input 3 and 4 on the EP1502.
- Wire the two card readers to Reader 1 and 2 on the EP1502.
- Connect the EP1502 to the internet via an Ethernet cable.
- Power on the boards.
Optional:
- Wire Output 1 & 2 to lock power.
- Wire lock power to the two physical locks.
Connecting the Controller to BluSKY
The process of connecting a controller to BluSKY is straight forward with minimal networking experience. We have provided detailed instructions on how to connect to BluSKY in our Network Configuration for Controllers guide. This process may cause you to lose connectivity for a short while.
- Connect a computer to the network and set its IP address to 192.168.0.250. This computer will serve to confirm connectivity.
- 1.1 Best way is to connect the controller to PC via network cable directly and setting up IP range of 192.168.0.xxx
- Enable the factory default network & user settings of the Controller using the dip switches as follows
- Set all the board's dip switches to OFF,
- Then set dip switch 2 to ON. You will need to restart the controller by removing, then re-adding power or pushing the black button on the controller.
- After the board has reset, set dip switch 2 to OFF and set dip switch 1 to ON. This enables the board's default user name and password (i.e. admin/password). Note: Once you set the dip switch to ON, you have 5 minutes to login, otherwise you timeout and have to reset the dip switch off and then on again.
- Check for the batter, make sure there is a battery installed on the controller. If there is not a battery, please install one before proceeding.
- Make sure for LP and MP controllers the jumpers for the batter or set to on. See Enable On Board Battery for Mercury LP Controllers
- Ping 192.168.0.251, the default IP address, to confirm the device is connected.
- Enter 192.168.0.251 in the address bar of your computer's browser.
- Push past any browser alerts; (these are only warnings from your browser).
- NOTE: When trying to load older EP controller UI page using modern browsers you may find that you get TLS errors. Refer to the following article for suggestions on how to work around that issue: How To Avoid TLS Errors When Logging Into EP Controllers
- Log-in using the default user name and password (admin/password)

- Add your own administrative user.
- Click Users in the leftmost menu.
- Add an administrative user by filling in the required fields.
- Select "Apply Settings" from the menu on the left side of the screen.
- Set dip switch 1 to OFF to disable the default login.
- Login again using the browser on your computer and the login credentials you just created.
- Configure the controller to communicate on the host network.
- Click "Network" on the left side of the screen.
- Configure the IP address, Subnet, Default Gateway and DNS Server, as required by the local network.
- Note: This configuration is dependent on the local network's parameters. If needed, request an acceptable local network configuration for your controller from the IT department that supports.the network.
- Click "Accept".
- Reconfigure your computer to connect to the local network.
- Ping the new controller's IP Address to ensure connectivity.
- Login to the controller again using the browser on your computer (At this point, they should both be devices on the local network).
- Push past any browser alerts.
- Log-in using the newly created administrative user.
- Now, connect the controller to the BluSKY service through the "Host
 Comm" menu.
 - Enter the following data exactly unless specified otherwise.
- Connection Type: IP Client
- Data Security: "TLS Required" or "TLS if Available" MUST match controller configuration in BluSKY.
- Host IP: "blub0x.cloudapp.net" - This URL may need to be white-listed depending on the local network configuration.
- Port #:
<number> - Note: Get the Port # from BluSky Controller settings (3010-3017)
- ***Note:***If you are connecting a BluBØX demo kit the Port # should be 3002. Also set the Data Security field to TLS Required
- ***Note:***The local firewall must not filter the port you are using.
- Connection Mode: Continuous
- Retry Interval: 5 sec
- Update the Auto Save
- Apply Settings and Reboot to complete the setup.
- Reminder: If step 1.1 was followed, disconnect the controller from PC (which we connected in step 1.1 via network cable) and connect it to the site network.
Summary
This process makes the important connection from the physical hardware to the BluSKY. This connection will be used to update the onboard database of the EP1502. This architecture makes sure that the system operates properly even if the system loses connectivity, but adds the ability to manage a system remotely.
Now that the hardware is in place, let's take a look at the configuration in BluSKY.