Demo Personnel
Overview
At this stage of the demo you have a facility that would be really great at keeping people out. Doors are locked and the System is online. Now, it is time to configure the people and companies (tenants) that will occupy the facility.
Setting Up Occupancies
Occupancies are the organization within a Facility. They provide an easy way to manage the personnel and permissions for the people using the system.
For this demo we will be setting up three Occupancies:
- Stellar Properties - The Occupancy that manages the Facility.
- ASO Security - A security company contracted to protect the building.
- American Catering - An Occupancy within the Facility.
Navigate to Occupancy creation. Main Menu-> Administration-> Occupancy-> Create
 Click to Enlarge
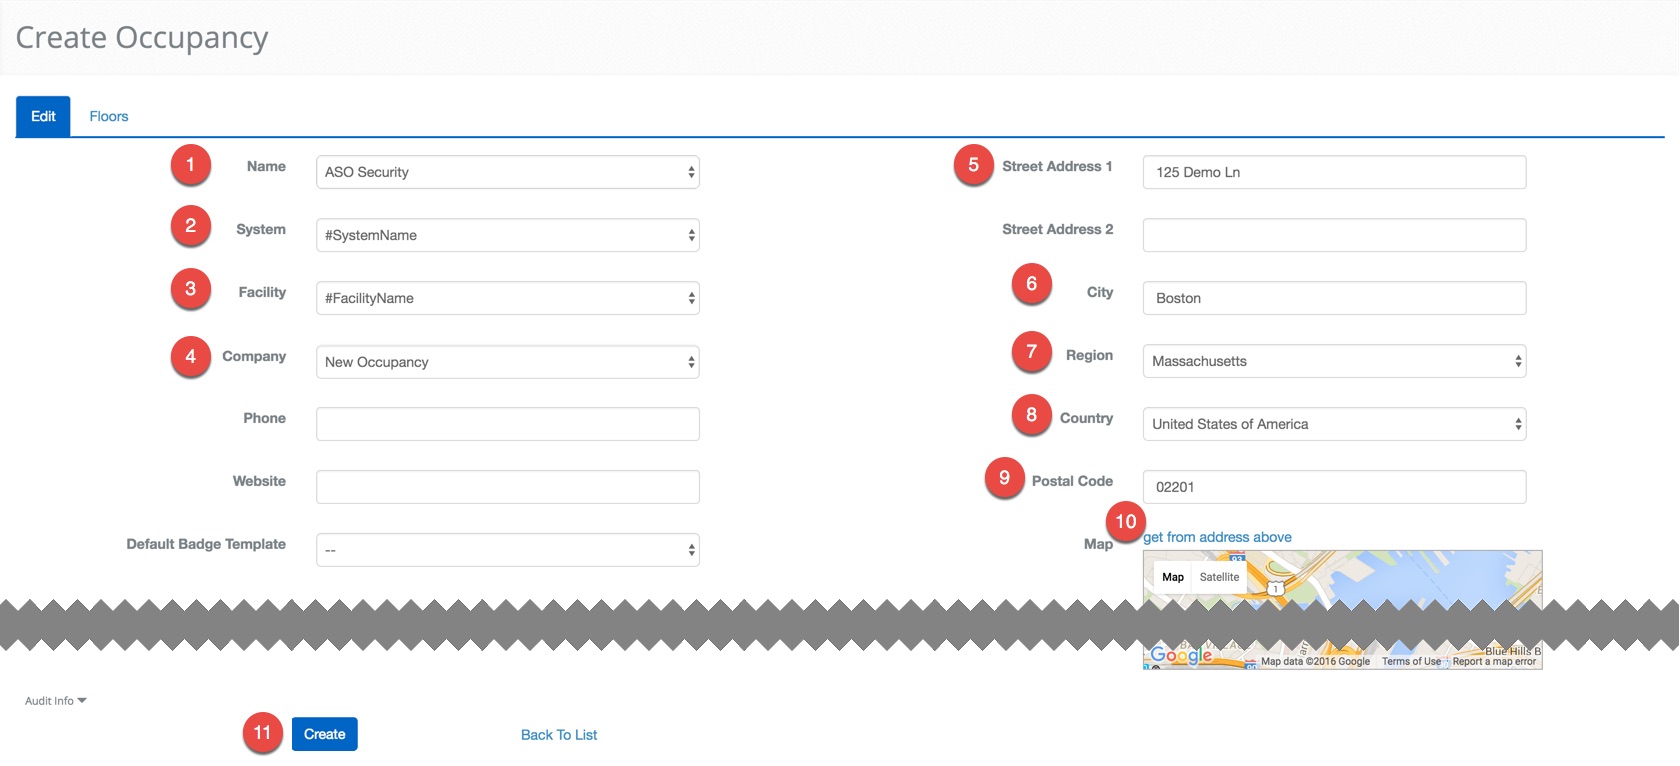
- Enter "Stellar Properties" in the Name text field.
- Select #SystemName from the System drop down menu.
- Select #FacilityName from the Facility drop-down menu.
- Select New Occupancy from the Company drop-down menu.
- Enter the 125 Demo Ln text area to add an address.
- Optional: Feel free to substitute your own address.
- Enter Boston in the City text field.
- Select Massachusetts from the Region drop down menu.
- Select United States of America from the Country drop down menu.
- Enter 02201 in the Postal Code text field**.**
- Click the get from address above text to add a location marker to the Map.
- When finished use the
 button to finish.
Next, we will create ASO. This will be very similar to the process above. Click the ![]() icon to create the next Occupancy.
icon to create the next Occupancy.
 Click to Enlarge
- Enter "ASO Security" in the Name text field.
- Select #SystemName from the System drop down menu.
- Select #FacilityName from the Facility drop-down menu.
- Select New Occupancy from the Company drop-down menu.
- Enter the 125 Demo Ln text area to add an address.
- Enter Boston in the City text field.
- Select Massachusetts from the Region drop down menu.
- Select United States of America from the Country drop down menu.
- Enter 02201 in the Postal Code text field**.**
- Click the get from address above text to add a location marker to the Map.
- When finished use the button to finish.
Finally, we will create the American Catering Occupancy. Click the ![]() icon to create the final Occupancy
icon to create the final Occupancy
 Click to Enlarge
- Enter "American Catering" in the Name text field.
- Select #SystemName from the System drop down menu.
- Select #FacilityName from the Facility drop-down menu.
- Select New Occupancy from the Company drop-down menu.
- Enter the 125 Demo Ln text area to add an address.
- Enter Boston in the City text field.
- Select Massachusetts from the Region drop down menu.
- Select United States of America from the Country drop down menu.
- Enter 02201 in the Postal Code text field**.**
- Click the get from address above text to add a location marker to the Map.
- When finished use the button to finish.
Creating an Access Schedule
Access Schedules are time intervals that are used to define when a credential or biometric signature is accepted at a Reader. We will set up two schedules that will be used for Access Levels in a moment. We will also use the 24/7 schedule that is available to all systems.
In this example, we set up an Access Schedule for Robyn. She is a morning person and like like most bakers, prefers to bake early in the morning. We will set up an Access Schedule that will be used to let her into the building at 3:00 AM and run until 5:00 PM.
Navigate to Schedule creation. Main Menu-> Administration-> Schedules-> Create
 Click to Enlarge
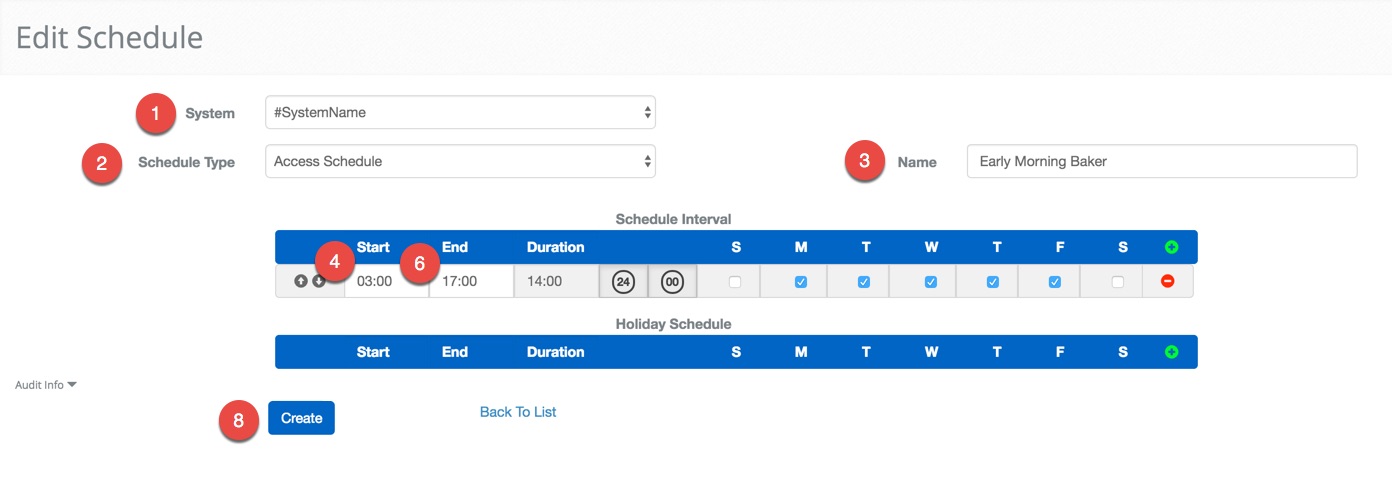
- Select #SystemName from the System drop down menu.
- Select Access Schedule using the Schedule Type drop-down menu.
- Enter "Early Morning Baker" in the Name text field.
- Click on 00:00 just below Start to open a time selector.
- In the time selection interface, click 3 and then click OK.
- Click on 00:00 just below End to open a time selector.
- In the time selection interface, click 17 and then click OK.
- When finished use the button to finish.
Creating an Access Level
We will create two Access Levels. The first is an "anywhere, anytime "Access Level called "Full Access" that will be assigned to Christina Bailey, James Moses, Mary Adelheart and Bob Hopkins. The other is used by Robyn ("Early Morning Baker") so that she is allowed in the building as early as 3:00 AM to start her baking shift. Let's start by making the Full Access, Access Level.
Navigate to Access Level creation. Main Menu-> Administration-> Access Levels-> Creation
 Click to Enlarge
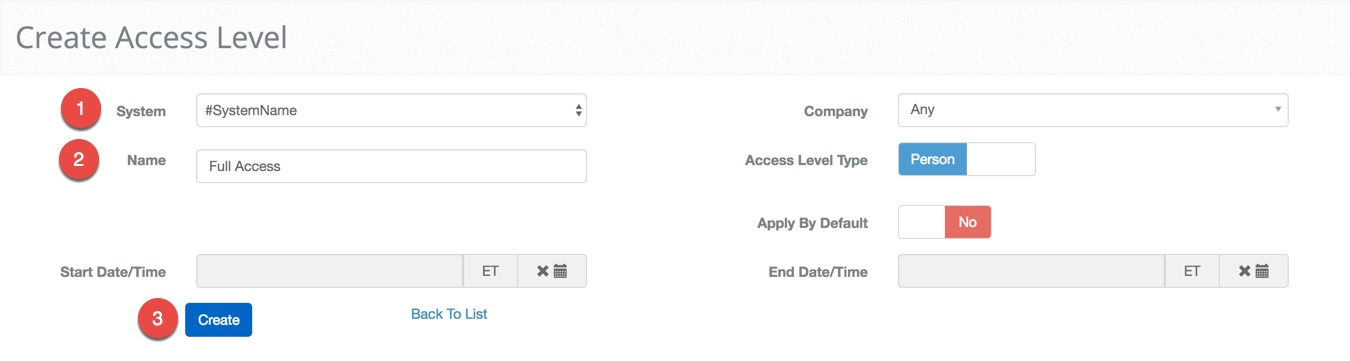
- Select the #SystemName the Access Level will be used for.
- Enter "Full Access" in the Name text field.
- When finished use the button to display the next screen.
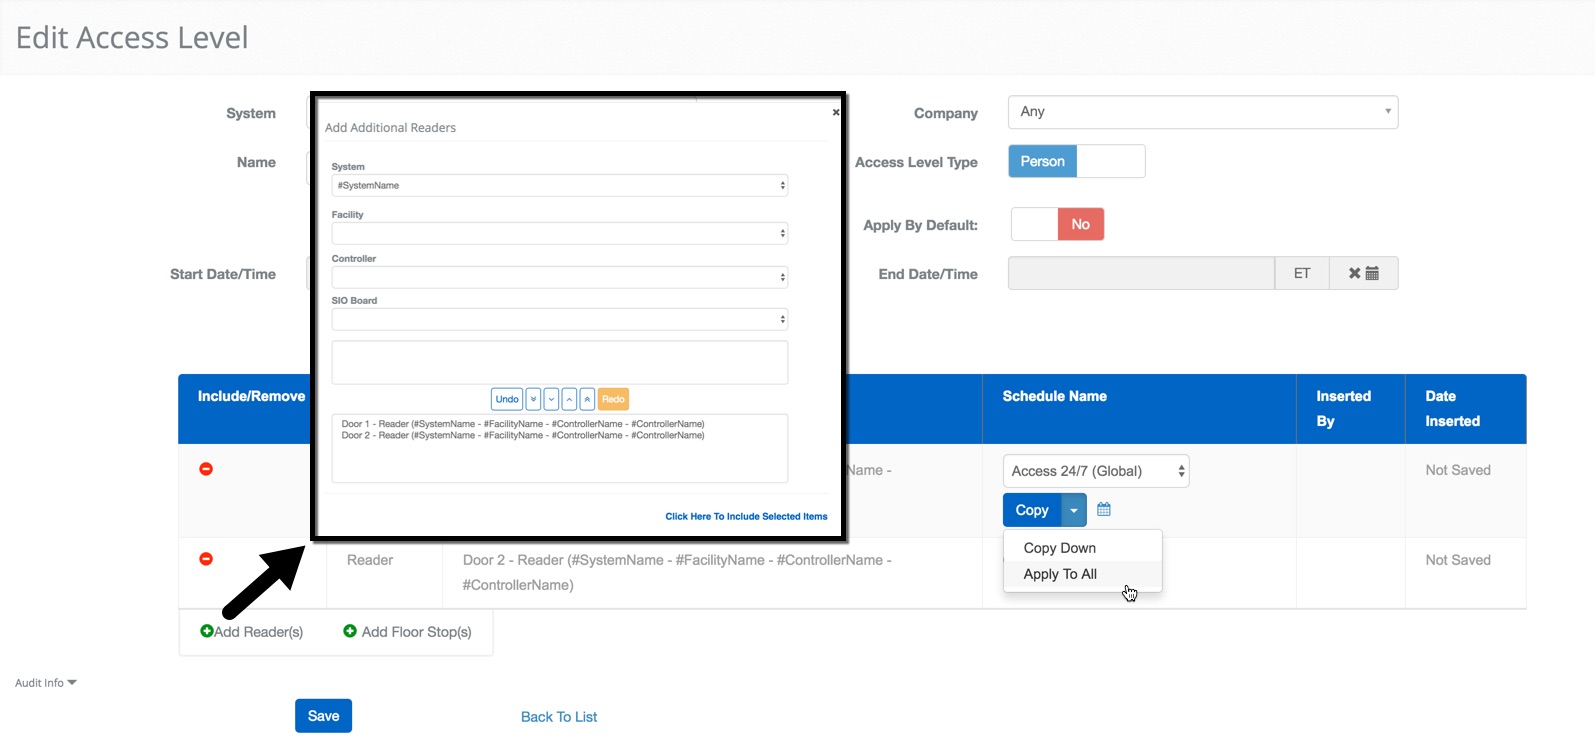
After you create the Access Level you are able to assign Floor Stops and Readers to the Access Level.
 Click to Enlarge
- Click the
 button next to Add Reader(s) or Add Floor Stop(s). A new window will pop up allowing you to choose Readers or Floor Stops to add to the Access Level.
 - Click the
 button to move all the available readers to the bottom assignment field.
 - Then choose the Access 24/7 (Global) Access Schedule to associate with the Reader or Floor Stop.
- Assign the schedule to all of the Readers by clicking the chevron the right of the copy button and clicking Apply To All.
- ***Note:***The entries will not be saved without assigning them to a schedule.
- Confirm changes with the
 button.
Ok, let's set up the next Access Level. Please note that this Access Level is being assigned to the American Catering Occupancy.
Click to Enlarge
- Select the #SystemName the Access Level will be used for.
- Select American Catering from the Company drop-down menu.
- Enter "Early Morning Baker" in the Name text field.
- When finished use the button to display the next screen.
After you create the Access Level you are able to assign Floor Stops and Readers to the Access Level.
Click to Enlarge
- Click the button next to Add Reader(s) or Add Floor Stop(s). A new window will pop up allowing you to choose Readers or Floor Stops to add to the Access Level.
- Click the button to move all the available readers to the bottom assignment field.
- Then choose the Early Morning Baker Access Schedule to associate with the Reader or Floor Stop.
- Assign the schedule to all of the Readers by clicking the chevron the right of the copy button and clicking Apply To All.
- ***Note:***The entries will not be saved without assigning them to a schedule.
- Confirm changes with the button.
Using Permissions and Creating Roles
Permissions are used to allow or disallow certain functionality in BluSKY. These permissions are then grouped together in a Role. The Role can then be assigned to a Person. We recommend that Roles be as restrictive as possible, to avoid costly mistakes. It should be noted that Roles and can be used in conjuncture with one another to extend additional permissions to a Person. These Roles can also be scoped to certain Vendors, Occupancies, Systems System Groups, or Integrator. The scope then will determine where the permissions are valid.
The first Role we will create is the Facility Manager Role. This Role enables the Facility Manager to configure all of the subsequent Occupancies and manage the System as a whole. To create this Role navigate to Role Creation, ***Main Menu-> Administration-> Roles.***Enter the name of the Role, select the System, leave the Occupancy field blank and use the image next to Role description to add the same permissions to the new Role.
Alright, now that we have the Facility Manager done, let's repeat this process for the remaining Roles. Remember, just replicate the Role as you see in the image, next to the description.
Creating the People
Now we can start adding the People that use the System. We will create a few sample people to demonstrate how their permissions and access rights work. To start we will create Bob Hopkins. Bob is a Facility(building) manager and should have access to the System anytime. He will also have to perform the day to day task for the entire System.
Get started by navigating to Person creation. Main Menu-> Administration-> People-> Create
- Click Occupancy in the Person Type option menu, if not selected already.
- Select Stellar Properties from the Occupancy drop down menu.
- Enter the "Bob" in the First Name text field.
- Enter **"**Hopkins" in the Last Name text field.
- Select Work from the first Add Email drop-down menu.
- Enter bh@domain.comin the email
- Click the default with the radio button to use this email as the login name.

- Enter "Blub0x123!" in the Password and Confirm Password text fields.
- Optional: Substitute your own password.
- Click the button to create this person.
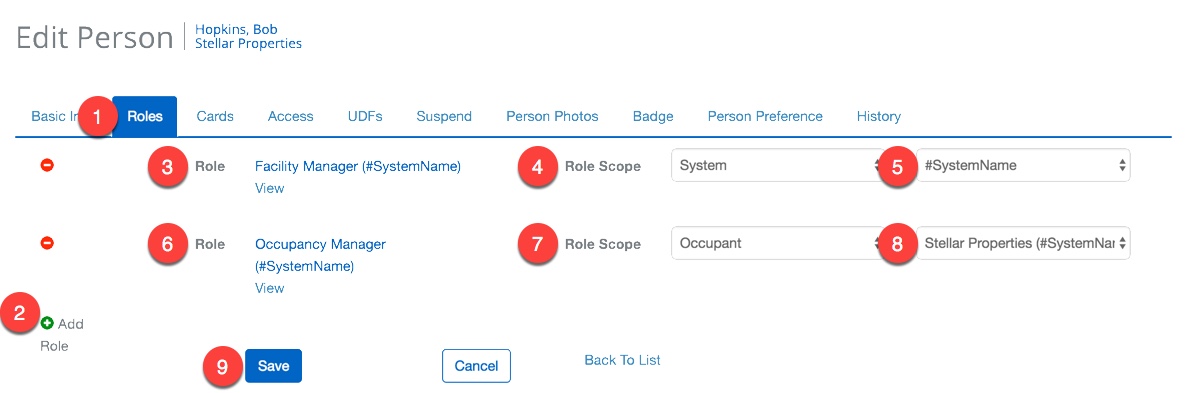
Now let's add the Roles. Bob will get two Roles with different scopes. The Occupancy Manger Role to manage his own Occupancy(Stellar Properties) and Facility Manager ( #SystemName)
 Click to Enlarge
- Click the Roles tab at the top of the Person record.
- Click the Add Role button twice.
- In the first row, select Facility Manager from the drop-down list.
- Select System for the Role Scope.
- Select #SystemName in the final drop-down menu.
- In the bottom row, select Occupancy Manager for the Role.
- Select Occupant for the Role Scope
- Select Stellar Properties for the final drop-down menu.
- Confirm changes with the button.
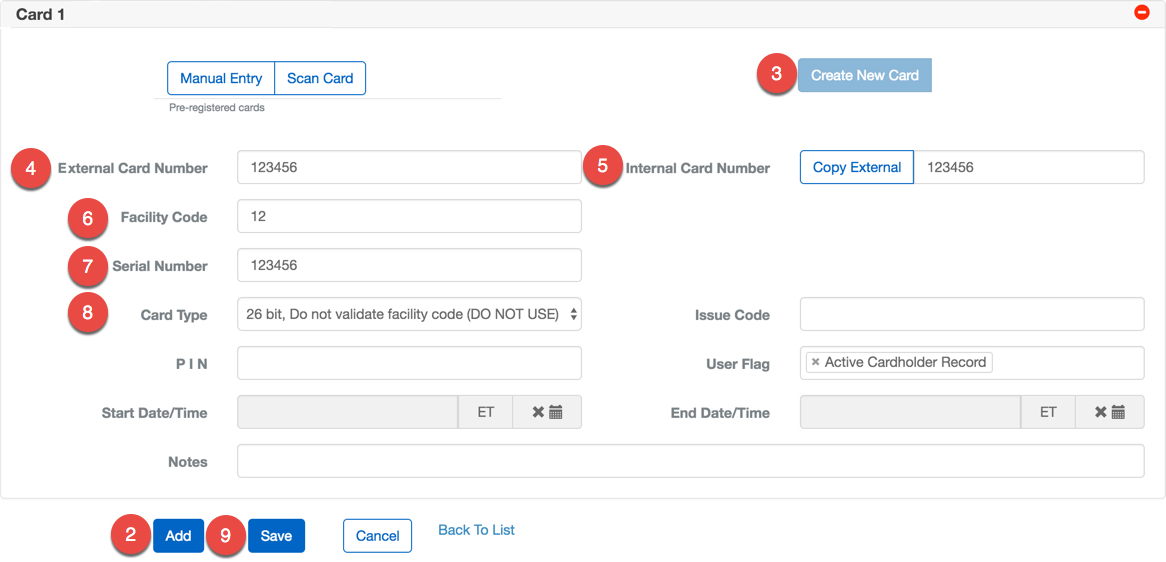
All we have to do now is add a card to his personnel record. Every Card that is assigned to a Person must be registered in BluSKY. This can be done in two ways. The first is by preregistering the Card through the Card Upload screen, or doing it at the time of assignment. We will only be adding five Cards so we chose to do this manually. There are many different types of Cards with different lengths and encoding formats. In this example, we will walk you through the process of adding a 26 bit Card with a Facility Code, you may have to make adjustments to accommodate the Cards you have on hand.
 Click to Enlarge
- In the Person Record, click the Cards tab at the top.
- Click the
 to start configuring the Person's Card.
 - Click the
 to register and assign a new Card.
 - Enter the External Card Number.
- Click the Copy External button.
- Enter the Facility Code.
- Enter the Serial Number.
- Select the Card type.
- Click the button to register and add the Card to the Person.
Now that Bob is all set up we need to repeat the process for the remaining people below.
Assigning Access Levels
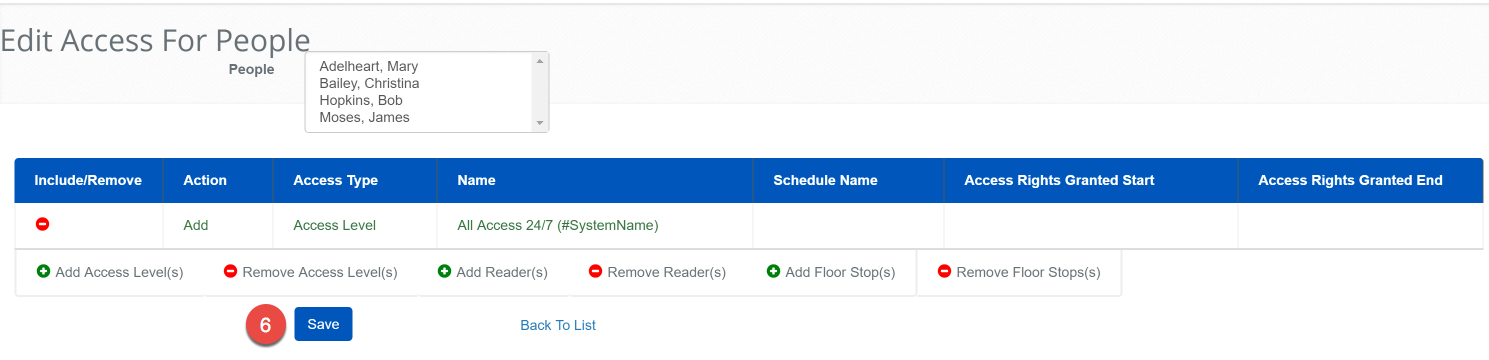
There are four people with exactly the same the same Access Level. We are going to use the quick Access Assignment feature, built into the Person List, to quickly assign the "All Access 24/7" Access Level to Bob Hopkins, Christina Bailey, James Moses and Mary Adelheart. This is definitely a tool you will want to use when you are assigning Access Levels to a larger fully functional system.
[
 ](/assets/images/DemoAccessLevelAssign_64ac4565e9b7.jpg "DemoAccessLevelAssign.jpg") Click to Enlarge
- On the Person List screen, click on Bob Hopkins, Christina Bailey, James Moses and Mary Adelheart to select them.
- Click the
 button to open the Multi-Person Access Assignment screen.
 - Click Add Access Level(s).
- Double click All Access 24/7.
- Click "Click Here To Select" to assign the Access Level to all of the selected People.
- Then click the button.
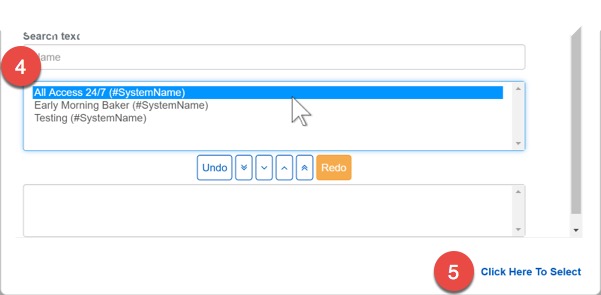
This is a convenient way to assign the same Access Level to many people. Robyn Douberty does have a different Access Level though. We can use the same feature to assign hers as well but we can also assign an Access Level, Reader or Floor Stop to a person through their person record, which we will show next.
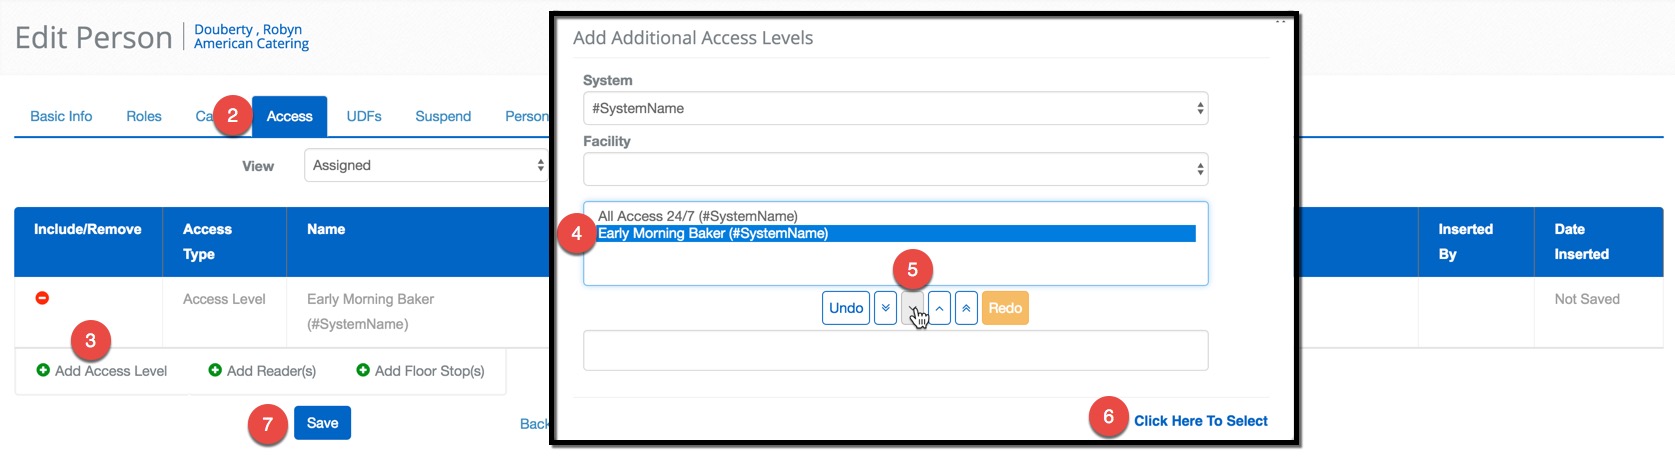 Click to Enlarge
- Double click on Robyn Douberty to open her edit screen.
- Click the Access tab at the top of the Person record.
- Click the next to Add Access Level.
- Click on Early Morning Baker.
- Click
 to move it to the assignment section of the menu.
 - Click "Click Here To Select" to select the Access Level and close the pop-up menu.
- Confirm changes with the button.
Wrapping Up
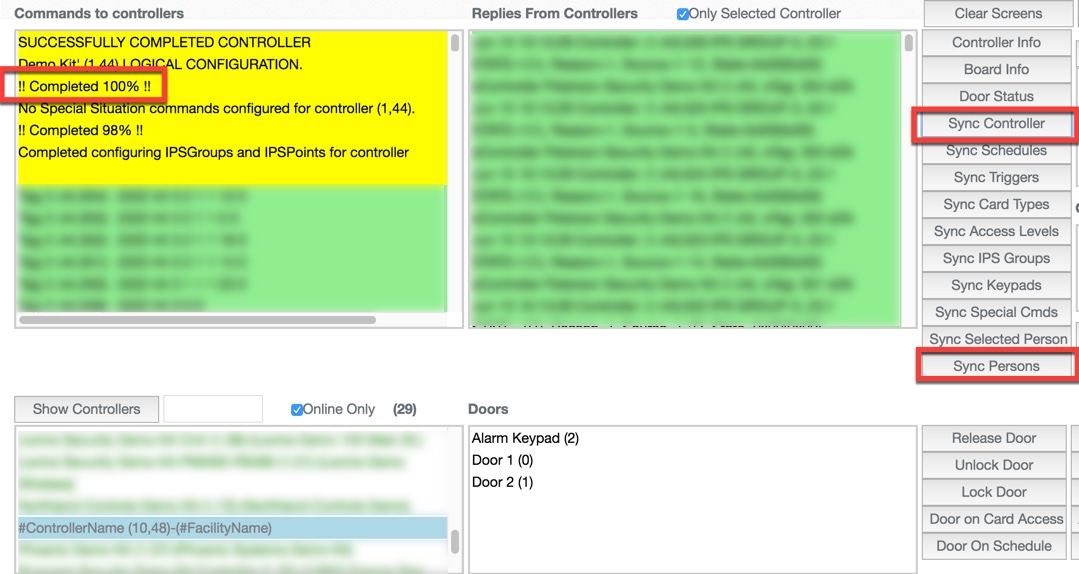
The entire system is almost ready to go live. The only thing left to do is to push the configuration to the onboard database on the EP1502. This is usually done over time automatically but we want to see the fruits of our hard labor now. To do this we will manually push the BluSKY configuration to the hardware using the Sync tool in the Mercury Test Tool.
 Click to Enlarge
- Navigate to the Mercury Test Tool.Main Menu-> Setup-> Diagnostics-> Mercury Test Tool
- Select the Controller you wish to reset from the list.
- Note: To search for a Controller by name. Enter a portion of the name in the text field next to the Show Controller button, then click the button to perform the search.
- Click the
 button.
 - Wait until you see the !! Completed 100% !! in the Commands to Controller field.
- Click the
 button.
 - Wait until you see the !! Completed 100% !! in the Commands to Controller field and you are done.
Summary
Congratulations, we are done. The System is fully functional and ready to be used by the people we just created. To recap, we started by creating the Occupancies that the individual People will belong to. Then we created an Access Schedule to use for creating Access Levels. Once we had the Access Schedules and Access Levels were complete we could create Roles to give the people different permissions and ways to use BluSKY. When we had all the pieces prepared, we then moved onto creating all the People for the System and gave them an Access Level, Role and Card. To make sure all of our hard work was not in vein we sync'd the controller to push all of our changes to the onboard database.
We all hope this process was a good warm up for what you might encounter out there in the field. The two door demo is a quick and small in scale System, but captures a lot of the important ideas needed to understand BluSKY. If you have any comments, or would like to see more, please contact us at documentation@blub0x.com. We look forward to your feedback and getting to know you during your time with BluSKY. Good Luck Out There!!!