Control Training
The Control menu contains tools that allow anyone with the proper permissions to control and monitor the system in real-time. This is where you go to process your visitors, investigate issues with their cards, lock or unlock doors as needed, or just monitor activity in the building.
While Visitors are included under the Control menu, they are used so frequently they are available as stand-alone training in the Visitor Request Training and Visitor Admission Training training modules.
Portals
This tool is intended for system administrators or security professionals who will need to control portal access in an ad-hoc nature. Portal Control will enable people with the proper permission the ability to temporarily lock or unlock a portal, simulate a card swipe and control the schedule of the Portal.
Controlling Portals
Getting Started
When you navigate to the Portal Control screen for the first time you may be asked to select your System. If this does not happen, don't worry, it simply means that we were able to determine your default system automatically.
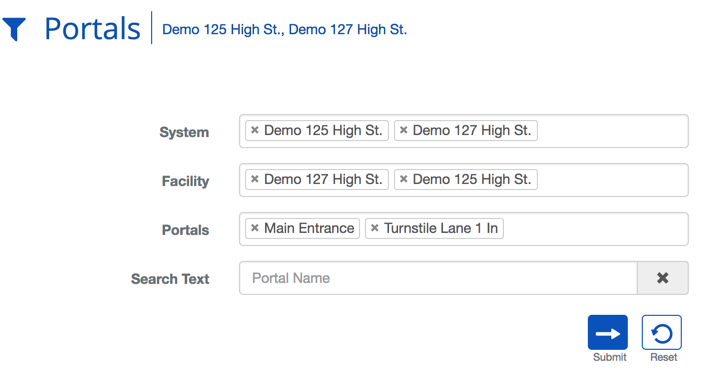
As you can see from the screen shot selecting multiple Systems or Facilities is a breeze. You can add as many Systems and Facilities as you have available. Once you have all of the necessary fields entered click the ![]() button to populate the control screen.
button to populate the control screen.
Portal Statuses
| Name | Description |
|---|---|
| The status of the portal is unknown. This is the initial status of all portals when the portal controller is first started. Once BluSKY has probed a portal the status will be updated. | |
| The Portal is open for entry. | |
| The Portal is open for exit. | |
| The Portal is currently closed. | |
| The Portal currently has an alarm status. | |
| The Portal is currently locked. Request exit switch works. | |
| The Portal is currently unlocked. | |
| Card | The Portal can only be accessed by using a card. |
| Card and Pin | The Portal can only be used by a card and a PIN. User has to have both to access the portal. |
| Card or Pin | The Portal can be accessed by a card or a PIN. |
| PIN | The Portal can be accessed only be a PIN code. |
Controlling the Portals
It should be no surprise that the hallmark of any access control system is the ability to control the flow of people through a system. This can be done with credentials and access rights but there are certainly times where having direct control is key. This is where the Portal Control screen comes into play. This control screen provides options for controlling one or more systems or facilities, allowing you to control your system on the east coast at the same time as controlling another system across the country. BluSKY delivers a flexible interface that provides the user the ability to control each individual Portal or entire Facilities with a few clicks.
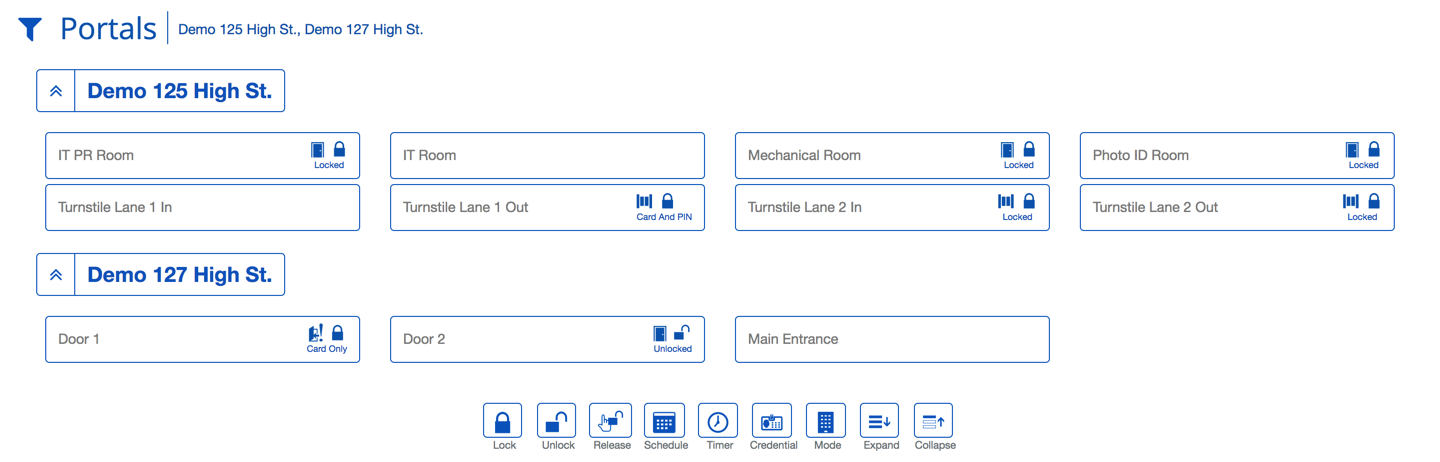
To control the Portal click on one or more of the Facilities or Portals and use the buttons on the bottom screen. Just please be aware than manual actions and modes will remain persistent until modified or the system is reset/resync'd.
Definitions
| Item | Description |
|---|---|
| Unlock - This will allow unrestricted access to the selected Portals. | |
| Lock - This will secure access to the Portals. This will prevent people from accessing even if they have valid credentials. | |
| Release - This will cause a timed unlocked period, allowing a person to use the Portals temporarily without a credential. | |
| Schedule - This return the Portal to their normal operating schedule. | |
| Timer - A customizable release timer for the Portal. | |
| Credential - This will allow the operator to simulate a person's credential without needing a physical copy. A useful tool for access right debugging. | |
| Mode - This will set the Portal to a specific access mode. See List below. This setting will remain until overridden or the Controller is set. | |
| Expand - Makes all of the individual Portals visible. | |
| Collapse - Show only the top most level of the Portal Control hierarchy. |
How-To Simulate a Credential
A great way to debug access issues is by simulating a credential at the Reader via the control interface. This provides a useful and convenient tool for determining if access issues are being caused by the hardware or the configuration in BluSKY. For example, if I were to simulate Alice's card at the Reader and see the Portal cycle, I would want to check Alice's physical card and the hardware. If I simulate Bob's card and nothing happens or I see a denied entry, I should start my debugging process in the configuration of Bob's Person record to ensure they have the proper credential and access rights.
- Navigate to Portal Control, or Elevator Control in BluSKY.
- Fill in search criteria if necessary.
- If you use the Control interface often you can likely skip this step.
- Click the Portal or Floor Stop you wish to simulate the credential against.
- Click the
 button to open the credential selection dialog.
 - Start typing in the name of the Person you want to use for the simulated credential.
- Click the Person's name once it appears.
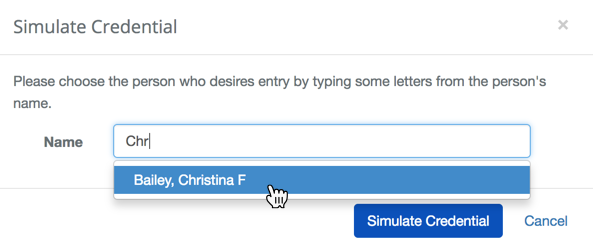
- Click the
 button and observe the status of the Floor Stop or Portal change.
Elevators
This article will discuss how to use the real time elevator control interface. It is important to note that for safety reasons and manufacturer specifications, BluSKY access control system controls the access rights to an elevator and not to the elevator itself. BluSKY is only enabling or disabling the ability to access the elevator on a specific floor or floors depending on your access rights.
Controlling the Elevators
Getting Started
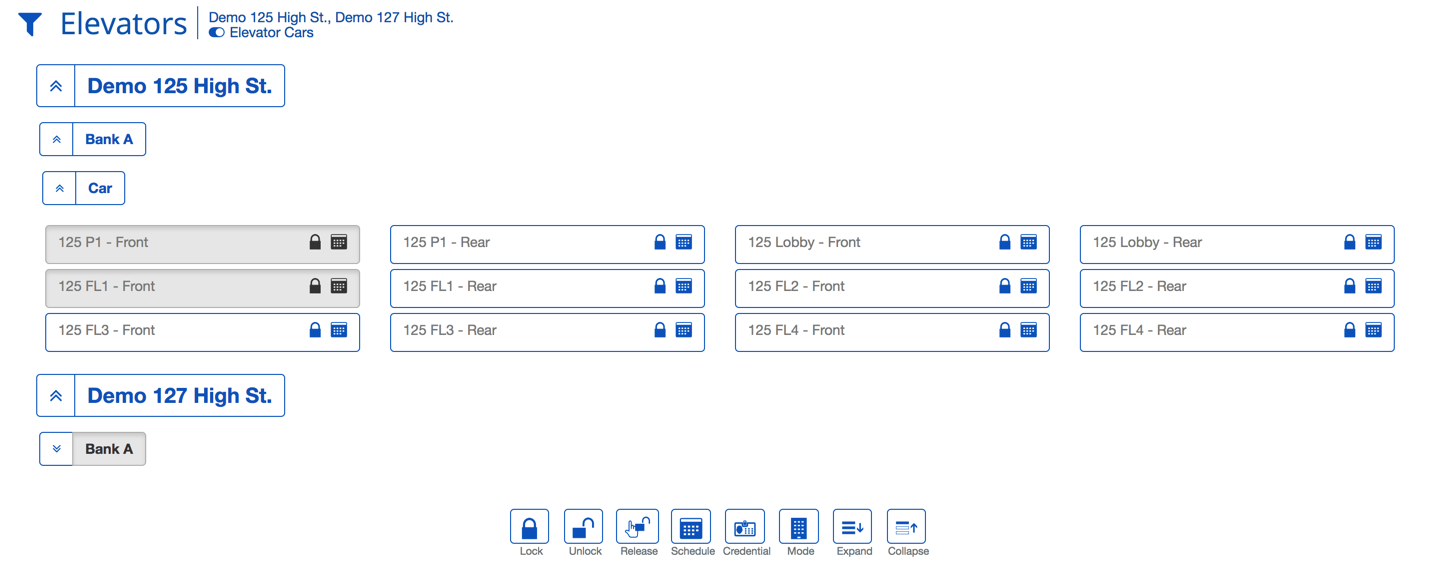
When using the Elevator Control screen for the first time you may be prompted to select the Systems and Facilities you want to control. Don't worry if you don't see this prompt, it is always available by clicking the filter icon in the top right-hand side of the screen. The "View" field enables the user to choose between displaying floor stops by Floors or Elevator Cars.

Once you select the ![]() button, the screen will display all floor stops, allowing you to select and control each of the Elevators or Floor Stops.
button, the screen will display all floor stops, allowing you to select and control each of the Elevators or Floor Stops.
Monitoring Elevators
The Elevator Control screen provides a powerful tool for viewing the real-time state of the elevator system at-a-glance. The rich visual language can help you quickly diagnose issues.

Elevator Statuses
| Item | Description |
|---|---|
| The Floor or Elevator Car's Floor Stop is currently secured and on schedule. | |
| The Floor or Elevator Car's Floor Stop is currently unsecured and on schedule.. | |
| Toggles between Unlock no boarder.PNG and Lock No Boarder.PNG | The Floor or Elevator Car's Floor Stop is currently in a release cycle. This is usually due to a timed release. |
| The Floor or Elevator Car's Floor Stop schedule has been interrupted by a manual override. | |
| The Floor or Elevator Car's Floor Stop is currently secured due to a manual override. | |
| The Floor or Elevator Car's Floor Stop is unsecured due to a manual override. | |
| The Destination Dispatch Elevator is on schedule. | |
| The Destination Dispatch Elevator has manually been put on Card Only Access. | |
| The Destination Dispatch Elevator is on Scheduled and Card Only Access |
Controlling Elevators
You are also able to control the Elevators and Floor Stops from this screen directly. Simply select the System, Elevator Bank, Car, Floor or Floor Stop you wish to control and use the buttons located at the bottom of the screen.
Definitions
| Item | Description |
|---|---|
| Unlock - This will allow unrestricted access to the selected Floor Stops. | |
| Lock - This will secure access to the Floor Stop. Elevators cannot be put on lock as they are always accessible. | |
| Release - This will cause a timed unlocked period, allowing a person to use the Floor Stop temporarily without a credential. | |
| Schedule - This return the Floor Stops to their normal operating schedule. | |
| Timer - A custom timed release of the Floor Stop. | |
| Credential - This will allow the operator to simulate a person's credential without needing a physical copy. | |
| Mode - This will set the Floor Stop to a specific access mode. See List below. | |
| Expand - Makes all of the individual Floor Stops visible | |
| Collapse - Show only the topmost level of the Elevator Control hierarchy. |
Alarms
Controlling the Alarms
Events
The Events Control interface is a hub for managing what is happening in a system. This interface provides deep insight into the operation of the System.
Using the Event Screen
Real Time Events
The Real Time Event screen is your heads up system status display. Whether you are running command and control or just want to be kept up to date about everything, the Even screen is the place to be.
Getting Started
The Event screen like many other screens has a highly customizable filter section. This is a great feature when you are only concerned with only certain aspects of the system. For example, during normal operation, I may want to only filter on alarms and overnight I may want to monitor all Portal activity. It's up to you and that is why it is powerful.
Once you have inputted all of the necessary criteria click the ![]() button to populate the list. If you need to change the criteria, just click the filter icon on the top left side to expose it again.
button to populate the list. If you need to change the criteria, just click the filter icon on the top left side to expose it again.


Definitions
| Field | Description |
|---|---|
| This indicates the number of rows selected out of the total number of rows found. Click to toggle between selecting or deselecting all of the displayed rows. This can be particularly useful when many alarms have accumulated. | |
| Event Date | The time and date of the alarm. The time is displayed based on the time zone of your default system. |
| Meta View | This is a visual description of the type of the event for easy analysis. |
| Person | The person, associated with the event. In the case of a card swipe, the card holder. |
| Event | A text description of the event category and event type. |
| By | The person responsible for the action in BluSKY. Typically only used for Operator activity because in the case of a card swipe there needs to be a cardholder name and the person who is simulating the swipe. |
Event History
The Event History displays recent events for your BluSKY system and can be an important tool for diagnosing issues or ensuring that proper procedures are being followed. For example, if a system is frequently finding Portals unlocked that should be secure the first thing, I would do is head over to the Event History page and run a report for recent operator activity. From there I can remind the person to return the Portal to schedule when they are finished. This is just one example of the many ways this screen can provide a useful tool for incident response.
Reviewing Events
In the cases where the appears you will also be able to get a video feed of the event. Just click the and you will see a recording from the time of the event and options to review the video further with the "Prev Minute" and "Next Minute" options.

Definitions
| Field | Description |
|---|---|
| This indicates the number of rows selected out of the total number of rows found. Click to toggle between selecting or deselecting all of the displayed rows. This can be particularly useful when many alarms have accumulated. | |
| Event Date | The time and date of the alarm. The time is displayed based on the time zone of your default system. |
| Meta View | This is a visual description of the type of the event for easy analysis. This is also where you can find any video associated with the event ( ). |
| Person | The person, associated with the event. In the case of a card swipe, the card holder. |
| Event | A text description of the event category and event type. |
| By | The person responsible for the action in BluSKY. Typically only used for Operator activity because in the case of a card swipe there needs to be a cardholder name and the person who is simulating the swipe. |
Control Points
The Control Point Control screen enables users to monitor, activate, or deactivate Control Points from one or more systems from one visually intuitive location .
Controlling and Monitoring Control Points
If you are using the Control Points Control screen for the first time you may need to select the Systems and Facilities you want to control. If you don't see this option, don't worry, BluSKY was able to select your default System. These settings can be changed at any time by clicking the filter icon in the top left-hand side of the screen. This can be a useful way to filter the results for larger systems or when controlling more than one System at a time.
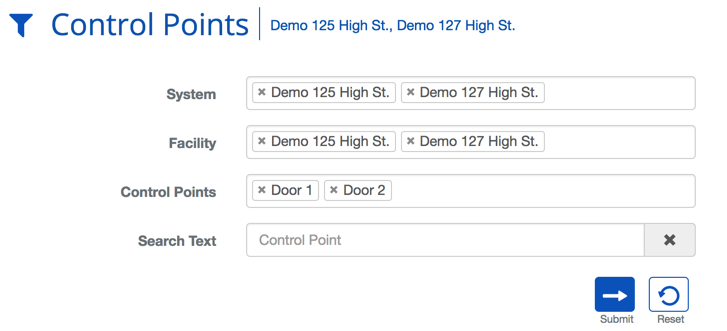
Once you have selected all of the criteria needed, click the ![]() button to load the selected Control Points.
button to load the selected Control Points.
Key Features
- Complete Control - You are able to select/deselect one one or more systems and/or individual points and control them all from the one screen. This capability can span multiple systems and provide a single point of control for an entire networks of systems.
- Multi-System/Multi-Facility - BluSKY's unique architecture is not limited by distance. You can control multiple buildings and systems all at once.
- "At-a-glance Information" - Visual cues provide information on the system at-a-glance.
Control
Once the Control Points load you will be able to control them easily. Simply click on each one you want to control, or click on the System to select them all. Then use the buttons at the bottom of the screen to Activate, Deactivate or Pulse the selected Control Points.

Definitions
| Item | Description |
|---|---|
| Active - This indicates that the Control Point is currently activated. | |
| Inactive - This indicates that the Control Point is not currently active. | |
| Activate - Turns the Control Point on. What activate means for this control point is determined by how the output was setup and the settings in Setup->Control Points. | |
| Deactivate - Turns the Control Point off. What deactivate means for this control point is determined by how the output was setup and the settings in Setup->Control Points. | |
| Pulse - This pulses the Control Point. Determining what a pulse does and for how long is determined by how the output was setup and the settings in Setup->Control Points. | |
| Expand - This exposes all the control points under each system. | |
| Collapse - This hides all the control points so only the system's icon is exposed. |
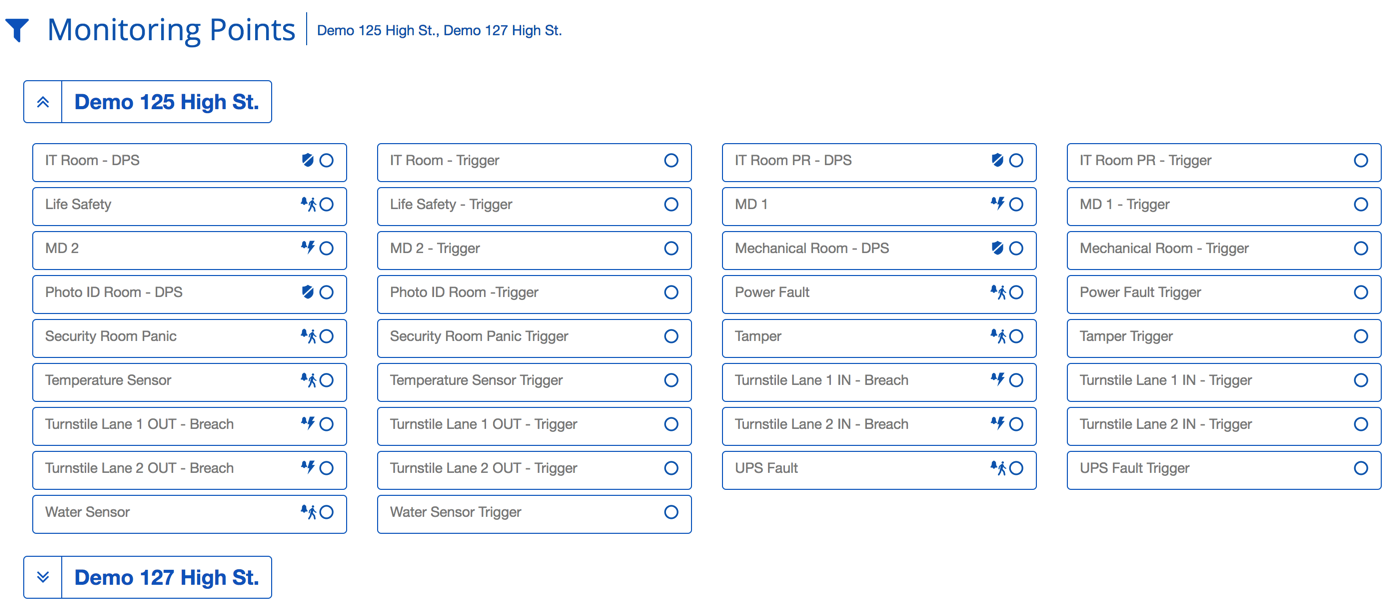
Monitoring Points
The Monitoring Point monitoring screen is a great tool for getting real-time statuses on the operation of IPS Points and Monitoring Points.
Controlling and Monitoring Control Points
If you are using the Control Points Control screen for the first time you may need to select the Systems and Facilities you want to control. If you don't see this option, don't worry, BluSKY was able to select your default System. These settings can be changed at any time by clicking the filter icon in the top left-hand side of the screen. This can be a useful way to filter the results for larger systems or when controlling more than one System at a time.
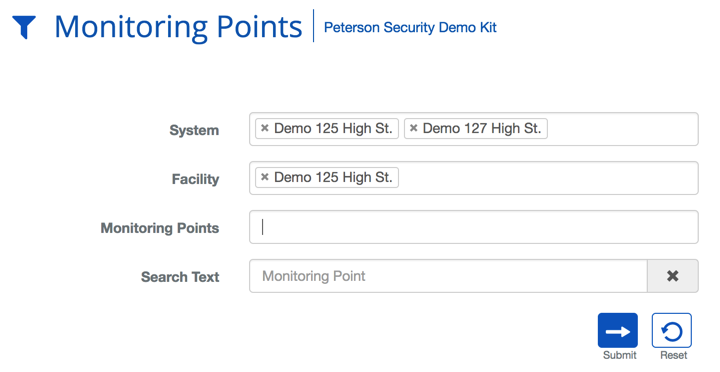
Once you have selected all of the criteria needed, click the ![]() button to load the available Control Points.
button to load the available Control Points.
Key Features
- Multi-System/Multi-Facility - BluSKY's unique architecture is not limited by distance. You can control multiple buildings and systems all at once.
- "At-a-glance Information" - Visual cues provide information on the system at-a-glance.
- This shows you the status of the alarm,
 means open, or not active,
  means closed, or active.
Monitoring
Unlike some of the similar screens, there are no ways to control the Monitoring Points. They, by definition, are suppose to be passive but they can provide a lot of insight into the operation of the Facility.
Definitions
| Item | Description |
|---|---|
| Active - This indicates that the Monitoring Point is currently activated. | |
| Inactive - This indicates that the Monitoring Point is not currently active. | |
| The following symbols will only appear for Monitoring Points that are associated with the Intrusion Prevention System ( IPS ). | |
| The IPS Group associated with the Monitoring Point is Armed Instantly. | |
| The IPS Group associated with the Monitoring Point is Disarmed. | |
| The IPS Group associated with the Monitoring Point is Armed Stay. | |
| The IPS Group associated with the Monitoring Point is Armed Away. |
More on IPS States.