Administration Training
Administration
The Administration section of BluSKY is where a user will find the most common administrative tools needed on a daily basis. From the Administration menu, users will be able to perform common tasks, such as adding new People, adjusting Access Levels and adding Vendors. The available options are determined by the user's permissions that have been set through their Role.
Occupancy
This is an instance of a company that resides within a Facility that is controlled by a BluSKY system. An Occupancy will always belongs to an access control system because they are physically located within the facility. Occupancies never have a physical address that is different from the access control system's physical address
Instructions
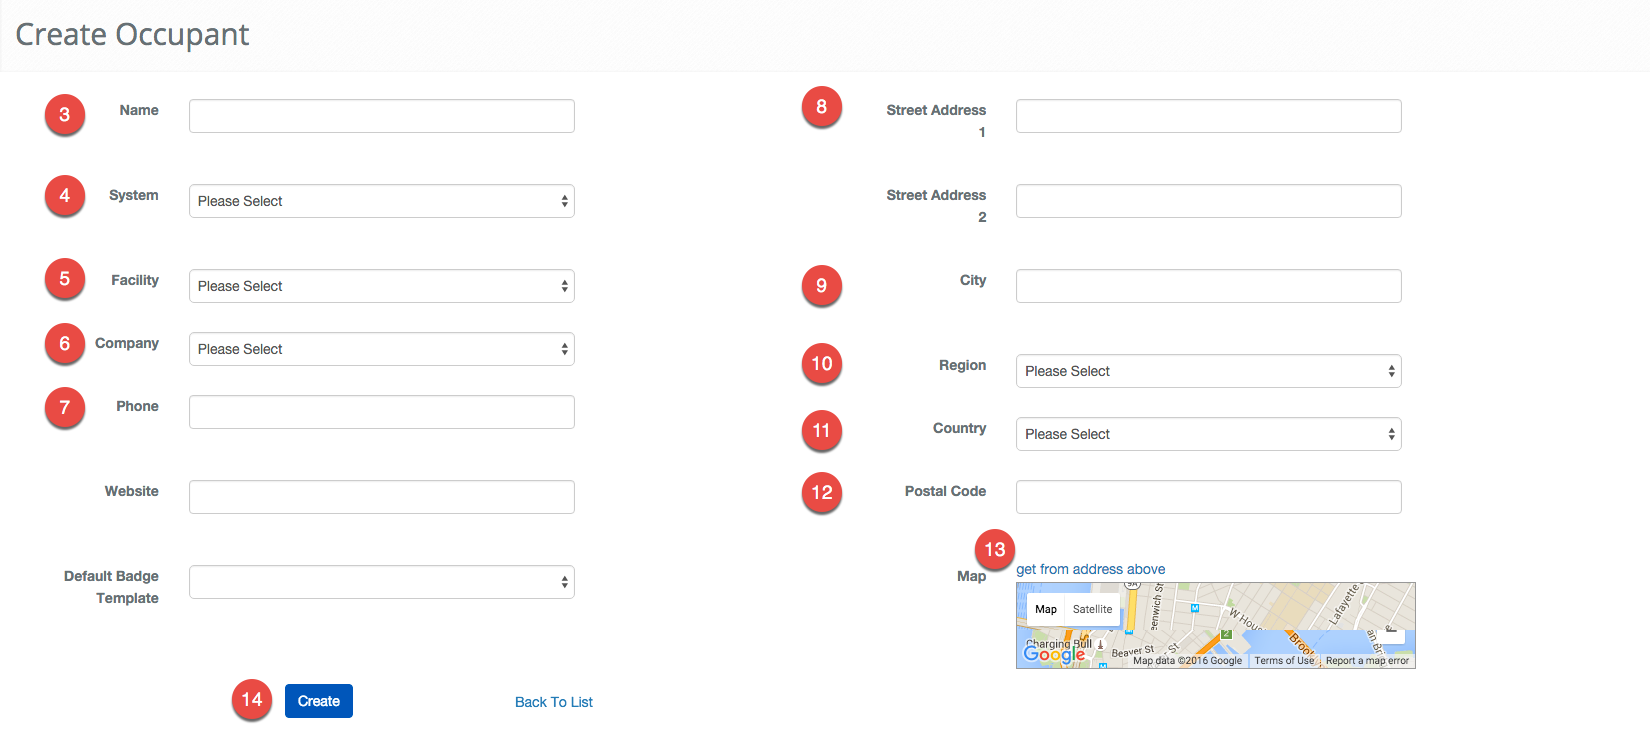
- Log in and navigate to Occupancy. Main Menu-> Administration-> Occupancy
- On the lower left-hand side click the
 Create button.
 - Enter the name of the Occupancy.
- Use the System drop-down menu to select the proper access control system.
- Use the Facility drop-down to select the Facility.
- Use the Company drop-down to select the Company. Often you will use the "New Occupancy" option.
- Optional: Enter the **Phone****Number,**Website, and Badge Template in the fields provided.
- Optional: Email Address Formula information can be entered, but this feature is still in development and has no effect at this time.
- Use the Street Address 1 text area to add an address. Street Address 2 is available if needed.
- Enter the City.
- Use the Region drop-down menu to select the State or Region.
- Select the Country.
- Enter the Postal Code.
- Click the get from address above text to add a location marker to the Map.
- When finished use the
 button to finish.
 - Select the "Floors" button
- Select the checkbox for the floor the occupancy resides in.
- Select "Set Default" for the floor is the default floor.
- Select "Save"
Schedules
Schedules are a collection of time intervals used to control Portals or Floor Stops. Schedules provide an easily managed mechanism to manage the access control system based off timing needs.
Instructions
In this exercise we will be creating an Access Schedule
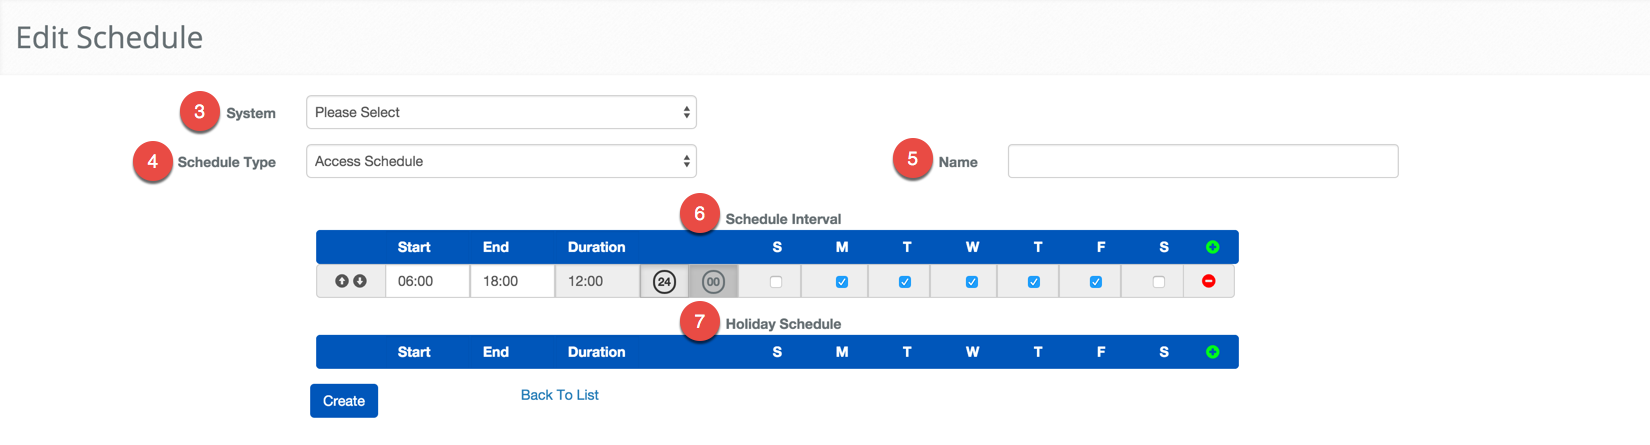
- Log in and navigate to Schedules. Main Menu-> Administration-> Schedules
- In the lower left-hand side click the icon.
- Select System the Schedule will be used with.
- It is important to verify that the Schedule Type is set to Access Schedule.
- Give the Schedule a name using he Name text field.
- Using the Schedule Interval, select the time you want to allow Access.
- ***Note:***If necessary use the
 icon to add another row for more complex timing.
 - *Note:*If there is a period where you wish to disallow access you must use the first interval up until the time where access should be suspended then use another interval when the Access schedule should go into effect again.
- This Schedule would be used to allow a person to use their credential to gain access from 6:00am to 6:00pm.
- Define the Schedule to be applied for Holidays.
- ***Note:***If the schedule is not going to change on a holiday, i.e. normal workday schedule, then you would leave this field blank. If you want to prevent people who are assigned this schedule from entering the building on a holiday then select the , but leave the S-S check boxes empty.
- When finished, use the button to finish.
Delegate Points
An Administrator can delegate points to another Occupancy or Vendor Company. Delegated points appear in the list of points that an Administrator of the receiving Occupancy or Vendor Company can add to a person's access rights or to Access Levels. For instance, in a multi-tenant office building, the Property Manager can delegate public access points such as the main entrance or the turnstiles to Occupancy Administrators and, in turn, they can assign these points to their employees.
Instructions
- Log in and navigate to Delegate Points. Main Menu-> Administration-> Delegate Points
- In the lower left hand side click the icon.
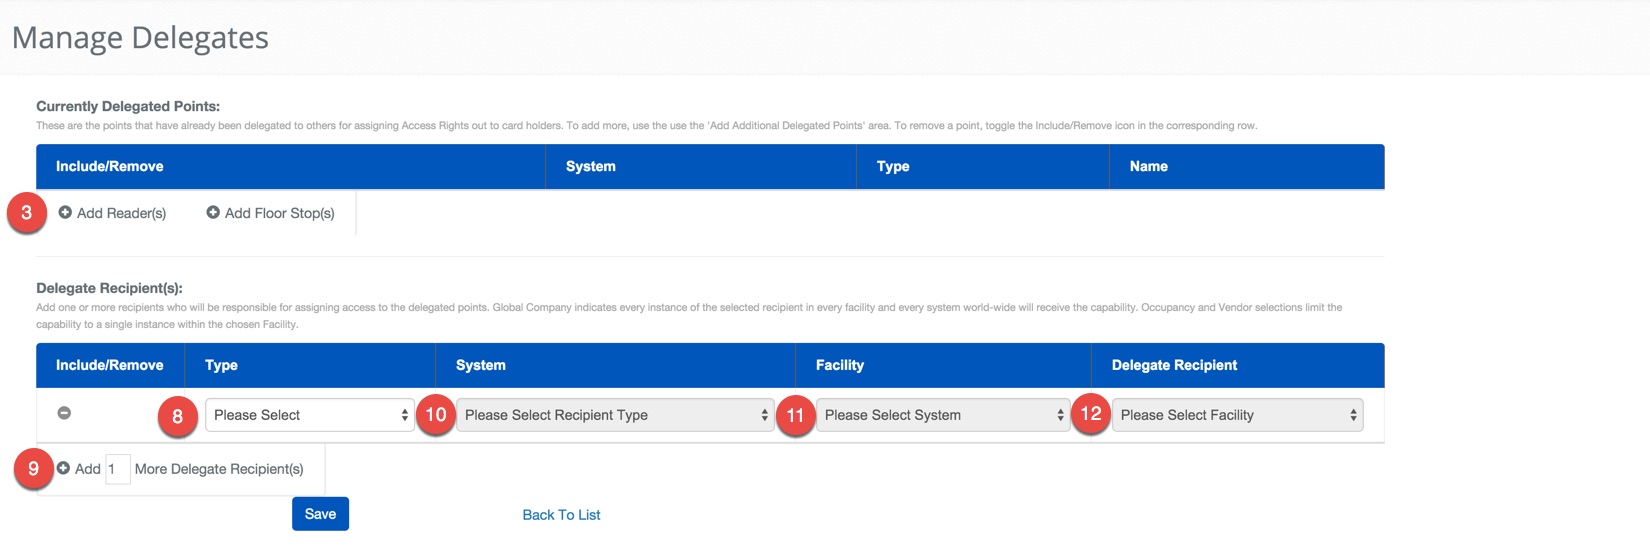
- Under the Currently Delegated Points header, click the
 button to add additional delegate points.
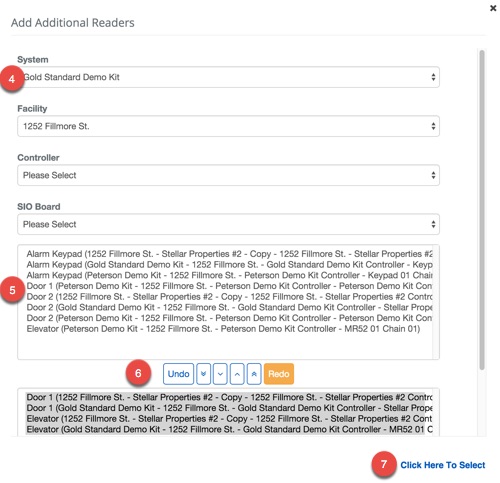
 - The next menu will let you select the System, Facility, Controller and SIO Board to populate the list with available Readers or Floor Stops.
- Select the Reader or Floor Stop from the top list.
- Then assign them using the
 icon to assign a single Reader or Floor Stopor the
  icon to move all of the Readers or Floor Stops.
 - Finish by clicking the Click Here to Select text.
- After you have selected all of the Readers and Floor Stops you will select who to delegate them to.
- Under the Delegate Recipient(s) header, use the
 to add the recipients of the delegated points.
- ***Note:***If you accidently add too many just use the
 to remove the row.
- Select the Type of the Recipient, Global Company, Vendor or Occupant.

- If you have selected Vendor or Occupant, select the System and Facility of the recipient.
- ***Note:***If you select Global Company you may skip this step.
- Select the Delegate Recipient from the drop down menu.
- When finished use the button to finish.
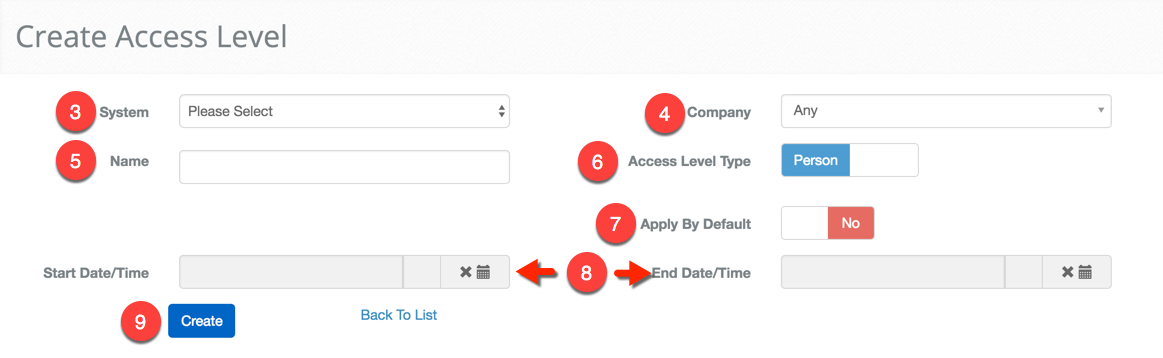
Access Levels
Access Levels are a simple way of granting access to individuals. An Access Level is a list of "access rights". An access right is a "securitypoint" + a Schedule combination. Portals (doors or turnstiles) or Floor Stops are considered security points. An access right might be "Main Entrance / 24x7" or "Floor-3 / 6a-to-7p: Access Levels act as a shorthand way of assigning several access rights to people. Also, when, one is edited, everybody to whom it was granted is immediately updated.
Instructions
- Log in and navigate to Access Levels. Main Menu-> Administration-> Access Levels
- Click the button to create a new Access Level.
- Select the System for which the Access Level is being created.
- If the Access Level should only be used by a specific Company, select it in the Company field.
- **Note:**If a Company is selected, the Access Level will only be viewable to be selected and applied by users with a Role that is scoped to the specified System and/or Company.
- **Note:**If a Company is NOT selected, the Access Level will only be viewable to be selected and applied by users with a Role that is scoped to the specified System. This typically means only the building manager can assign this Access Level to a person.
- Name the Access Level.
- ***Note:***BluBØX recommends naming the Access Level in such a way that it describes the access and not the people that use the Access Level. It is typically better to group Access Levels together to describe the type of person using Access Level Groups.
- Use the Person/Visitor toggle to specify whether this Access Level is for People or for Visitors.
- Note: The same Access Level cannot be used for both Visitors and People.
- Apply By Default: if selected, the Access Level will be given automatically to every person who is affiliated with the Company specified in #4. If the Company field is set to "Any" the Access Level will be given to all people records that are created in the System, regardless of Company affiliation.
- Start & End Date /Time: these fields serve to specify a validity period for the Access Level. If no Start Time is specified, the Access Level is immediately valid. If no End Time is specified, the Access Level never expires.
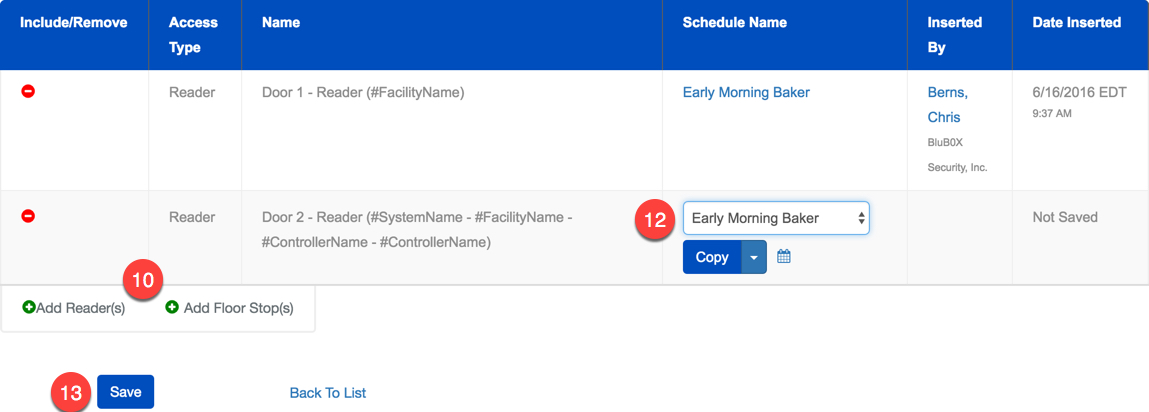
- Click the button to display the next screen. A sample is shown below. It serves to specify the list of access rights (security point/Schedule combinations) that shall be contained in the Access Level.
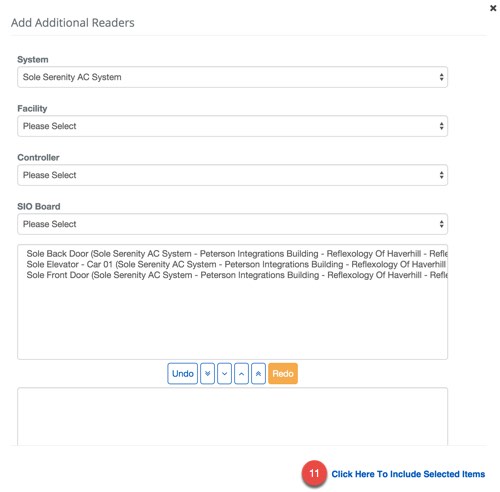
- Click the icon next to Add Reader(s) or to Add Floor Stop(s) to add a new security point.
- Highlight the one or more security points (Readers or Floor Stops) that appear in the top list that must be included in the Access Level, then click the button to move them to the lower assignment list.
- Hint: If you wish to move ALL the security points from the top list to the lower list, you can do it in one step by clicking the button without selecting anything.
- Either way, complete the task by clicking the "Click Here To Include Selected Items" link at the bottom of the window. This will add the security points from the lower list into the Access Level.
- Access Schedules: the final step is to specify a Schedule for each of the Access Level's security points using the pull-downs in the Schedule name column.
- Note: Any security point to which a Schedule is not assigned at this time will not be included in the Access Level when it is saved.
- Save the Access Level by clicking the
 button.
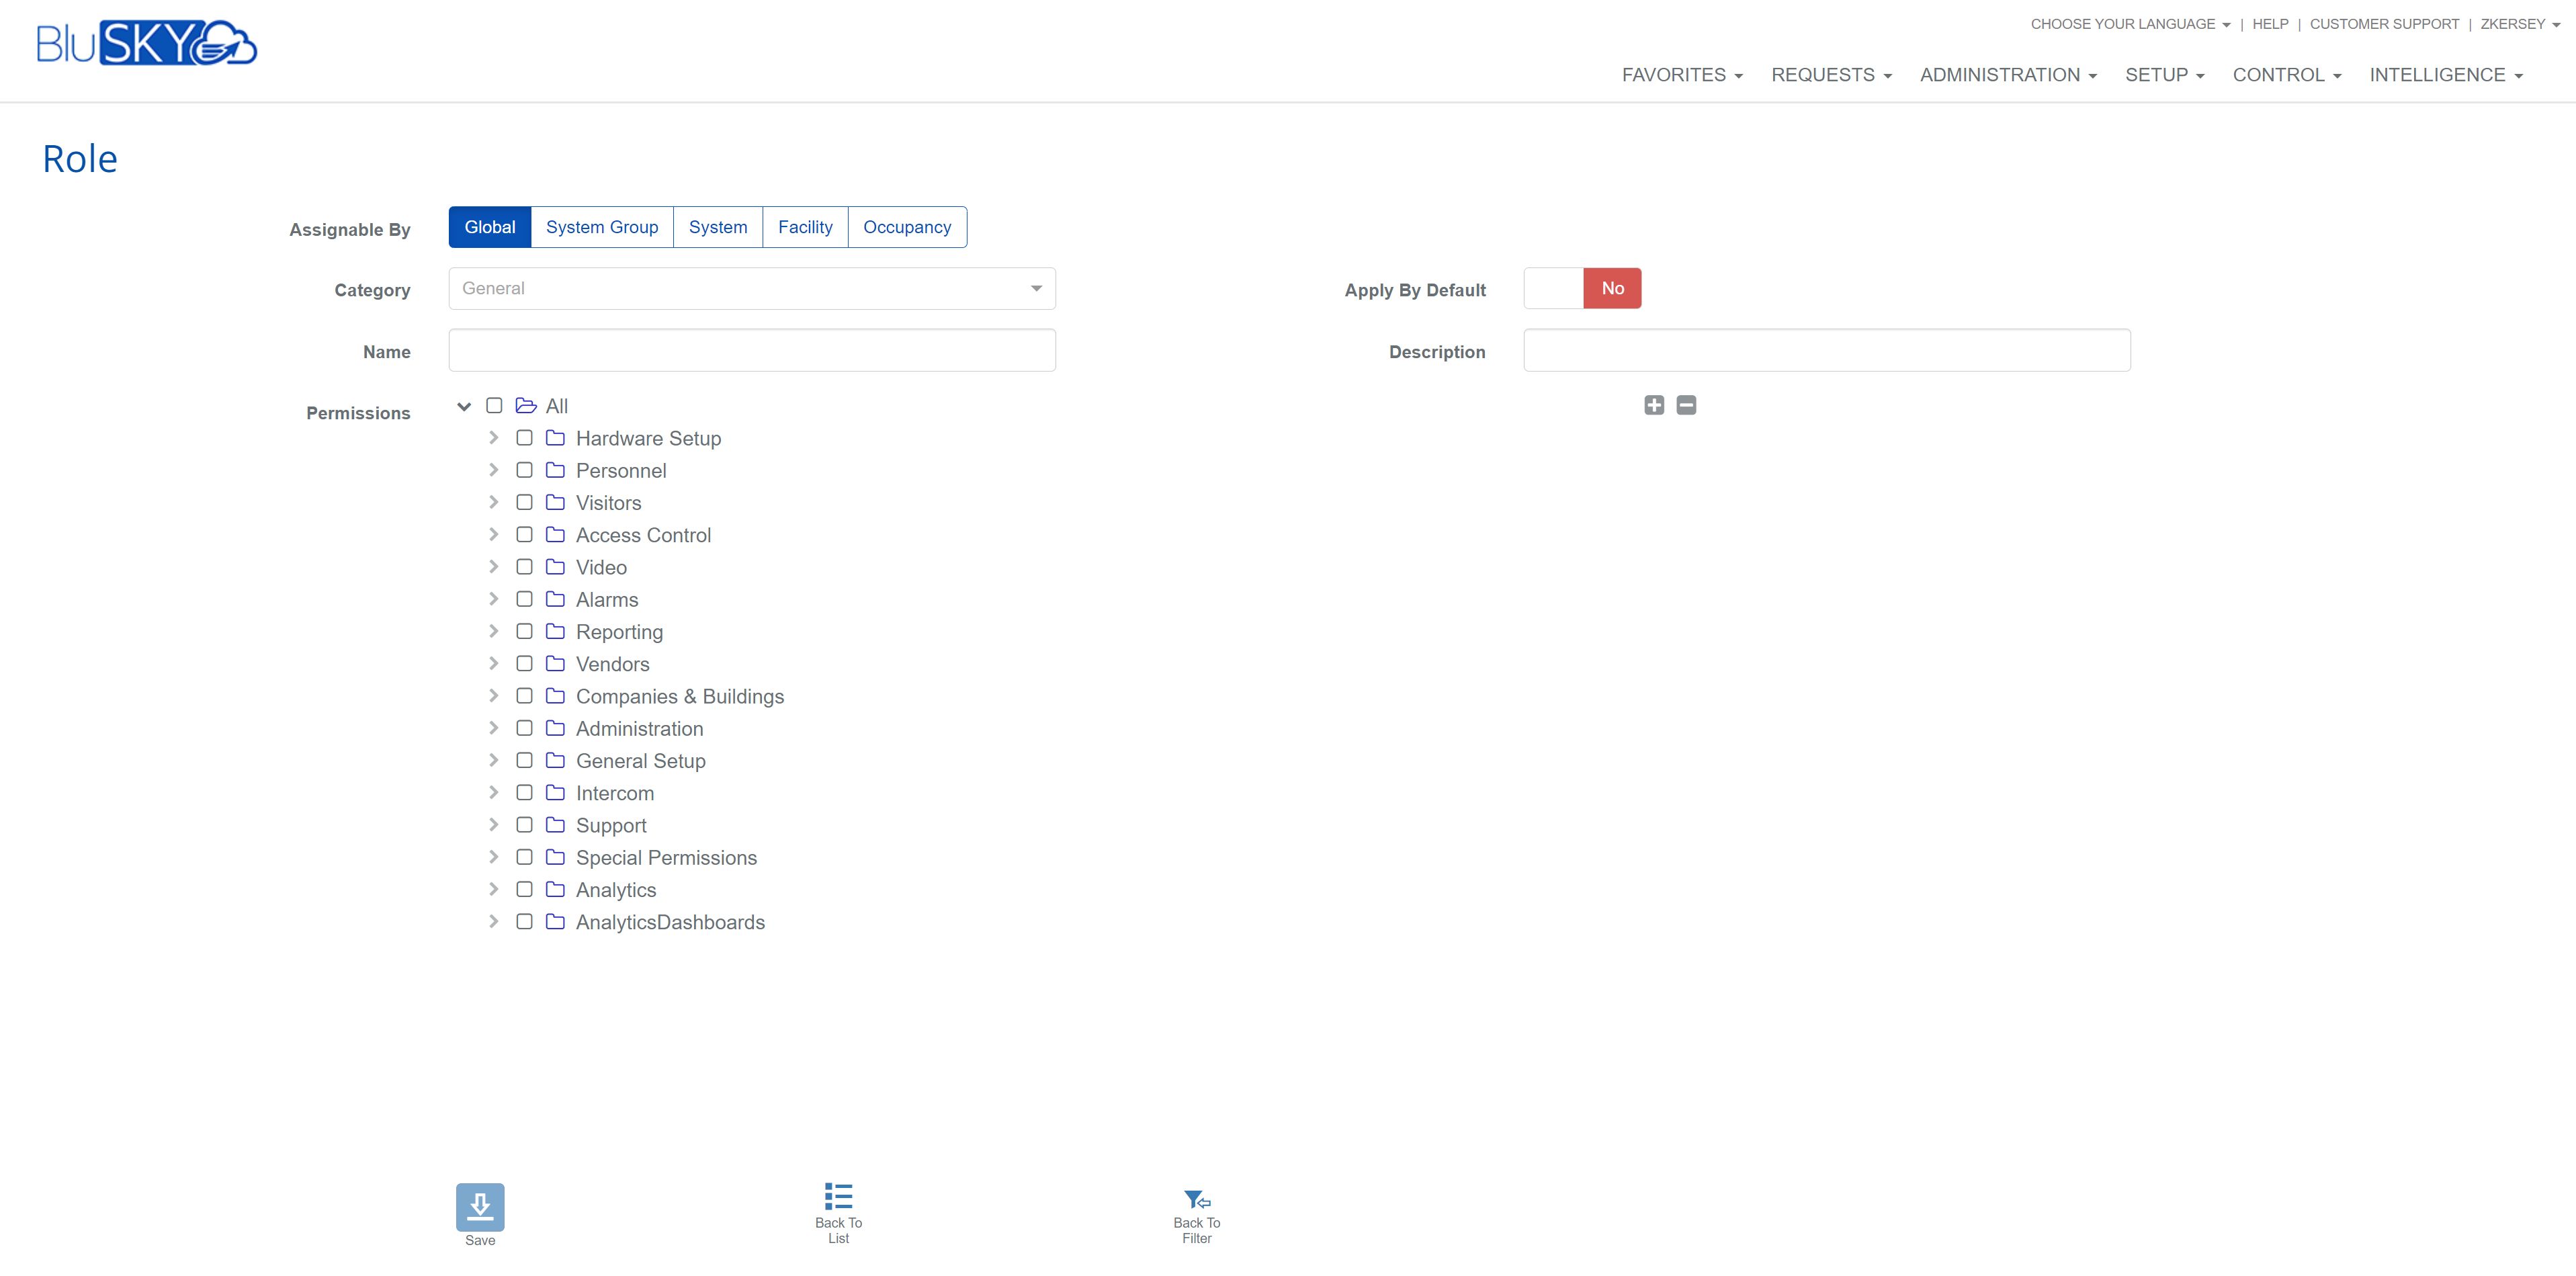
Roles
Roles are a collection of permissions that can be granted to one or more Person. Roles are predominately used to define a Person ability to control the system through BluSKY.
If you need help understanding permissions please check out our Permissions Article
Instructions
- Log in and navigate to Roles. Main Menu-> Administration-> Roles
- On the filter page, click the Submit button to load the list view.
- On the lower left hand, side click the icon.
- Select the scope that the Role will be used for with Assignable By.
- Fill in the field that appears based on the chosen Role scope:
- Global: N/A
- System Group: System Group
- System: System
- Facility: Facility
- Occupancy: System and Occupancy
- Select the Category of this Role (General or Life Safety).
- You can also specify if the Role should be Apply by Default to the people created with the same Occupant.
- Enter the name of the Role using the Name field.
- You may also add a Description for easy administration of the Role.
- Set the Permissions for this role. Please read the Permissions article if you do not completely understand the impact of each choice.
- You set the permission by left-clicking on the box to the left of the box(s) you want to select.
- You can drill down into the sub-menus by clicking on the hollow triangle next to the option you want to drill into.
- Key:
 = Partial Permissions,
  = Complete Permissions.
- Create the Role by selecting the button.
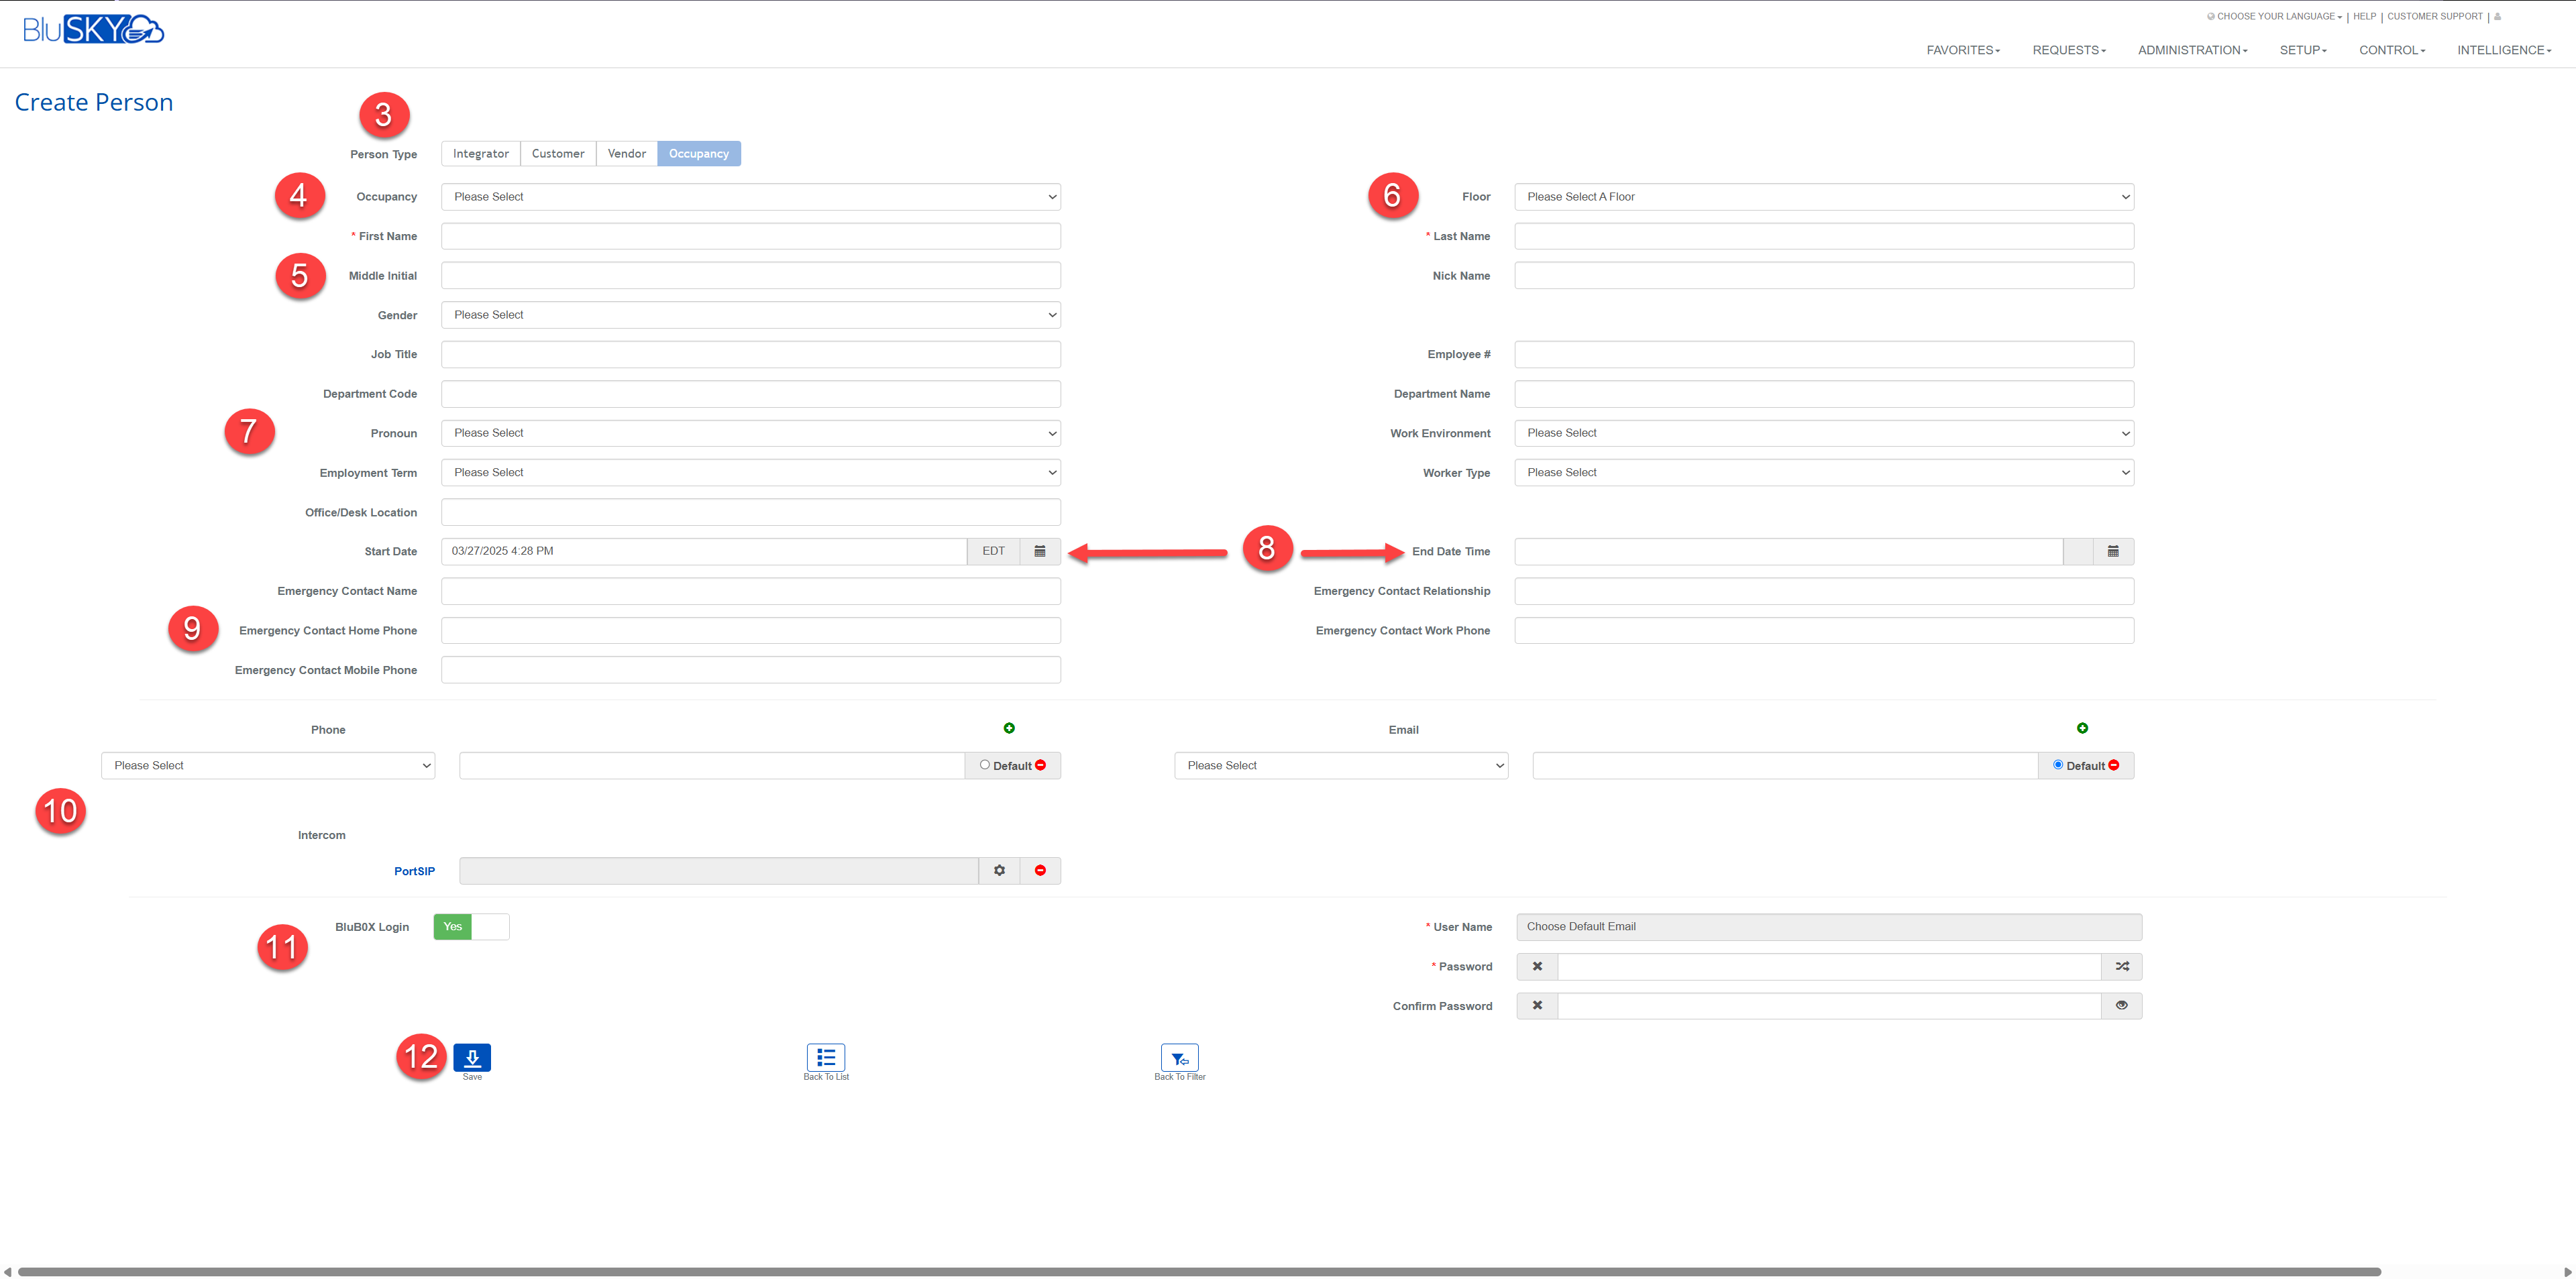
People
People are the ones that utilize the access control system on a regular basis. One of the most powerful features of BluSKY is its ability to manage and control the various aspects of any Person in the system.
Use one of the links below to learn more about the Person View List
Instructions
- Log in and navigate to People. Main Menu-> Administration-> People
- In the lower left-hand side of the view list, click the icon.
- Select the type of entity this newly-created Person will belong to. (Integrator, Customer,Vendor or Occupancy).
- Based on the previous choice, select the Integrator, Customer,Vendor or Occupancy using the correspondingly-labeled field.
- Enter personal information about the Person.
- Enter a First Name and Last Name.
- Optionally, enter a Middle Initial and/or Nick Name.
- Optionally, select a Gender and/or Pronounsusing the dropdown fields.
- Select the home Floor of the Person.
- Note: the list of available Floor options is limited to Floors that the entity (Integrator, Customer, Vendor or Occupancy) belongs to in its Facility.
- Optionally, enter department/job information about the Person.
- Enter a Job Title, Employee #, Department Code, Department Name, and/or Office/Desk Location.
- Select a Work Environment, Employment Term,and/or Worker Typeusing the dropdown fields.
- If applicable, use the Start Date and End Date fields to specify a delayed profile activation date or a profile expiration date.
- ***Note:***By default, People are created with a Start Date equal to the current time and a blank End Date. This means their Person profile is immediately active and does not expire.
- Optionally, enter emergency contact information for the Person.
- Enter an Emergency Contact Name, Emergency Contact Relationship, Emergency Contact Home Phone, Emergency Contact Work Phone, and/or Emergency Contact Mobile Phone.
- If applicable, enter contact information for the Person.
- If this Person intends to receive SMS/text Notifications from BluSKY, enter their Phone number and select its type (Work, Home, Mobile, Call Tree, or Fax) using the adjacent dropdown field.
- If this Person intends to receive email Notifications from BluSKY or log in to BluSKY, enter their Email addressand select its type (Work, Occupancy, or Personal) using the adjacent dropdown field.
- If this Person intends to receive Intercom calls through BluSKY, select the PortSIP option from the dropdown field. After the text box turns gray, click on the gear button to automatically generate a PortSIP extension for this Person profile.
- Note: Multiple phone numbers or email addresses can be added using the green add buttons.
- If multiple phone numbers or email addresses exist for a single Person profile, using the Default radio button to indicate which contact information is the default.

- If applicable, set the BluB0X Login toggle to 'Yes' to reveal the login information fields.
- Note: The User Name field cannot be edited and automatically uses the value of the default email address.
- Enter a Password for this Person profile.
- Note: Passwords must be at least 8 characters long and include uppercase, lowercase, and special characters.
- Note: If desired, use the shuffle button to generate a random password.
- Re-enter the same value in the Confirm Password field that is in the Password field.
- ***Note:***The eye button can be used to toggle both Password fields' displays between secured text or normal text.

- When finished, use the button to create the Person profile.
Add an Access Level to a Person
- Log in and navigate to People. Main Menu->Administration->People
- Use the search criteria feature, then select the entry you wish to edit from the list.
- Click the
 button in the lower left-hand side to open the Person Edit screen.
- Note: If the edit button is not available, ensure that only one entry has been highlighted.
- Use the tabs to select Access if not already on the correct page.
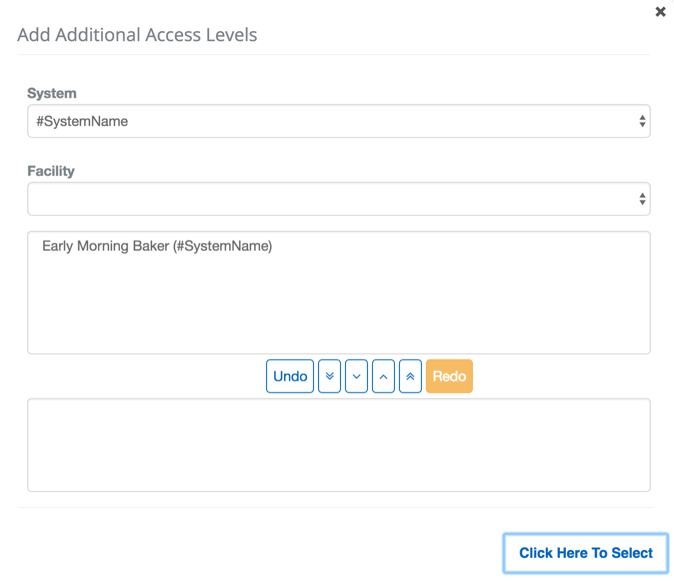
- Use the Add Access Level button below the list to add an Access Level**.**
![]()
- In the new popup menu, click all of the Access Levels you want to assign.
- Use the button to move them to the assign section of the menu. All Access Levels in the lower section field will be added to the Person.
- Note: If you have an Access Level assigned mistakenly use the
 button to move it to the unassigned section again.
- Add the selected Access Levels to the Person by clicking the
 button.
 - Commit changes with the button.
Add Reader Access to a Person

- Log in and navigate to People. Main Menu->Administration->People
- Use the search criteria feature, then select the entry you wish to edit from the list.
- Click the buttonin the lower left-hand side to open the Person Edit screen.
- Note: If the edit button is not available, ensure that only one entry has been highlighted.
- Use the tabs to select Access if not already on the correct page.
- Use the Add Reader(s) button below the list to add a Reader.
![]()
- In the new popup menu, click all of the Readers you want to assign.
- Use the button to move them to the assign section of the menu. All Readers in the lower section field will be added to the Person.
- Note: If you have a Reader assigned mistakenly use the button to move it to the unassigned section again.
- Add the selected Readers to the Person by clicking the button.
- Once the Readers have been added use the Schedule drop-down menu to select the Access Schedule that should be used for this Readers.
- Note: Repeat this step until all Readers have a Schedule or use the copy options to apply to multiple Readers.
- Optional: Assign a start and end time for the access rights using the Access Rights Granted Start and Access Rights Granted End to select a date and time for the access rights to begin and/or expire.
- Commit changes with the button.
Vendors
Vendors are organizations that need access to an access control system to provide goods or services to the Occupants of that system. After you set up a Vendor you can create new people associated with the Vendor and have the Vendor company manage their own personnel and access rights.
Instructions
In order to create a Vendor, you will need to provide details on the Vendor. This information will include the basics like name, address and contact information. There may also be COI specific fields that indicate the status of the Vendor's COI and their ability to perform work in the building. Do not worry if these fields are not displayed, they are only exposed when your System requires COI for Vendors. 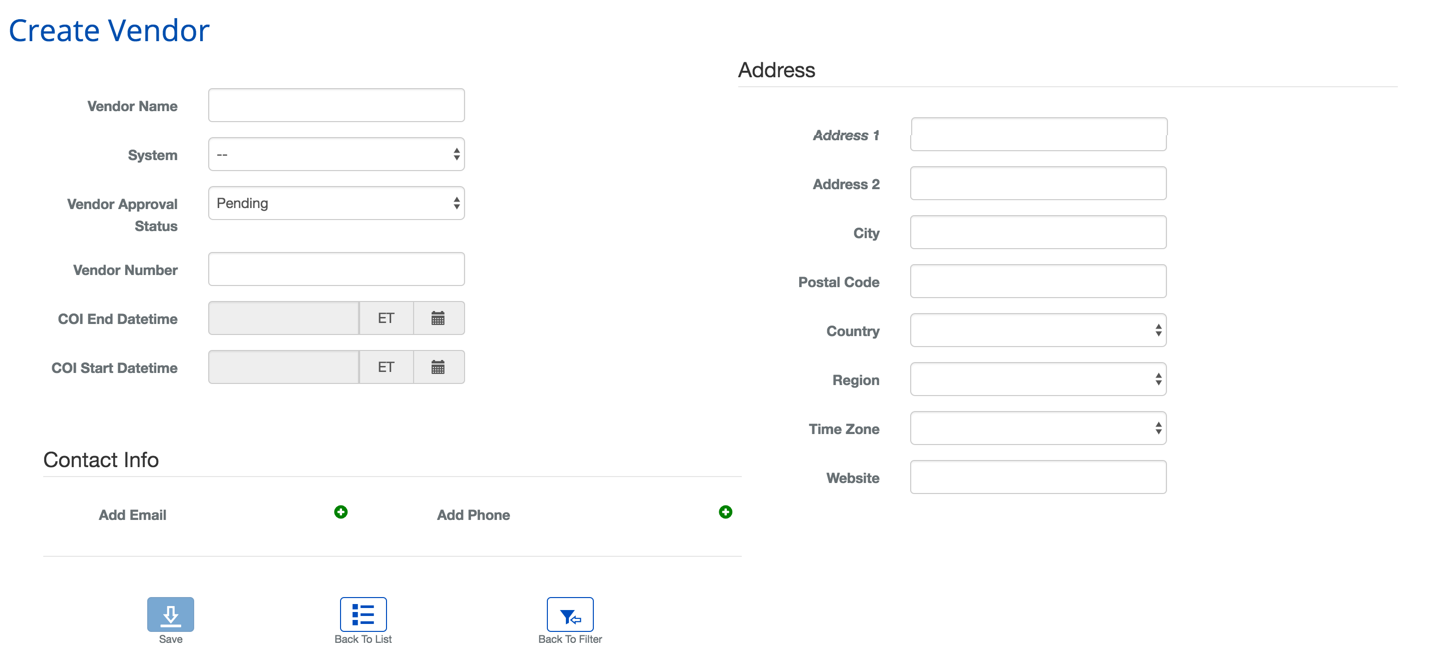
- Enter the Vendor's name.
- Select the System the Vendor will need access.
- Note: This Vendor can be associated with other Systems as well, through the Associations tab that will be available once the initial record is created.
- Select the current Vendor Approval Status.
- Note: This status will indicate to the person admitting the Vendor, whether they are allowed on site. The person will, however, have the ability to override the status if the situation allows for it.
- Enter the Vendor Number if applicable.
- If applicable: Add when the Certificate of Insurance (COI) becomes valid..
- If applicable: Add when the Certificate of Insurance (COI) becomes invalid..
- Note: If these fields are not visible on the user interface, contact support@blub0x.com or your Integrator of record.
- Add the Contact Information for the user using the appropriate fields. The more details you are able to provide the easier administering the Vendor will be in the future.
- Choose the Time Zone of the Vendor.
- **Note:**This is an important step, it will prevent the entry from being created if the time zone is not set.
- Use the get from address above text to add a location marker to the map. (Not shown in image above)
- When finished use the button to finish.
Definitions
| Name | Description |
|---|---|
| Vendor Name | The name of the Vendor |
| System | The System that will store the Vendor record. Note the Vendor can be shared across System by using the Associations tab. |
| Vendor Approval Status | This field indicated whether the Vendor has been Approved or Not Approved to perform work in the building. |
| Vendor Number | Any numeric used to identify the Vendor. |
| COI Start Datetime | When the Certificate of Insurance (COI) becomes valid. |
| COI End Datetime | When the Certificate of Insurance (COI) becomes invalid. |
| Address | The address of the Integrator, User, or Company. |
| Address 2 | An additional address field for lengthy or complex addresses. |
| City | The City. |
| Region | The Region, i.e. State, Province, County, etc. |
| Country | The country. |
| Time Zone | The time zone of the Vendor's office. |
| Contact Info | Where the contact emails and phone numbers are stored. |
Holidays
Special days of the year may interfere with normal business operations. Holidays provide an easy way to control the access control system when you or your employees are enjoying a day off with friends and family.
Instructions
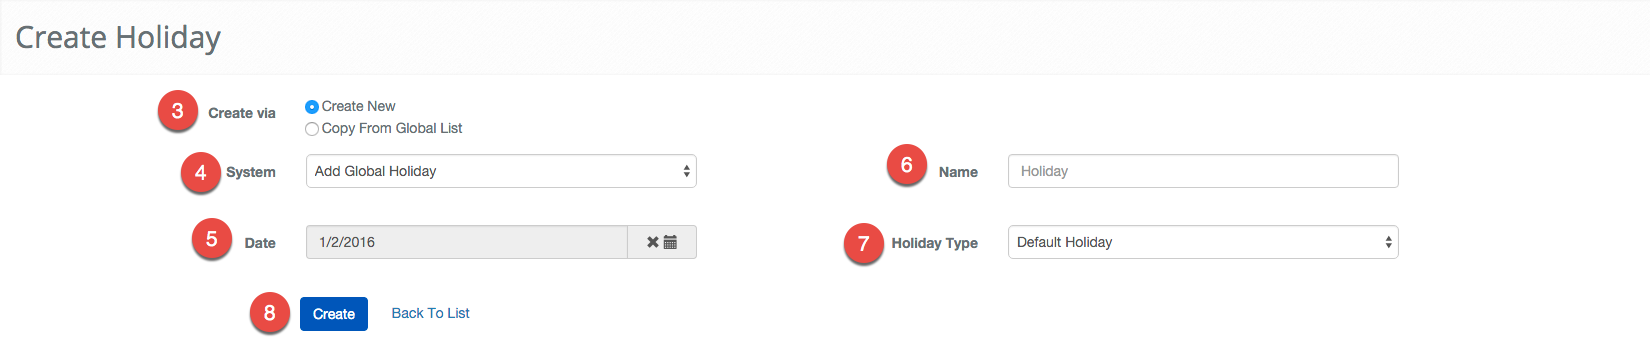
- Log in and navigate to Holidays. Main Menu-> Administration-> Holidays
- On the lower left-hand side click the icon.
- Select the Create New radio button to the right of the Create via text.
- Use the System drop down menu to Select the proper access control system.
- Next, enter the date of the Holiday.


- Enter the Name of the Holiday.
- Select Default Holiday from the drop-down menu.
- Once complete, use the button to finish.
Watchlist
A Watchlist is a list of people that are banned from the Facility. The list is maintained by the Occupants and when a Visitor Request is made that has the same name as someone on the list a warning is presented to the person.
Information: This feature is currently in Beta
Instructions
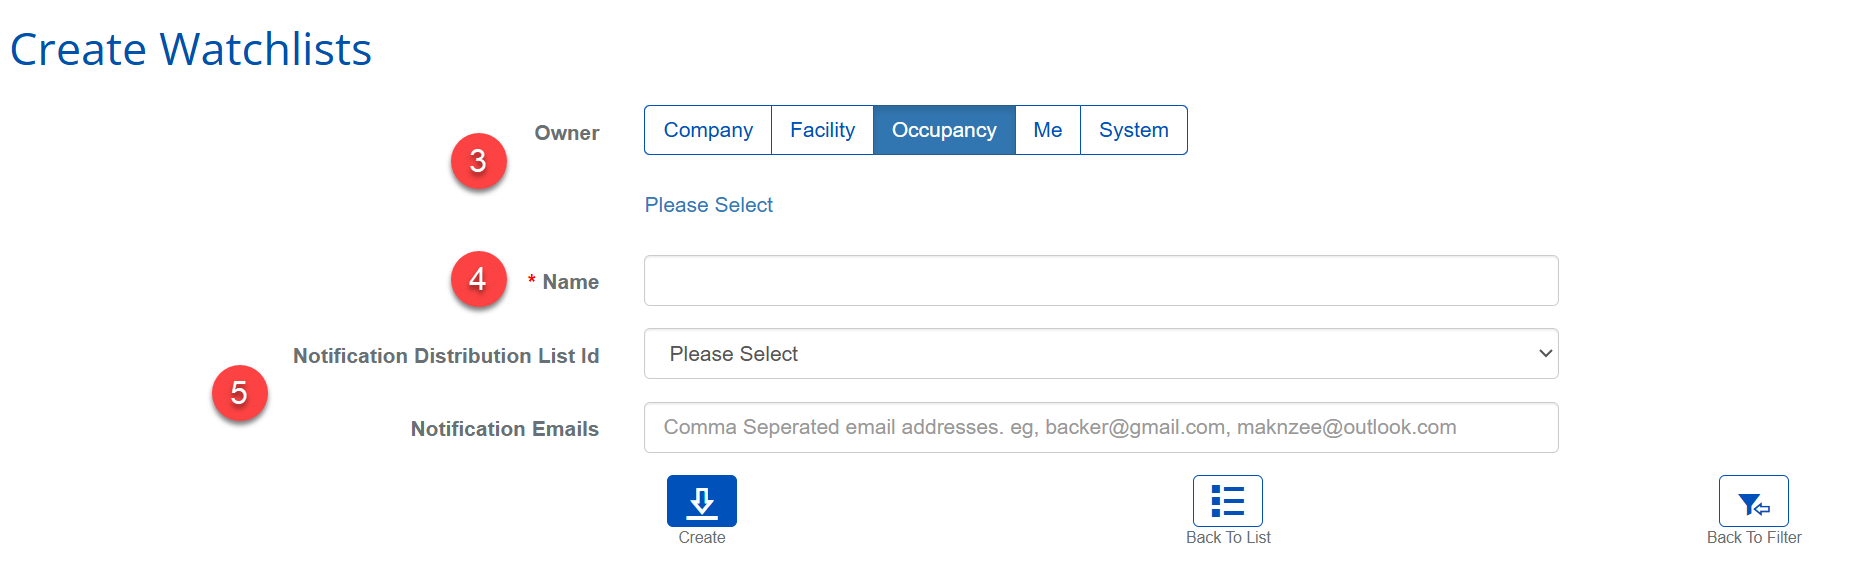
- In BluSKY, navigate to Watchlists. Main Menu-> Administration-> Watchlists
- In the lower left hand side click the icon.
- Depending on the user's Role, a number of available options are available to specify the Owner of the Watchlist. The selection here impacts who is able to view/edit/delete the Watchlist, as well as the scope of its application.
- See the Watchlist Owner Definition section below for more information on each Owner type.
- When the Owner selection is changed, users must specify the entity by clicking "Please Select" to open a picker window or making a selection in the drop-down menu (in the case of System Owner). This step is not necessary if Me is selected.
- Use the Name text field to give the Watchlist a name.
- If applicable, specify a Distribution List to receive Watchlist Notifications using the Notification Distribution List Id dropdown menu. Or, specify a list of static email addresses to receive these Notifications using the Notification Emails field.
- When finished, click the
 button to save the new Watchlist.
You are now ready to add Members to your new Watchlist. Follow this guide for steps on how to do just that: