How to change a reader from "Card Only" mode to "Card and Pin" on a schedule
Overview
This article assumes that the reader is familiar with Schedules, Triggers, Commands, and Procedures. If you are not familiar, then please select the links to get a basic understanding of these features.
Create a schedule for the time you want the reader to be in "Card and Pin" mode
Before starting to configure the reader to change modes please take a moment and think about the behavior you want.
- When do you want to have the Reader in "Card and Pin" mode?
- In the example below we create one schedule that spans from the start time (08:00) to the end time (17:00). For example: Door 1 to be in "Card Only" mode during the business day (08:00 - 17:00).
- Create a schedule for the time period that you want the reader mode set to "Card Only". Only during this schedule will only a card swipe grant access. At the end of the schedule period the card reader will be reset to "Card and Pin" mode. Anytime outside the newly created schedule the user will have to swipe their card AND enter a PIN (Card and Pin mode).
- When do you want the portal put back on schedule?
- This could be a separate schedule. We are only concerned about the end time for the schedule.
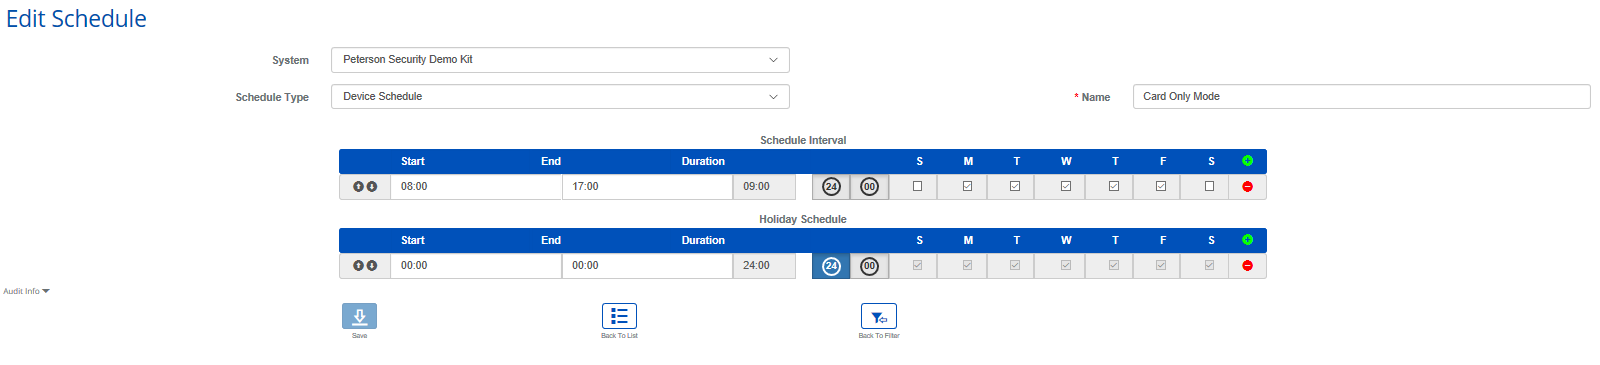
Create First Card Swipe Schedule
- Go to Schedule -> Create
- Create a schedule for the time period that you want to be the card reader in "Card Only" mode. Only during this schedule the card reader will be in "Card Only" mode. Outside this schedule the card reader will be in "Card and Pin" mode. At the end of the schedule the card reader will be reset to "Card and Pin" mode. We recommend that for holidays this schedule does not enable the reader to change to "Card Only" mode. The example below will enable "Card Only" mode M-F, from 08:00 to 17:00. This ability is not available on weekends or holidays. Note: The duration for the holidays is 00:00, not 24:00.
Create "Card Only" Triggers
You will create 2 triggers:
- One trigger "CardOnlyModeSet" to set the "Card Only" mode to allow only a card swipe to grant access.
- The other trigger "CardOnlyModeReset" to set the "CardandPin" mode to enforce users to swipe their card AND enter a PIN.
Trigger: CardOnlyModeSet
Create a Trigger to recognize when the "Casrd Only Mode" schedule created above becomes active. This trigger is only concerned with the start time of the schedule selected.
- Create a trigger: Setup->Triggers->Create
- System, Controller, and Name will change based on your configuration.
- Set "Trigger Source Type" to "Timezone"
- Set "Transaction Type" to "Change of State: Trigger Variable, Time Zone & Triggers"
- Set Transaction Code" to "Became Active"
- Set "Trigger Schedule" to "Device Always On (Global)
- This could be set to the same as the Source Schedule, but to avoid a race condition where the two schedules are started milliseconds apart and out of order it is best practice to leave this running 24/7.
- Set "Source Schedule" to "Card Only Mode"
- Select Create

Trigger: CardOnlyModeReset
Create a Trigger to recognize when the "Card Only Mode" schedule created above becomes inactive. This trigger is only concerned with the end-time of the schedule.
- Create a trigger: Setup->Triggers->Create
- System, Controller, and Name will change based on your configuration.
- Set "Trigger Source Type" to "Timezone"
- Set "Transaction Type" to "Change of State: Trigger Variable, Time Zone & Triggers"
- Set Transaction Code" to "Became inactive"
- Set "Trigger Schedule" to "Device Always On (Global)
- This could be set to the same as the Source Schedule, but to avoid a race condition where the two schedules are started milisecons appart and out of order it is best practice to leave this running 24/7.
- Set "Source Schedule" to "Card Only Mode"
- Select Create

Create First Card Swipe Commands
Now that the triggers have been created it is time to create the actions (Commands) that you want done when the trigger is triggered.
There will be 2 commands created.
- The 1st command will be "CardOnlyModeSet". This command will set the "Card Only" mode for the portal to enable only a card swipe to grant access.
- The 2nd command will be "CardOnlyModeReset". This command will set the "Card and Pin" mode for the portal to enforce a card swipe and a PIN be entered.
Command: CardOnlyMode
This flag will be set the "Card Only" portal mode for the Door 1 Portal when the schedule starts.

Command: CardandPinMode
This command will be set the "Card and Pin required" portal mode for the Door 1 Portal when the schedule ends.

Create Card Only Procedures
Now that you have triggers and commands you need to link the two together, so that when the trigger is triggered there is an action (Command) taken. You need to create 2 procedures
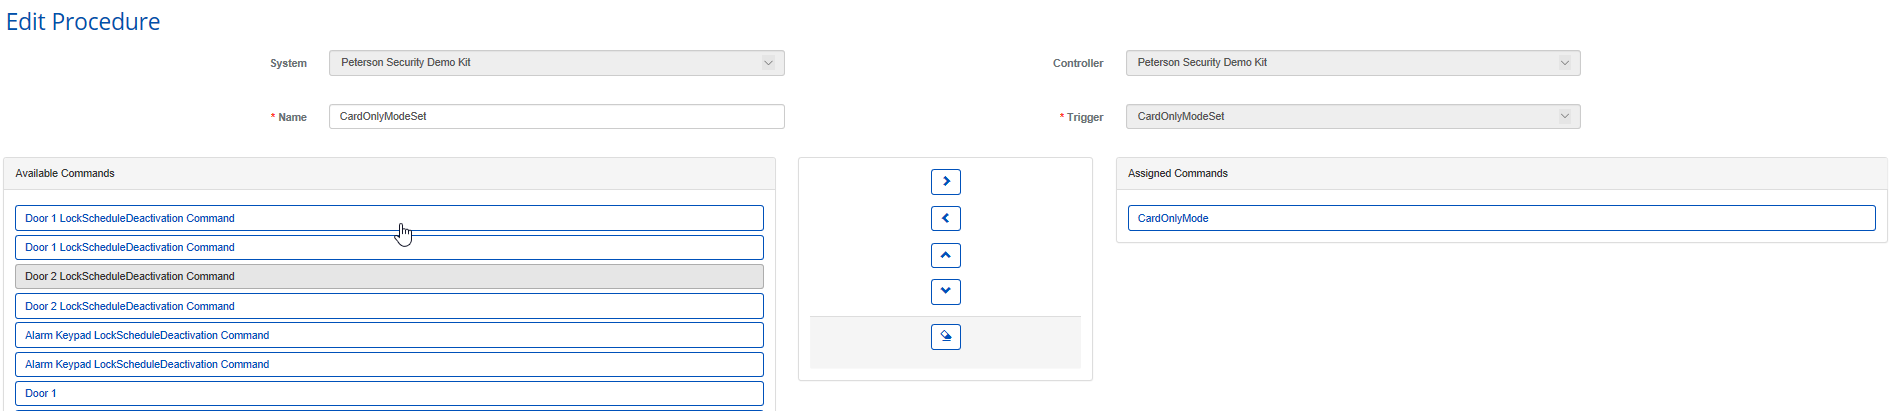
Procedure: CardOnlyModeSet
In the screenshot below you can see the connecting of the CardOnlyModeSet trigger to the CardOnlyMode command. Nothing complicated here.
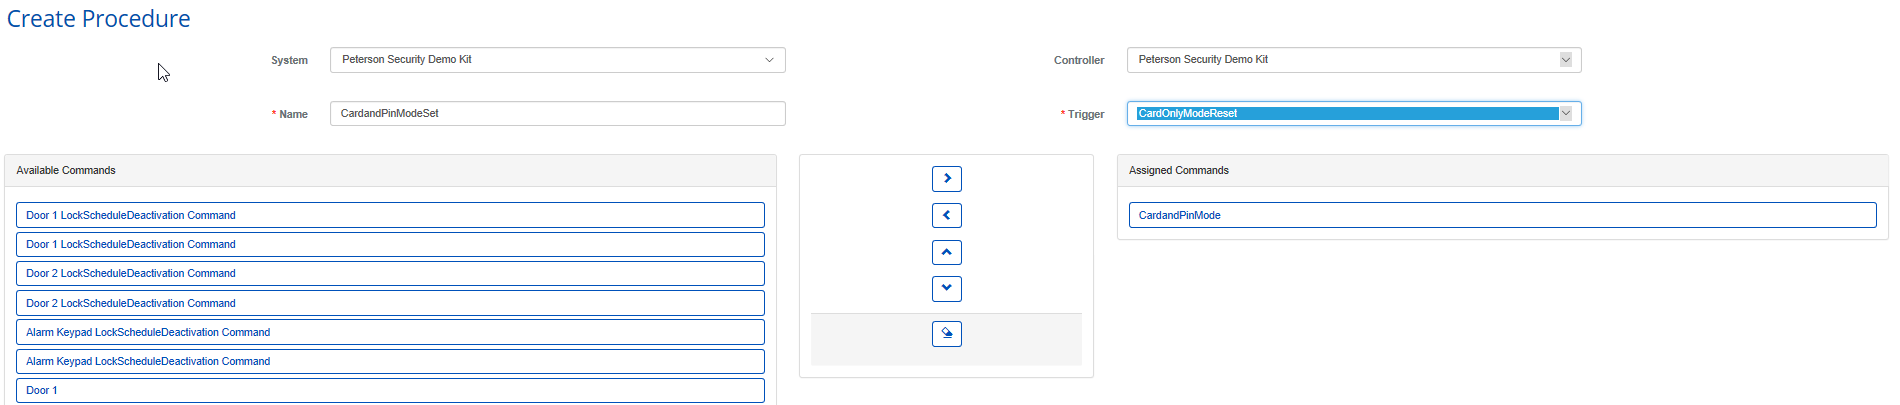
Procedure: CardandPinModeSet
In the screenshot below you can see the connecting of the "CardOnlyModeReset" trigger to the "CandandPinMode" command. This procedure will be called at the trailing edge of the "Card Only Mode" schedule. Phrased slightly differently, we want to make sure the portal is set back to "Card and Pin" mode at the end of the day.