Visitor Admission - Quick Start
Visitor Admission is the primary means for Security or an office administrator to process a visitor into a building or a facility. With this interface, the user can take a picture, assign an access card, check a visitor in at the beginning of the day and out at the end of the day. This is also where a user can see who is expected, who is in, and who has left the building.
If you are looking for how to create a new Visitor Request, please see our quick start guide for Requesting a Visitor.
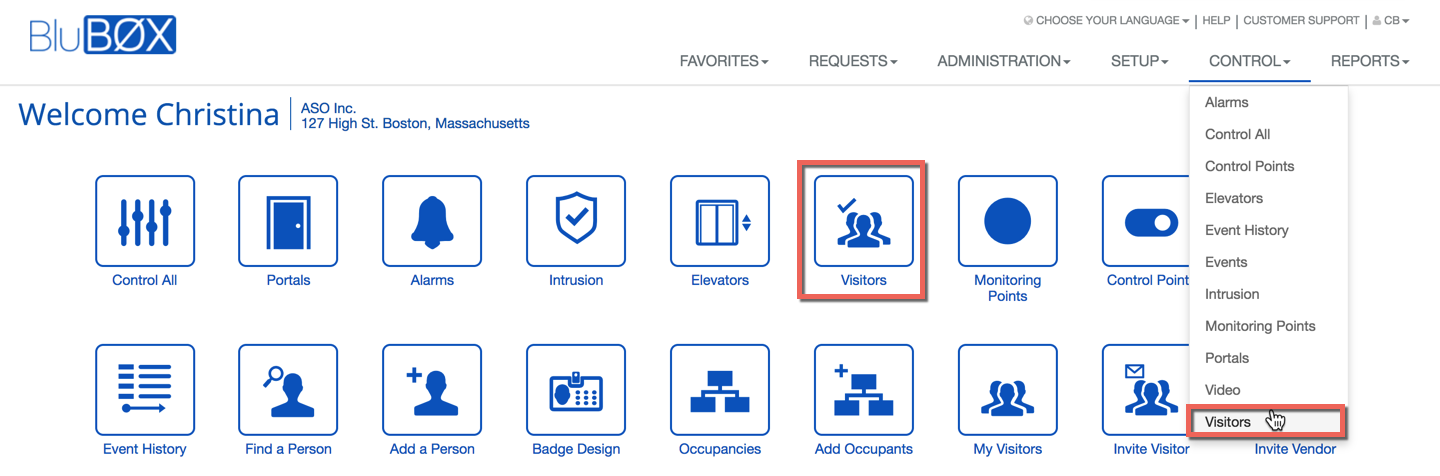
Getting to Visitor Admission
If you have permission to process visitors, the button will appear on the home screen and will available through the Control drop-down menu. If you do not have access to this portion of BluSKY and believe you should, please contact your tenant or building manager.
Search Criteria
Proper use of the search feature can make visitor processing smooth and welcoming for your guests. Especially in larger buildings where speed is of the essence, BluSKY is here to help.
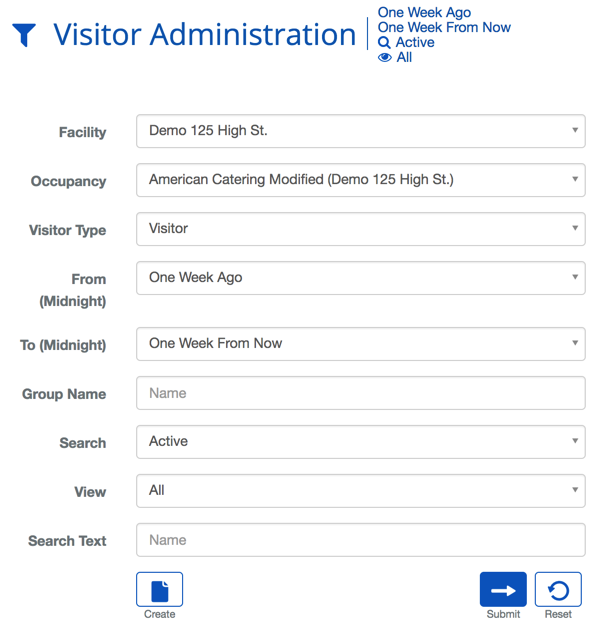
| Criteria | Description |
|---|---|
| Facility | This will narrow search results to a particular Facility. |
| Occupancy | This will narrow search results to a particular Occupant. |
| Search Text | This field is used to limit the number of rows listed in the list box below. To use simply type a string of characters or words. Please note you will only see those items you have the permission and access rights for. |
| Visitor Type | Type of Visitor expected. |
| Days Before | How many days in the past the Visitor was expected. |
| Days After | How many days in the future the Visitor is expected. |
| Group Name | This will narrow search results to a particular Group. |
| View | This option toggle whether deleted entries are included in results. |
| Create | Will bring you to the create screen. Use this if the entity does not exist in the BluSKY database. Be extremely careful not to create duplicates with slightly different names. |
| Submit | This button performs a search based on the criteria selected in the filter. |
| Reset | This button clears all fields in order to start a new search. |
Creating a Visitor Request
Visitor Requests become Visitor Invitations in the Visitor Admission screen. Since all Visitor Invitations start as Visitor Requests so we added a shortcut to Visitor Request Creation. This allows you to quickly add new Visitors that may not be pre-registered. Once you are done, BluSKY will return you to the Visitor Admission screen to allow you to check the visitor in right away. The guides Create a Visitor Request and Requesting a Visitor- Quick Start, cover these topics in more detail.
Viewing and Editing the Visitor Invitation
Pre-authorized visitors is the best way to ensure a smooth visitor experience. However, sometimes changes may need to be made or you may need more details than the list view provides. To see more information, select the entry from the list and click the ![]() button to view or the
button to view or the ![]() button to edit. See how to, Edit a Visitor Request or View a Visitor Request for more details.
button to edit. See how to, Edit a Visitor Request or View a Visitor Request for more details.
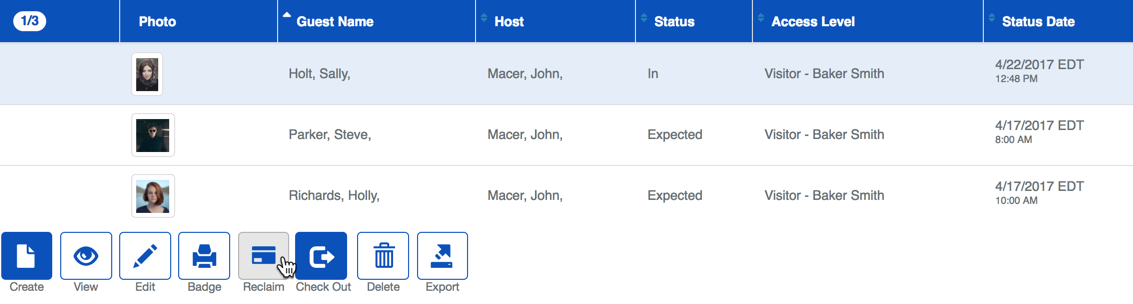
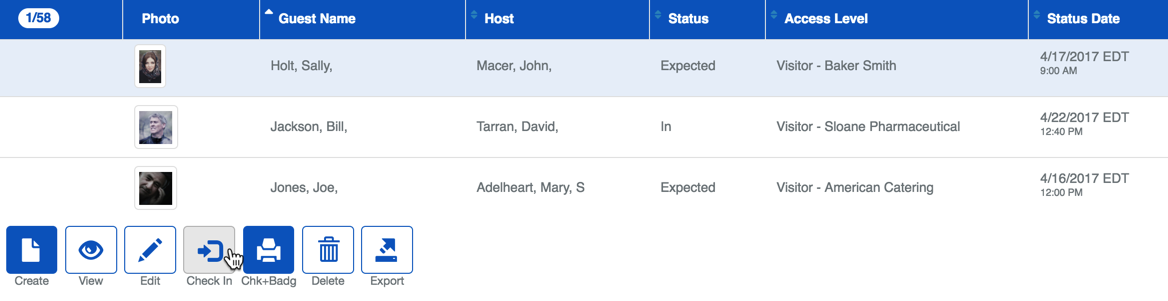
Visitor Admission
The option laid out below describe the some of the ways BluSKY is able to manage visitors. In general, we recommend assigning credentials via the edit screen before the guest arrives. This can help keep congestion to a minimum when multiple guests arrive at once. If the person has a badge already waiting and does not require any changes, the Check In process is usually the fastest. However, there are additional tools for Checking In and Badging in a single step.
Once the guest has departed for the day you have a few options. If the visitor did not receive a credential that grants them access simply check the visitor out and you are done. The process of checking out a visitor will not remove their access rights to the system. This can be particularly useful when a visitor will be returning soon.
For Facilities that use cards or other credentials, you may want to reclaim the credential. This will remove the credential from its current holder and return it to the pool of available credentials for reassignment. Please note: This will remove all access the visitor once had with that credential and will need to be reassigned when checked in again.
Checking In a Visitor
Checking In a visitor indicates that the visitor has arrived at a Facility.
Select one or more of the visitors you want to check in and click the ![]() button. This will indicate to the system that the person has arrived and it currently in the Facility.
button. This will indicate to the system that the person has arrived and it currently in the Facility.
**Tip:**If the visitor is part of a group you may select one of the members of the group and click the ![]() button to run a new query for the rest of the members, very convenient for processing large groups of people quickly. This option will only appear if the visitor is assigned to a group however.
button to run a new query for the rest of the members, very convenient for processing large groups of people quickly. This option will only appear if the visitor is assigned to a group however.
Pre-Printing a Visitor Badge/Pass
Printing a Visitor Badge will print a Visitor Badge for the visitor.
This can be done for one or more Visitors at a time. Just select all of the badges you wish to print by clicking on them. When you have them all selected, just click the ![]() to open the batch printing dialog.
to open the batch printing dialog.

Here you can select how many badges your would like to print at a time. This can be a helpful feature when there are hundreds or thousands to badges to print at a time and you don't want to block access to the printer the entire time. This feature can also be really helpful with finicky printers. 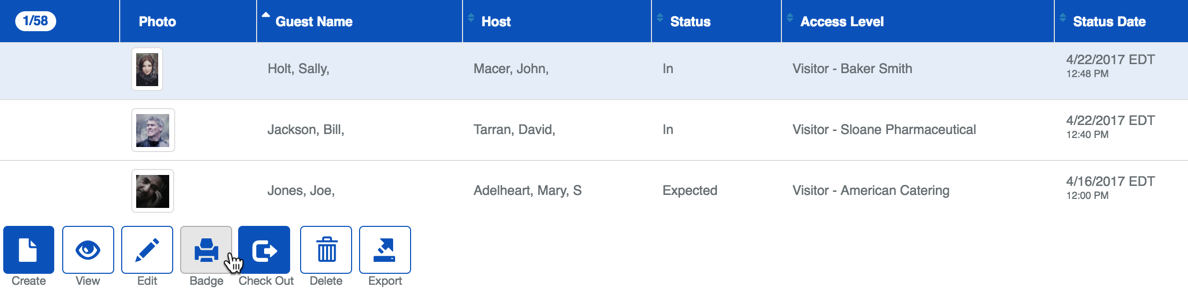
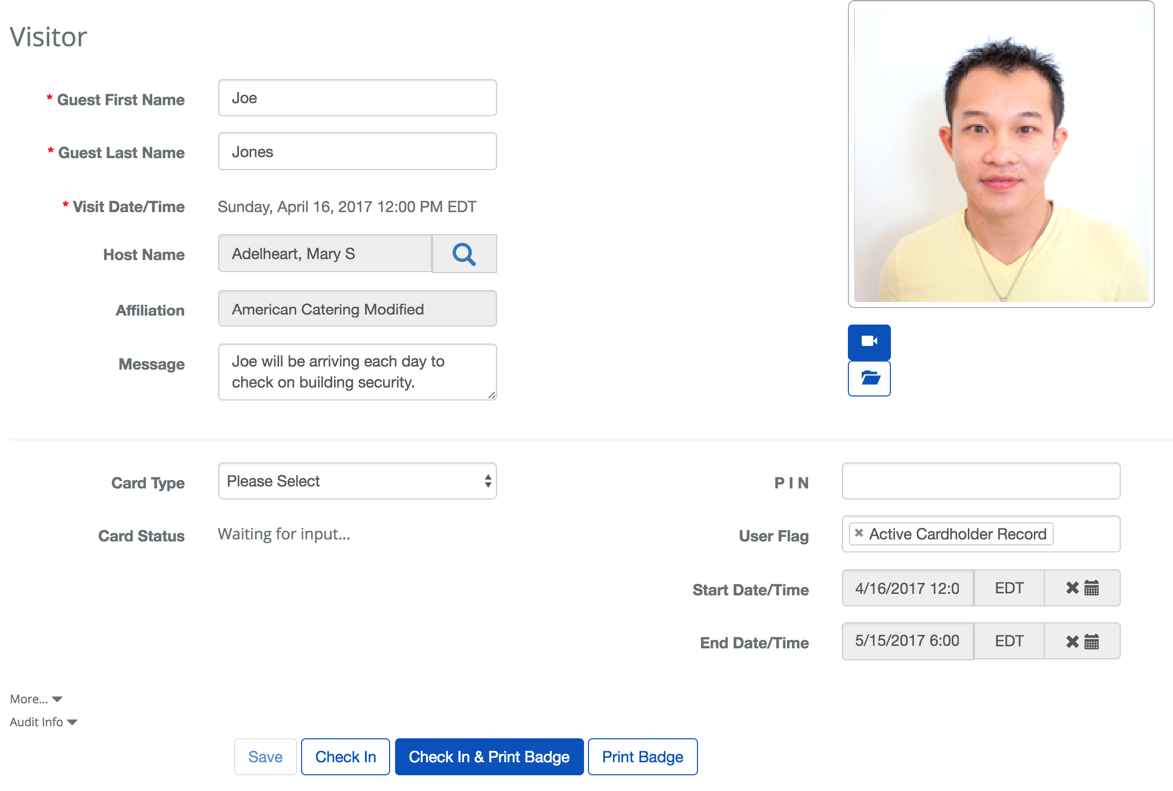
Check In and Badge
Check In and Badge will open the Visitor Instance edit window, allowing you to Check In the visitor, edit and assign credentials.
If your Facility waits to assign credential until the visitor has arrived the Check in & Badge option will enable you to take both steps with a click. Just click the ![]() button and new dialog will open up. From this screen, you will be able to assign a card and check the person in. For more information on assigning a credential from this dialog, check out our documentation on Checking In and Badging a Visitor.
button and new dialog will open up. From this screen, you will be able to assign a card and check the person in. For more information on assigning a credential from this dialog, check out our documentation on Checking In and Badging a Visitor.
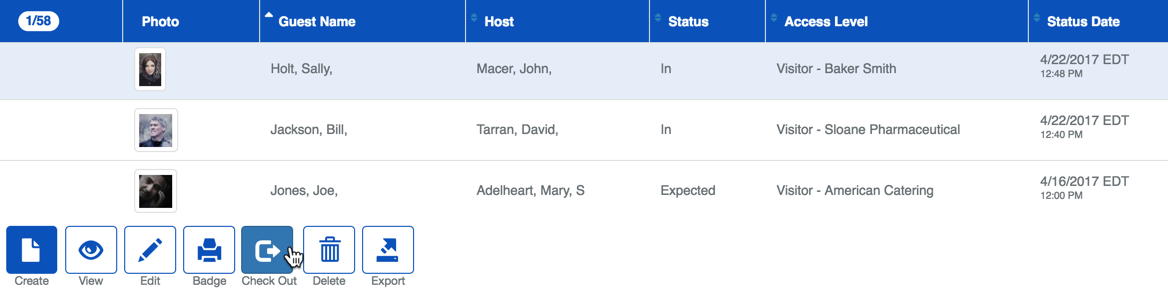
Checking Out a Visitor
Checking Out a visitor indicates that the visitor has departed the Facility.
Once the visitor is ready to leave the checkout process is just as simple. Simply, select all of the departing visitors and click the ![]() button.
button.
Reclaim a Credential
Reclaiming a Credential will remove the credential from the current visitor and return it to the available pool of credentials. It will also check the visitor out.
This feature can be helpful when reusing credentials or when a visitor needs to have all of the permissions revoked for some reason. To reclaim the card select the visitor and click the ![]() button.
button.