How-To: Email Multiple People on Visitor Check-In
Overview
However, there is a way around this. This how-to article details the process of setting up email notifications for multiple people or groups of people when a Visitor arrives and checks in. There are three modules in BluSKY that need to be set up to enable this:
- Distribution List: used to group together the email addresses that will receive the single notification.
- Notification Template: used to specify the wording of the email notification received by the Distribution List.
- Rule: used to create the logic to send an email notification (using the Template) to the Distribution List whenever a Visitor checks-in.
Distribution List Setup Instructions
General Distribution List Setup
- Log in and navigate to Distribution Lists. Main Menu-> Administration-> Distribution List
- Click the
 button, located on the bottom left hand side.
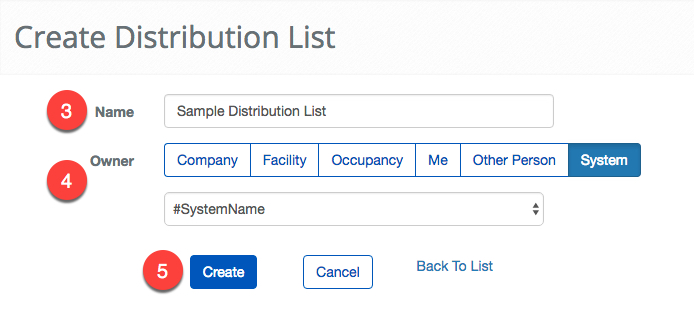
- Enter a name for the Distribution List in the name field.
- Select the owner of the Distribution List. Then select the individual System, System Group, Facility, Person or Company that will have access to the Distribution List.
- Note: This field will determine who has access to the Distribution List.
- Click the
 button to create the Distribution List. The page will refresh with the created Distribution List and present you with options to add People and other groups to the list.
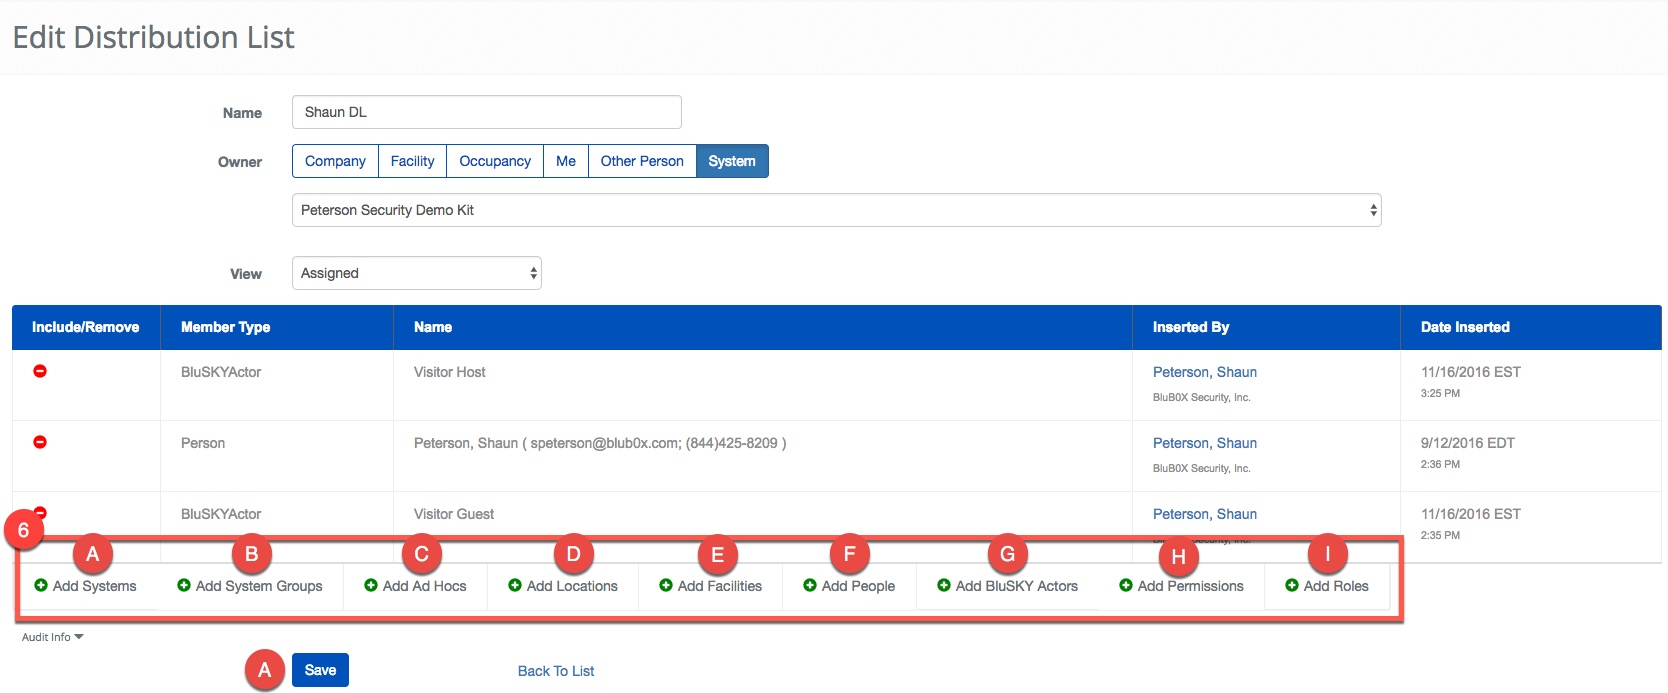
- Use the
 button to select the different groups of People to notify.
- Add System - If selected, you are able to add all the People in an entire System to the list.
- Add System Group - Adding a System Group adds all of the People of the System Group selected to the Distribution List.
- Add Ad Hocs - This option allows you to create a Person to be notified with only a name and email address. This is the only way to notify someone that is not a Person in BluSKY.
- Add Locations - This option is still being developed and should be available soon.
- Add Facilities - This option allows you to add a Facility to a Distribution List. Once added, any Person associated with the Facility will be part of the Distribution List. This option can be particularly useful when administrating a large multi-Facility campus System.
- Add People - This adds one or more People to the Distribution List.
- Add BluSKY Actors - Use this option to add "Actors". Actors are used when you do not know who the person will be at time you create the Distribution List, but BluSKY will know when the Distrubtion List is used.
- Visitor Guest - The guest in a Visitor Request
- Visitor Host - The host in the Visitor Request
- Account Owner - The BluSKY person with an email address. This useful for sending an email to a user when their BluSKY login has been changed.
- Add Permissions - If a Permission is selected, the Distribution List will add all of the People that have the selected Permission to the Distribution List. Please bear in mind that the selection will be limited by the choice of Owner.
- Add Roles - If a Role is selected, everyone that is assigned said Role will be a part of the Distribution List.
- Click the
 button to commit your changes.
Notification Template Setup Instructions
General Notification Template Setup
- Log in and navigate to Notifications. Main Menu-> Administration-> Notification
- In the lower left hand side click the icon.
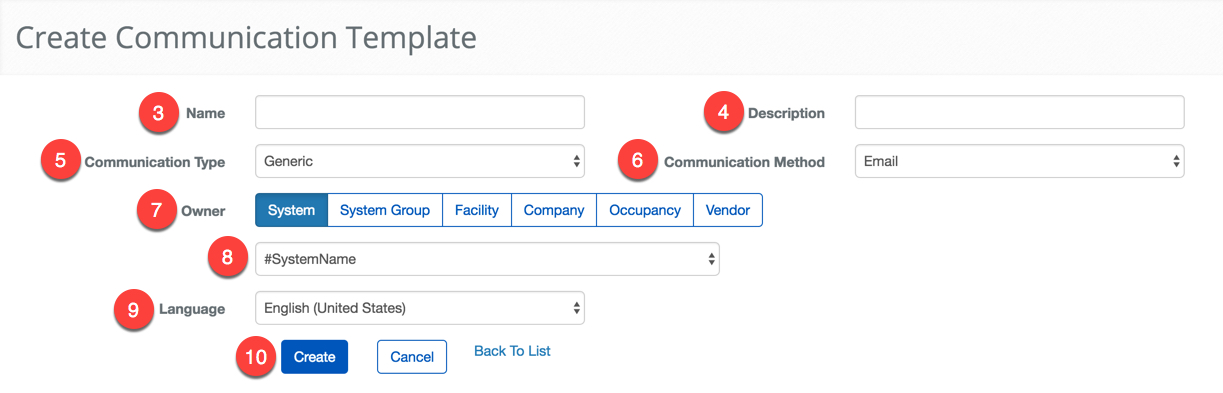
- Enter a name in the Name text field.
- Add a description to help identify the purpose of the Notification.
- Select the Communication Type from the drop down menu. This field will determine the reason the Notification will be sent. i.e Generic Alarm or Simple Rule.
- Select the Communication Method. Either SMS( text ) or email.
- Select the Owner of the list. This field will determine which group of people get what Notification.
- Note: The Owner will try to determine the most appropriate Notification to send to each Person. This process prefers the most restrictive owner first and will fall back to a more general Notification if needed. For example, if a Notification's Owner is an Occupancy, people of that Occupancy will receive that specific Notification but if none is specified it will default to the BluSKY template that we provide.
- Depending on the choice of the Owner, select the appropriate System, System Group, Facility, Company, Occupancy or Vendor.
- Note: Depending on your permissions some option may not be available
- If needed select a specific language for the Template.
- When finished use the button to refresh the screen.
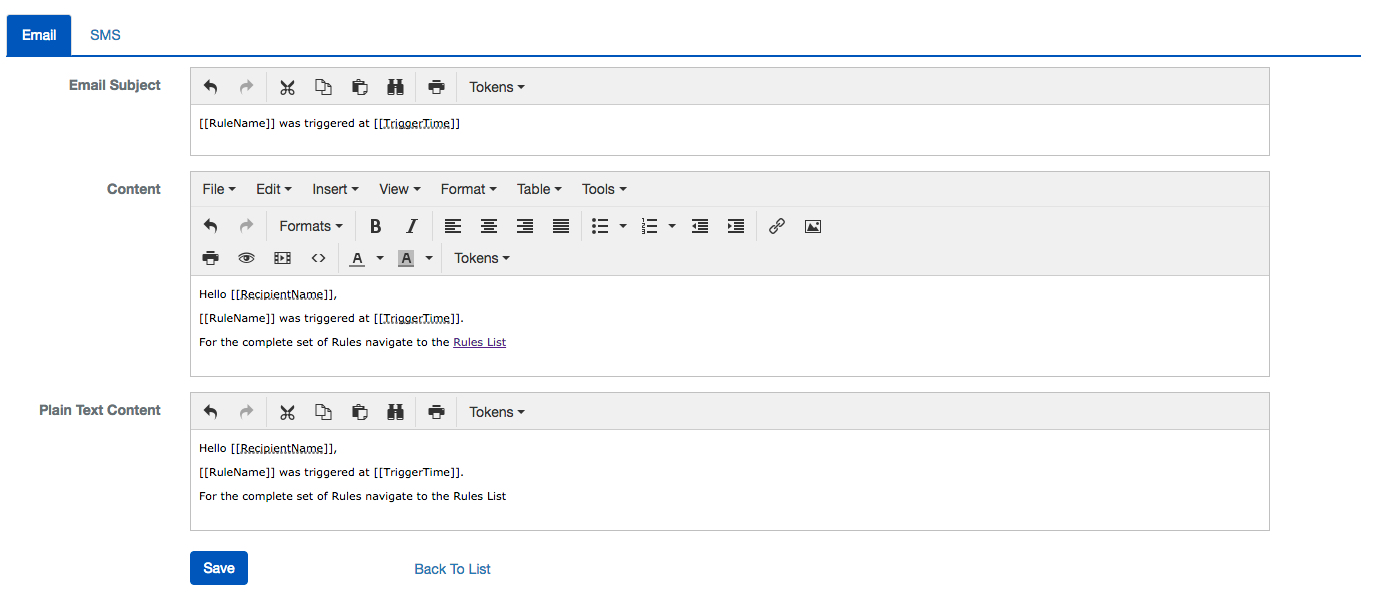
Create a Subject, Content and Plain Text Content message to use when Notifications are sent. The Plain Text Content section will serve as a fall back if the recipient is not able to receive HTML emails ( i.e no embedded links and formatting). We also provide "Tokens" that allow you to insert relative information about the Notification. The Tokens available will depend on the the Communication Type selected. Below is an example of a Notification we have created, notice the and tokens being used and the exclusion of the hyperlink in the Plain Text Content field.
Specific Template Setup for this How-To
Ensure to select the "Visitor Checked-In" option from the Communication Type dropdown field. This will allow you see the appropriate Tokens when generating the wording of the template.
Rule Setup Instructions
General Rule Setup
Rules by nature are dynamic. They can come in many different variation and will require different processes depending on the intended goal. This example is meant to illustrate the power of Rules. For more specific information about some of the most common Rules, please see our documentation of Simple Rules Examples.
- Log in and navigate to Rules. Main Menu-> Administration-> Rules
- Click the
 button to create a new Simple Rule.
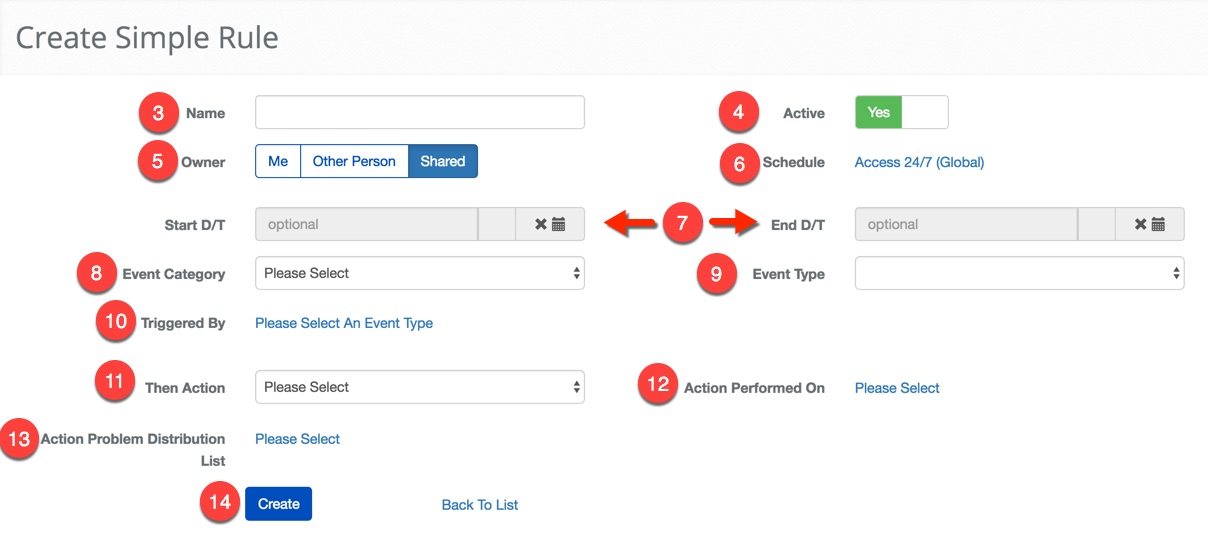
- Name the Rule in the name text field. Using a descriptive name can make the Rules easier to manage in the future.
- If you are creating a Rule that will be used in the future set the Active toggle to "No".
- Note: This toggle can be used to activate and deactivated the Rule when needed.
- Select the owner of the Rule.
- Me - Only the Person creating will be able to view and edit the Rule.
- Other Person - Only the Person you are creating the Rule for will be able to view and edit the Rule.
- Shared - Anyone with the proper hardware permissions and who is part of the same System will be able to view and edit.
- Select a Schedule to indicate the days of the week and the time of day when the Rule should be used.
- Optional: If the Rule should only be active during a certain period of time, set the Start Date/Time and End Date/Time.
- Note: You are never required to specify a Start Date and Time if you wish the entry to be active immediately.
- Select the Event Category. This field determines the type of action that will initiate a Rule.
- Select the Event Type. This field determines the specific type of action that will initiate the Rule.
- Note: This selection is entirely dependent on the choice made in the Event Category drop down.
- Select the specific device or condition that will trigger the Rule to begin. This selection will be dynamic based on the previous two choices.
- Select the "Then Action". This field will determine the Output of the Rule.
- Click the "Please Select" link to load the appropriate picker to select the desired entry for the Then Action. The picker will dynamically change depending on which Then Action is selected.
- Optional: Use the Action Problem Distribution List to select a Person or group of People to be notified if something prevents the Rule from taking effect.
- When finished click the
 button to create the new Rule.
Specific Rule Setup for this How-To
Ensure to select the "Visitor" option from the Event Category dropdown field and the "Visitor Checked-In" option from the Event Type dropdown field. After selecting these values, click the "Triggered By" link and select the type of Visitor Invitations that trigger this Rule. For example, if you want all Visitor Invitations in your Occupancy to trigger this Rule, then select "All Visitors in Occupancy: Your Occupancy Name" from the selection window.
Ensure to select the "Send Email" option from the Then Action dropdown field - this will activate the fields that allow selection of the Distribution List and Notification Template created for this Rule:

- Use the Action Performed On field to select the Distribution List that was created for this Rule.
- Toggle the Override Notification Template to Yes to activate the custom Notification Template fields.
- Select the "Visitor Checked In" value from the Communication Type dropdown field.
- Use the Notification link to select the Notification Template that was created for this Rule.