Create a Portal
BluSKY URL: https://blusky.blub0x.com/en-US/MercuryPortal/Create
Overview
Portals are the grouping of devices that work together to secure entry or exit. A Portal will contain a combination of locks, inputs, and sensors that assist in managing the access control system easily. This article shows you How to Create a Portal.
Instructions
- Log in and navigate to Portals. Main Menu-> Setup-> System Setup-> Portal
- Use the
 icon on the lower left side to create a new Portal.
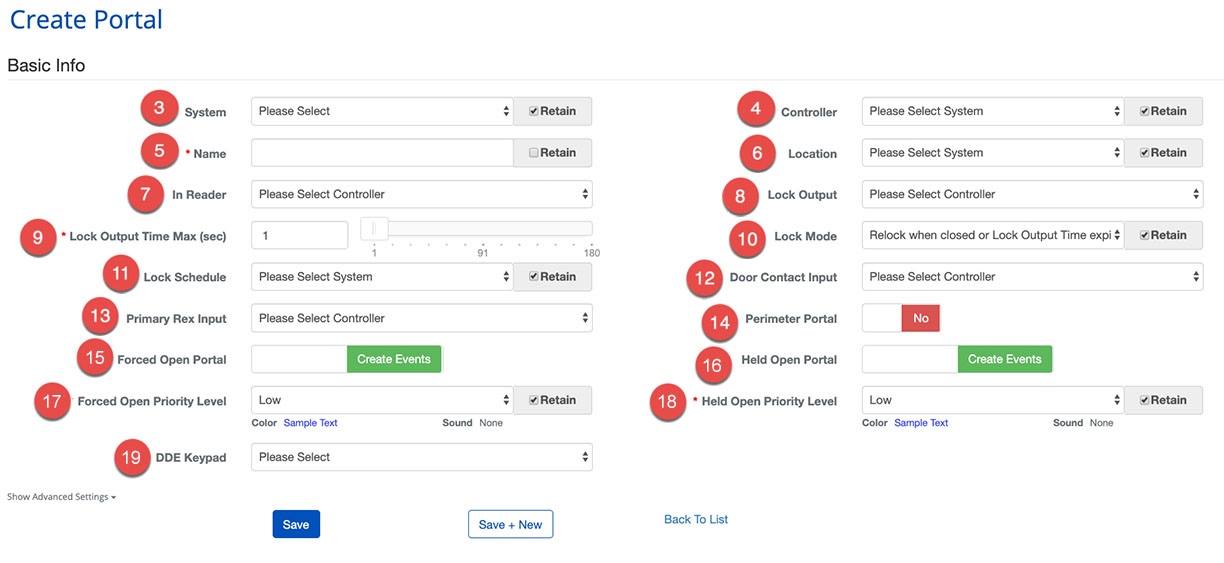
 - First, choose the System using the dropdown menu.
- Then choose which Controller will manage the Portal.
- Next, enter a Name for the Portal.
- Note: Choose a descriptive name to make the management of the Portal easier in the future
- Select Location
- Select the In Reader that will provide credentials to the AC System.
- Next, we assign the Lock Output that will be used to control the Portal.
- Set the Lock Output Time Max. This will determine how long the Output is in its unlocked state.
- Set the Lock Output Mode by choosing from the dropdown menu.
- Now, we must assign a Lock Schedule that will determine when the Portal is Locked.
- Note: This must be a Device Schedule.
- Select the correct Door Contact Input to allow the Portal to report its state.
- Next, we will designate the Primary Rex Input using the dropdown menu.
- To complete Portal use the toggle to specify if the Portal should be treated as a Perimeter Portal or not.
- Set the behavior for Forced Open Portal events.
- Note: Forced Open and Held Open events will always create events. For more on the benefits of each configuration see, Forced Open and Held Open Alarms and Events
- Set the behavior for Held Open Portal events.
- Set the behavior for Forced Open Priority Level events.
- Set the behavior for Held Open Priority Level events.
- Select DDE Keypad floor.
- When finished use the
 button to finish or the
  to continue configuring Portals.
- Note: There are many more ways to configure a Portal, Show Advanced Settings
 option will expand these options.
- Note: There are many more ways to configure a Portal, Show Advanced Settings
