Interactive Maps
Module Overview
Purpose and Functionality:
The Interactive Maps module is a critical component of the BluSKY security platform, designed to provide a visual representation of a facility's security devices and events. It allows users to monitor and manage security devices, view live camera feeds, review event timelines, and control device states within an interactive floorplan interface.
Target Audience:
This module is intended for security personnel, facility managers, and system administrators responsible for the ongoing management and monitoring of building security within the BluSKY platform.
Getting Started
Accessing the Module:
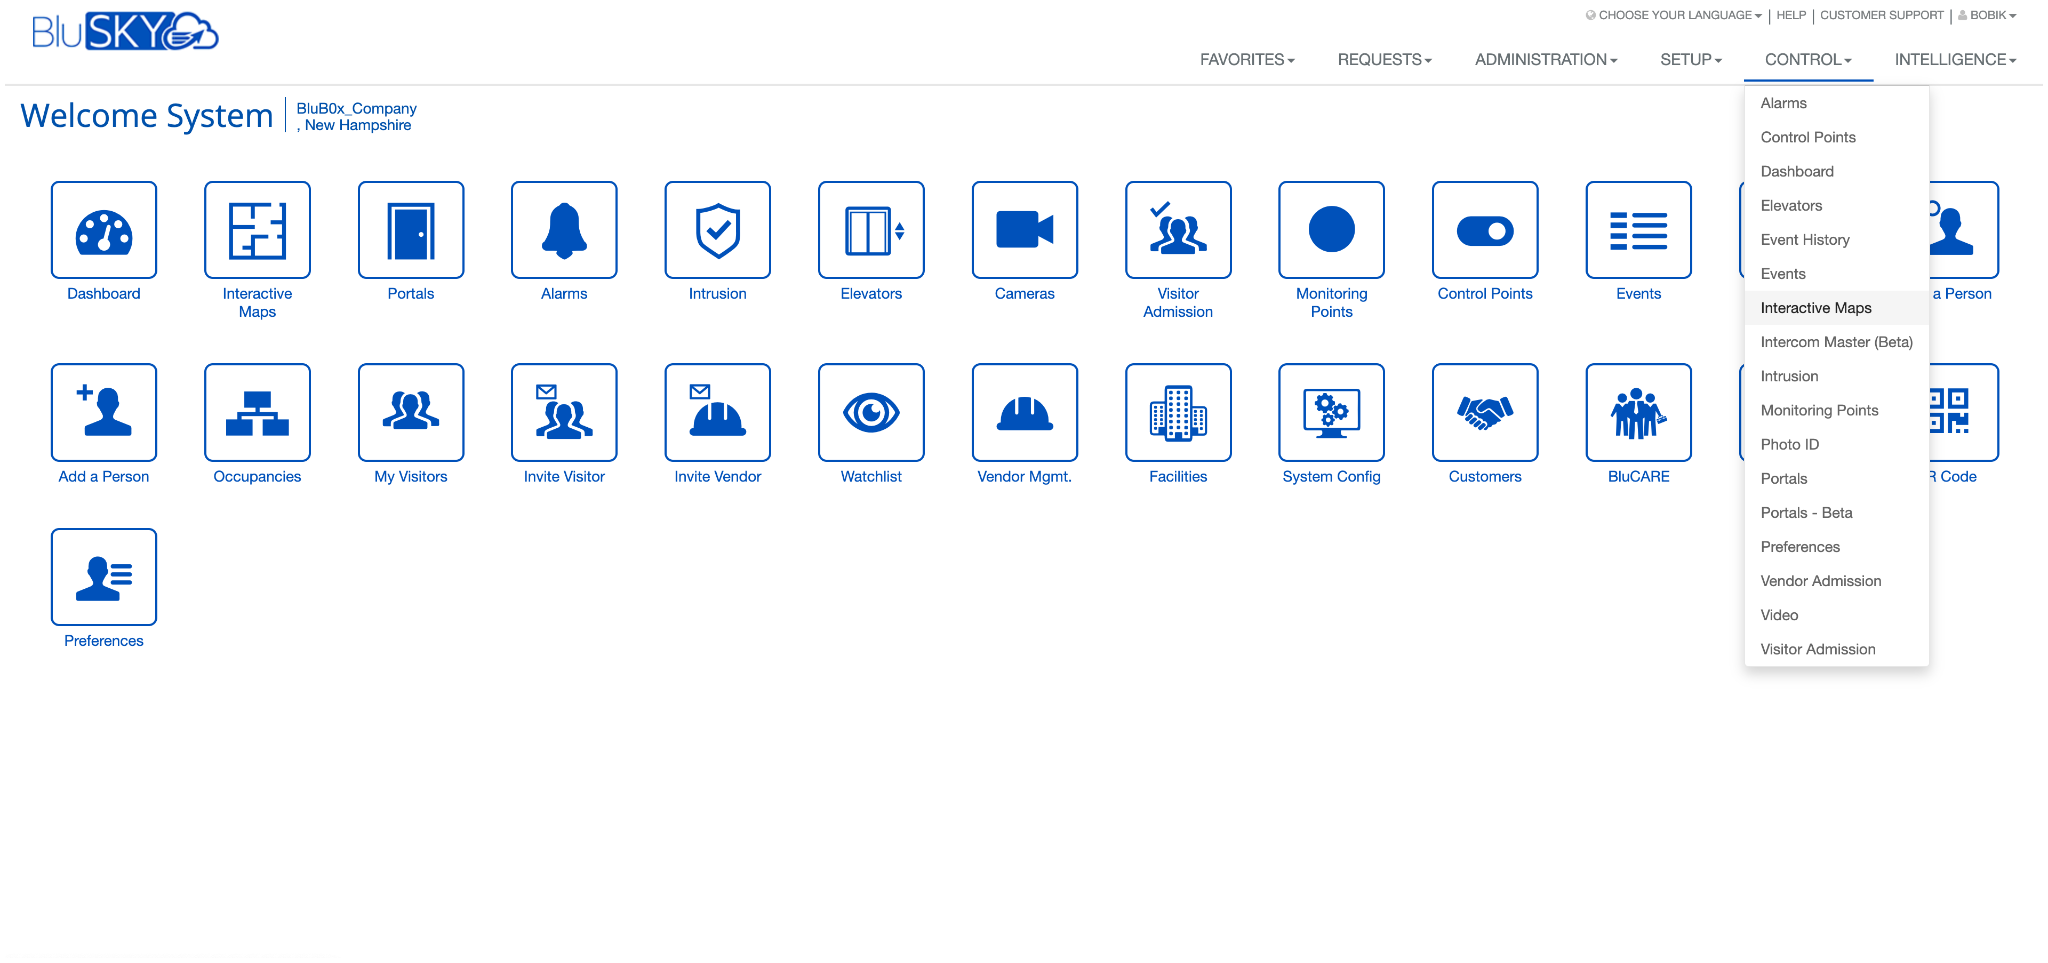
To access the Interactive Maps module, select the icon from the 'Favorites' menu on the home screen or choose it from the 'Control' menu. The module will display the last accessed floorplan or default to the user's primary building if no recent activity is detected.
Prerequisites:
Users should have the appropriate permissions set to view and interact with the Interactive Maps module. Ensure that your system, facility, and device data are up-to-date within BluSKY for accurate representation on the maps.
User Interface Description
Layout Overview:
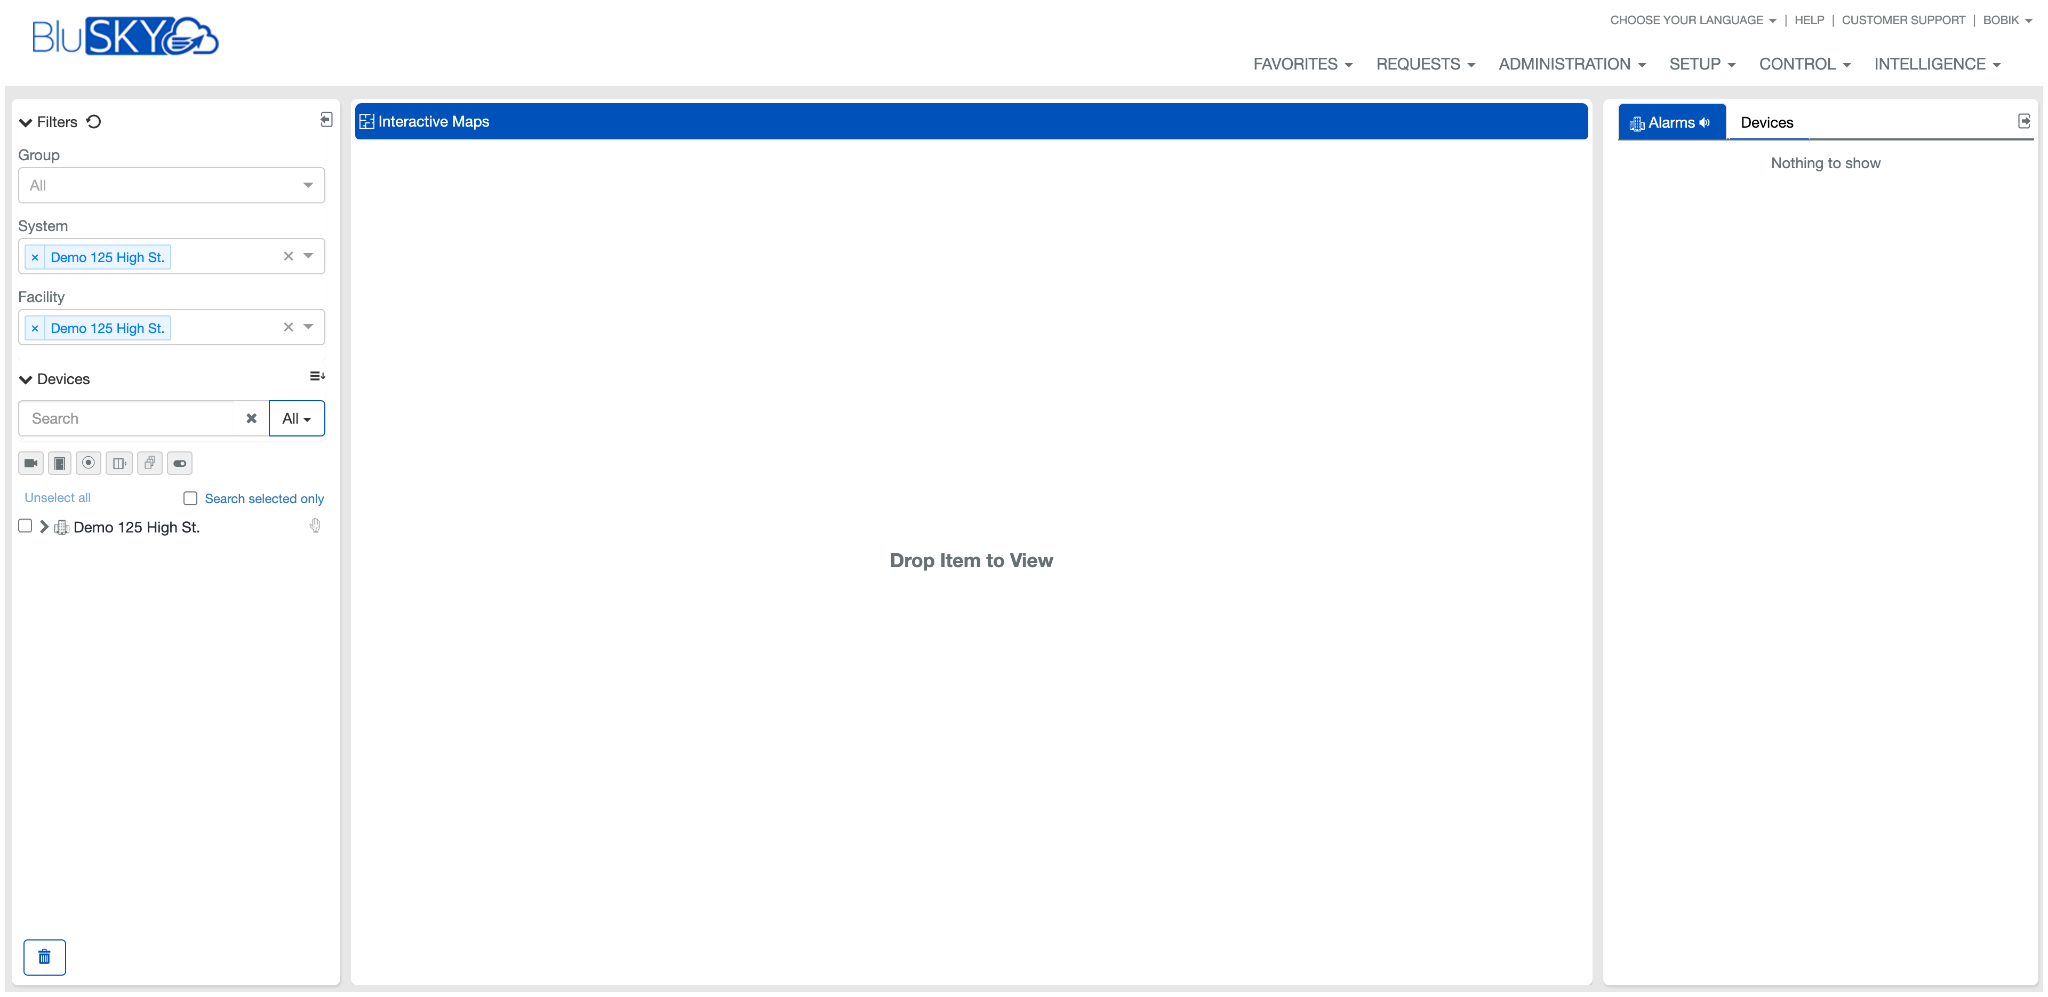
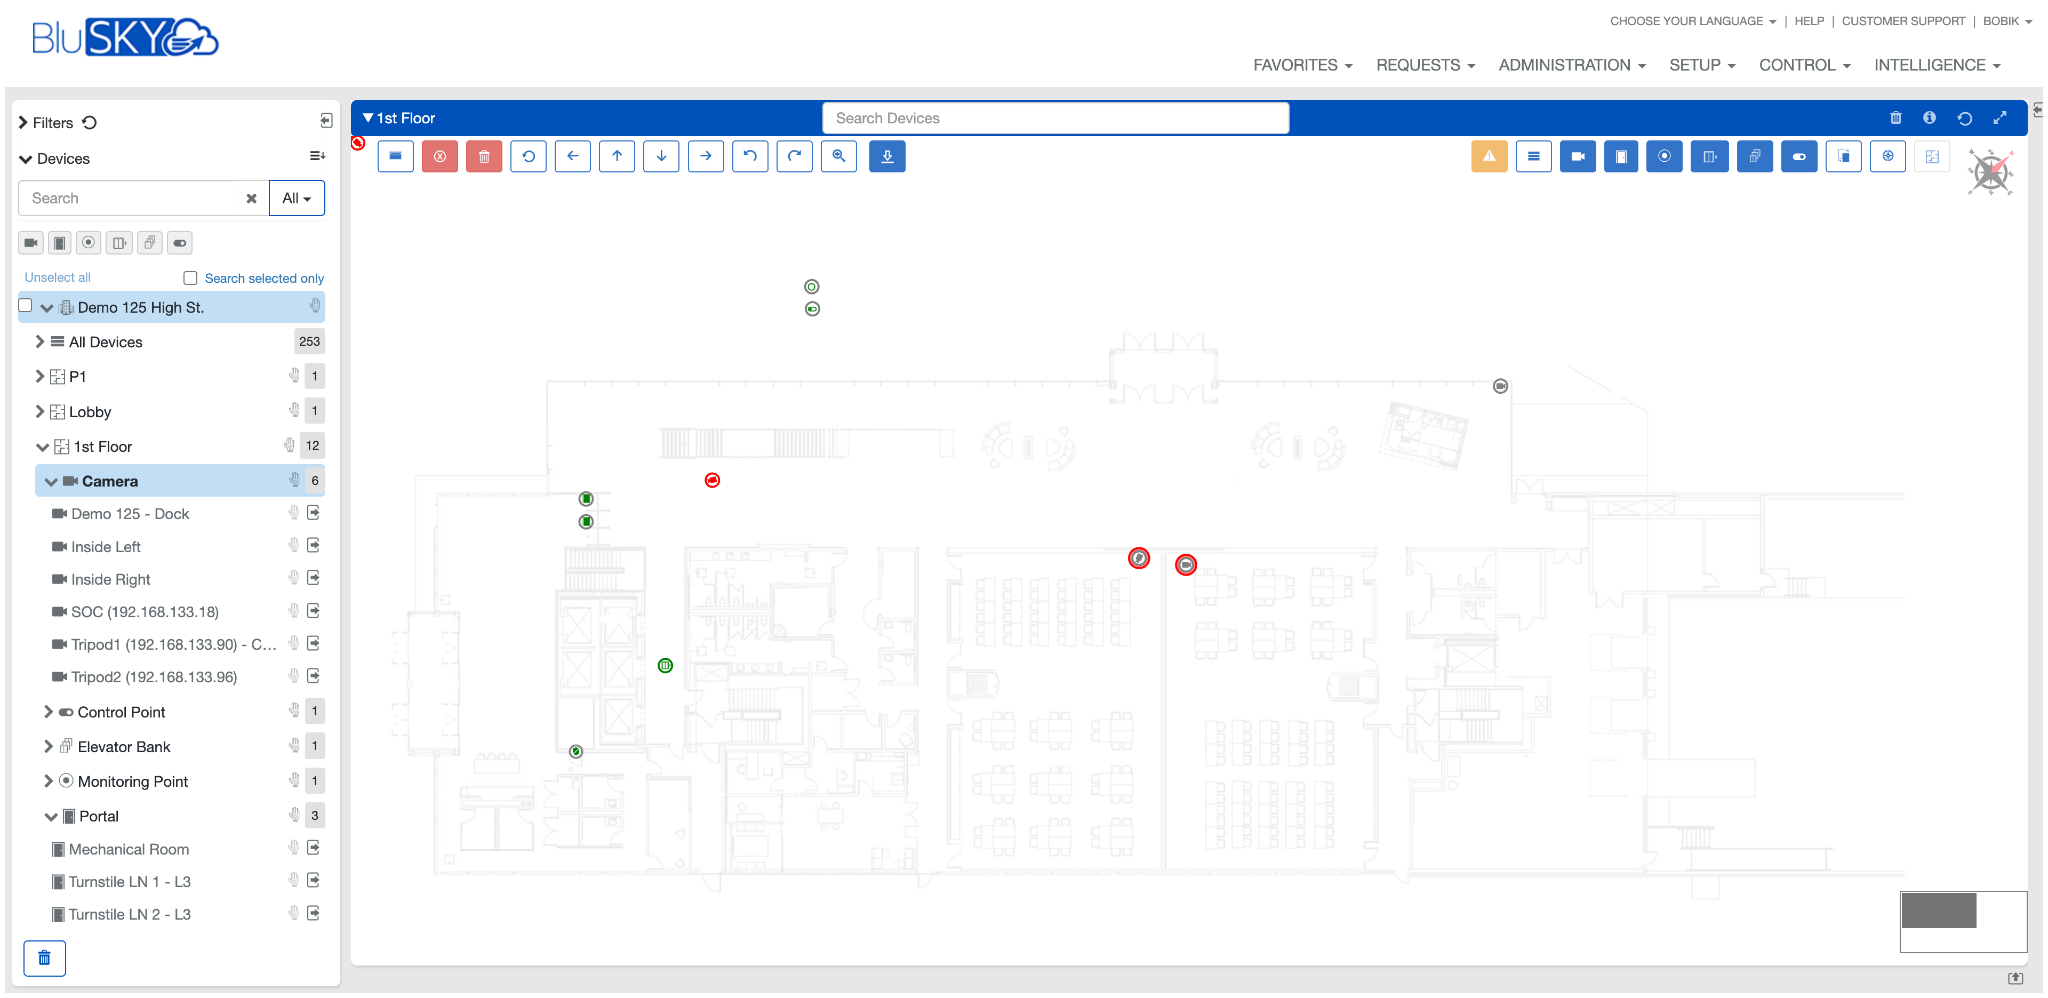
The Interactive Maps interface features a central map area, left-side device and floor navigation, and a right-side control and event review sidebar. The map area displays device icons with color-coded statuses, while the sidebar offers tabs for alarms, events, and devices.
Feature Details
Feature List:
- Real-time and historical event timeline
- Device status indicators
- Live camera feeds
- Universal Device Control (UDC) for individual and associated devices
- Map view customization and editing tools
Feature Descriptions:
Each feature is designed to streamline facility monitoring and incident response. Device icons on the map can be interacted with to control and manage devices, while the timeline allows for the review of past and present events.
User Instructions
Step-by-Step Guides:
Using the Left Navigation Tree in BluSKY Interactive Maps
Overview
The Left Navigation Tree in the BluSKY Interactive Maps module is a hierarchical interface that allows users to navigate through facilities, floors, and devices to manage and monitor a building's security system effectively.
Interface Description
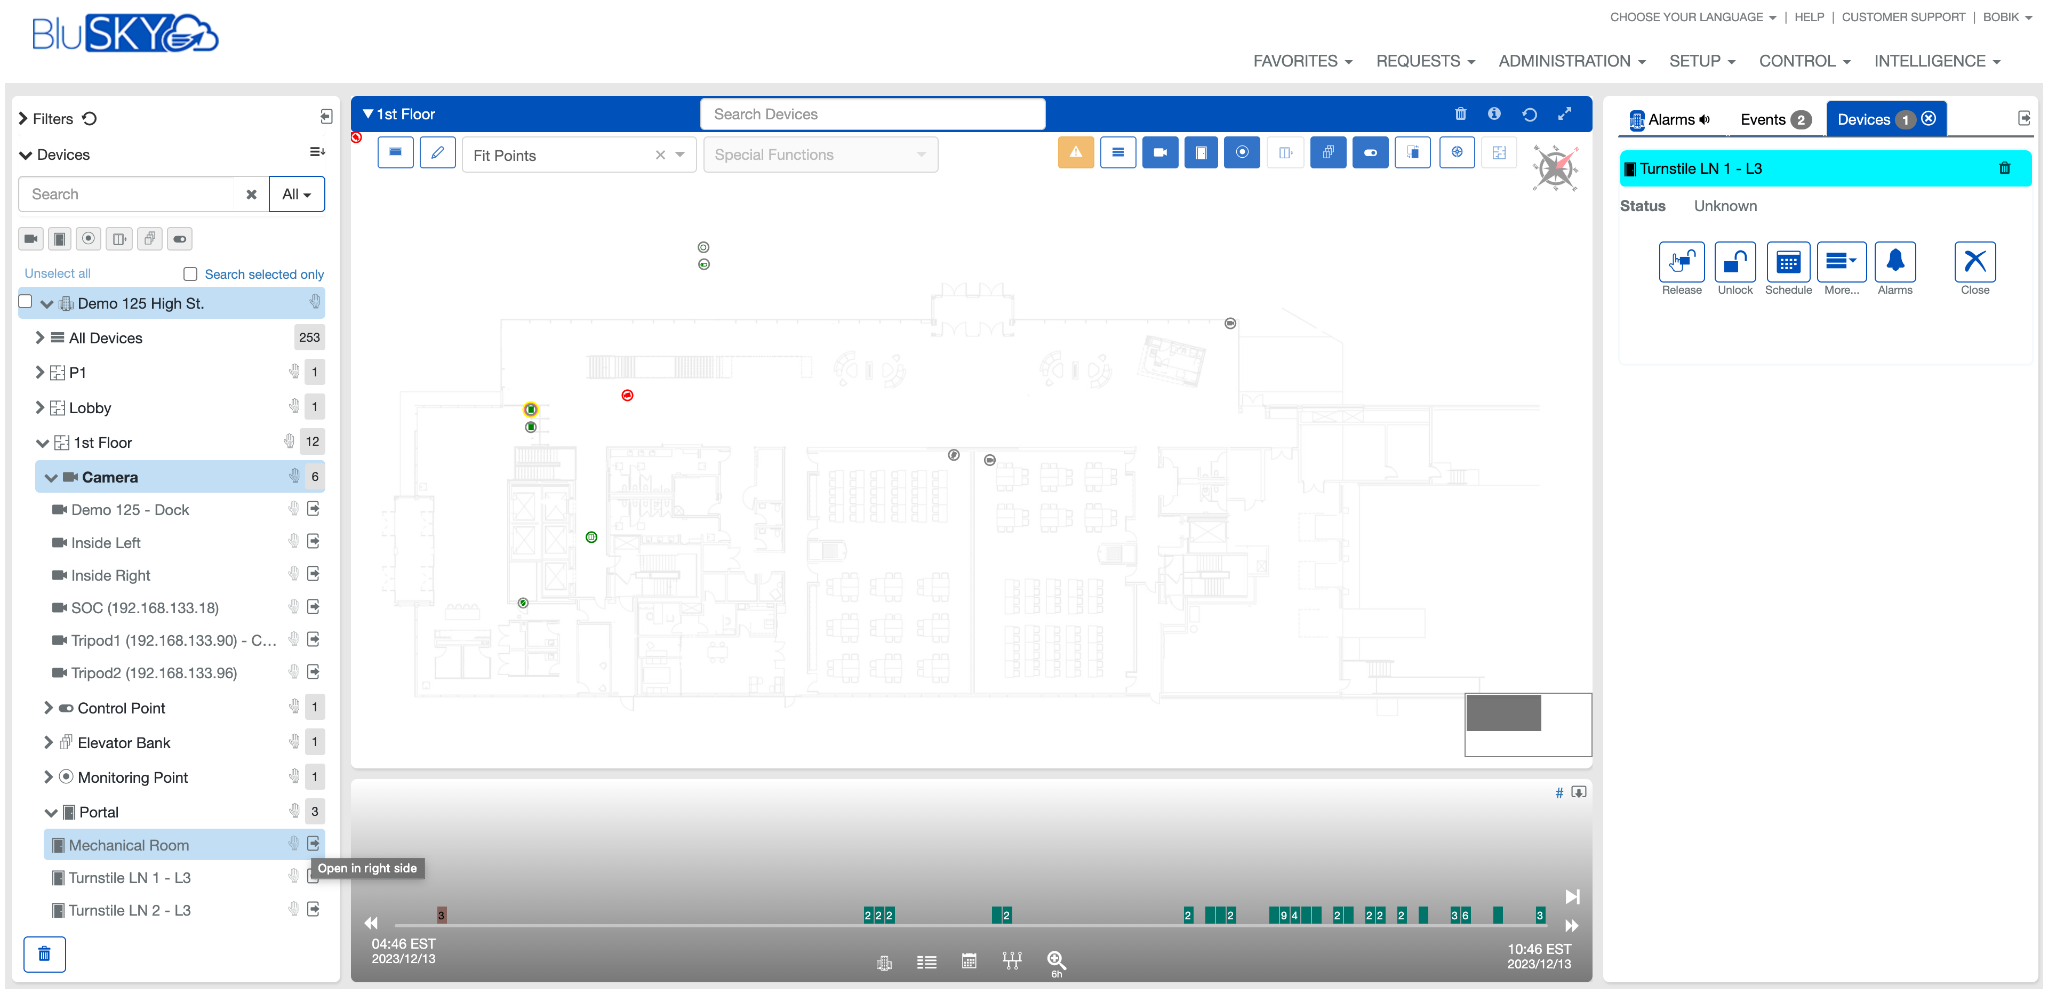
The Left Navigation Tree consists of expandable sections that represent different groupings such as systems, facilities, floors, and devices.
- Groups: Organizes devices by groups (e.g., security, HVAC).
- Systems: Lists all systems integrated within BluSKY (e.g., access control, video surveillance).
- Facilities: Displays buildings or properties managed within BluSKY.
- Floors: Shows all levels within the selected facility, allowing you to drill down to specific areas.
- Devices: Under each floor, devices are categorized and listed for easy navigation.
Interacting with the Tree
Expanding and Collapsing Categories
- Click the 'Twisty' icon next to a category to expand or collapse the list.
- Expanding a category reveals subcategories or individual items, such as floors or devices.
Selecting a Facility or Floor
- Click on a facility to view all associated floors and devices in the main Interactive Maps view.
- Drag a floor from the Left Navigation Tree onto the Interactive Maps stage to load that specific floor plan.
Viewing and Managing Devices
- Expand a floor to see categories of devices (e.g., cameras, doors).
- The number next to each category indicates the quantity of devices.
- Expand a device category to list individual devices.
- Devices can be selected for detailed management or dragged onto the Interactive Maps if in edit mode.
Best Practices
- Regularly update device listings to reflect any changes in your facility’s layout or device inventory.
- Utilize the search functionality within the Left Navigation Tree to quickly locate specific devices.
- Familiarize yourself with the organization of devices within the tree to streamline your monitoring and management tasks.
User Documentation for Main Interactive Maps Section in BluSKY
Overview
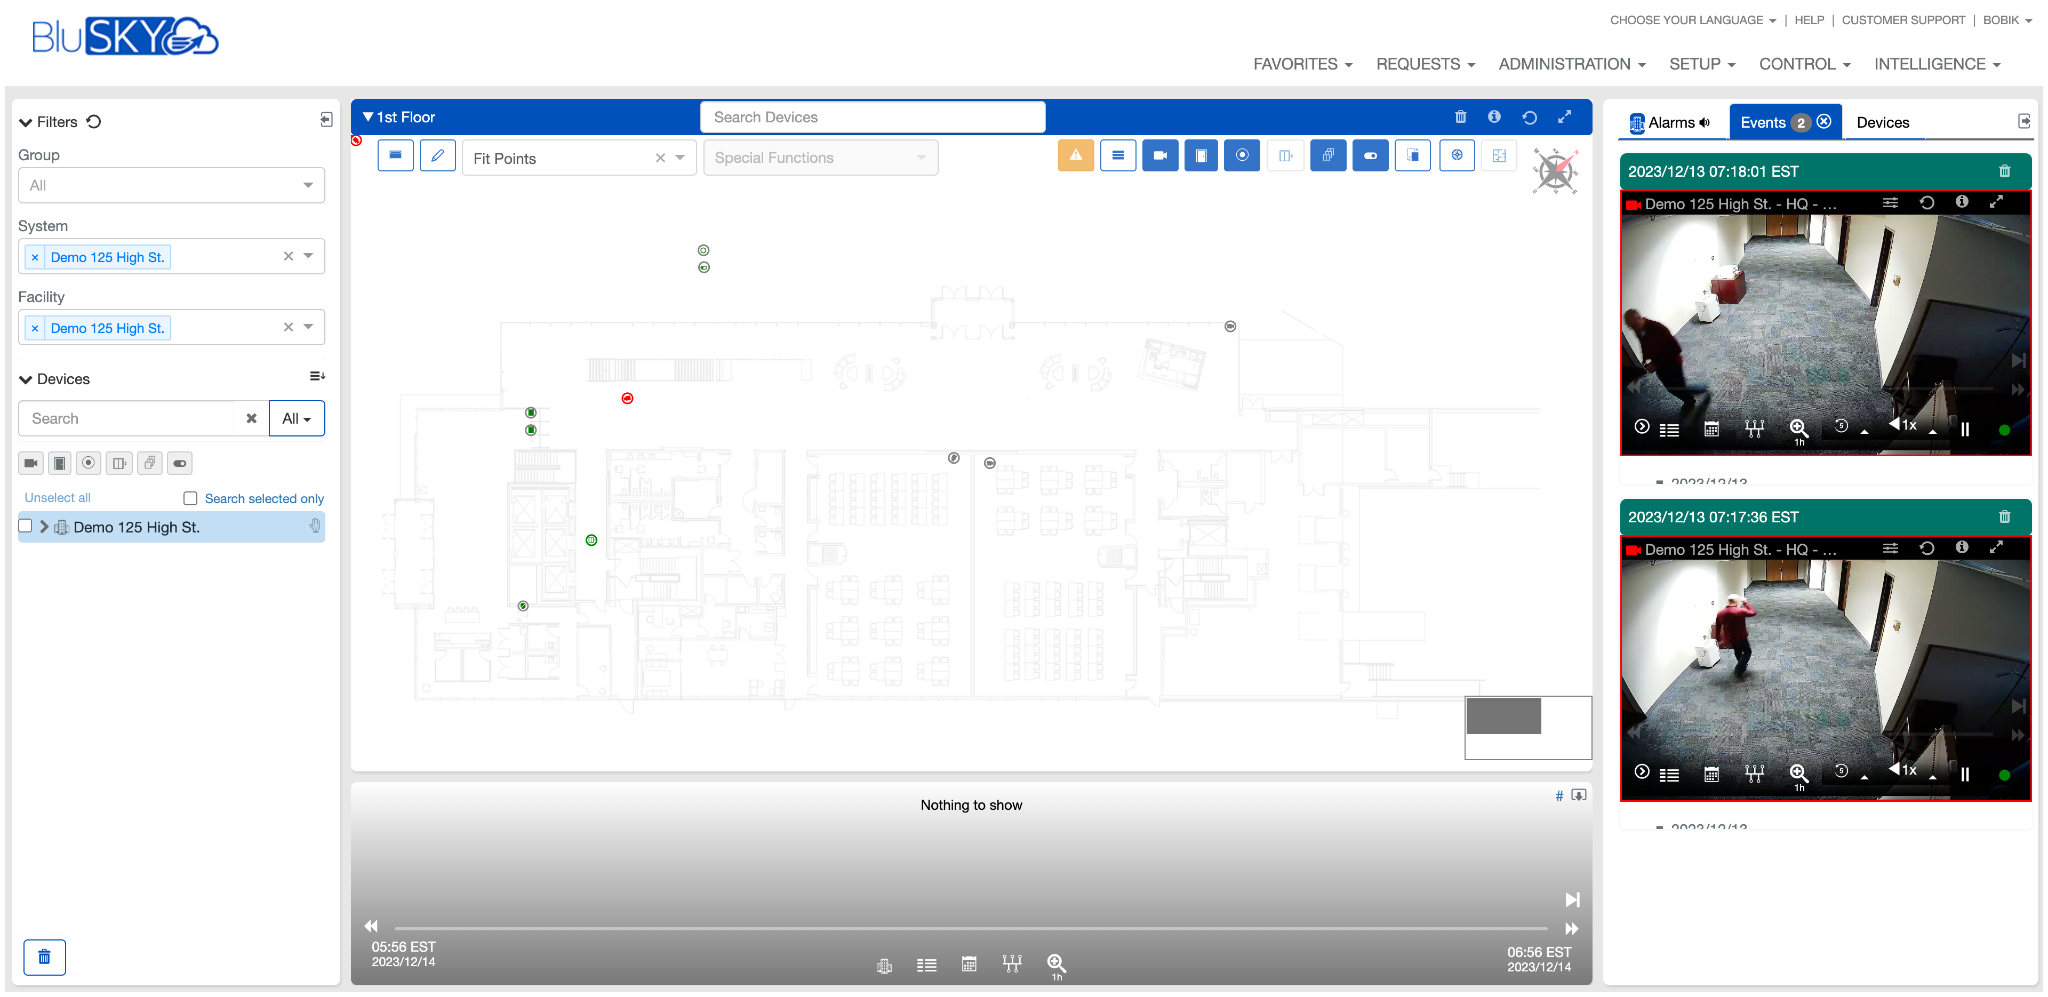
The Main Interactive Maps section of the BluSKY platform is a dynamic and interactive feature that enables users to visualize and control security devices within a facility. It provides a graphical layout of each floor, detailing the placement and status of security components.
Interface Description:
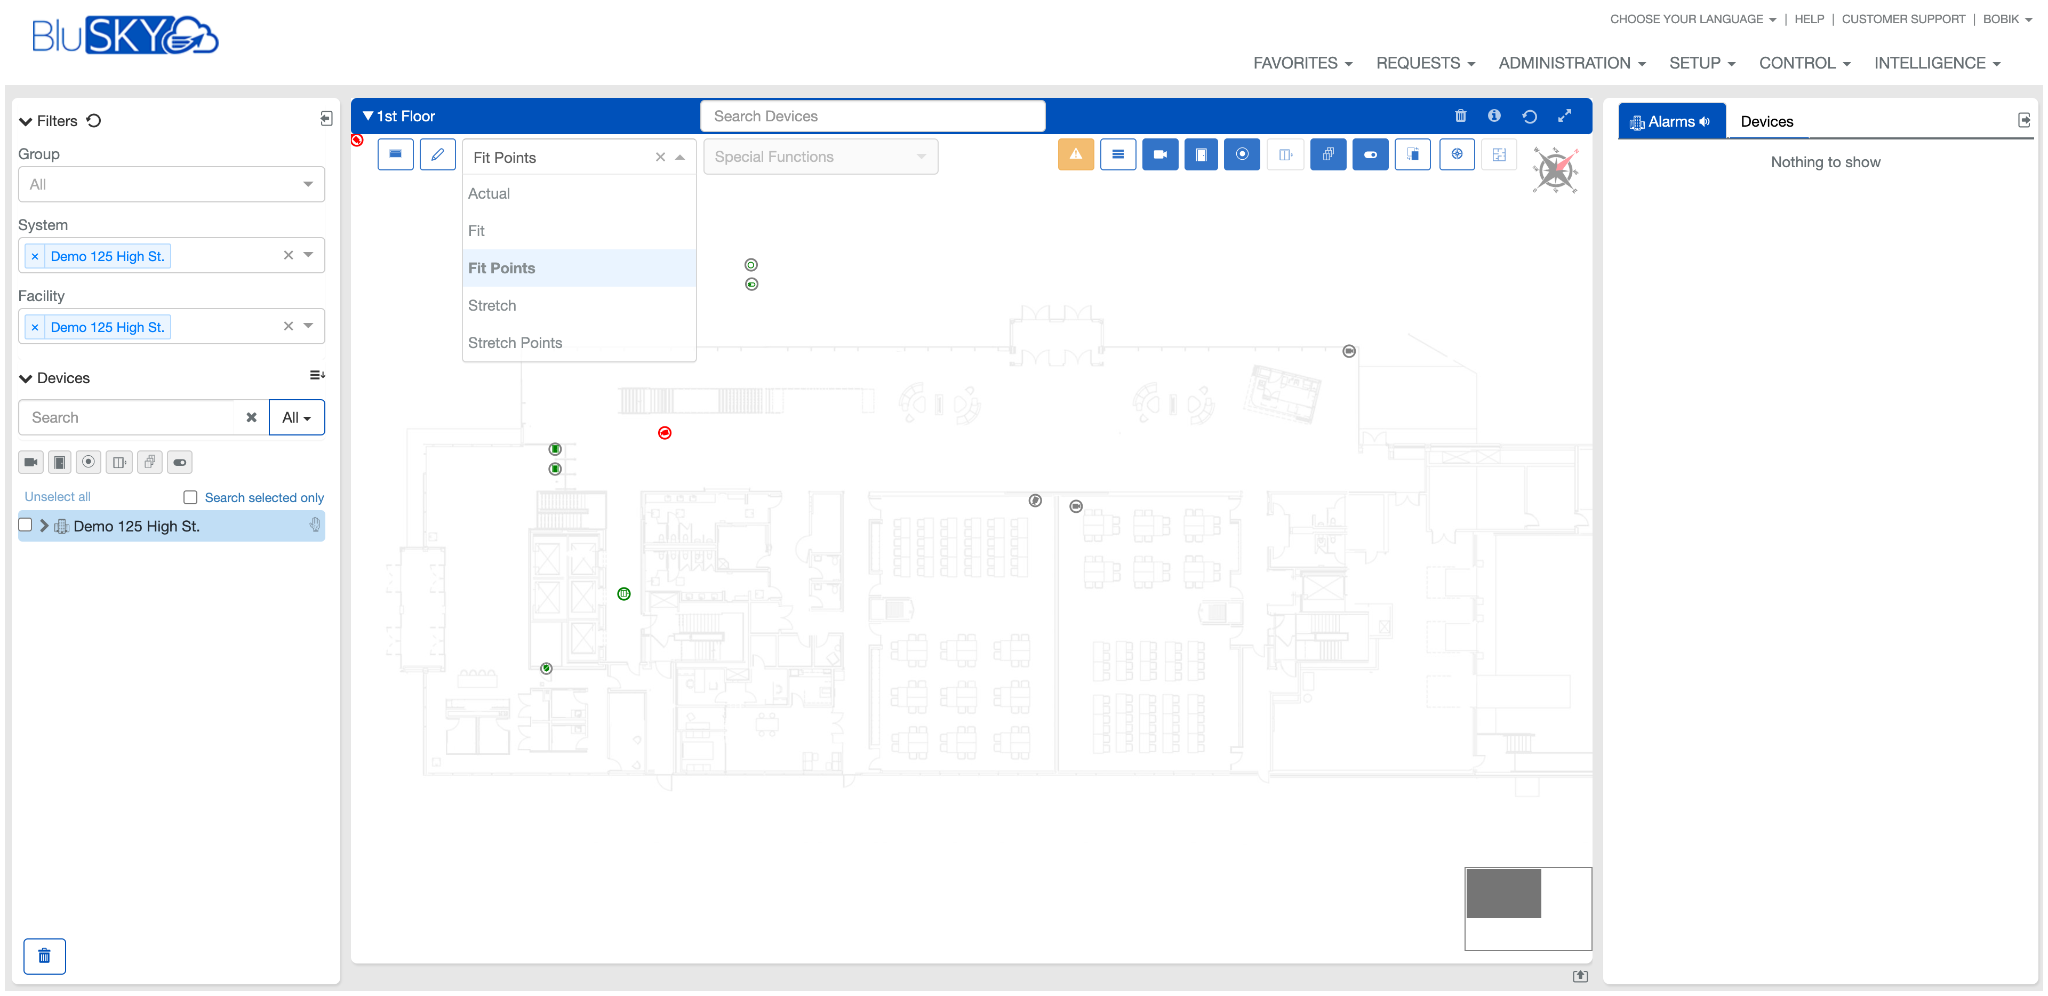
The Main Interactive Maps section is the focal point of the module, displaying a detailed and scalable floor plan of the selected facility.
- Floor Plan: A visual layout of the selected building floor, including walls, doors, and other architectural features.
- Device Icons: Representations of security devices, such as cameras, alarms, and access points, positioned accurately on the floor plan.
- Status Indicators: Color-coded icons indicating the operational status of each device (e.g., green for normal, red for alarm or offline).
Interacting with the Main Interactive Maps
Navigating and Viewing Floor Plans
- Use the dropdown menu in the upper left corner of the Interactive Maps section to select different floors within the facility.
- Zoom in or out for a more detailed view or a broader overview using the zoom controls.

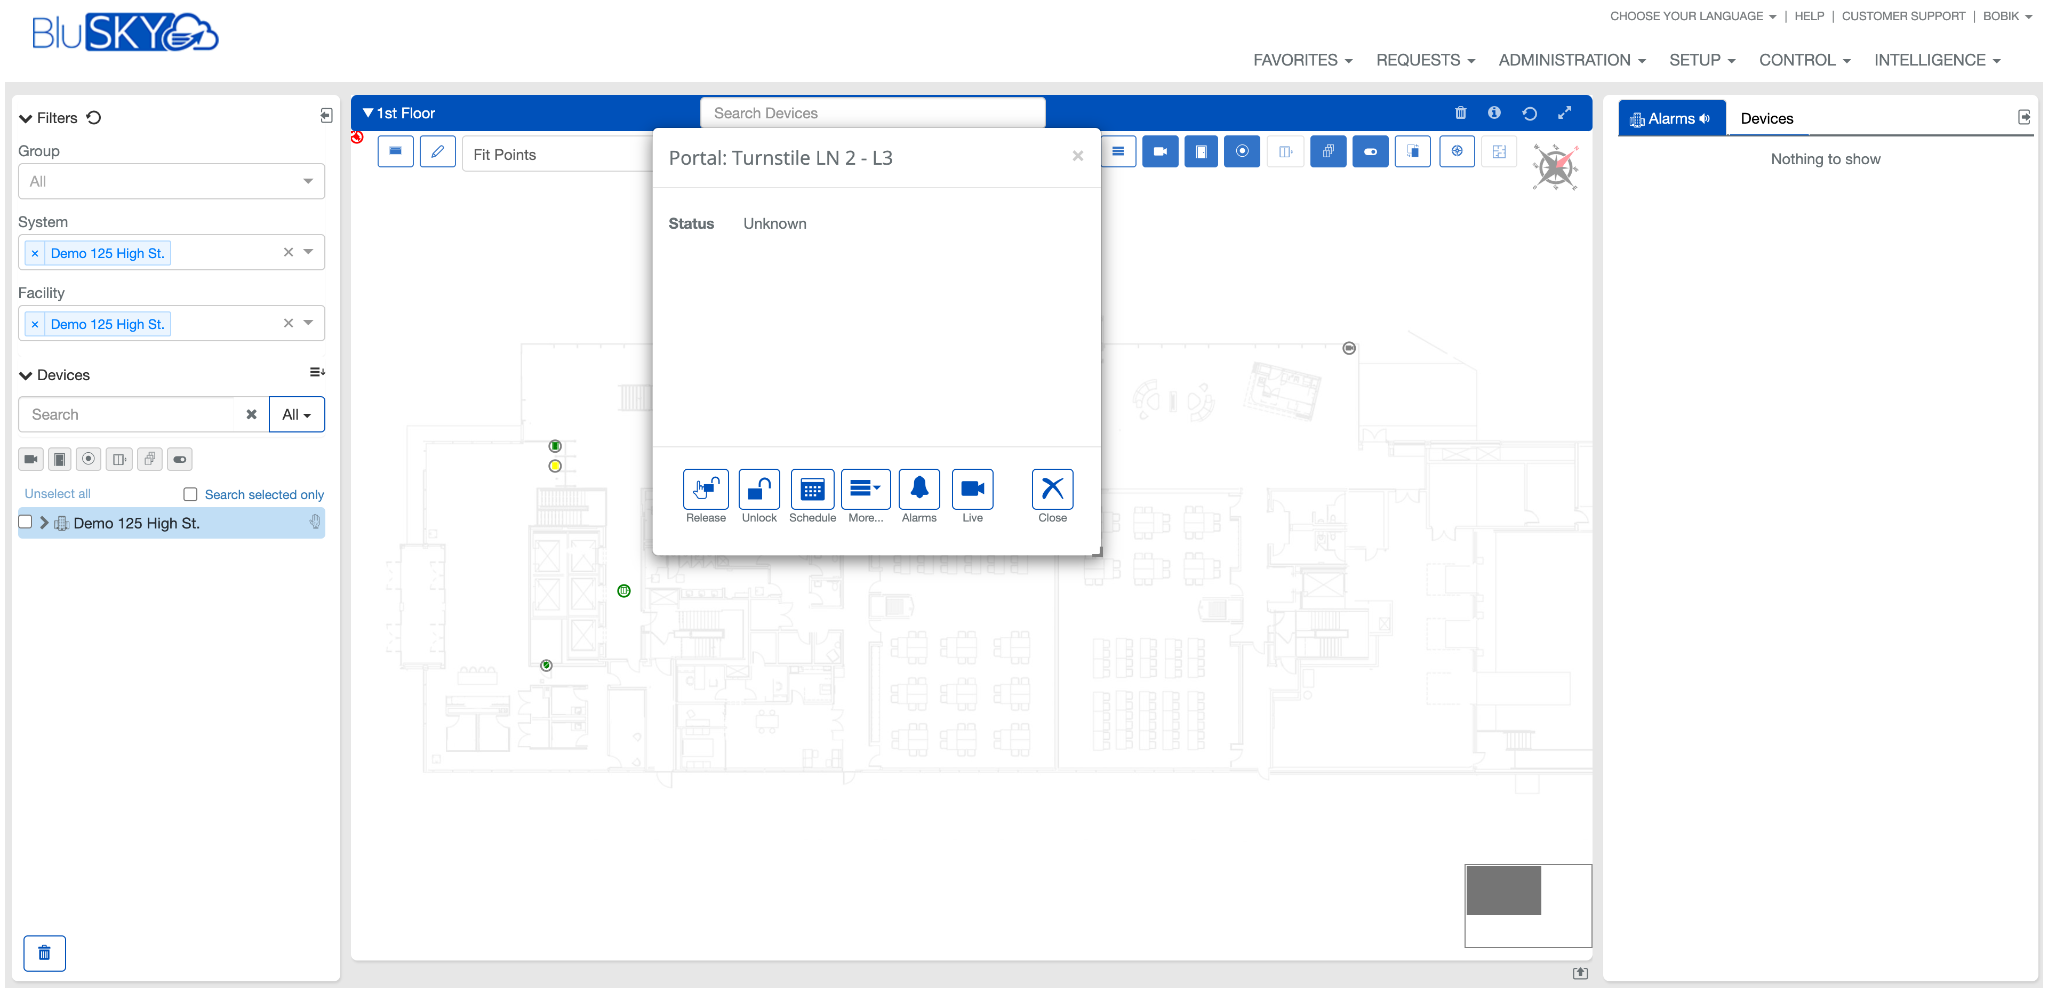
Selecting and Managing Devices
- Click on any device icon to open the Universal Device Control (UDC), allowing you to manage the settings and controls for that specific device.
- Double-clicking on a device icon will transfer its UDC panel to the right sidebar, providing persistent access to its controls without obscuring the map.
Editing the Map
- Access edit mode by selecting the edit icon from the top toolbar to add or adjust device icons on the floor plan.
- In edit mode, you can drag devices from the left navigation tree onto the map, positioning them as needed.
- Device icons can be fine-tuned using directional arrows and rotation options available in edit mode.
- Save any changes to the floor plan layout by clicking the save icon.
Customizing Map View
- Toggle between different map icon views using the view control icon, choosing from a stacked view, an overlay view, or hiding icons.
- Adjust the map's opacity using the opacity control to ensure device icons are easily visible over the floor plan.
- Set the north orientation for the map using the compass icon, and apply this orientation across all maps for consistency.
Best Practices
- Regularly verify and update the floor plan and device positions to reflect any changes in the physical layout.
- Use the status indicators to promptly address any devices that may require attention.
- Utilize the zoom and customization features to adapt the map view to your needs for effective monitoring.
User Documentation for Using the Events Timeline in BluSKY Interactive Maps
Overview
The Events Timeline in BluSKY's Interactive Maps is a tool designed to provide users with chronological visualization and management of security-related events within their facilities.
Accessing the Events Timeline
- Open BluSKY by logging in with your user credentials.
- Navigate to the Interactive Maps module by selecting it from the 'Favorites' or 'Control' menu on the home screen.
- The Events Timeline is located at the bottom of the Interactive Maps interface.
Interface Description
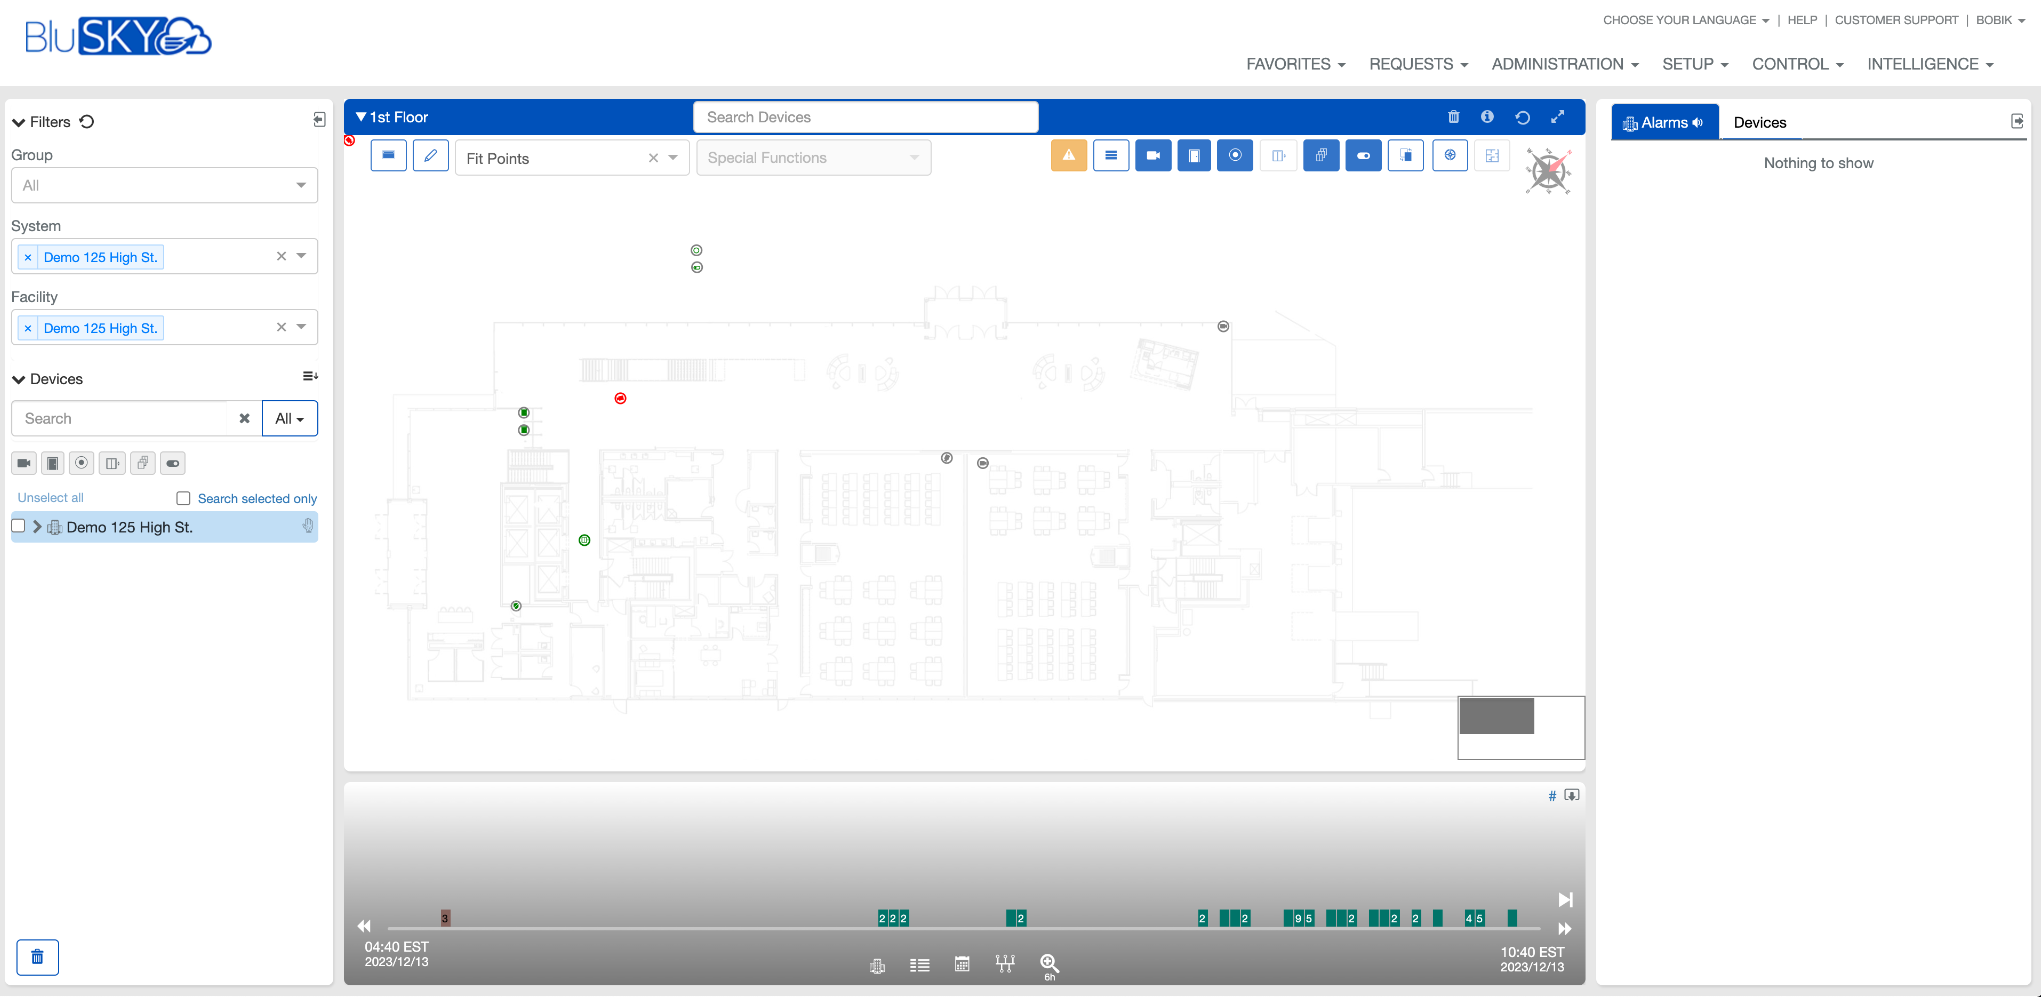
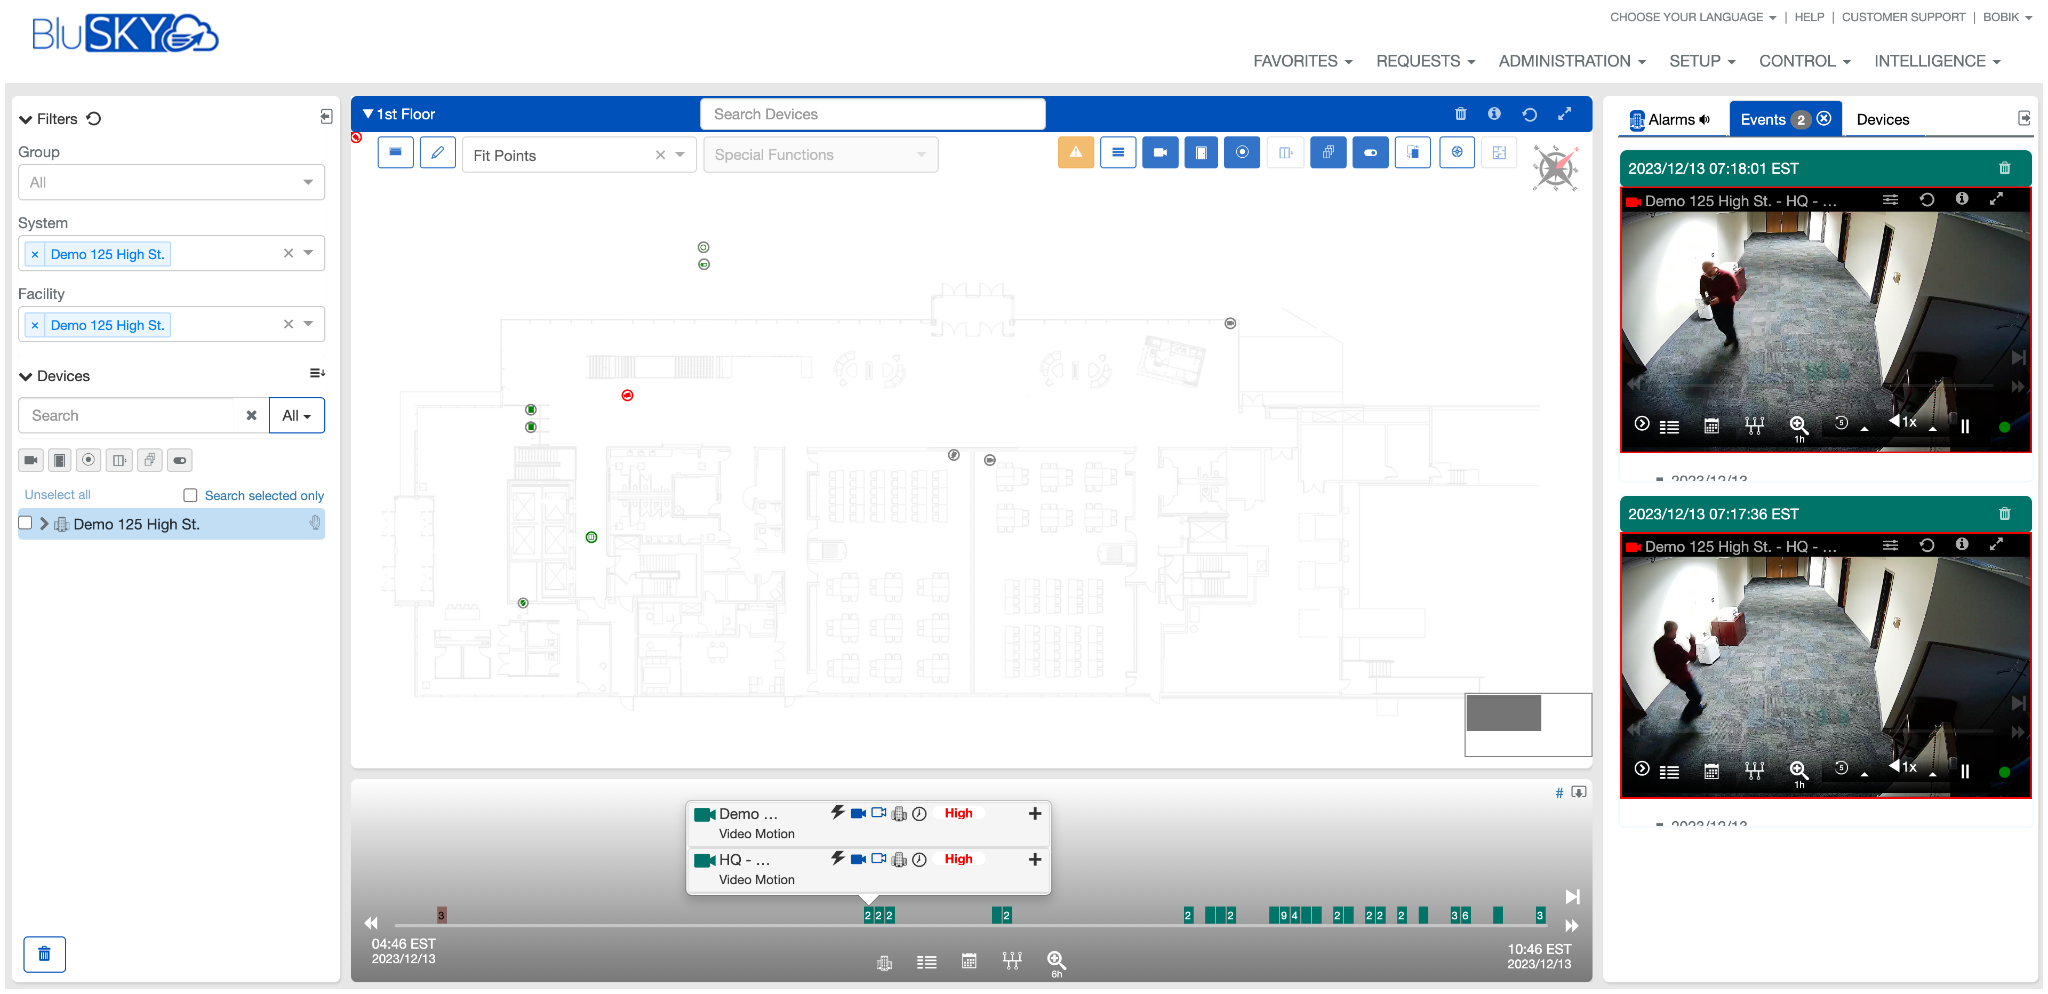
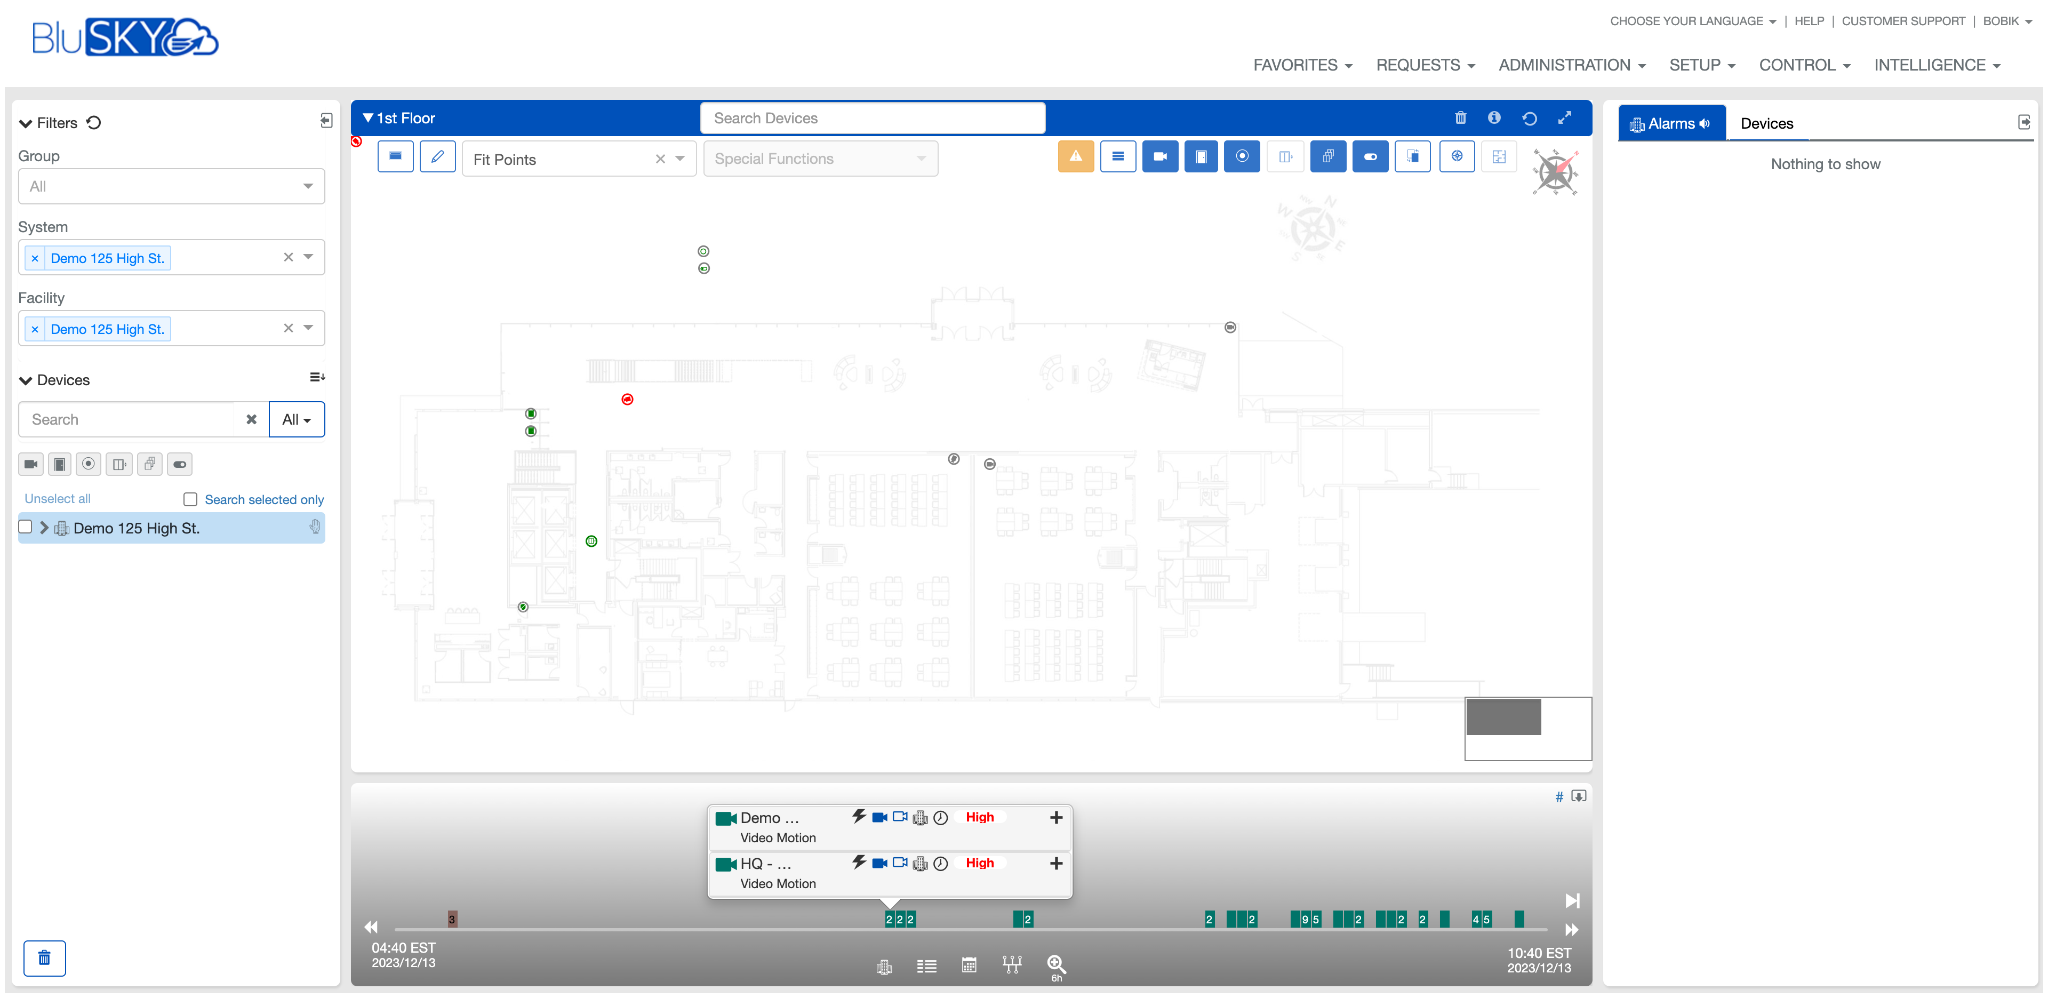
The Events Timeline is a horizontal bar that spans the bottom of the Interactive Maps screen, displaying events as colored flags or markers that correspond to their occurrence in time.
- Timeline Bar: Shows a linear representation of time, with the ability to scroll backward and forward to review past and current events.
- Event Flags: Visual indicators on the timeline bar that represent individual events. Their colors and shapes may denote the type and priority of the event.
- Expand/Collapse Arrow: A button to extend or minimize the Events Timeline for a more detailed view or to free up screen space.
- Time Blocks: Segments on the timeline that group events within defined periods.
Interacting with the Events Timeline
Viewing Events
- Click the expand arrow to open the Events Timeline fully.
- Scroll along the timeline to view different time periods and the events that occurred within them.
Filtering Events
- Open the Events filter to specify criteria for the events you wish to see, such as time zone, historical or real-time events, and event categories.
- Use the Select All/Unselect All toggle to quickly adjust which events are displayed.
- Apply the filter settings to update the timeline with your specified criteria.
Selecting Time and Date
- Click the calendar icon to choose a specific date and time to view on the timeline.
- Adjust the time blocks to focus on particular periods during the selected day.
Custom Time Blocks
- Create custom time blocks for personalized event review by clicking the plus sign.
- Name the time block and define its start and end times.
- Once created, select the custom time block to adjust the timeline view accordingly.
Investigating Events
- Hover over an event flag to see a brief description or metadata.
- Click on an event to view it in detail within the Interactive Maps interface.
- Double-click on an event to send it to the right sidebar under the Events tab for further analysis.
Timeline Navigation and Zoom
- Use the zoom control to adjust the visible time span on the timeline, ranging from minutes to hours.
- Navigate through time using the arrow buttons, with the option to reset the timeline to the current moment.
Best Practices
- Regularly review the Events Timeline to stay updated on security matters.
- Utilize the filtering options to streamline the events display according to your operational focus.
- Investigate events promptly for timely responses to security incidents.
User Documentation for Using the Right Sidebar in BluSKY Interactive Maps
Overview
The Right Sidebar in BluSKY's Interactive Maps is a dedicated area for detailed monitoring and control of security events, alarms, and devices. It offers users the ability to investigate and manage various security components without obstructing the main interactive map view.
Accessing the Right Sidebar
Upon entering the Interactive Maps module in BluSKY:
- Locate the Right Sidebar: It's positioned on the right edge of the Interactive Maps interface.
- Understand the Tabs: There are three primary tabs labeled 'Alarms', 'Events', and 'Devices' that you can navigate between.
Not specified within the provided information.
Interface Description
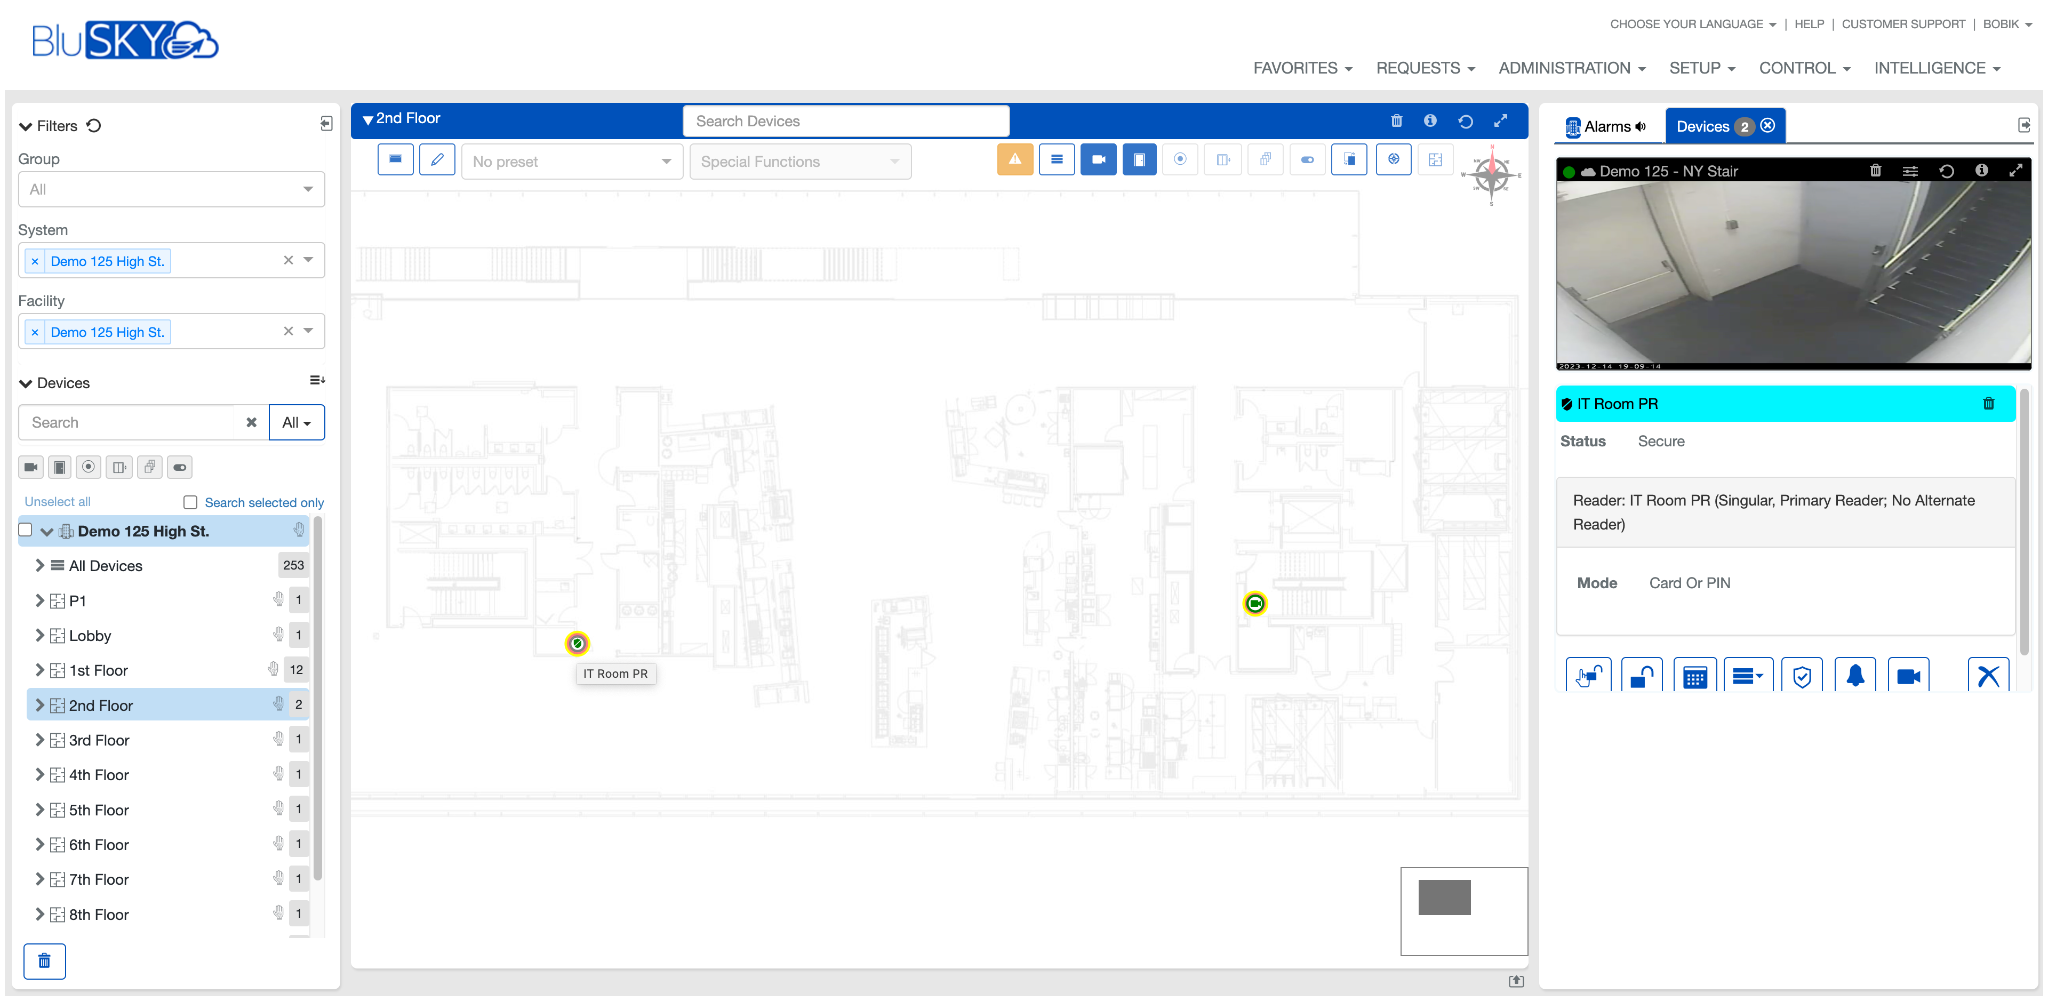
Each tab within the Right Sidebar serves a specific function:
- Alarms Tab: Automatically populates with live alarms from the system, facilities, or specific floors.
- Events Tab: Displays events that have been selected from the Events Timeline for further action or review.
- Devices Tab: Shows details and controls for devices selected either from the map or the Left Navigation Tree.
Interacting with the Right Sidebar
Managing Alarms
- Filtering Alarms: Choose to display alarms from the entire system, a particular facility, or just the floor plan currently in view using the filter icons within the Alarms tab.
- Viewing Alarm Details: Click on an alarm to expand its details and access control options.
Reviewing Events
- Selecting Events: Bring events from the Events Timeline into the sidebar by double-clicking on them.
- Investigating Events: Up to 50 events can be examined in the sidebar. Click on an event to see detailed information and related video or device controls.
Controlling Devices
- Accessing Device Controls: Devices can be added to the sidebar by double-clicking their icons on the map or selecting them in the Left Navigation Tree and using the arrow button.
Using Universal Device Control: Each device in the sidebar has a UDC interface that allows for full control and monitoring.
Best Practices
- Regularly utilize the Right Sidebar to keep the main map view clear for ongoing monitoring and situational awareness.
- Make use of the filtering capabilities in the Alarms tab to focus on the most relevant security information.
- Use the Events tab for in-depth examination of security incidents without losing sight of the live map.
Use Case Scenarios:
- Monitoring door access and releasing locks in case of an emergency.
- Reviewing camera footage following a security alert.
- Adjusting device configurations to respond to changing security needs.
Administration and Configuration
Administrative Functions:
Administrators can enter edit mode to add or adjust device icons on the map, tailor the map view, and save layout changes.
Configuration Options:
Admins can also configure the visibility of devices by category, adjust map opacity, and set the north direction for consistency across maps.
Integration and Interoperability
Integration with Other Modules:
Interactive Maps work in tandem with other BluSKY modules like Alarms and Camera Management for a cohesive security operation.
External Integrations:
The module can integrate with third-party camera systems to provide live video feeds within the platform.
Troubleshooting and Support
Common Issues and Solutions:
If a device does not appear on the map, verify its inclusion in the left-side navigation tree and ensure it's placed on the correct floorplan.
Support Resources:
For additional support, contact BluSKY customer service or consult the online forums.
Security and Compliance
Security Features:
The module enforces strict permissions for user access and control, ensuring secure management of facility security.
Compliance Information:
Interactive Maps adhere to industry standards for data security and privacy.
Appendices
Glossary:
UDC - Universal Device Control
FAQs:
- Q: How do I access the Interactive Maps module? A: Select the Interactive Maps icon from the 'Favorites' menu or the 'Control' menu on the home screen
- Q: Can I view multiple buildings in Interactive Maps? A: Yes, if you have multiple buildings, you can switch between them, but the default view will be your primary building.
- Q: How do I add a device to the map? A: Enter edit mode, select the device from the device list on the left, and drag it onto the floorplan.
- Q: What do the different colors of the device icons represent? A: Green usually indicates the device is functioning properly, while red signifies that it is offline or in alarm mode.
- Q: How can I zoom in on the map? A: Use the zoom in and zoom out icons located on the map toolbar.
- Q: How do I edit a floorplan? A: Click the edit icon to enter edit mode, where you can add or adjust device positions on the floorplan.
- Q: Can I customize the timeline view? A: Yes, you can adjust the timeline scale and set custom time blocks for focused event review.
- Q: How do I filter events on the timeline? A: Use the Events filter to select the time zone, event type, and whether you want to see historical or real-time events.
- Q: What is the maximum number of events I can view at one time? A: The Events tab can display up to 50 events for investigation.
- Q: How do I move an event to the right sidebar for further investigation? A: Double-click on the event in the timeline, and it will be sent to the Events tab on the right sidebar.
- Q: How can I highlight specific devices on the map? A: Use the devices list icon to show all devices for the floorplan, then select the checkboxes to highlight them.
- Q: Can I control devices directly from the map? A: Yes, by selecting a device icon, you can bring up the UDC screen to control that device.
- Q: How do I save changes made in edit mode? A: After arranging the devices, click the save icon to save your layout changes.
- Q: How do I adjust the map's opacity? A: Use the opacity icon to increase or decrease the map's visibility.
- Q: What should I do if a device doesn't appear on the map? A: Ensure the device is included in the left-side navigation and placed correctly on the floorplan.
- Q: How do I set the north direction for the map? A: Use the compass icon to set the north direction, and apply it to all maps with the adjacent floor plan icon.
- Q: Can I view camera feeds from the Interactive Maps? A: Yes, if there is an associated camera with a device, you can view its feed through the UDC.
- Q: How do I switch between different floor plans? A: Use the dropdown in the upper left corner of the Interactive Maps area to select different floor plans.
- Q: How do I report an issue with Interactive Maps? A: Provide feedback via the BluSKY support portal or contact customer service.
- Q: Can I view events for a specific floor only? A: Yes, filter the events by selecting the map icon to display alarms for the floor plan currently shown.
Feedback and updates:
Providing Feedback:
Users are encouraged to provide feedback through the customer support channels or the feedback option within the BluSKY platform.