Create a Reader
BluSKY URL: https://blusky.blub0x.com/en-US/MercuryReader/Create
Overview
Readers are any devices that read and validate credentials to allow access. This article will detail the steps for creating a new Reader in BluSKY.
Instructions
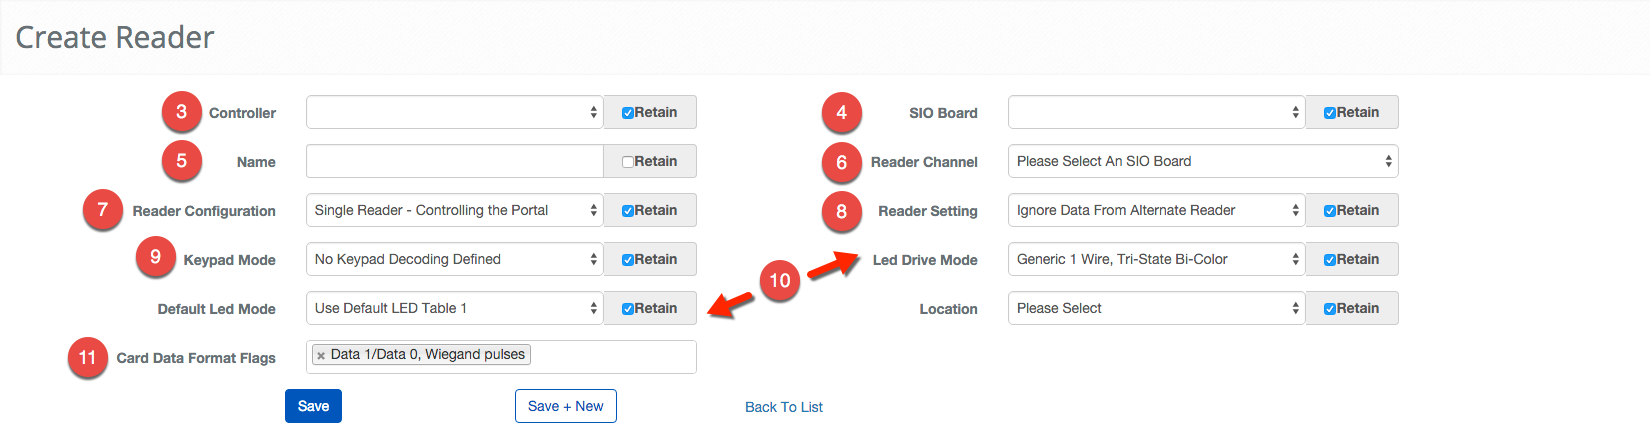
Wiegand Reader
- Navigate to Readers. Main Menu-> Setup-> System Setup-> Readers
- Use the
 icon in the lower left side to create a new Reader.
 - First, pick the Controller that will manage the Reader.
- Select the SIO Board the Reader is attached.
- ***Note:***In some situations the SIO Board and Controller will be the same.
- Enter a name for the Reader in the Name text field.
- ***Note:***Using good names can make the process of servicing and debugging much easier.
- Select the Reader Channel that corresponds with the Reader port on the SIO Board or Controller.
- Note: This is the number that corresponds with which connection is used on the board.
- Choose the Reader Configuration.
- Choose the Reader Setting from the dropdown menu.
- Choose the Keypad Mode.
- Select the appropriate LED Drive Mode and Default LED Mode.
- Click in the Card Data Format Flags field to bring up list of applicable Format Flags.
- Confirm the entry with the
 button or because of the nature of this operation we provide a
  button to move onto the next entry quickly.
OSDP Reader
- Navigate to Readers. Main Menu-> Setup-> System Setup-> Readers
- Use the icon in the lower left side to create a new Reader.
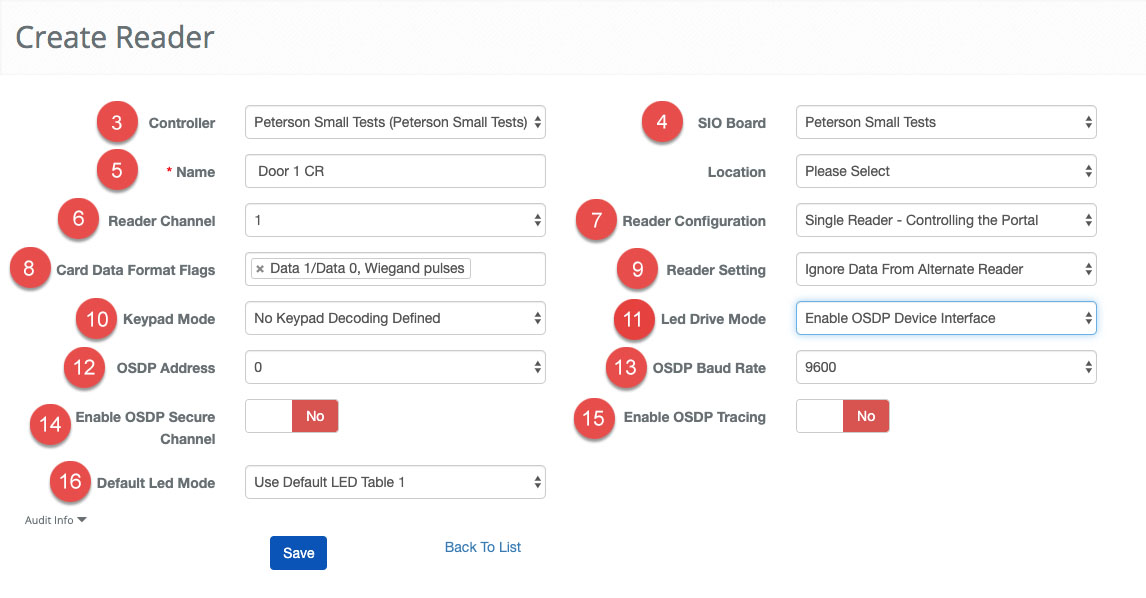
- First, pick the Controller that will manage the Reader.
- Select the SIO Board the Reader is attached.
- ***Note:***In some situations the SIO Board and Controller will be the same.
- Enter a name for the Reader in the Name text field.
- ***Note:***Using good names can make the process of servicing and debugging much easier.
- Select the Reader Channel that corresponds with the Reader port on the SIO Board or Controller.
- Note: This is the number that corresponds with which connection is used on the board.
- Choose the Reader Configuration.
- Click in the Card Data Format Flags field to bring up list of applicable Format Flags.
- Choose the Reader Setting from the dropdown menu.
- Choose the Keypad Mode.
- Select the appropriate Led Drive Mode set to OSDP Device Interface
- OSDP Address - Select the channel the reader is configured for. Most single OSDP Readers are 0. You can purchase readers with different channel numbers, and there are reader configuration cards that will change the channel. If you do not know your channel start with 0 and work your way up. Note: WIth OSDP you can now "daisy-chain" 4 readers to a single reader port on the SIO board.
- Set the OSDP Baud Rate - 4 speed options 9600 (default) 19200, 38400, 115200
- Enable OSDP Secure Channel allows for secure communication from Controller to Reader
- Enable OSDP Tracing This should be set to "No" unless directed by BluB0X support. This setting will add OSDP reader information to Mercury debug logs, which would also need to be manually configured by BluB0X Support.
- Click in the Default LED Mode field to bring up list of applicable modes.
- Confirm the entry with the button or because of the nature of this operation we provide a button to move onto the next entry quickly.