Edit a Portal
BluSKY URL:https://blusky.blub0x.com/en-US/MercuryPortal
Overview
Portals are the grouping of devices that work together to secure entry or exit. A Portal will contain a combination of locks, inputs and sensors and assist in managing the access control system easily. This article provides assistance in making various edits to an existing Portal.
Edit a Portal's Controller
This action is not a common change that should be made. Please ensure that this is the correct edit before proceeding. This would typically only be necessary for a System that is being expanded.
- Log in and navigate to Portals. Main Menu-> Setup-> System Setup-> Portal
- Use the search feature and then select the entry you wish to edit from the list.
- Click the
 icon in the lower left side of the screen.
- Note: If the edit button is not available ensure that only one entry has been highlighted.
- Use the Controller drop down menu to select the correct Controller.
- Confirm changes with the
 button.
Edit a Portal's Name
- Log in and navigate to Portals. Main Menu-> Setup-> System Setup-> Portal
- Use the search feature and then select the entry you wish to edit from the list.
- Click the icon in the lower left side of the screen.
- Note: If the edit button is not available ensure that only one entry has been highlighted.
- Use the Name text field to enter the new name for the Portal.
- Confirm changes with the button.
Edit a Portal's In Reader
- Log in and navigate to Portals. Main Menu-> Setup-> System Setup-> Portal
- Use the search feature and then select the entry you wish to edit from the list.
- Click the icon in the lower left side of the screen.
- Note: If the edit button is not available ensure that only one entry has been highlighted.
- Use the In Reader drop down menu to select the correct Reader being used for the Portal.
- Confirm changes with the button.
Edit a Portal's Lock Output
- Log in and navigate to Portals. Main Menu-> Setup-> System Setup-> Portal
- Use the search feature and then select the entry you wish to edit from the list.
- Click the icon in the lower left side of the screen.
- Note: If the edit button is not available ensure that only one entry has been highlighted.
- Use the Lock Output dropdown menu from the drop down menu.
- Confirm changes with the button.
Edit a Portal's Lock Output Time
- Log in and navigate to Portals. Main Menu-> Setup-> System Setup-> Portal
- Use the search feature and then select the entry you wish to edit from the list.
- Click the icon in the lower left side of the screen.
- Note: If the edit button is not available ensure that only one entry has been highlighted.
- To adjust you may use the slider or the text field to enter the time in seconds the Lock will deactivate, only ( 3 - 180 seconds is valid).
- Confirm changes with the button.
Edit a Portal's Lock Output Mode
- Log in and navigate to Portals. Main Menu-> Setup-> System Setup-> Portal
- Use the search feature and then select the entry you wish to edit from the list.
- Click the icon in the lower left side of the screen.
- Note: If the edit button is not available ensure that only one entry has been highlighted.
- Use the Lock Output Mode drop down menu to select the correct operation for the lock being used for the portal.
- Confirm changes with the button.
Edit a Portal's Lock Schedule
- Log in and navigate to Portals. Main Menu-> Setup-> System Setup-> Portal
- Use the search feature and then select the entry you wish to edit from the list.
- Click the icon in the lower left side of the screen.
- Note: If the edit button is not available ensure that only one entry has been highlighted.
- Use the Lock Schedule drop down menu to select the correct Device Schedule
- ***Note:***Only Device Schedules can be applied to a lock, if the schedule does not appear in the list please ensure that the schedule is a Device Schedule
- Confirm changes with the button.
Edit a Portal's Door Contact Input
- Log in and navigate to Portals. Main Menu-> Setup-> System Setup-> Portal
- Use the search feature and then select the entry you wish to edit from the list.
- Click the icon in the lower left side of the screen.
- Note: If the edit button is not available ensure that only one entry has been highlighted.
- Use the Door Contact Input drop down menu to select the Input being used to monitor the Portal, this is sometimes referred to as a Door Position Sensor or DPS for short
- Confirm changes with the button.
Edit a Portal's Primary Rex Input
- Log in and navigate to Portals. Main Menu-> Setup-> System Setup-> Portal
- Use the search feature and then select the entry you wish to edit from the list.
- Click the icon in the lower left side of the screen.
- Note: If the edit button is not available ensure that only one entry has been highlighted.
- Use the Primary Rex Input drop down menu to select the correct Input being used for the Request to Exit (REX)
- Confirm changes with the button.
Toggle the Portal as a Perimeter Portal
- Log in and navigate to Portals. Main Menu-> Setup-> System Setup-> Portal
- Use the search feature and then select the entry you wish to edit from the list.
- Click the icon in the lower left side of the screen.
- Note: If the edit button is not available ensure that only one entry has been highlighted.
- Use the Perimeter Portal to toggle the Portal from Yes to No or vice versa.
- Confirm changes with the button.
Change the Help Open Time
- Log in and navigate to Portals. Main Menu-> Setup-> System Setup-> Portal
- Use the search feature and then select the entry you wish to edit from the list.
- Click the icon in the lower left side of the screen.
- Note: If the edit button is not available ensure that only one entry has been highlighted.
- Locate the
 text and click it to expand advanced options.
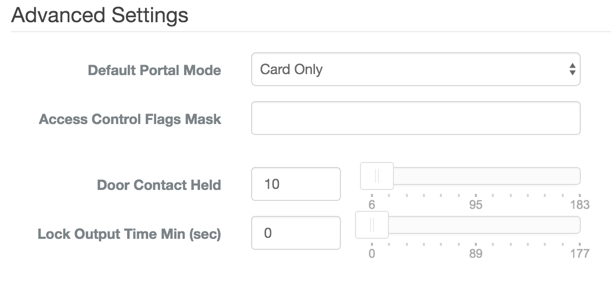
 - Scroll down until you locate Advanced Settings.
- In the Advanced Setting section, use the Door Contact Held's slider or text field to input the time in seconds the door is allowed to stay open without triggering a door help alarm.
- ***Note:***The time can vary greatly depending on function of the Portal and the People using it. Consult the end-user to determine their needs.
- Confirm changes with the button.