Alarms Control
Overview
The Alarms page gives you a heads-up real-time display of the alarms in BluSKY. This is a critical component of real-time monitoring. The Alarm Control interface allows operators to monitor, acknowledge, clear, and comment on any kind of alarm. Operators can also view video, location, and other information associated with the alarm. You can manage alarms originating from Portals, Intrusion Groups, Monitoring Points, or logical alarms from the BluB0X Analytics.
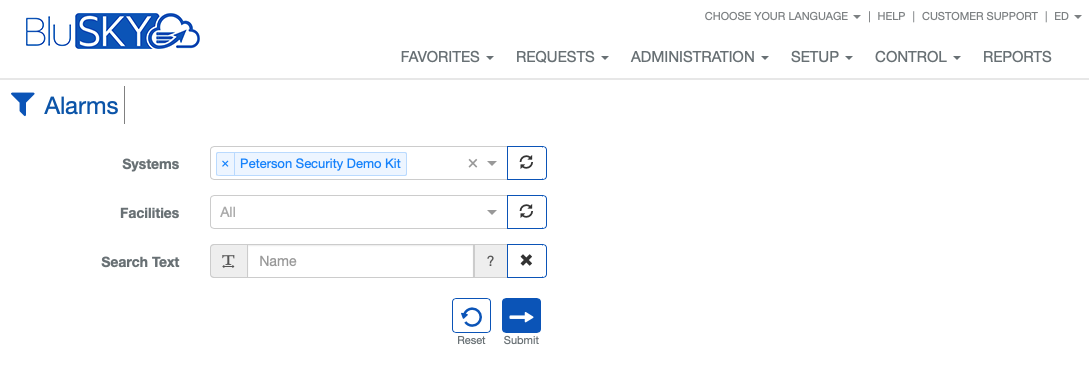
Alarms Filter Criteria
Filter criteria can be specified to limit the view list page to relevant alarms. The filter criteria dialog may automatically populate the System and/or Facility that you have access to. If you have access to multiple Systems and Facilities, you can select one or more by using the drop-down menu. Additionally, you can narrow down your search by specifying a search text. This feature allows you to only display alarms that match a particular name.
Once the criteria is selected, click ![]() (Submit Button) to populate the Alarms View list. If you need to change your criteria you can reenter the filter criteria by clicking the filter icon on the top left side of the screen.
(Submit Button) to populate the Alarms View list. If you need to change your criteria you can reenter the filter criteria by clicking the filter icon on the top left side of the screen.
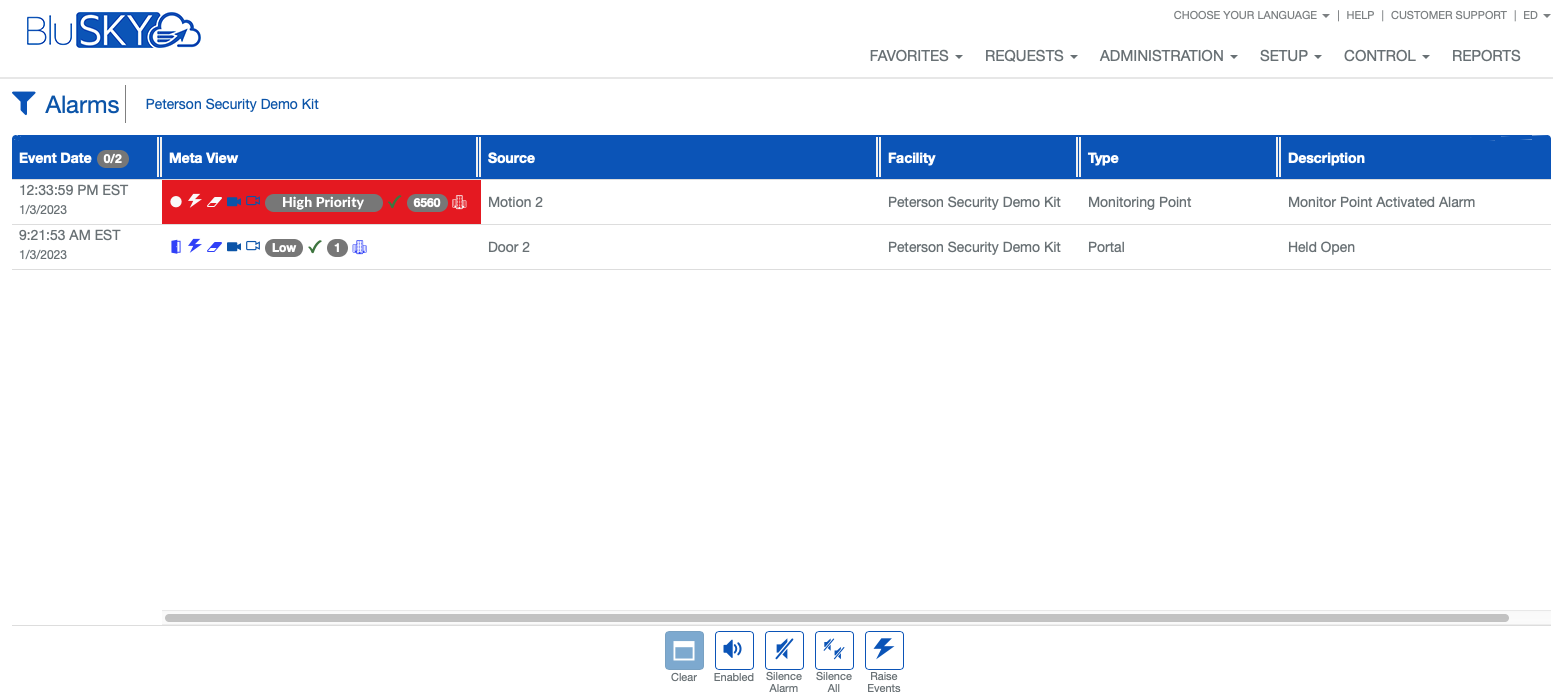
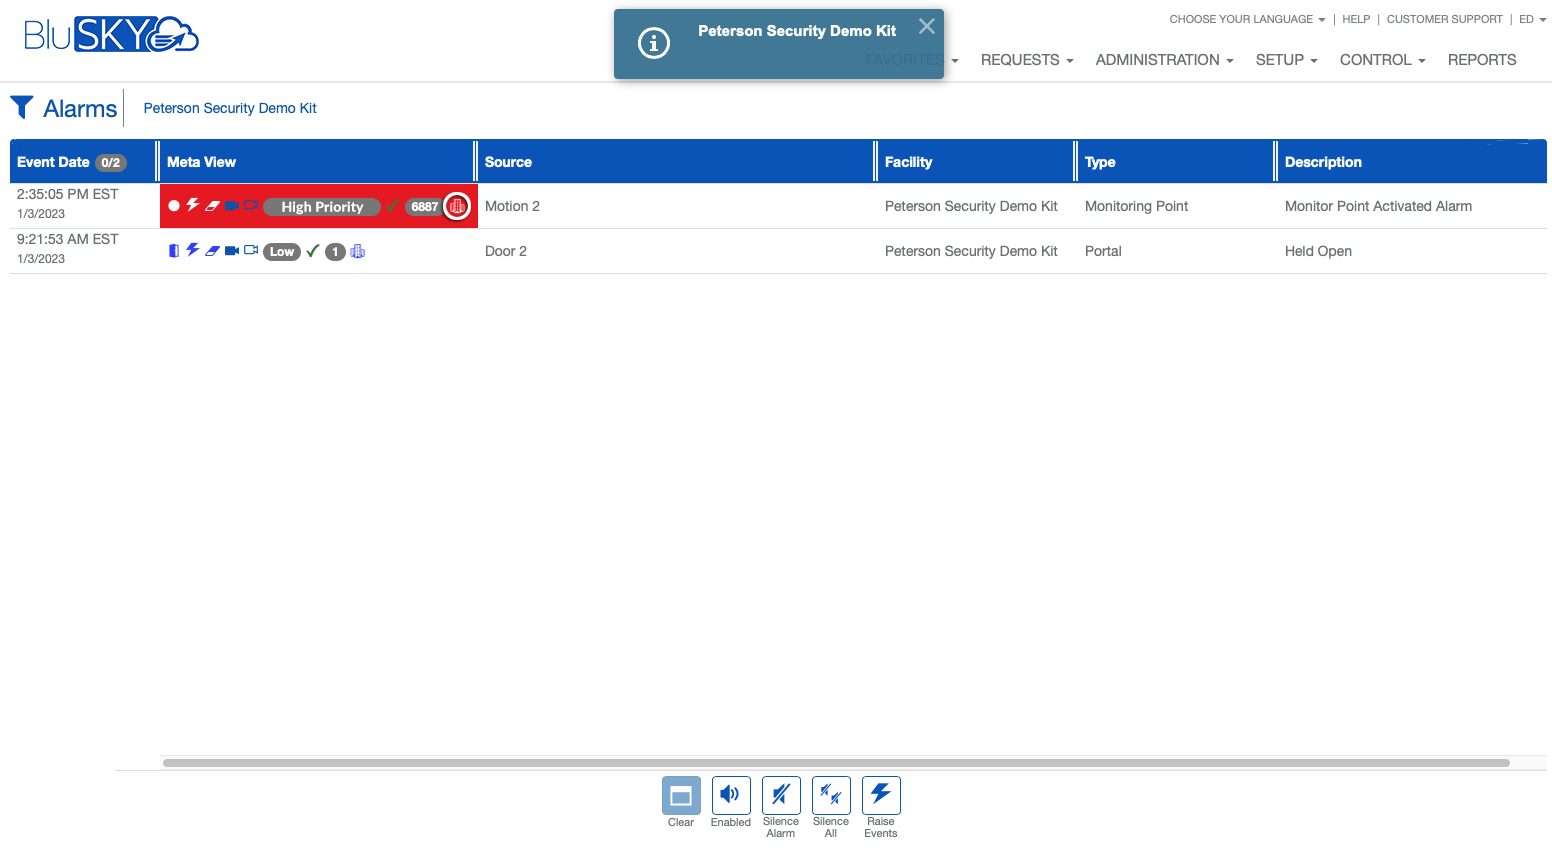
Alarms View List
On the Alarms View List Page, you can access the recent alarms that have occurred on your system. New alarms that match your search criteria will automatically populate on this list as they happen.
To review information associated with each alarm, simply click on any of the icons in the Meta View column. This will provide you with detailed information about the alarm, including the date and time it occurred, as well as any comments that have been added by other users, or instructions associated with this alarm type.
You also have the option to add your own comments to each alarm, as well as to acknowledge or clear them. Simply click on the appropriate button to make your selection. Please note that when you click on any of the informational icons, the alarm will automatically be marked as acknowledged. This helps to ensure that all alarms are properly tracked and addressed.
To clear an alarm, use the  Clear button. You can select an individual alarm by clicking on that row in the list. You can also select multiple alarms, or use the
 ![]() Select All button at the top of the Event Date column to select/deselect all. Once an alarm is cleared, it will be removed from the list**.**Cleared alarms will still be visible using the Event History page with Event Type set to Alarm.
Select All button at the top of the Event Date column to select/deselect all. Once an alarm is cleared, it will be removed from the list**.**Cleared alarms will still be visible using the Event History page with Event Type set to Alarm.
Alarms can be configured to have an audible notification. These can be silenced using the icons at the bottom of the page. You can mute all alarms by toggling the 
 "Enabled/Muted" button, or you can choose to silence alarms as they happen. You have the option to silence the selected alarms or to silence all existing alarms. Any new alarms will continue to trigger the audible portion as long as you have audio "Enabled".
Alarm Type
The first icon in the Meta View column depicts the alarm type.
 Dot - Monitoring or IPS Point Alarm
 Door - Portal Alarm
 Bell - Logical Alarm
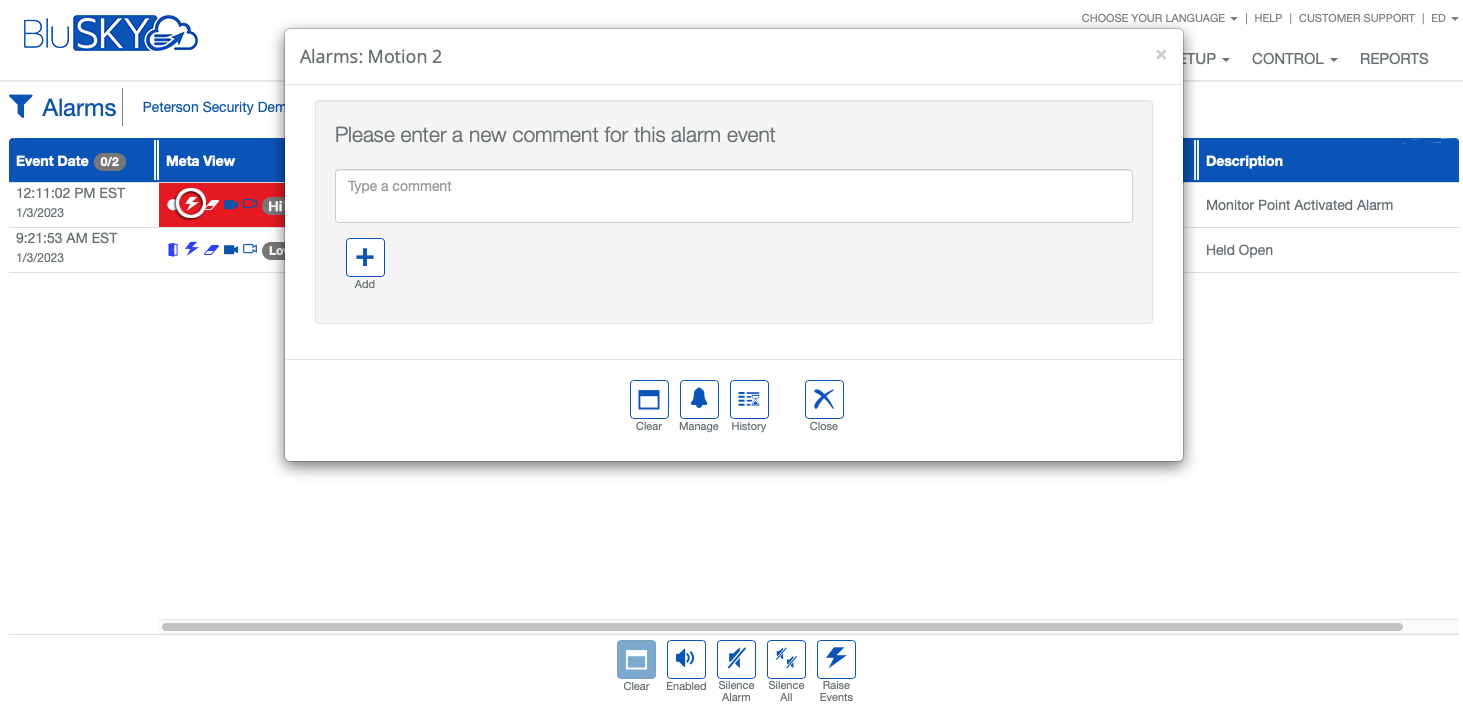
Alarm Comments & Instructions
Click the ![]() Lightning Bolt icon to display the interface to view and add comments, review alarm instructions, and to see historical list of all alarms that exist for this particular alarm. To add a comment, type in the comment box and click the Add button. Existing comments and alarm instructions can be seen on the Manage page. You can also clear the alarm from this dialog.
Lightning Bolt icon to display the interface to view and add comments, review alarm instructions, and to see historical list of all alarms that exist for this particular alarm. To add a comment, type in the comment box and click the Add button. Existing comments and alarm instructions can be seen on the Manage page. You can also clear the alarm from this dialog.
Alarm Comments
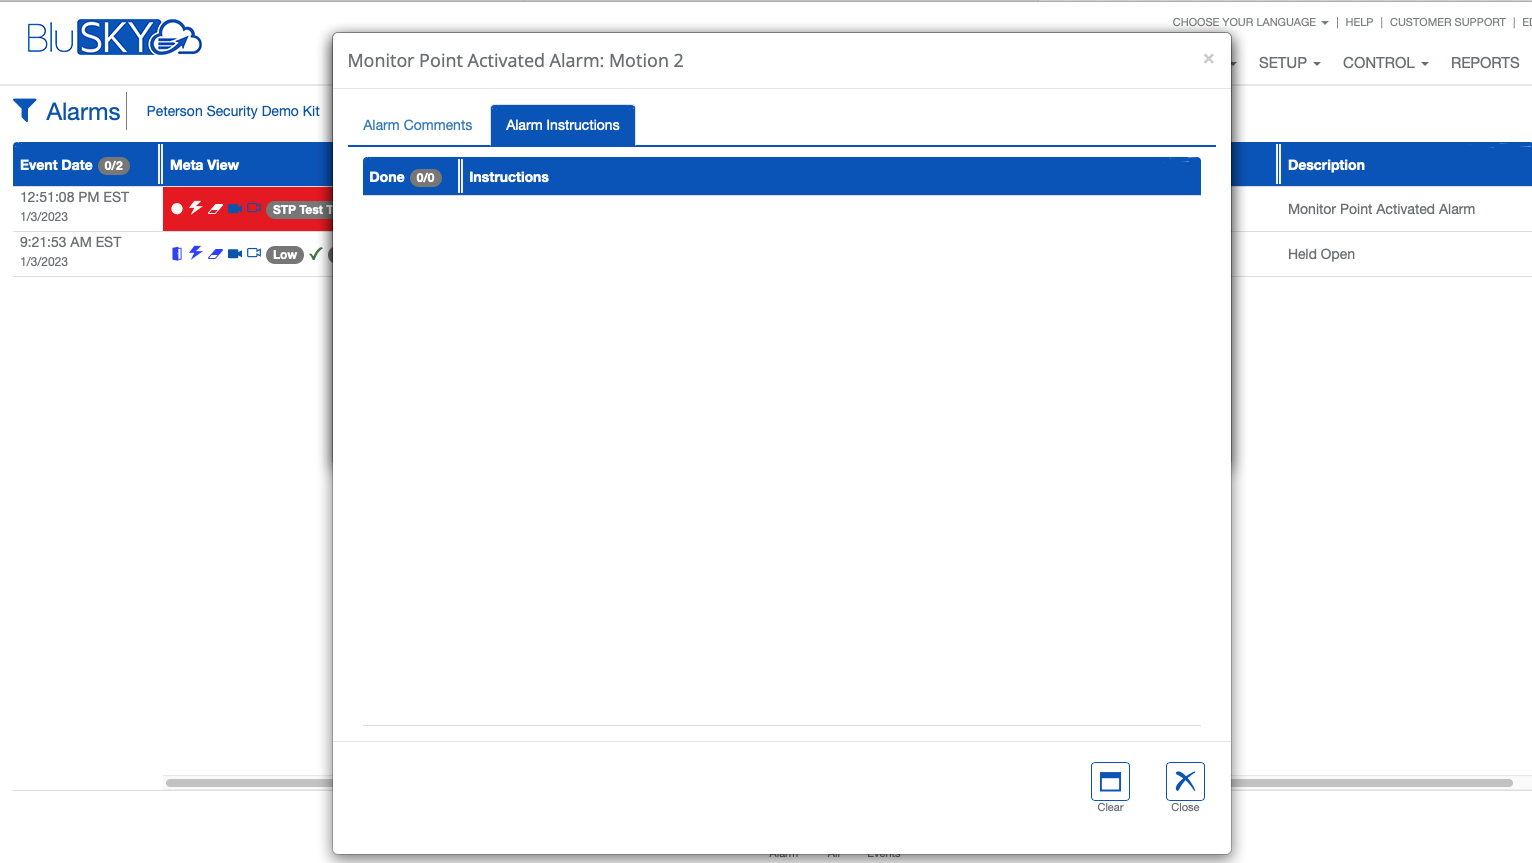
Click ![]() Manage to display the Alarm Comments and Alarm Instructions tabs page. View all existing comments or add more.
Manage to display the Alarm Comments and Alarm Instructions tabs page. View all existing comments or add more.
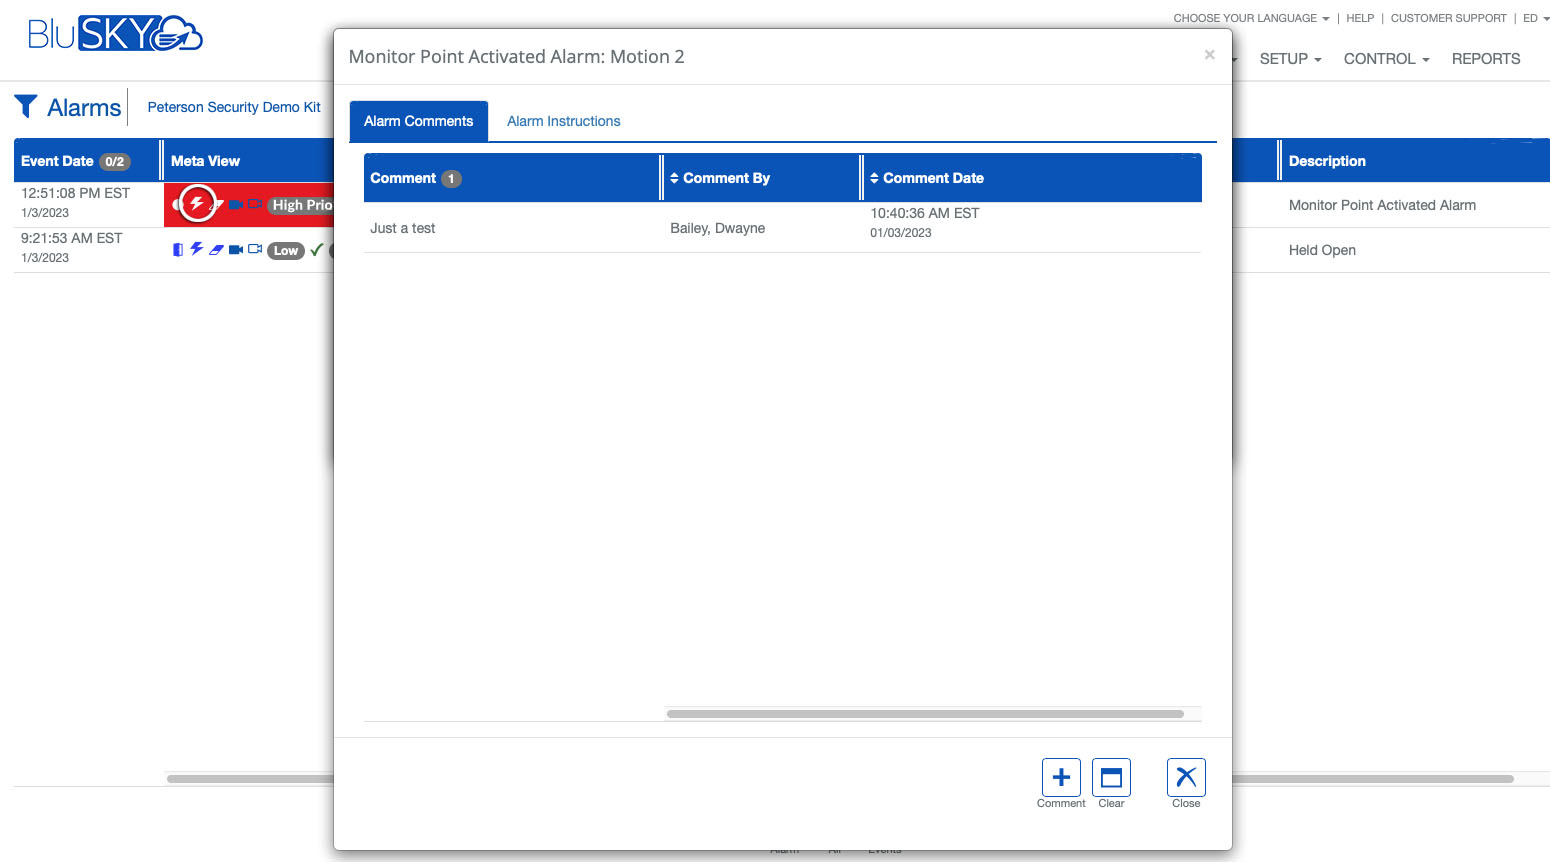
Alarm Instructions
Alarm Instructions can be provided to direct the monitoring staff as to the steps they should take when specific alarms occur.
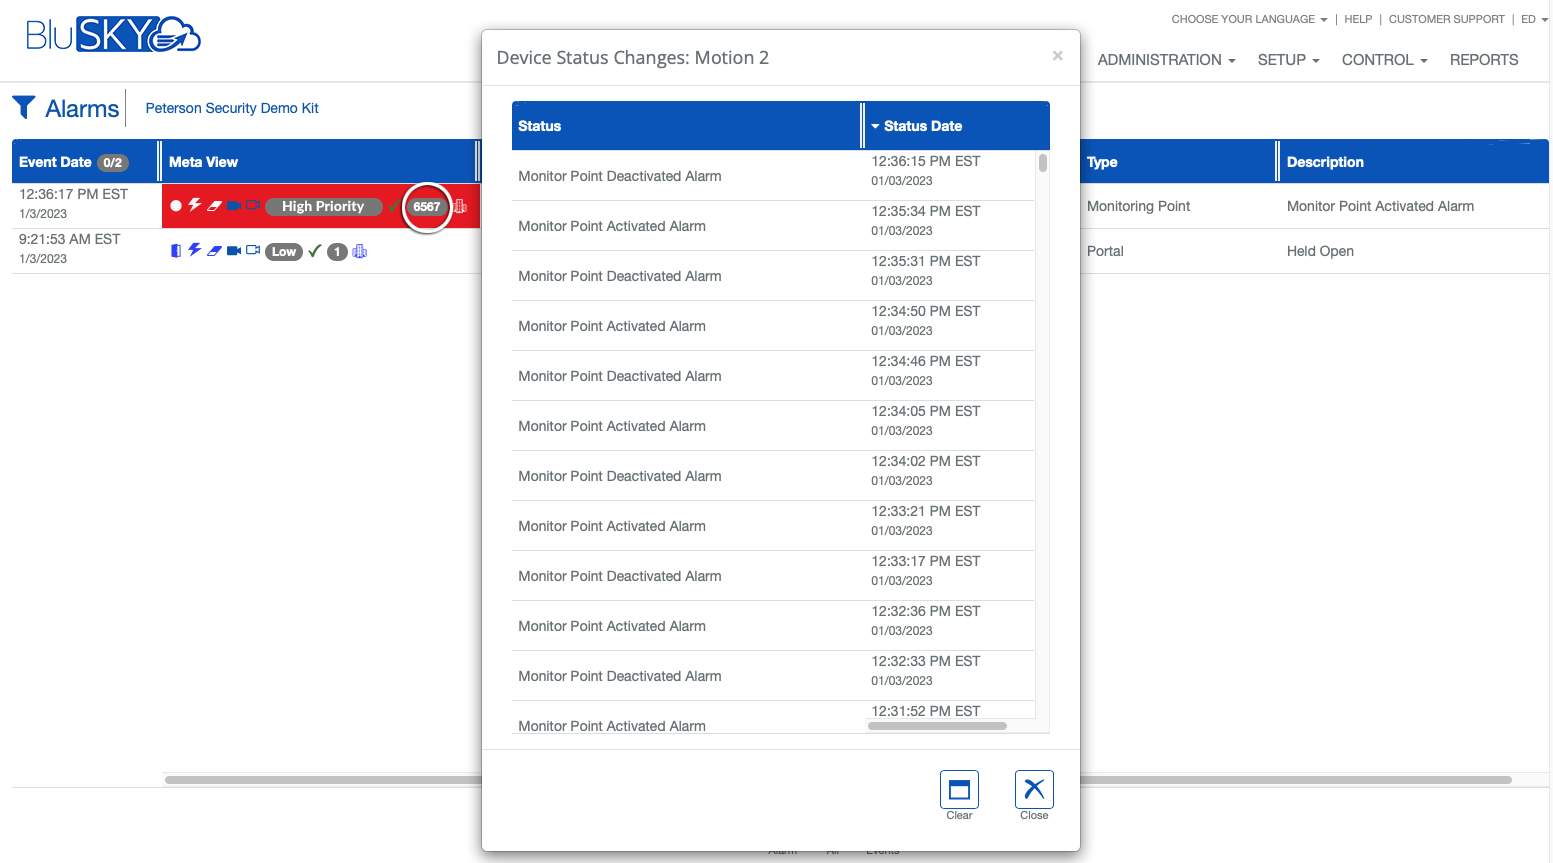
History
Select History to display a list of all Device Status Changes that created alarms along with the time they occurred.
Clear Alarm
If you click the ![]() Eraser Icon, it will immediately clear that alarm. Cleared alarms will be removed from the Alarm View list, but can still be viewed in Event History with the Alarm Event type selected.
Eraser Icon, it will immediately clear that alarm. Cleared alarms will be removed from the Alarm View list, but can still be viewed in Event History with the Alarm Event type selected.
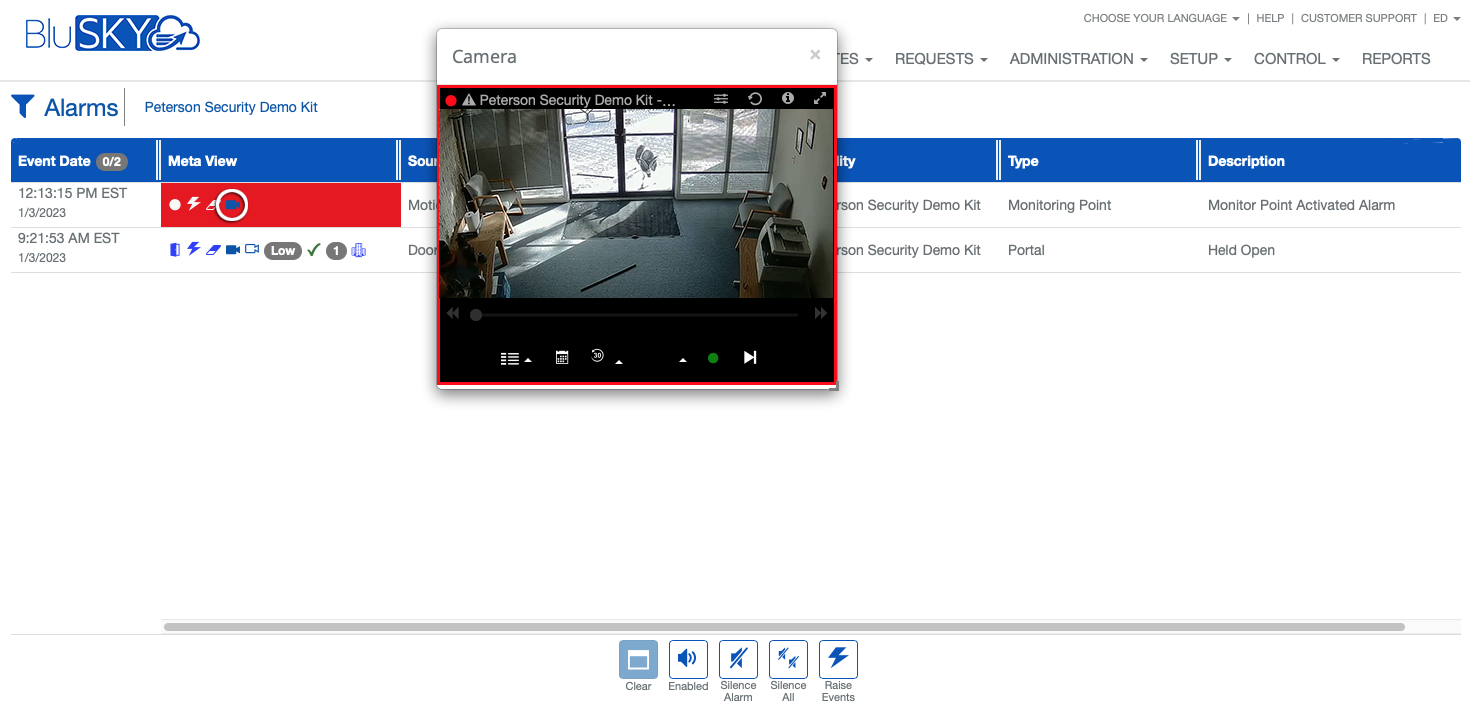
Video Clips
If a ![]() Camera icon is present in the Meta View options, it indicates one or more cameras are associated with the device that triggered the alarm and a video clip is available.
Camera icon is present in the Meta View options, it indicates one or more cameras are associated with the device that triggered the alarm and a video clip is available. ![]() A solid-filled camera icon indicates the video clip has been uploaded to BluSKY, while a
A solid-filled camera icon indicates the video clip has been uploaded to BluSKY, while a ![]() hollow-camera icon indicates that the video clip is still on the video server. The difference between the location of the video clip can affect how long it takes to load, as well as how long the video clip may be retained.
hollow-camera icon indicates that the video clip is still on the video server. The difference between the location of the video clip can affect how long it takes to load, as well as how long the video clip may be retained.
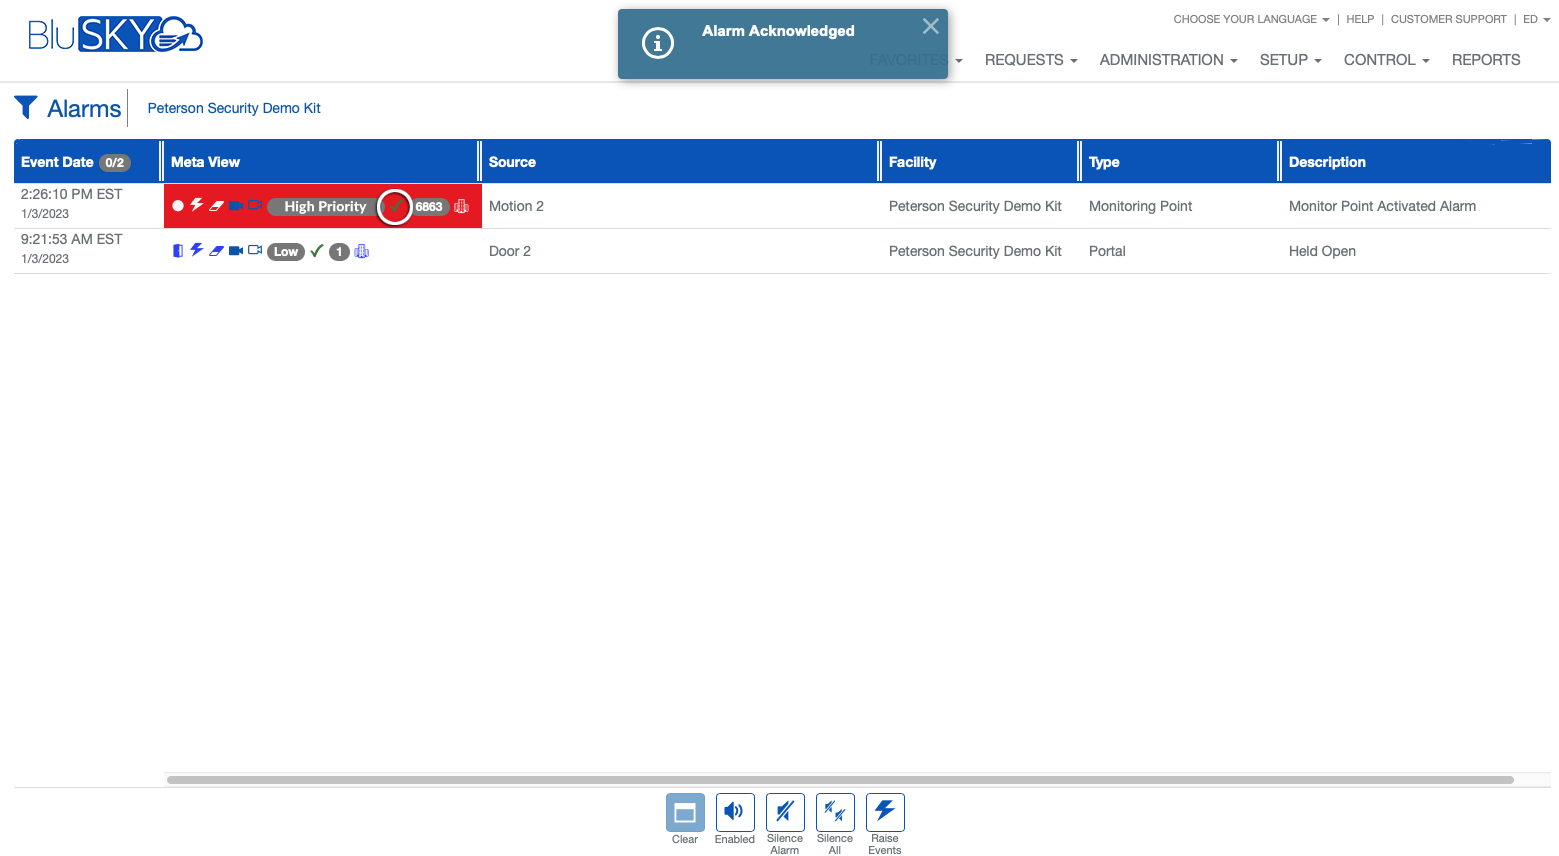
Alarm Acknowledged
Viewing any of the alarm information via the Meta View will automatically mark the alarm as Acknowledged, and indicated by displaying the ![]() checkmark icon in the Meta View. If you are acknowledging an alarm, you may wish to add a comment about any information gathered or steps taken after the alarm was detected.
checkmark icon in the Meta View. If you are acknowledging an alarm, you may wish to add a comment about any information gathered or steps taken after the alarm was detected.
Device Status Changes
The number displayed in the oval icon indicates how many device status changes have occurred for this particular alarm since they were last cleared.
Facilities
Click the ![]() Facility icon to display the facility information where the alarm occurred.
Facility icon to display the facility information where the alarm occurred.
#####
Definitions
| Field | Description |
|---|---|
| Clear - Clears the selected alarms and removes them from the Alarm View list. |
| Enabled - Toggle to enable or mute all audible alarm notifications. |
| Silence Alarm - Silence the selected alarms. |
 | Silence All - Silence all current alarms. |
 | Raise Events - |
 | Manage - Open alarm comments and instruction interface to assist in managing the alarm. |
 | History - Display list of all device status changes that have occurred for this alarm since the last time it was cleared. |
 | Close - Close current interface or dialog box. |
| Portal - indicates the alarm was generated by a portal alarm condition. | |
| Monitoring Point - indicates alarm was created based on a monitoring point or IPS point change of state. | |
| Alarm Comments - opens dialog to view and update comments as well as viewing alarm instructions. | |
| Erase - Clear the alarm and remove it from the Alarm View list. | |
| Camera (Solid) - Solid filled camera icon indicates a video clip is available associated with this alarm and that the video clip has been uploaded to BluSky. Video clips that have been uploaded to BluSky load a little faster than if they are on the video server and usually have a 30 day retention. | |
| Camera (Hollow) - Hollow camera icon indicates a video clip is available associated with this alarm and that the video clip is stored on the video server. Video clips may take a little longer to load, and their retention period will depend on available storage and how the video server is configured. | |
| Alarm Acknowledged - Indicates that the alarm has been acknowledged by someone. | |
| History Events - Indicates number of device status changes associated with this alarm since it was last cleared. | |
| Facilities - Indicates building in which the alarm occurred. | |
| Select All | |
| This indicates the number of rows selected out of the total number of rows found. Click to toggle between selecting or deselecting all of the displayed rows. This can be particularly useful when many alarms have accumulated. | |
| Event Date | The time and date of the alarm. The time is displayed based on the time zone of your default system. |
| Meta View | Icons in the Meta View can be used to view and manage additional information about the alarm. |
| Source | The name of the point generating the alarm. |
| Type | A text description of the kind of point being alarmed, Ex. portal or monitoring point. |
| Description | A short description of the cause of the alarm. |
| Status | Current state of the alarm it is either Acknowledged or Unacknowledged |