Edit a Vendor
BluSKY URL:https://blusky.blub0x.com/en-US/Vendor
Overview
Vendors are organizations that need access to an access control system to provide good or services to the Occupants of the system. This article will cover how to edit an existing Vendor
Edit the Name of a Vendor
- Log in and navigate to Vendors. Main Menu->Administration->Vendors
- Select the entry you wish to edit from the list.
- Click the
 icon in the lower left side of the screen.
- Note: If the edit button is not available ensure that only one entry has been highlighted.
- Using the Vendor Name field enter the corrected Vendor's name.
![]()
- Confirm changes with the
 button.
Change the System for a Vendor
- Log in and navigate to Vendors. Main Menu-> Administration-> Vendors
- Select the entry you wish to edit from the list.
- Using the icon in the lower left hand side.
- Note: If the edit button is not available ensure that only one entry has been highlighted.
- Select the correct System using the dropdown menu.
![]()
- Confirm changes with the button.
Change the Occupant Field for a Vendor
- Log in and navigate to Vendors. Main Menu-> Administration-> Vendors
- Select the entry you wish to edit from the list.
- Using the icon in the lower left hand side.
- Note: If the edit button is not available ensure that only one entry has been highlighted.
- Select the correct Occupant using the dropdown menu.
![]()
- Confirm changes with the button.
Change the Vendor Number
- Log in and navigate to Vendors. Main Menu-> Administration-> Vendors
- Select the entry you wish to edit from the list
- Using the icon in the lower left hand side
- Note: If the edit button is not available ensure that only one entry has been highlighted
- Enter the Vendor Number if applicable
![]()
- Confirm changes with the button
Edit a Vendor's Address
- Log in and navigate to Vendors. Main Menu-> Administration-> Vendors
- Select the entry you wish to edit from the list.
- Click the icon in the lower left side of the screen.
- Note: If the edit button is not available ensure that only one entry has been highlighted.
- Navigate to the appropriate Address text fields and use the Region and Country drop down menu's to make the appropriate changes.
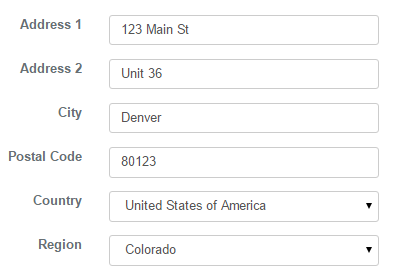
- Confirm changes with the button.
Add a Vendor's Email
- Log in and navigate to Vendors. Main Menu-> Administration-> Vendors
- Select the entry you wish to edit from the list.
- Using the icon in the lower left hand side.
- Note: If the edit button is not available ensure that only one entry has been highlighted.
- Click
 icon to the right of Add email.
 - Enter the Email Address.
- Confirm changes with the button.
Add a Vendor's Telephone Number
- Log in and navigate to Vendors. Main Menu-> Administration-> Vendors
- Select the entry you wish to edit from the list.
- Using the icon in the lower left hand side.
- Note: If the edit button is not available ensure that only one entry has been highlighted.
- Click icon to the right of Add Phone.
- Enter the Phone Number.
- Confirm changes with the button.