Change Multiple People
Overview
Let's face it, in a System there are likely many people with the same access needs. Rather than making you go from record to record to assign a new Access Level or point to everyone, we allow for multi-person access right editing right from the People View List.
Using the Multi-Person Access Feature
Navigate to the Person screen. **(**Main Menu-> Administration-> People).
Enter your search criteria as needed and click ![]() to populate the Person List. Once the list populates, select all the people whose access you want to change by clicking on them once.Be careful not to double click a person, this will de-select all the previously selected people and open the single person edit screen.
to populate the Person List. Once the list populates, select all the people whose access you want to change by clicking on them once.Be careful not to double click a person, this will de-select all the previously selected people and open the single person edit screen.
Once you have selected everyone you want to modify, click the ![]() button to open the Multi-Person Access dialog, with three options to adding and removing access.
button to open the Multi-Person Access dialog, with three options to adding and removing access.
Information: By selecting the count button in the upper left corner of the screen you will select/de-select all rows. This is a huge time saver.
**Information:**When removing access is it OK to have people in the list that do not have the access being removed. This makes is easy to remove access from an occupancy where some people have access and some do not have access.
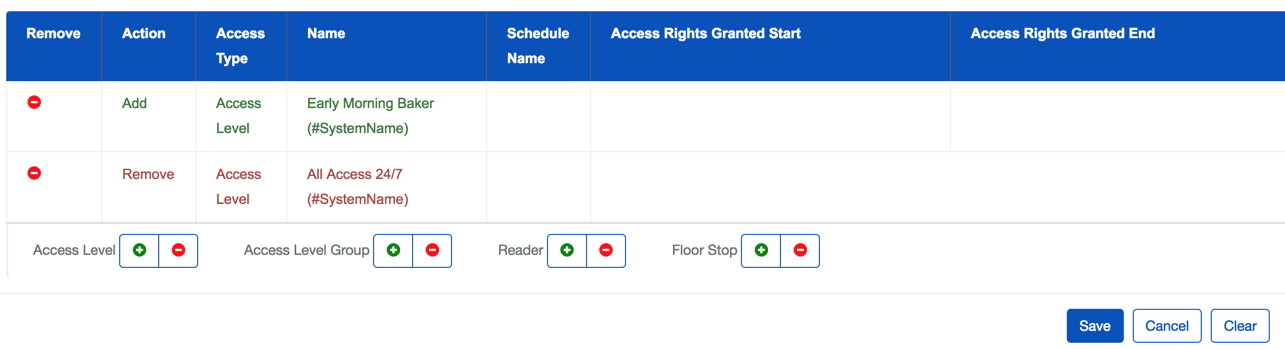
Add or Remove Access Levels
When the modal dialog loads you will see a list of the People you have selected.
Towards the bottom of the screen you will see the ![]() Add Access Level(s) and
Add Access Level(s) and ![]() Remove Access Level(s) buttons.
Remove Access Level(s) buttons.

Clicking on either option will display another modal dialog, allowing you to select the Access Level you wish to assign to remove.
Information: You must select the Access Levels you want to add and those you want to remove separately.
- You can use the Search feature to find an Access Level in the top list.
- Highlight it and drop it it to the bottom list.
- Repeat as needed.
- Once you have selected all the desired Access Levels, click the "Click Here to Select" link.
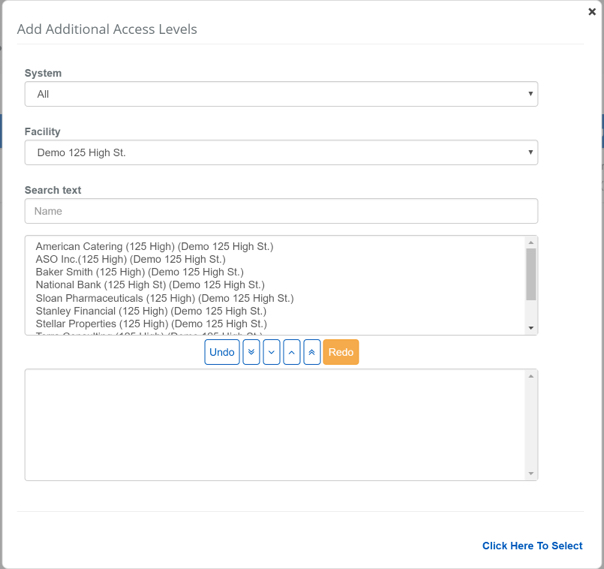
The list will refresh with the chosen Access Levels.
Check that the selection is correct.
You may continue to add Readers and Floor Stops as needed.
When finished, click the ![]() button.
button.
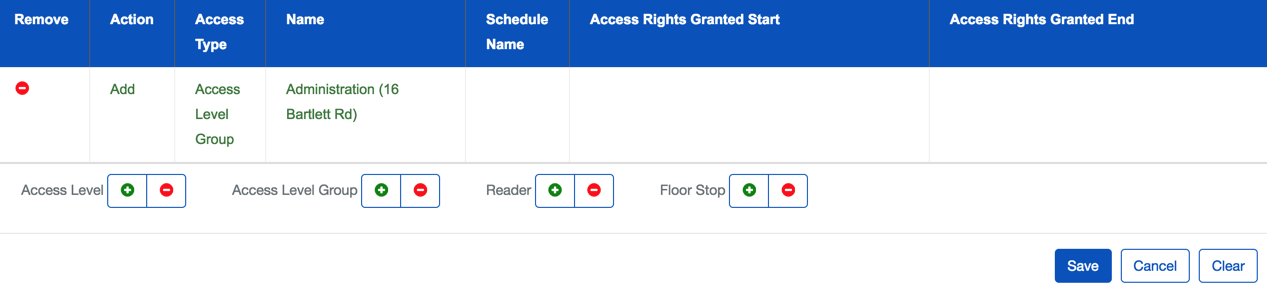
Add or Remove Access Levels Groups
When the modal dialog loads you will see a list of the People you have selected.
Towards the bottom of the screen you will see the ![]() Add Access Level Group(s) and
Add Access Level Group(s) and ![]() Remove Access Level Groups(s) buttons.
Remove Access Level Groups(s) buttons.

Clicking on either option will display another modal dialog, allowing you to select the Access Level you wish to assign to remove.
Information: You must select the Access Level Groups you want to add and those you want to remove separately.
- You can use the Search feature to find an Access Level in the top list.
- Highlight it and drop it it to the bottom list.
- Repeat as needed.
- Once you have selected all the desired Access Levels, click the "Click Here to Select" link.

- The list will refresh with the chosen Access Levels.
- Check that the selection is correct.
- You may continue to add Access Levels, Readers and Floor Stops as needed.
- When finished, click the
 button.
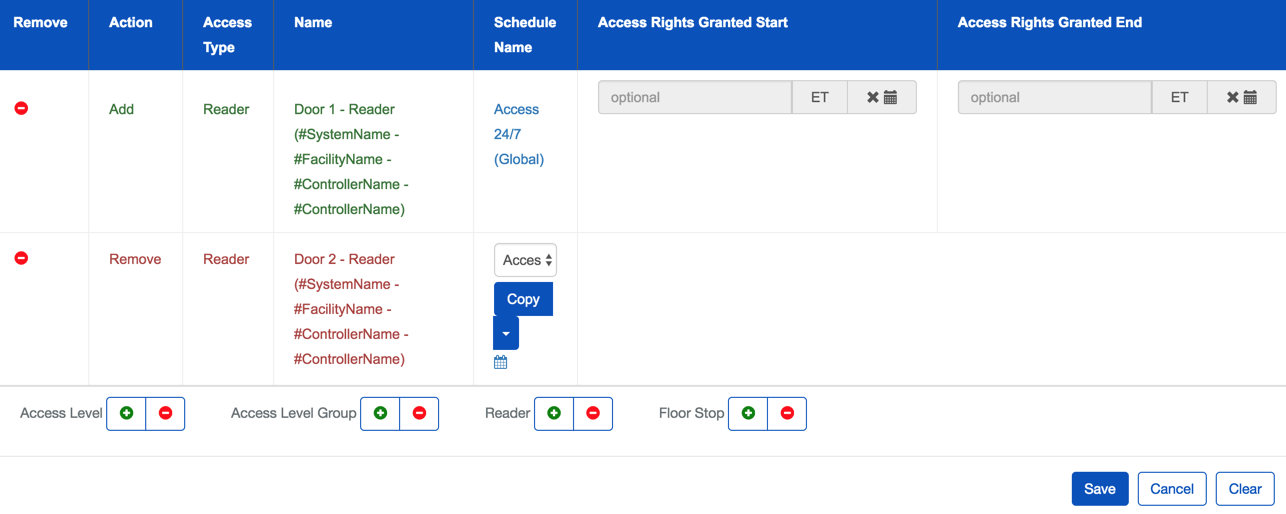
 Add or Remove Readers
When the dialog loads you will see a list of the selected people. Towards the bottom of the screen you will the ![]() Add Readers(s) and
Add Readers(s) and ![]() Remove Reader(s) buttons.
Remove Reader(s) buttons.

Once you make a selection you will be presented with the Access Level selection dialog. From this menu, use the search features as needed, to select the Readers you wish to remove or add. Once you have selected the Reader you are looking for, click the "Click Here to Select" link.
Information: You must select the Readers to remove and add separately.
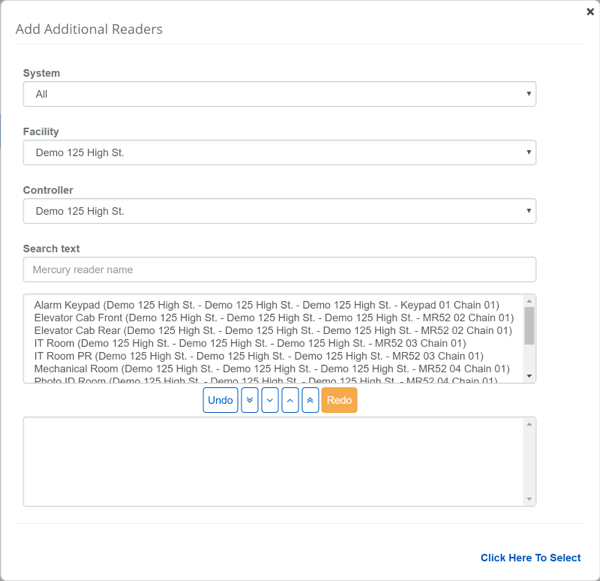
The list will refresh with the chosen Readers. If you are following along from the section above please note, unlike Access Levels you will also have to assign an Access Schedule, even when you are removing Reader/Schedule combinations. This is because BluSKY allows a Person to have the same Reader with two different schedules. Please review that the selection is correct. You may continue to add Access Levels and Floor Stops as needed. When finished, click the ![]() button.
button.
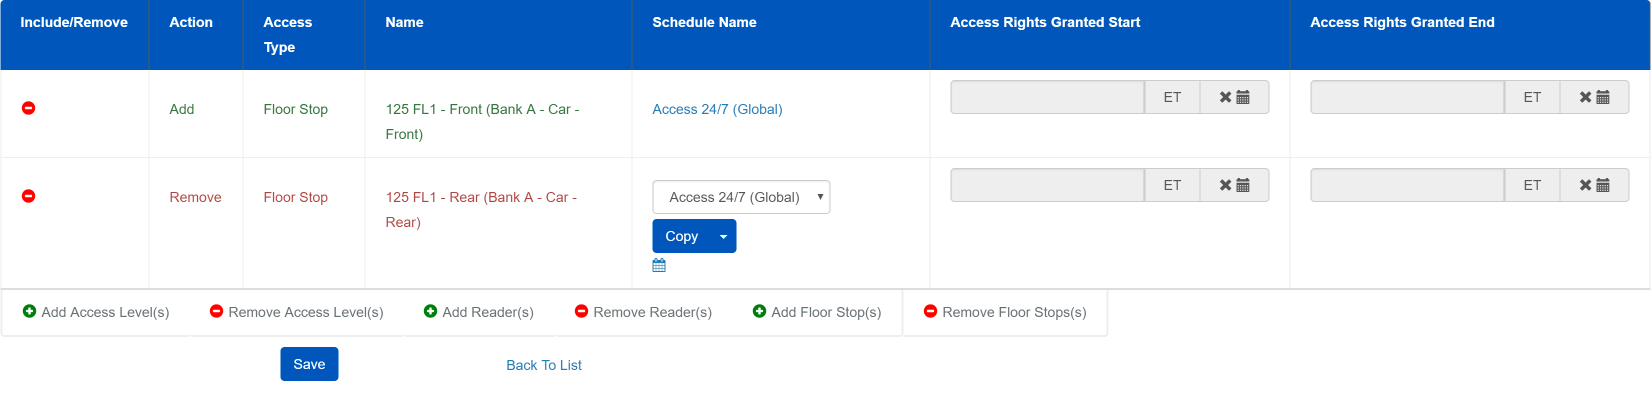
Add or Remove Floor Stops
When the dialog loads you will see a list of the selected people. Towards the bottom of the screen you will the ![]() Add Floor Stop(s) and
Add Floor Stop(s) and ![]() Remove Floor Stop(s) buttons.
Remove Floor Stop(s) buttons.

Once you make a selection you will be presented with the Access Level selection dialog. From this menu, use the search features as needed, to select the Floor Stops you wish to remove or add. Once you have selected all of the Floor Stops, click the "Click Here to Select" link.
Information: You must select the Floor Stops to remove and add separately.
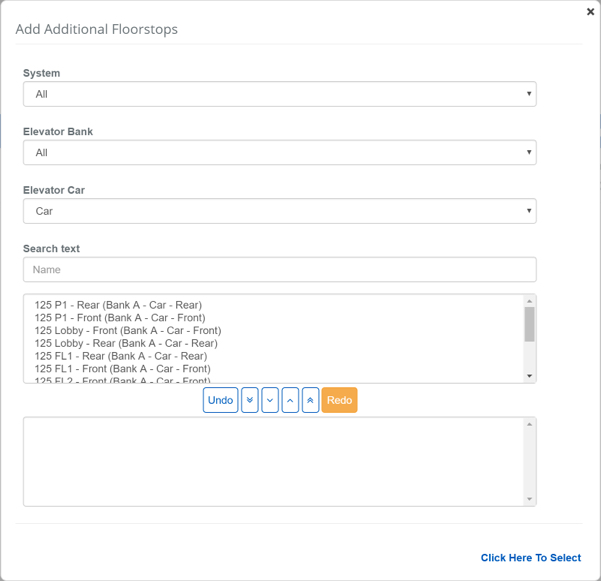
The list will refresh with the chosen Floor Stop. You will also have to assign an Access Schedule to each entry. This includes Floor Stops that you are trying to remove as well. Please review that the selection is correct. You may continue to add Access Levels and Readers as needed. When finished, click the ![]() button.
button.