Skip to main content
Otis DDE Configuration/Testing Checklist
- Last updated
-
-
Save as PDF
-
Server Applications
Installed Applications
- MS SQL
- LocalSync
- ServerManager
- OtisInterface
BluSKY Verification
In Setup>Facility>Banks
- Elevator banks are setup as Otis destination
- Elevator banks have unique numbers corresponding to Otis documentation
- Elevator banks have cars according to Otis documentation
In Setup>Facility>Cars
- Each car has a unique number corresponding to Otis documentation. You must configure all cars, even when they are not needed for the function of the system
- The first car in the bank has correct floors served by its bank
- Each floor has the correct landing number according to the Otis documentation
- If there are global keypads create a global bank(s)
- Create a fictitious car in the global bank
- Assign ALL floors of other banks with correct landing numbers to that car
In Setup>Destination Keypads
- Each keypad has an IP address according to Otis documentation
- Each keypad assigned to a correct floor
- Each keypad has a name that clearly associates it with the bank, floor and unique keypad number
In Setup>Interfloor Matrix
- Each keypad has a floor/schedule pair for each floor in its bank
- Each global keypad has a floor schedule pair for every floor across all the bunk in the building
- For the commission, all floors in every keypad have "Always Off" schedule. This makes floors public and will not lock the building when connecting to Otis
Test Cards
- At least two cards are ready for testing
- At least two persons have assigned above cards and access levels that have assigned floor schedules
- One person has all the floors in the building. Another person has some floors in the building
In Setup>Server
- Server is created in BluSKY
- Elevator banks are assigned to the server
- Server role is correctly assigned to the server
- Sync status and data upload are enabled
- Data download batch size is set to 500
In Setup>DDE Diagnostics
- The system name is visible in DDE Diagnostics screen
- Remote server name is visible in DDE Diagnostics screen
- Elevator banks and elevator manufacturer are visible in DDE Diagnostics screen
- Elevator keypads are visible in DDE Diagnostics screen
- Bank floor stops are visible in DDE diagnostics screen
- Each floor stop has a correct landing number in parenthesis
In Control>Elevators
- Elevator banks are visible in RTC elevators screen
- All floors are visible per each bank
- All floors have correct names
- All floors are "On Schedule"
Server Verification
Server
- Operating system has all the latest updates
- Windows MSMQ and Telnet features are enabled
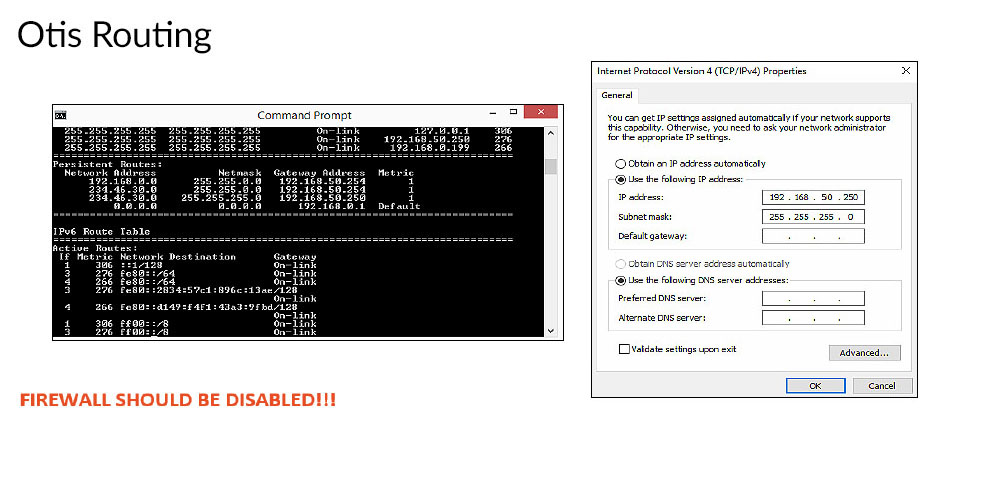
- Both NIC Cards are clearly named. One to BluBØX network, another to Otis Elevator
- Persisting routing to NIC card is applied (See DDE Routing)
SQL Server
- The latest version of SQL Server (from OPS folder) is installed with dual login mode
LocalSYNC
- The latest version of Local Sync is installed with the administrator account
- Correct RemoteServerId is specified in LocalSync.exe.config file
- Start Local Sync in Console and verify that there are no errors
- Verify that Local Sync created BluB0X and BluB0XLogs databases in the SQL Server
- Stop ServerManager in the console and start in service mode
ServerManager
- The latest version of the server manager is installed
- Correct RemoteServerId is specified in ServerManager.exe.config file
- Start ServerManager in the console mode and verify there are no errors
- Stop ServerManager in the console and start in service mode
OtisInterface
- The latest version of Otis interface is installed
- Correct RemoteServerId is specified in OtisInterface.exe.config file
- Correct SignalRUrl is specified in OtisInterface.exe.config file ( <add key="SignalRUrl" value="https://signalrhub.blub0x.com/signalr"/>)
Bench Testing
- Prepare a test simulator computer. Set the IP address of it corresponding to the subnet of the Otis controller
- Create all IP addresses on the test simulator computer that correspond to IP addresses of all devices on Otis side
- Connect a NIC card of the test simulator computer to the OTIS side NIC card of the server
- Start the Otis simulator on the test simulator computer
- Start the OtisInterface in console mode
- No red line errors in the console
- Verify that you can see the startup dialog in DDE diagnostics screen
- Verify that all matrixes are coming down from the server to the test simulator
- Click on the heartbeats checkbox in DDE diagnostics screen. Verify that you can see the heartbeats from and to the server
- Uncheck the heartbeats checkbox. Verify that heartbeats stop showing in DDE Diagnostics screen
- Change one of the matrixes in the BluSKY and verify that the change came down to the test simulator
- Simulate a card swipe on the test simulator and verify that the Otis interface replies correctly
- Check "Show" Person Floors" checkbox. Swipe the card and verify that the allowed floor matrix sent to the test simulator is correct
- Disconnect the cable between the test simulator and server. Wait until Otis interface reports that Otis Group(s) is offline
- Verify that this message is visible in the console and also in DDE diagnostics screen
- Reconnect the cable back. Verify that applications reconnected, keypad matrixes were resent, heartbeats started and card swipes are working properly
- Stop the Otis interface in the console mode
- Restart Otis interface in service mode
- Verify all communication again including matrixes, heartbeats and card swipes
- Verify that card swipes are showing up in the events and event history screens
Building Commissioning
- The remote server is connected and reachable from the internet through TeamViewer
- Local Sync, ServerManager, and OtisInterface services are running with automatic startup
- Start DDE Diagnostics screen in BluSKY and navigate to the system/server/elevator bank
- Stop and restart OtisInterface service. Verify that you see the startup communications in DDE diagnostics screen
- Swipe a card at each keypad on every floor and in every elevator bank. Verify that the correct keypad number is reported in the DDE diagnostic screen
- Connect Otis side NIC Card of the server to the Otis Layer 3 switch
- Verify that Otis interface connected to Otis bank controllers
- Verify that heartbeats are coming and going
- Verify that the keypad matrixes where sent and you can change them
- Verify that the floors open
- Verify that card swipes open the correct floors for that card
- Open Elevators RTC screen. Verify that you can open a floor and place it back to schedule
- Do all other verification required by Otis and the building management
- Change the keypads FloorMatrix to the schedules required by the building
- Verify that floors are open or secure according to the applied schedules
DDE Routing