Edit a Visitor Invitation
Overview
Visitor Admission is the primary means for checking people into a facility. In most applications this would be a security station that is charged with confirming identities and processing the expected visitor. This article will provide detailed instruction on how to make the various edits to a Visitor Invitation, including how to assign credentials to a Visitor.
***Note:***Changes made to the Visitor Invitation will applied to the Visitor Instance and a notification email will be sent to the requester of the change.
Change the Host of a Visitor
- Log in and navigate to Visitor Invitation. Main Menu-> Requests-> Visitor Invitation
- Select the entry you wish to edit from the list. Use the search feature to find the entry quickly.
- In the lower left hand side click the
 button.
 - Click the
 button to open a pop-up window to select the correct Host.
 - Use the search feature provided to find the Person that will be the Host.
- Click the
 button to confirm your selection.
 - Confirm changes with the
 button.
Change a Visitor's Name
- Log in and navigate to Visitor Invitation. Main Menu-> Requests-> Visitor Invitation
- Select the entry you wish to edit from the list. Use the search feature to find the entry quickly.
- In the lower left hand side click the button.
- Use the First Name and/or Last Name text field to enter the correct name.
- Confirm changes with the button.
Change a Visitor Email Address
- Log in and navigate to Visitor Invitation. Main Menu-> Requests-> Visitor Invitation
- Select the entry you wish to edit from the list. Use the search feature to find the entry quickly.
- In the lower left hand side click the button.
- Use the Guest Email text field to enter the corrected email address.
- Confirm changes with the button.
Change the Affiliation of the Visitor
The Affiliation field is used to identify where the Visitor is coming from and is most commonly used to provide information about the Visitor's company.
- Log in and navigate to Visitor Invitation. Main Menu-> Requests-> Visitor Invitation
- Select the entry you wish to edit from the list. Use the search feature to find the entry quickly.
- In the lower left hand side click the button.
- Use the Affiliation text field to enter an Affiliation.
- Confirm changes with the button.
Remove a Visitor from a Group
- Log in and navigate to Visitor Invitation. Main Menu-> Requests-> Visitor Invitation
- Select the entry you wish to edit from the list. Use the search feature to find the entry quickly.
- In the lower left hand side click the button.
- Set the Group selector to None.

- Confirm changes with the button.
Assign a New Group to a Visitor
- Log in and navigate to Visitor Invitation. Main Menu-> Requests-> Visitor Invitation
- Select the entry you wish to edit from the list. Use the search feature to find the entry quickly.
- In the lower left hand side click the button.
- Set the Group selector to New.

- Confirm changes with the button.
Assign an Existing Group to a Visitor
- Log in and navigate to Visitor Invitation. Main Menu-> Requests-> Visitor Invitation
- Select the entry you wish to edit from the list. Use the search feature to find the entry quickly.
- In the lower left hand side click the button.
- Set the Group selector to Existing.
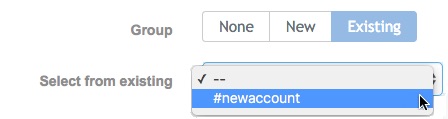
- Confirm changes with the button.