Create an Access Level
BluSKY URL: https://blusky.blub0x.com/en-US/AccessLevel/Create
Overview
An Access Level is a list of "Access Rights". An Access Right is a Security Point / Schedule combination. Portals (doors or turnstiles) or Floor Stops are Security Points. An Access Right might be "Main Entrance / 24x7" or "Floor-3 / 6am-to-7pm". An Access Level acts as a shorthand way of assigning several Access Rights to people. Then, when an Access Level is edited, everybody to whom it was granted is immediately updated.
Instructions
- Log in and navigate to Access Levels. Main Menu-> Administration-> Access Levels
- Click the
 button to create a new Access Level.
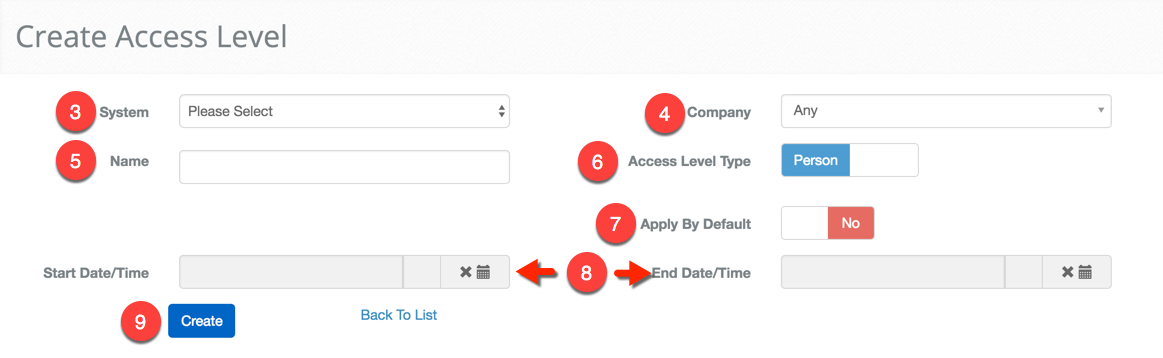
 - Select the System for which the Access Level is being created.
- If the Access Level should only be used by a specific Company, select it in the Company field.
- **Note:**If a Company is selected, the Access Level will only be viewable to be selected and applied by users with a Role that is scoped to the specified System and/or Company.
- **Note:**If a Company is NOT selected, the Access Level will only be viewable to be selected and applied by users with a Role that is scoped to the specified System. This typically means only the building manager can assign this Access Level to a person.
- Name the Access Level.
- ***Note:***BluBØX recommends naming the Access Level in such a way that it describes the access and not the people that use the Access Level. It is typically better to group Access Levels together to describe the type of person using Access Level Groups.
- Use the Person/Visitor toggle to specify whether this Access Level is for People or for Visitors.
- Note: The same Access Level cannot be used for both Visitors and People.
- Apply By Default: if selected, the Access Level will be given automatically to every person who is affiliated with the Company specified in #4. If the Company field is set to "Any" the Access Level will be given to all people records that are created in the System, regardless of Company affiliation.
- Start & End Date /Time: these fields serve to specify a validity period for the Access Level. If no Start Time is specified, the Access Level is immediately valid. If no End Time is specified, the Access Level never expires.
- Click the
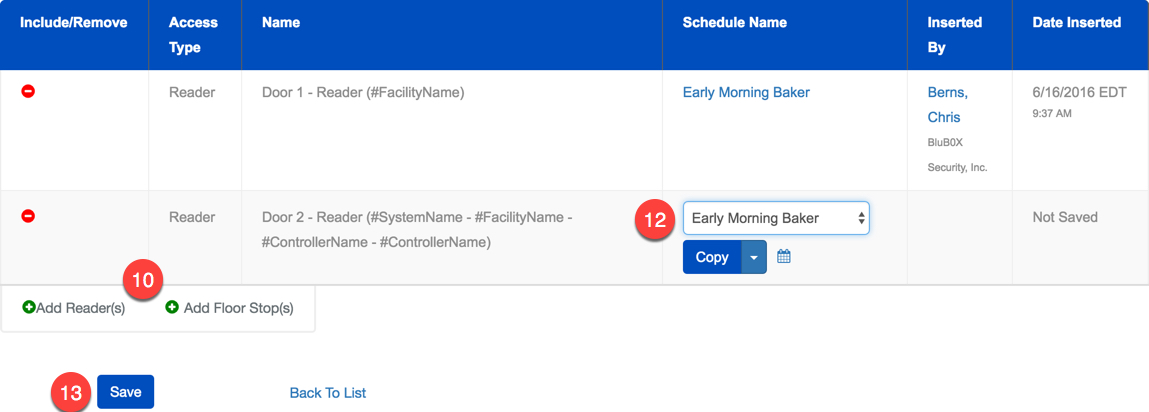
 button to display the next screen. A sample is shown below. It serves to specify the list of access rights (security point/Schedule combinations) that shall be contained in the Access Level.
 - Click the
 icon next to Add Reader(s) or to Add Floor Stop(s) to add a new security point.
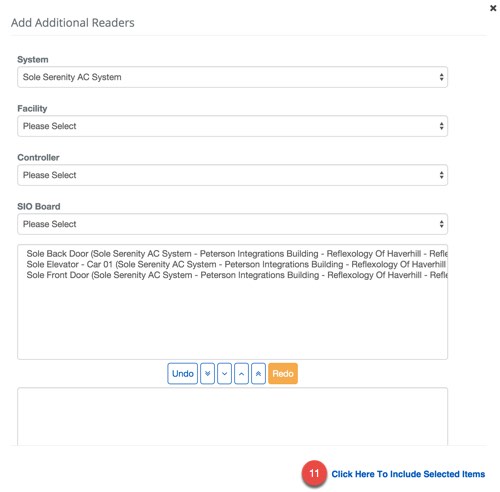
 - Highlight the one or more security points (Readers or Floor Stops) that appear in the top list that must be included in the Access Level, then click the
 button to move them to the lower assignment list.
- Hint: If you wish to move ALL the security points from the top list to the lower list, you can do it in one step by clicking the
 button without selecting anything.
 - Either way, complete the task by clicking the "Click Here To Include Selected Items" link at the bottom of the window. This will add the security points from the lower list into the Access Level.
- Access Schedules: the final step is to specify a Schedule for each of the Access Level's security points using the pull-downs in the Schedule name column.
- Note: Any security point to which a Schedule is not assigned at this time will not be included in the Access Level when it is saved.
- Save the Access Level by clicking the
 button.