Token Works Drivers License Scanner
Overview
This document will cover how to install Token Works Licenses scanners (M260 and M280) software and then install BluB0X's integration software to enable the license scanner to communicate with BluSKY's various input screens.
Instructions
Pre-install
- Make sure you have the paperwork sent with the License scanner, this paperwork has the Activation Key you will need later in the process.
- Get a local admin account for this system, you will need the login and password for the installation process
- Download the two installation files at the bottom of this article.
- IDWedgePro-Installer-1.0.2.2.zip - Software provided by TokenWorks to install their software on the local system.IDWedgePro-Installer-1.0.2.2.zip
- Blub0xDriversLicenseHandler.installer.msi - BluB0X software to integrate TokenWorks software into BluSKY. Blub0xDriversLicenseHandler_1.5.Installer.msi
- If you are updating the BluB0X Driver License Handler on an existing installation, you can skip the IDWedgePro installation steps shown below and jump to the install steps for the License Handler. Please be sure to UNINSTALL the old BluB0X Driver License Handler before installing the new version. You may need to rename the msi file to add ".txt" on the end of the file name in order to copy/move the file. Just rename back by removing ".txt" before installation.
IDWedgePro Install
- Plug The ID Scanner's USB cable into the system that will be used to swipe drivers license data into BluSKY.
- Install IDWedgePro-Installer-1.0.2.2.zip first
- Double click on "IDWedgePro-Installer-1.0.2.2.zip" software to install it.
- Select "Extract" and then "Extract all" in new screen
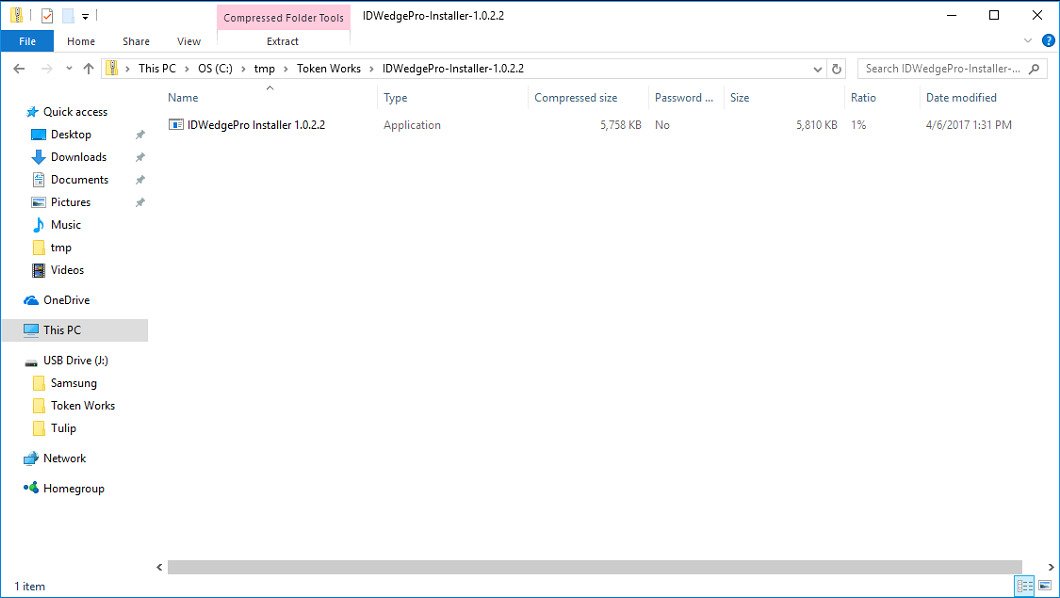
- Select location for the extracted files and select "Extract". Ex. C:\BluB0X

- Double select "IDWedgePro Installer x.x.x.x" in the location where you extracted the installation
- Select Accept for the Software License Agreement. You will see a pop-up with files extracting.
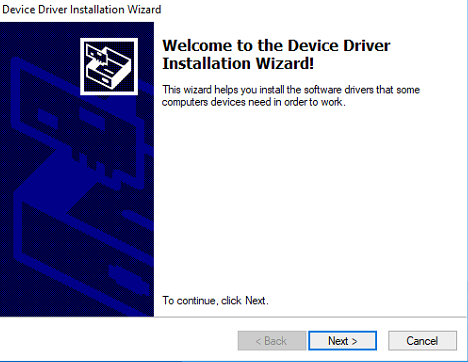
- On Windows 19 you will get a pop-up asking for permission to make changes to the system. Select "Yes"
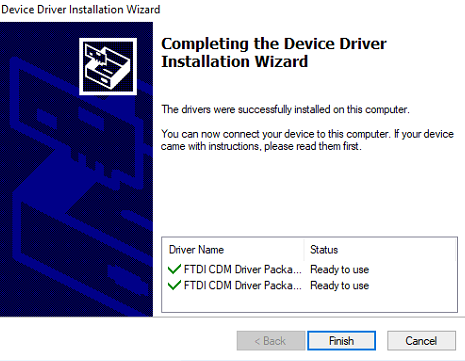
- Select "Yes" if prompted to Extract FTDI CDM Drivers
- Select "Next" to install the device drivers
- "Accept" the agreement and then select "Next"
- Select "Finish"
- Right Click
 Icon on desktop. Select "Run as Administrator"
- If the application does not pop-up then it might be under the "Hidden Icons" on the task bar. You might have to select the UP arrow on the task bar and right click the icon and select "Show Application"

- Select Settings -> "Port Settings"
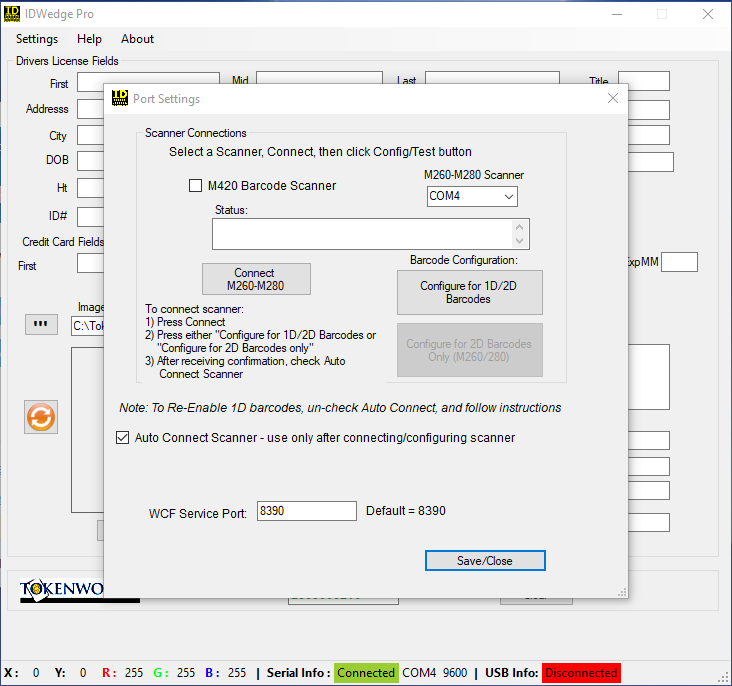
- Select "Connect M260-M280" button
- You should see an "OK" message in the OK window
- Select "Configure for 2D Barcodes Only (M260/M280)
- Select "Auto Connect Scanner - use only after connecting/configuring Scanner"
- Select "Save/Close"
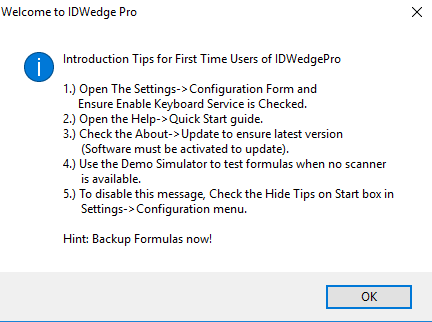
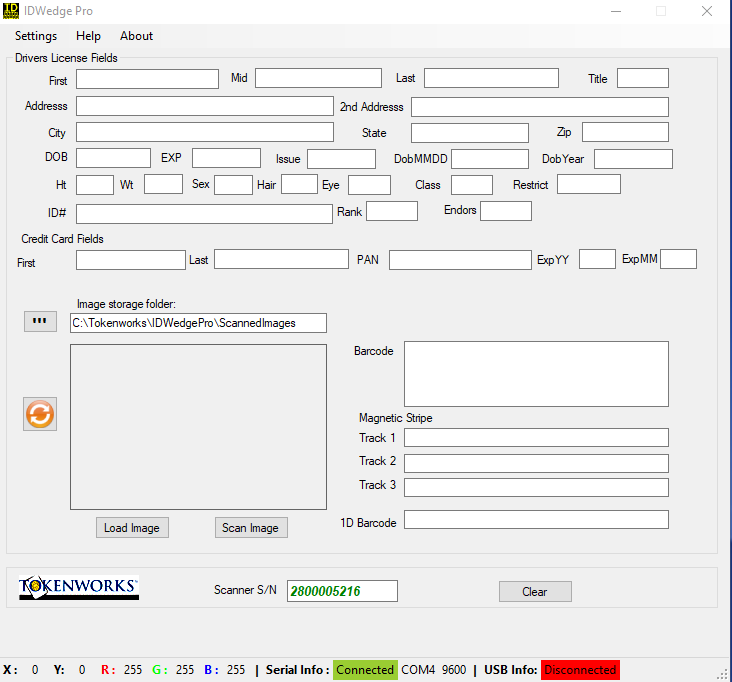
- Select Settings -> Configuration

- Per image above
- Select "Enable WCF Service"
- Select "Send App to Tray on Launch or Minimize"
- Select "Hide Tips on Start"
- Select "Suppress User Messages"
- Select Save
Install BluB0X Drivers License Handler
- If you are upgrading an existing installation, please uninstall previous version of Blub0xDriversLicenseHandler BEFORE installing the new version.
- Double Click "Blub0xDriversLicenseHandler.installer.msi"

- Select the location of the install. Taking the default is OK, then select "Next"
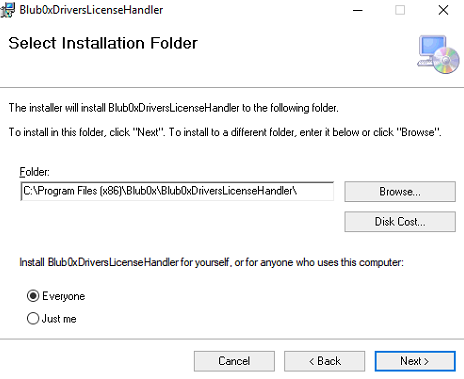
- Select "Next" again to confirm the installation
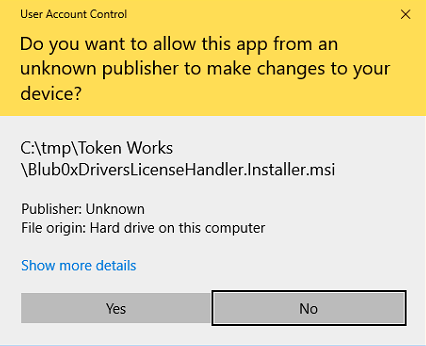
- The Screen will go black and you will get a pop-up allow the installer to make changes to the device. Select "Yes"
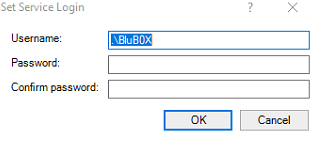
- You will need to give the install an administrative login. Fillin User Name and Password, then select "OK"
- Select "Close"

Test Installation
Test IDWedge Pro
- Right Click from the hidden icons tab on the task bar. Select "Show Application"
- The Application should pop-up on your screen. Plunge or swipe a drivers license. The screen should populate with at least the first and last name.
- If it does not populate, then select the "X" in the top right to shut it down. Then right click from the desktop, select "Run as administrator" and retry the previous test again. If it still failed contact BluB0X Support (Support@blub0x.com)
- If the previous step was successful, then bring up BluSKY in a Chrome Browser, select Control->Visitor Admission->Create and plung/swipe and drivers license. You should see the First Name and Last Name fields populate. If it does not, please check the list of other requirements below.
Other Requirements For License Scanner Use
Other requirements to have license scanner fully functional are listed below. Please make sure all of these are completed. If you are still having issues, then please contact BluB0X Support (support@blubox.com).
- Driver's License Scanner Module Enabled - This can only be done by BluB0X staff, please contact to make this feature has been enabled.
- Visitor Request Configuration - You MUST have a visitor request configuration created, and the Use License Scanner field must be set to "Yes". Visitor & Vendor configuration can be found under the "Setup" menu, scroll down to the bottom of the list.