BluSKY Logbook User Guide
BluSKY Logbook User Guide
This guide explains how to use the logbook application on BluSKY, covering everything from filtering and reviewing entries to creating new logbook entries and updating their statuses. It also provides insight into upcoming enhancements designed to further streamline log management.
1. Accessing the Logbook Application
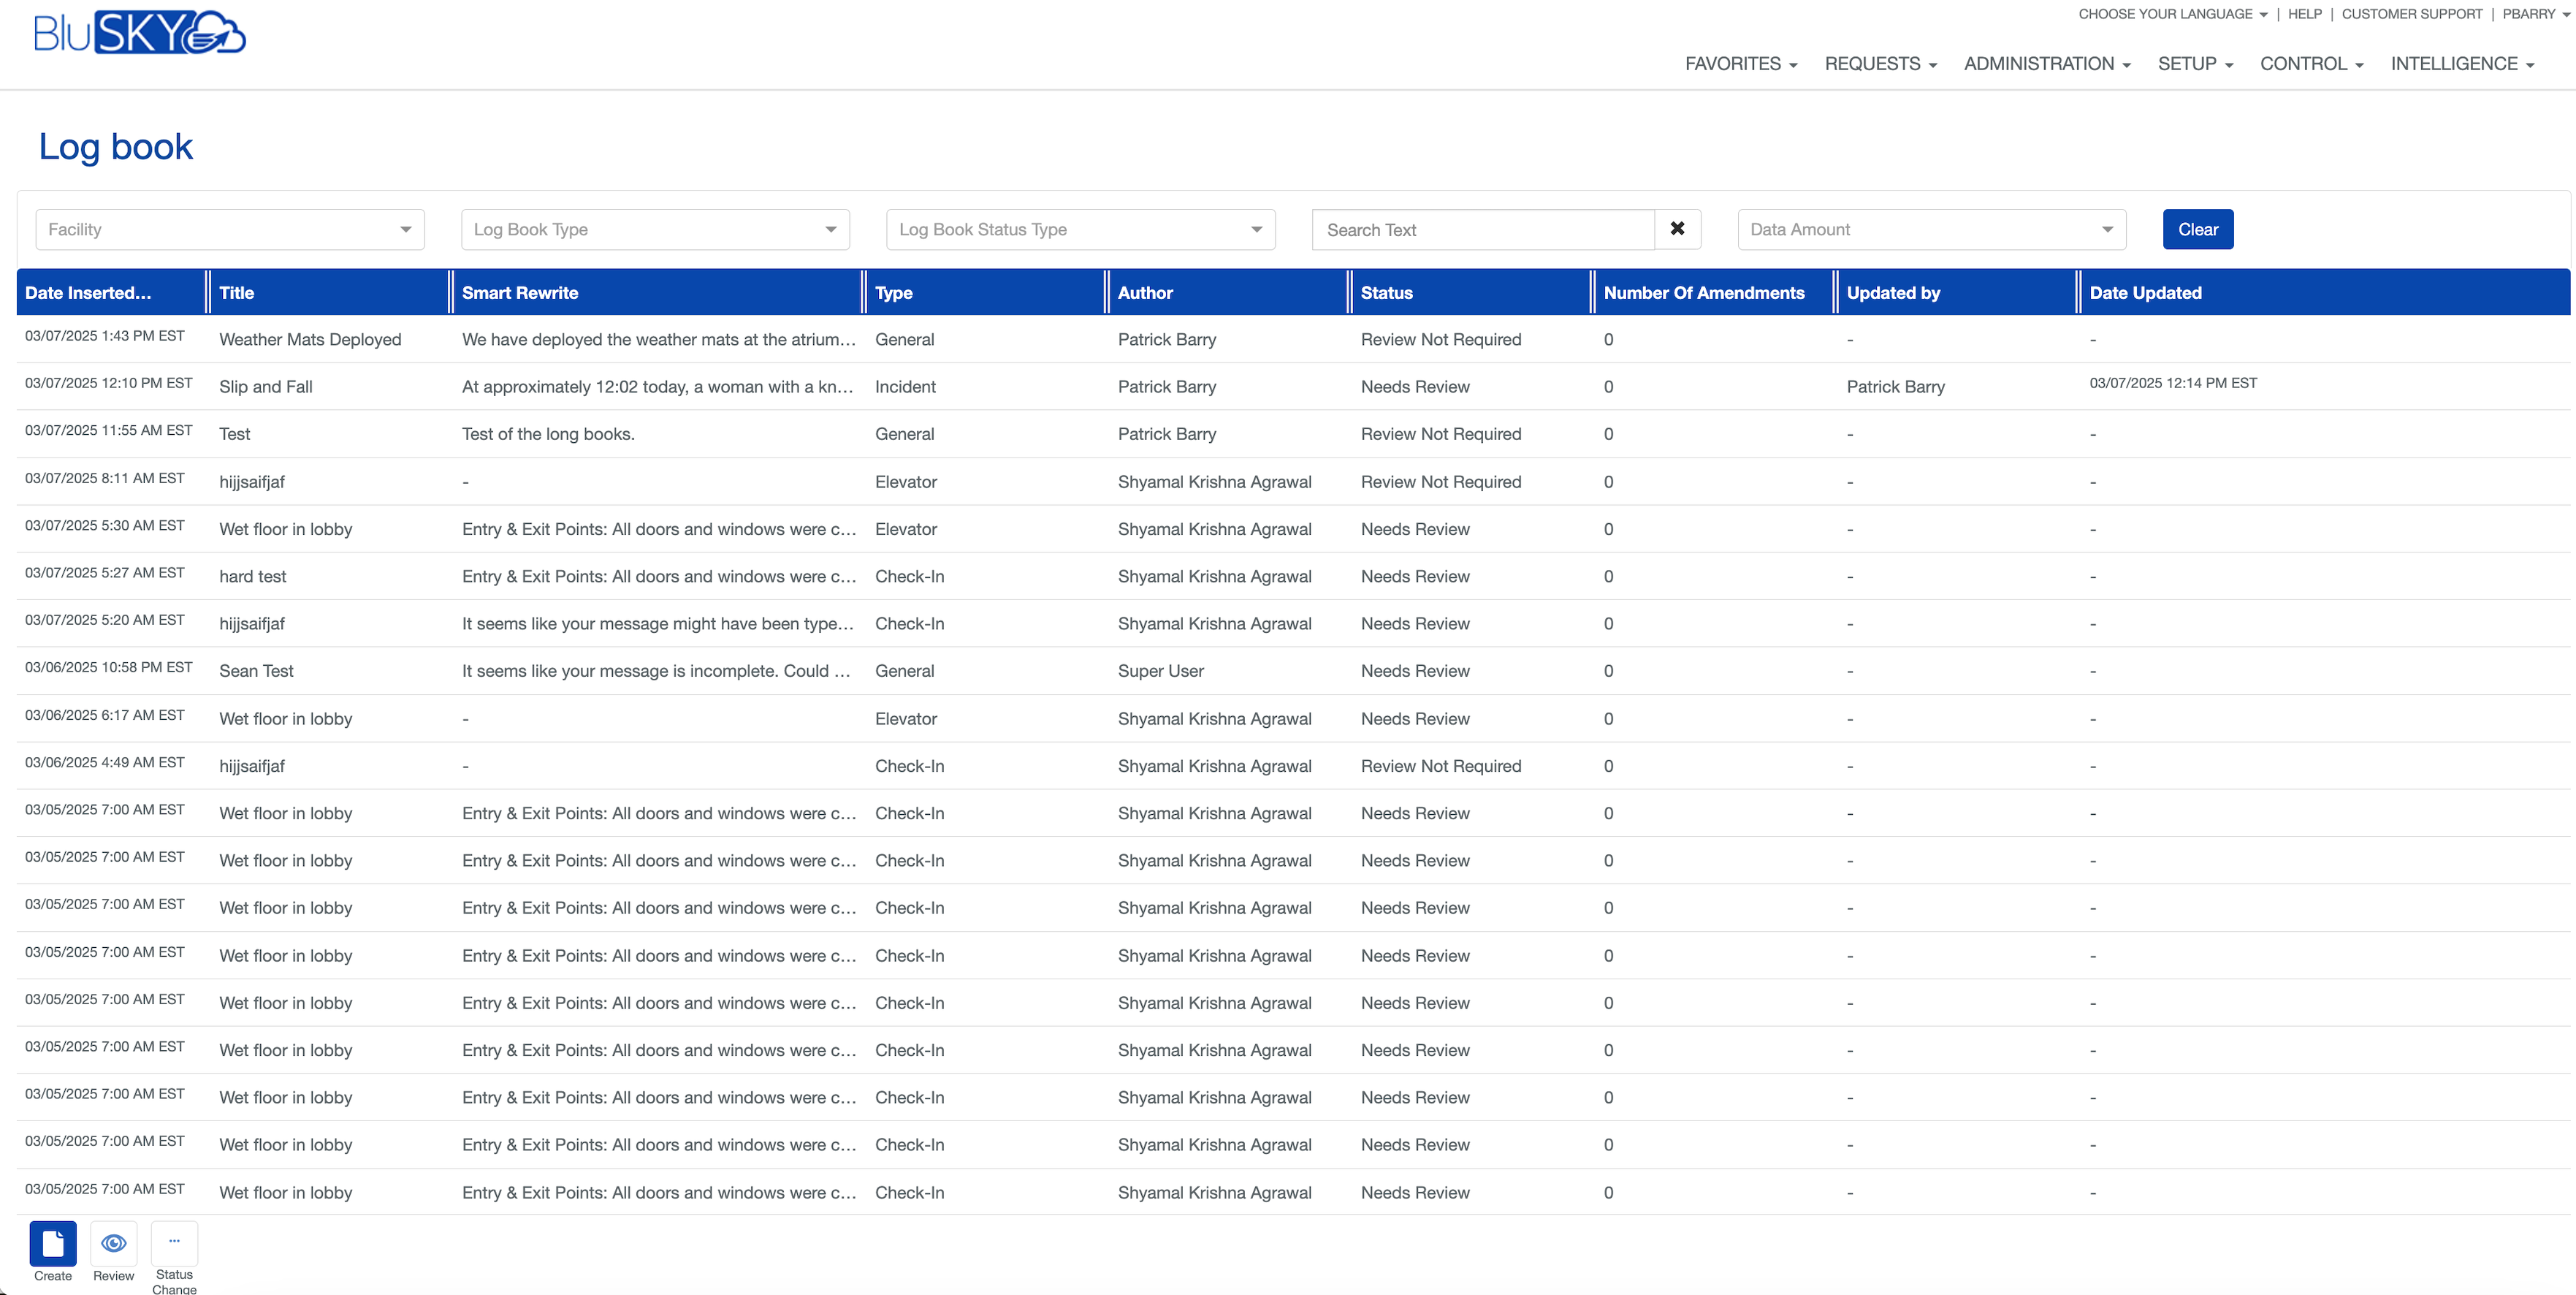
When you first launch the logbook application, you are taken to the List Screen. This screen is the central hub for viewing logbook entries and managing filters, actions, and settings.
1.1 Overview of the List Screen
- Filter Bar:
At the top of the screen, you have access to various filters that help you search and narrow down logbook entries:
Facility: Select a facility to view entries specific to that site.
Logbook Type: Choose among five types:
- Check-in logbook
- Elevator logbook
- General logbook
- Incident logbook
- Lighting logbook
Logbook Status: Filter entries based on their status:
- Needs review
- Pending
- Review done
- Review not required
- Reviewed and needs verification
Text Search: Enter keywords to search within the log entries.
Time Range: Choose a predefined range (last hour, last three hours, 12 hours, last day, two days, three days, or last week) or define a custom date range by specifying start and end dates.
Clear Filters: Reset all filters to return to the default view.
- Entry Details:
Each logbook entry in the list shows:
- Date Inserted: When the entry was added.
- Title: The logbook entry title.
- Description: Initially labeled as "smart rewrite," this field now displays a cleaned-up version of the original entry. An AI-powered process revises the entry to correct grammar, consolidate information, and improve flow without altering the original content.
- Type: The type of logbook.
- Author: The person who created the entry.
- Status: The current status of the entry.
- Amendments: Number of follow-ups (currently all set to zero, as this feature is not active yet).
- Updated By/Date Updated: Information on who modified the entry and when.
Action Buttons: Located at the bottom of the screen, these buttons facilitate further actions:
- Create: Opens the logbook entry creation page.
- Review: Displays detailed information for a selected entry.
- Status Change: Allows you to update the status of a selected logbook entry.
2. Creating a New Logbook Entry:
To add a new logbook entry, follow these steps:
2.1 Navigating to the Creation Screen
-
Initiate Creation:
-
Click the Create button located at the lower right of the list screen. This takes you to the Logbook Entry Creation screen.
2.2 Entering Required Information
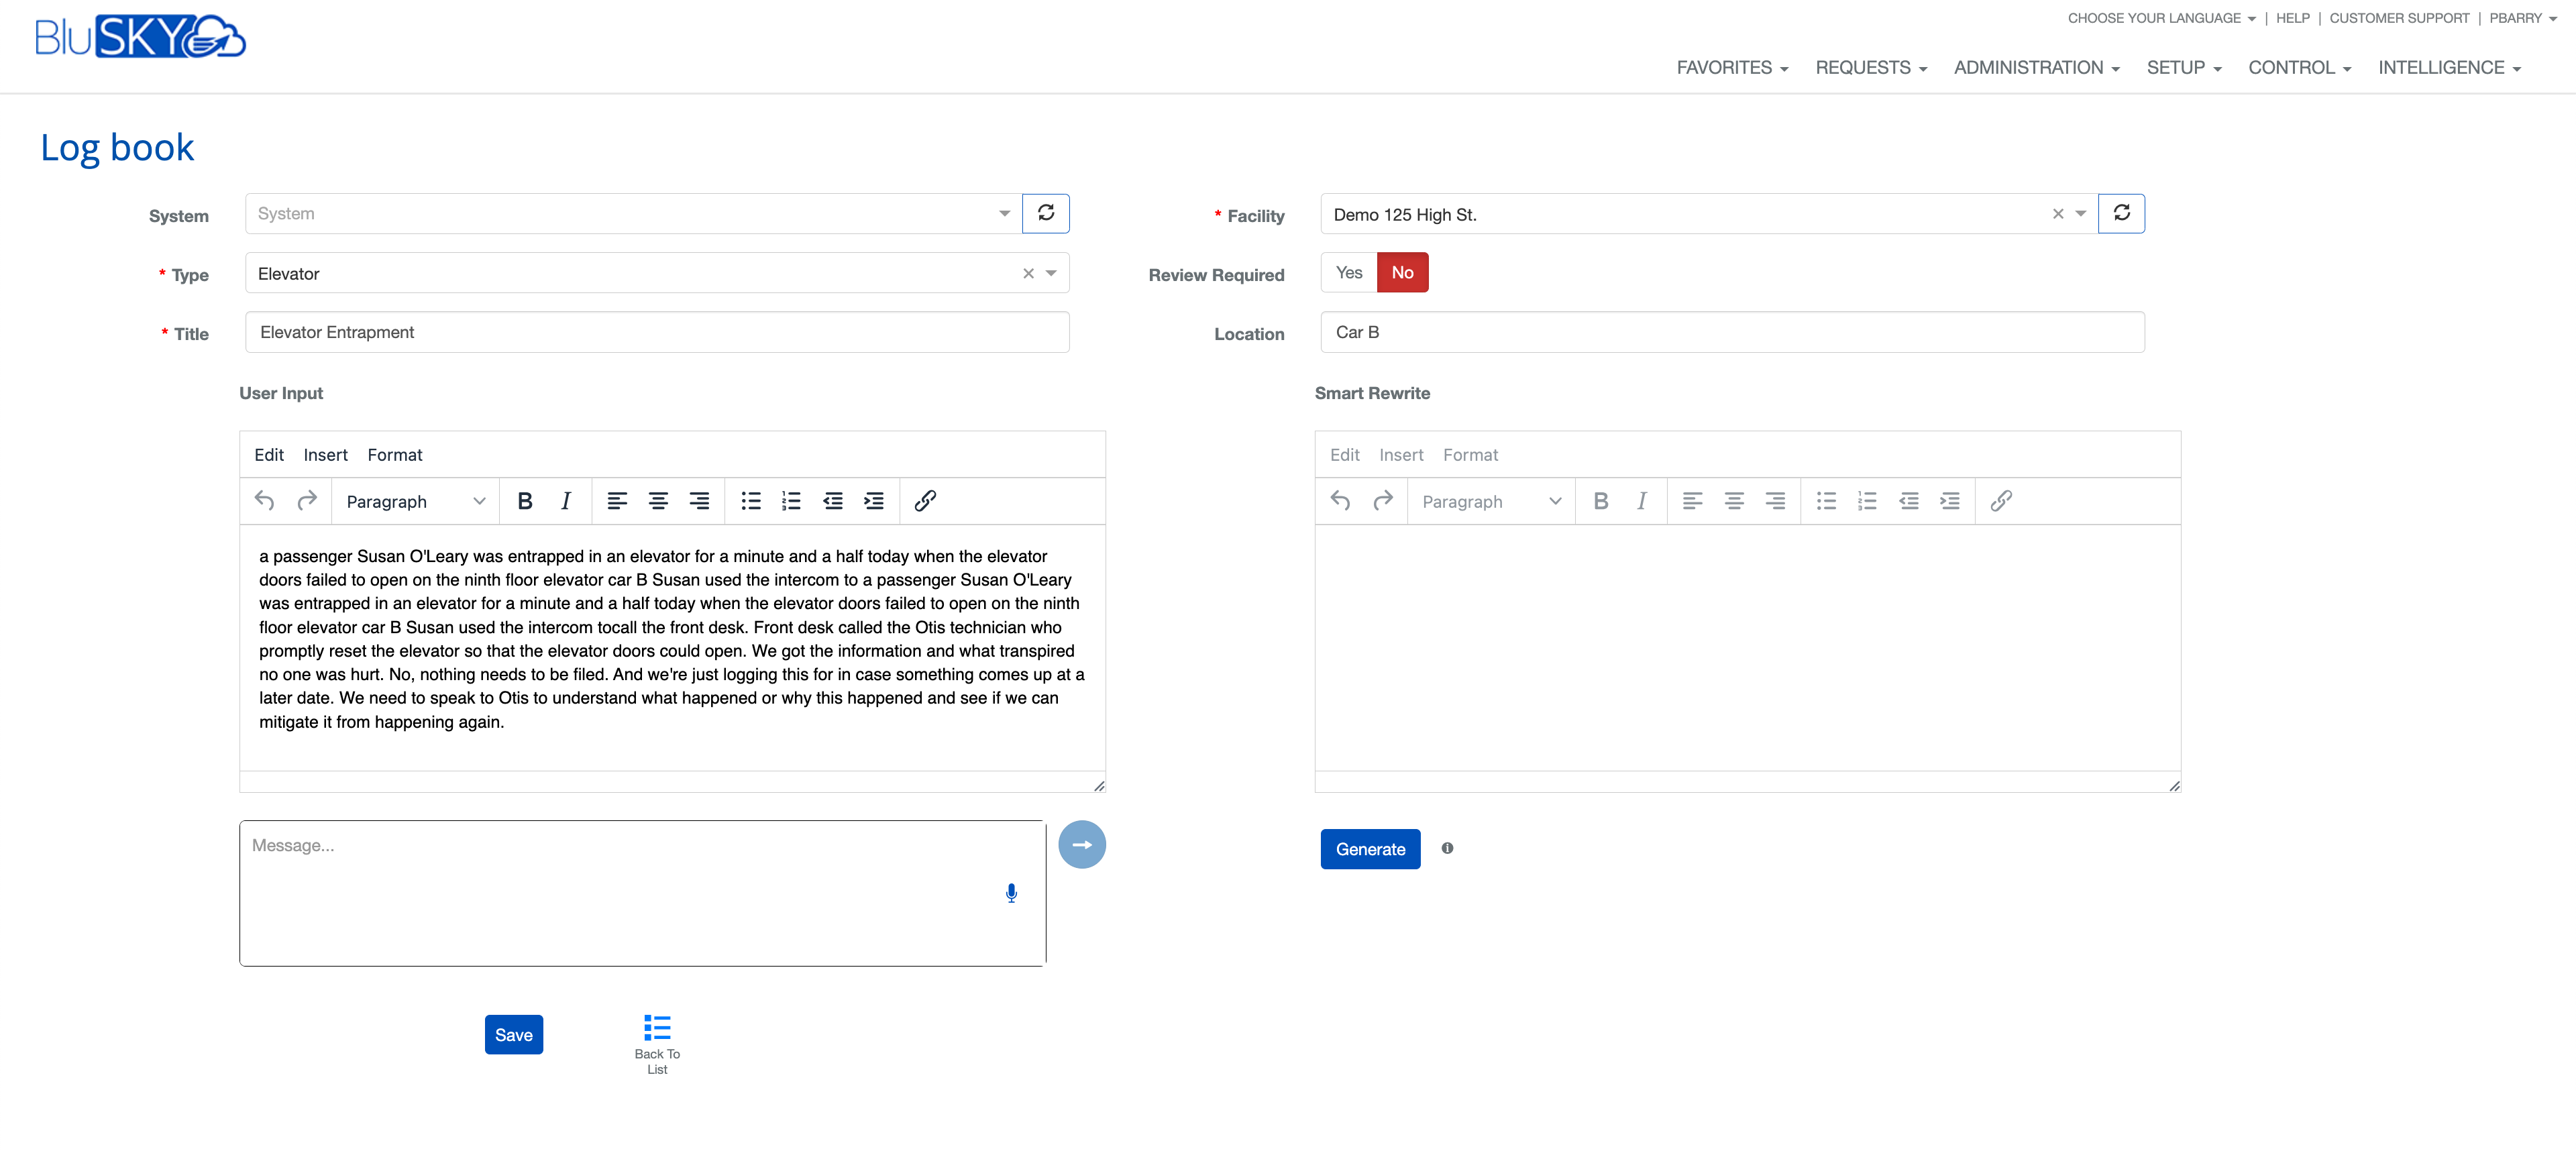
Facility:
- You must select a facility. For example, choose “Demo 125” or any preferred site.
- Optionally, you can enter a system value which helps to narrow down the list of facilities automatically. Note that starting with a system is not mandatory. In future integrations with the left navigation, the system and facility values will auto-populate based on your selection.
Logbook Type:
- This is a required field. Select the appropriate type (for example, a general logbook).
2.3 Optional Settings
Review Required:
Toggle a yes-no option to indicate if the log entry needs a review.
Title:
Provide a title for the log entry. (Future enhancements may automate title generation based on the entry content to minimize manual input.)
Location:
Optionally, add a location. This field will eventually integrate with regional and location data.
2.4 Entering Logbook Content
-
Text Entry and Dictation:
-
Enter the detailed logbook entry in the provided text area.
-
Alternatively, use the integrated Whisper interface:
-
Click the microphone button to start recording your spoken entry.
-
Press the red square to stop the recording.
-
You can start and stop the recording as needed.
-
Once you finish recording, click the right-pointing arrow to transfer the dictated content to the text input area.
2.5 Saving the Logbook Entry
Smart Rewrite Process:
- When the content is transferred, the Save button becomes highlighted.
- Click Save to finalize the entry.
- On saving, the application automatically generates the smart rewrite version of your entry. This AI-driven process refines the text by correcting grammar, summarizing information, and ensuring the content is clear while preserving its original context.
Return to List Screen:
- After saving, you are redirected back to the list screen where the new entry is visible.
3. Reviewing and Modifying Logbook Entries:
3.1 Reviewing an Entry
Accessing Details:
- From the list screen, simply select an entry to review it.
- This brings up a detailed view that mirrors the configuration screen, displaying all the information associated with the log entry.
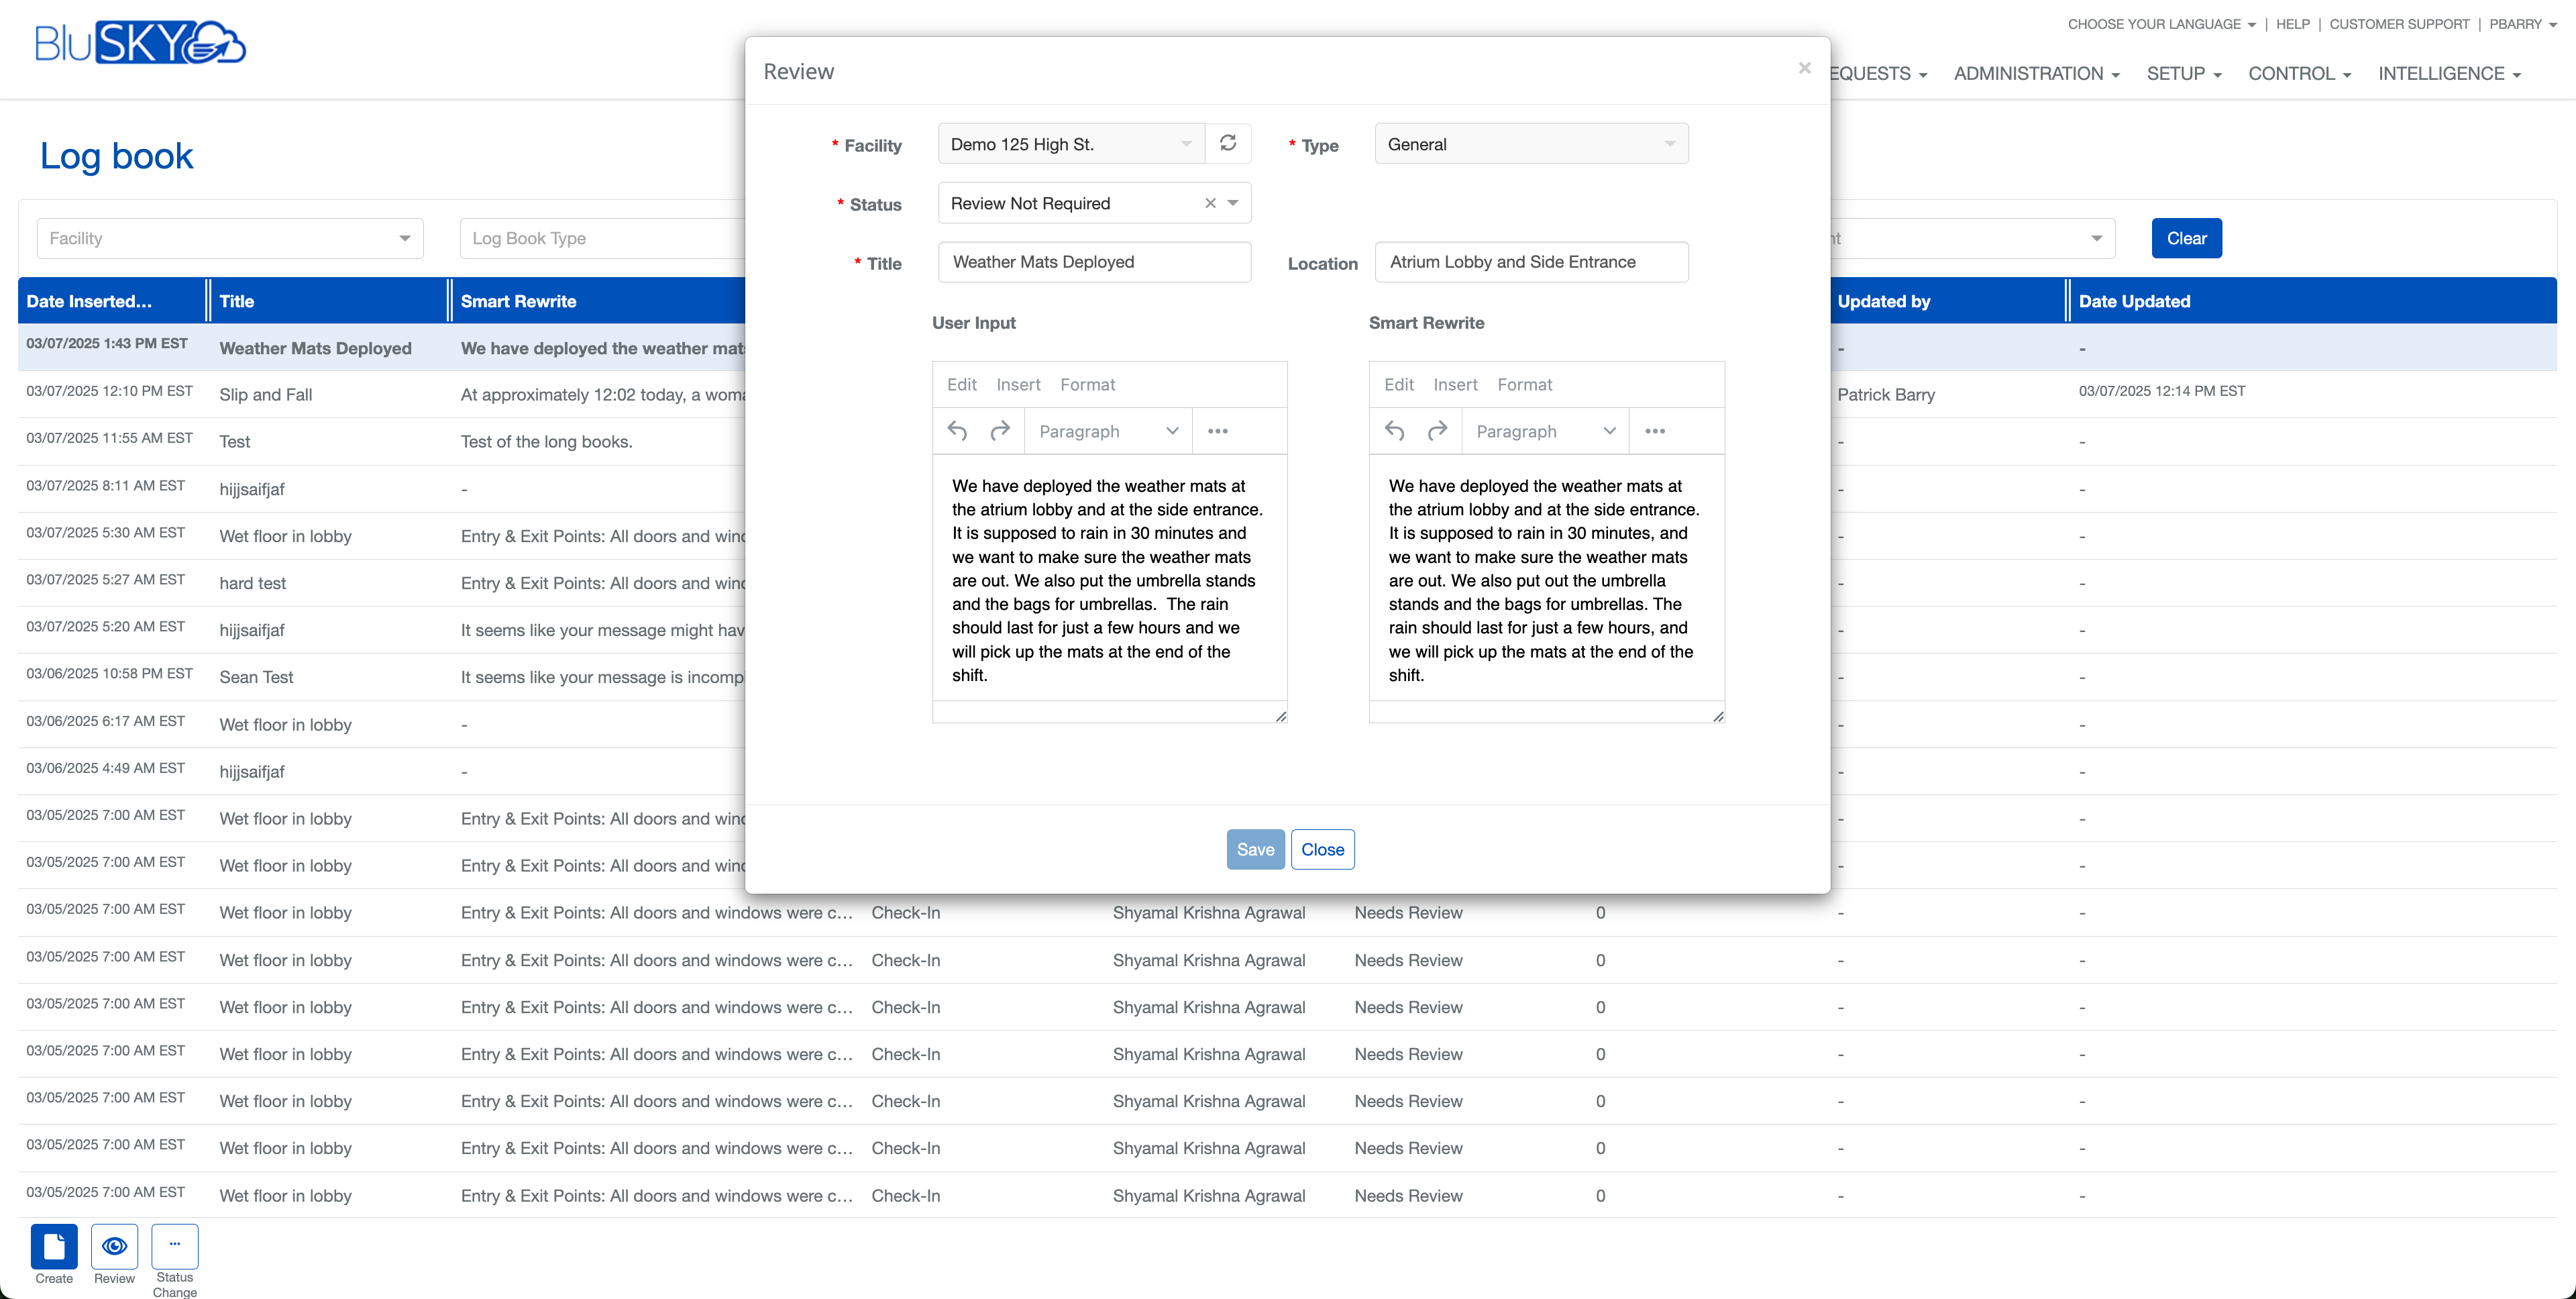
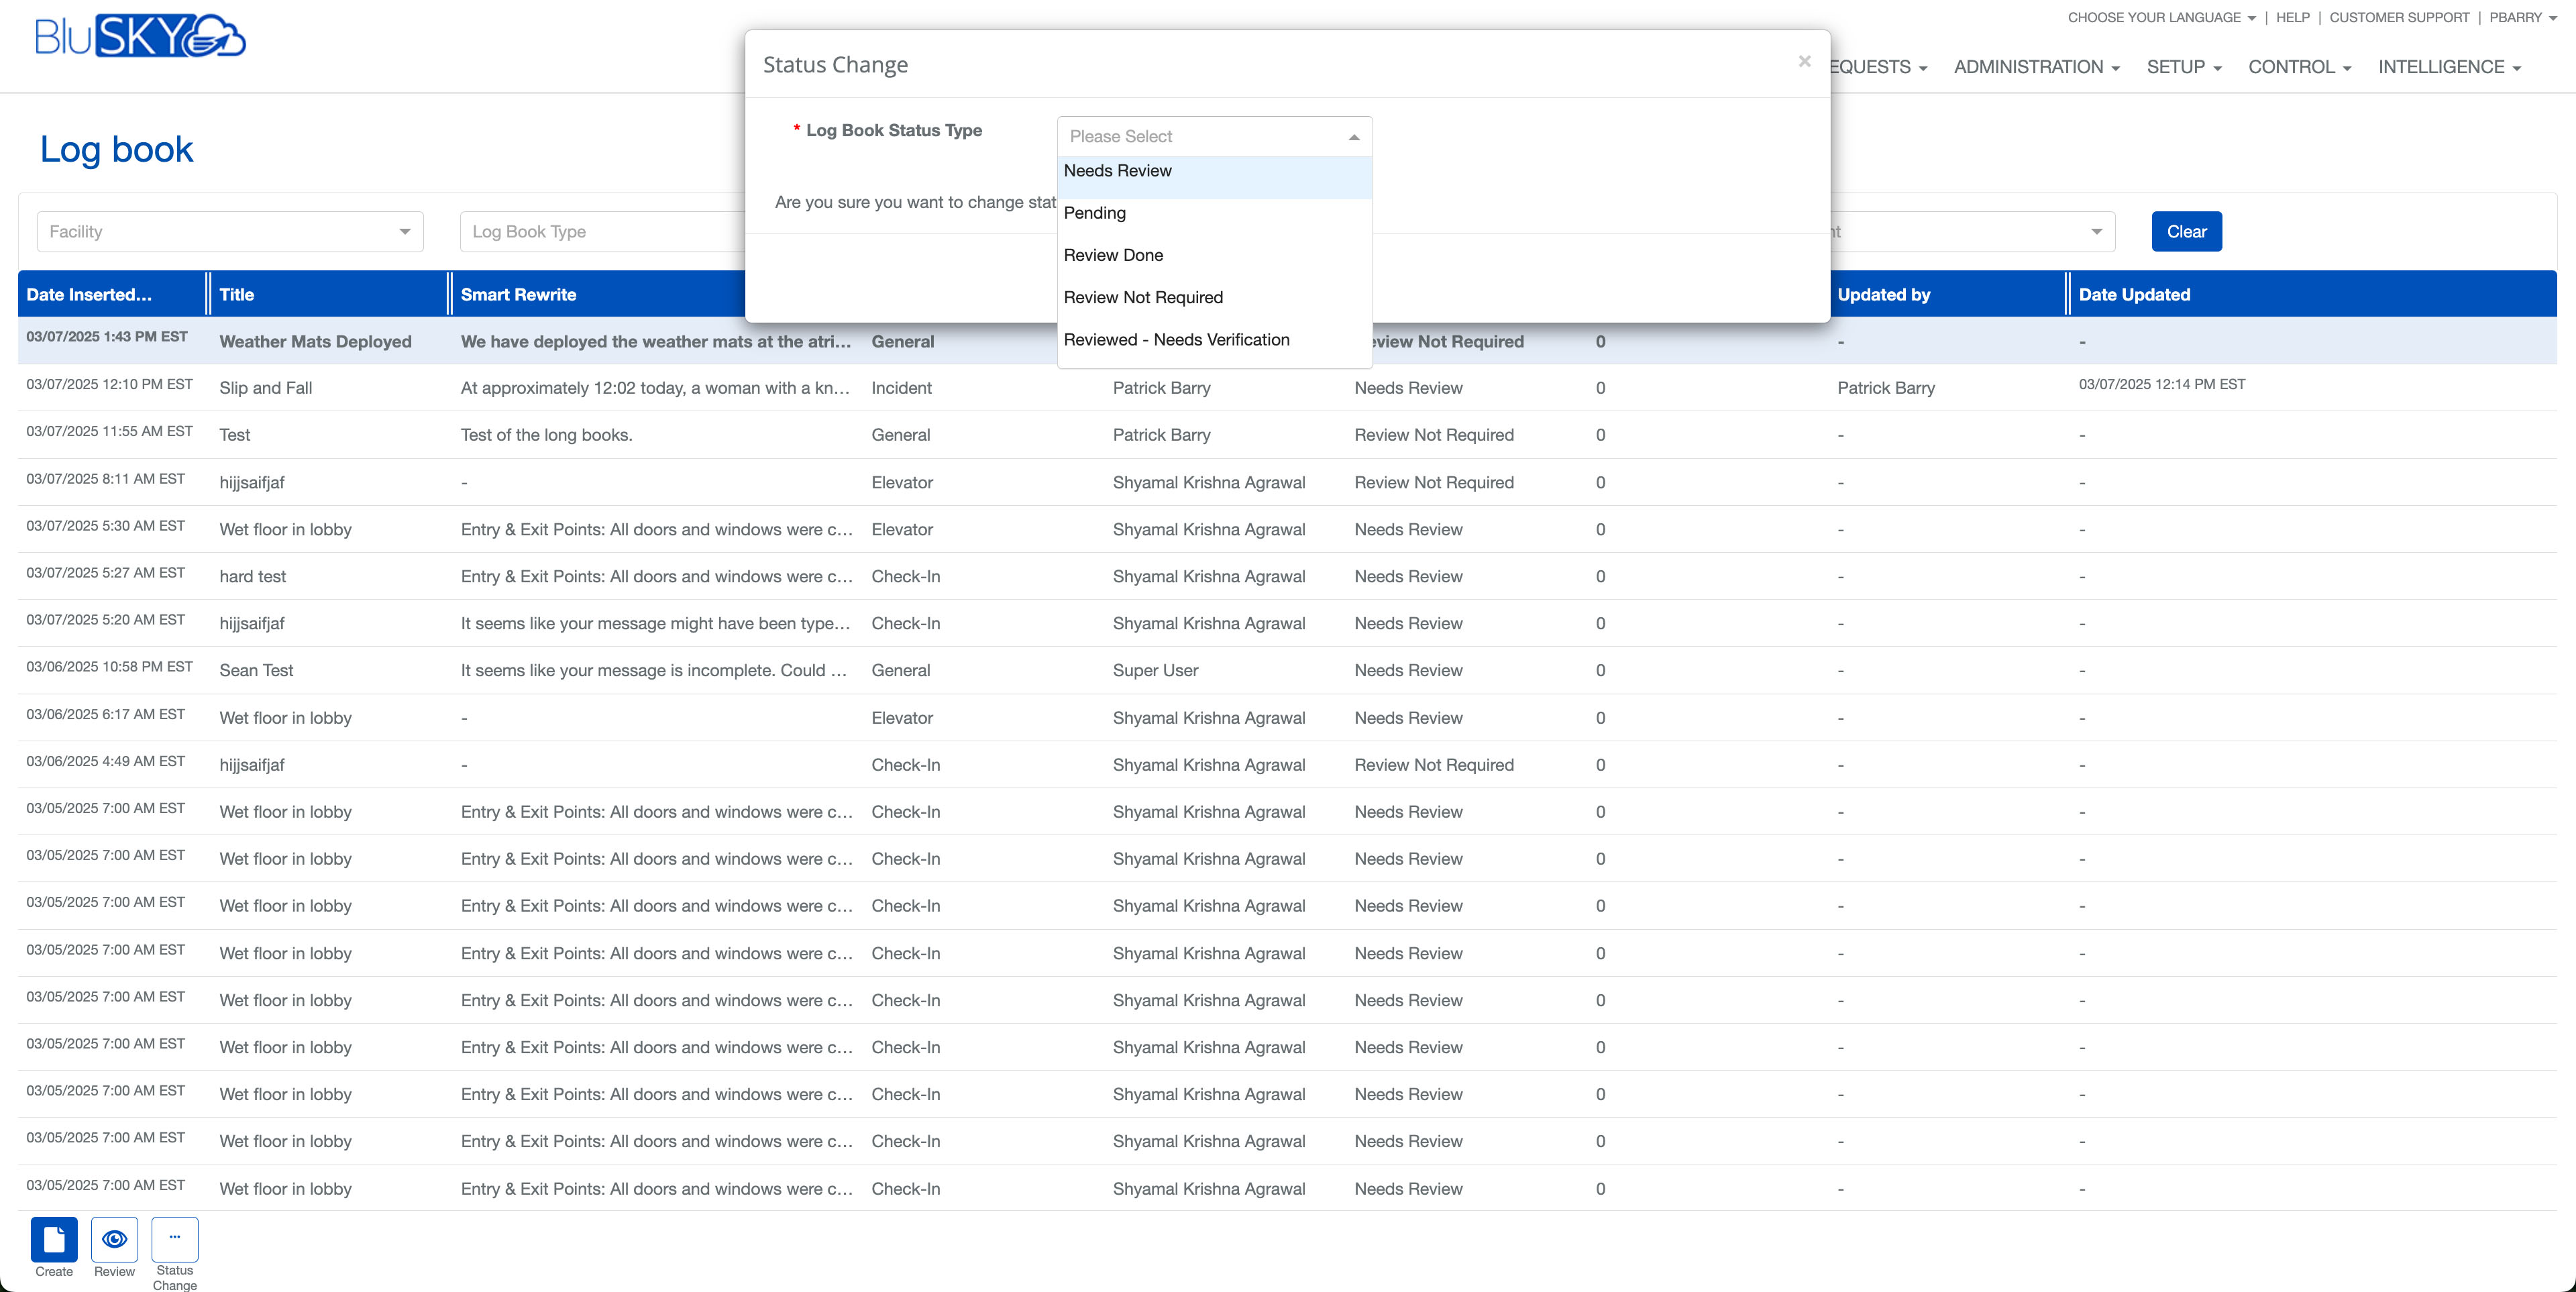
3.2 Changing Logbook Status
Status Update Options:
- Logbook entries can have their status updated to reflect their current state. For example:
- If an entry has been reviewed, you might change its status to “Review done” or “Reviewed and ready for closure.”
- If further review is needed, you can update the status to “Needs review” or “Pending.”
- To change the status, select an entry and use the Status Change button to apply the desired update.
4. Future Enhancements and Additional Features:
4.1 Logbook Summarization
Automated Summaries:
- A summarization feature is being developed to automatically aggregate log entries over various time periods:
- Hourly, eight-hour, 24-hour, weekly, monthly, quarterly, and yearly summaries.
- Differentiated summaries for weekdays and weekends.
- This feature will be powered by AI and is designed to consolidate information, making it easier to review logs over extended periods.
- Additionally, summarization will incorporate external data like weather information.
4.2 Enhanced Attachments and Multimedia Integration
Future Capabilities:
- Upcoming updates will allow users to attach video clips, photos, reports, and analytics to logbook entries.
- For instance, during a guard tour, you may capture a photo with your phone and directly attach it to a relevant log entry.
4.3 Integration with BluB0X AI
Dual Entry Points:
- In addition to BluSKY’s native logbook entry process, logbooks can also be submitted through BluB0X AI via the BluSKY Web Interface.
- This provides flexibility and multiple avenues for data entry, ensuring seamless integration across platforms.
5. Conclusion
The BluSKY logbook application is designed to be a comprehensive, user-friendly tool for managing logbook entries. Whether you are creating new entries using manual text input or voice dictation, reviewing detailed logs, or updating entry statuses, every aspect of the process is streamlined for efficiency. With future enhancements like AI-powered summarization and multimedia attachments on the horizon, the application will continue to evolve, offering even greater capabilities to support your operational needs.
For additional details, troubleshooting, or updates, please refer to the BluINFO knowledgebase.
This guide should serve as a detailed reference for anyone needing to learn and use all aspects of the BluSKY logbook application.