Edit a Person
BluSKY URL: https://blusky.blub0x.com/en-US/Person
Overview
People are the ones that utilize the access control system on a regular basis. This article will detail how to edit a Person's assigned Card/s in BluSky.
Add Cards
There are several different ways that Cards are added to a Person's record.
-
Manual Entry - Use this option when the Card is already known to the System, typically via a Card Upload.
-
This method will provide suggestions of known cards to help you pair it.
-
Scan Card- Use this option if you have an unencrypted Card reader that can be used to input the fields automatically.
-
Create New Card - Use this option if the Card is not already known to the System. This method will require that you input all of the needed information, including Internal, External, and Facility Code numbers, as well as the Card Type
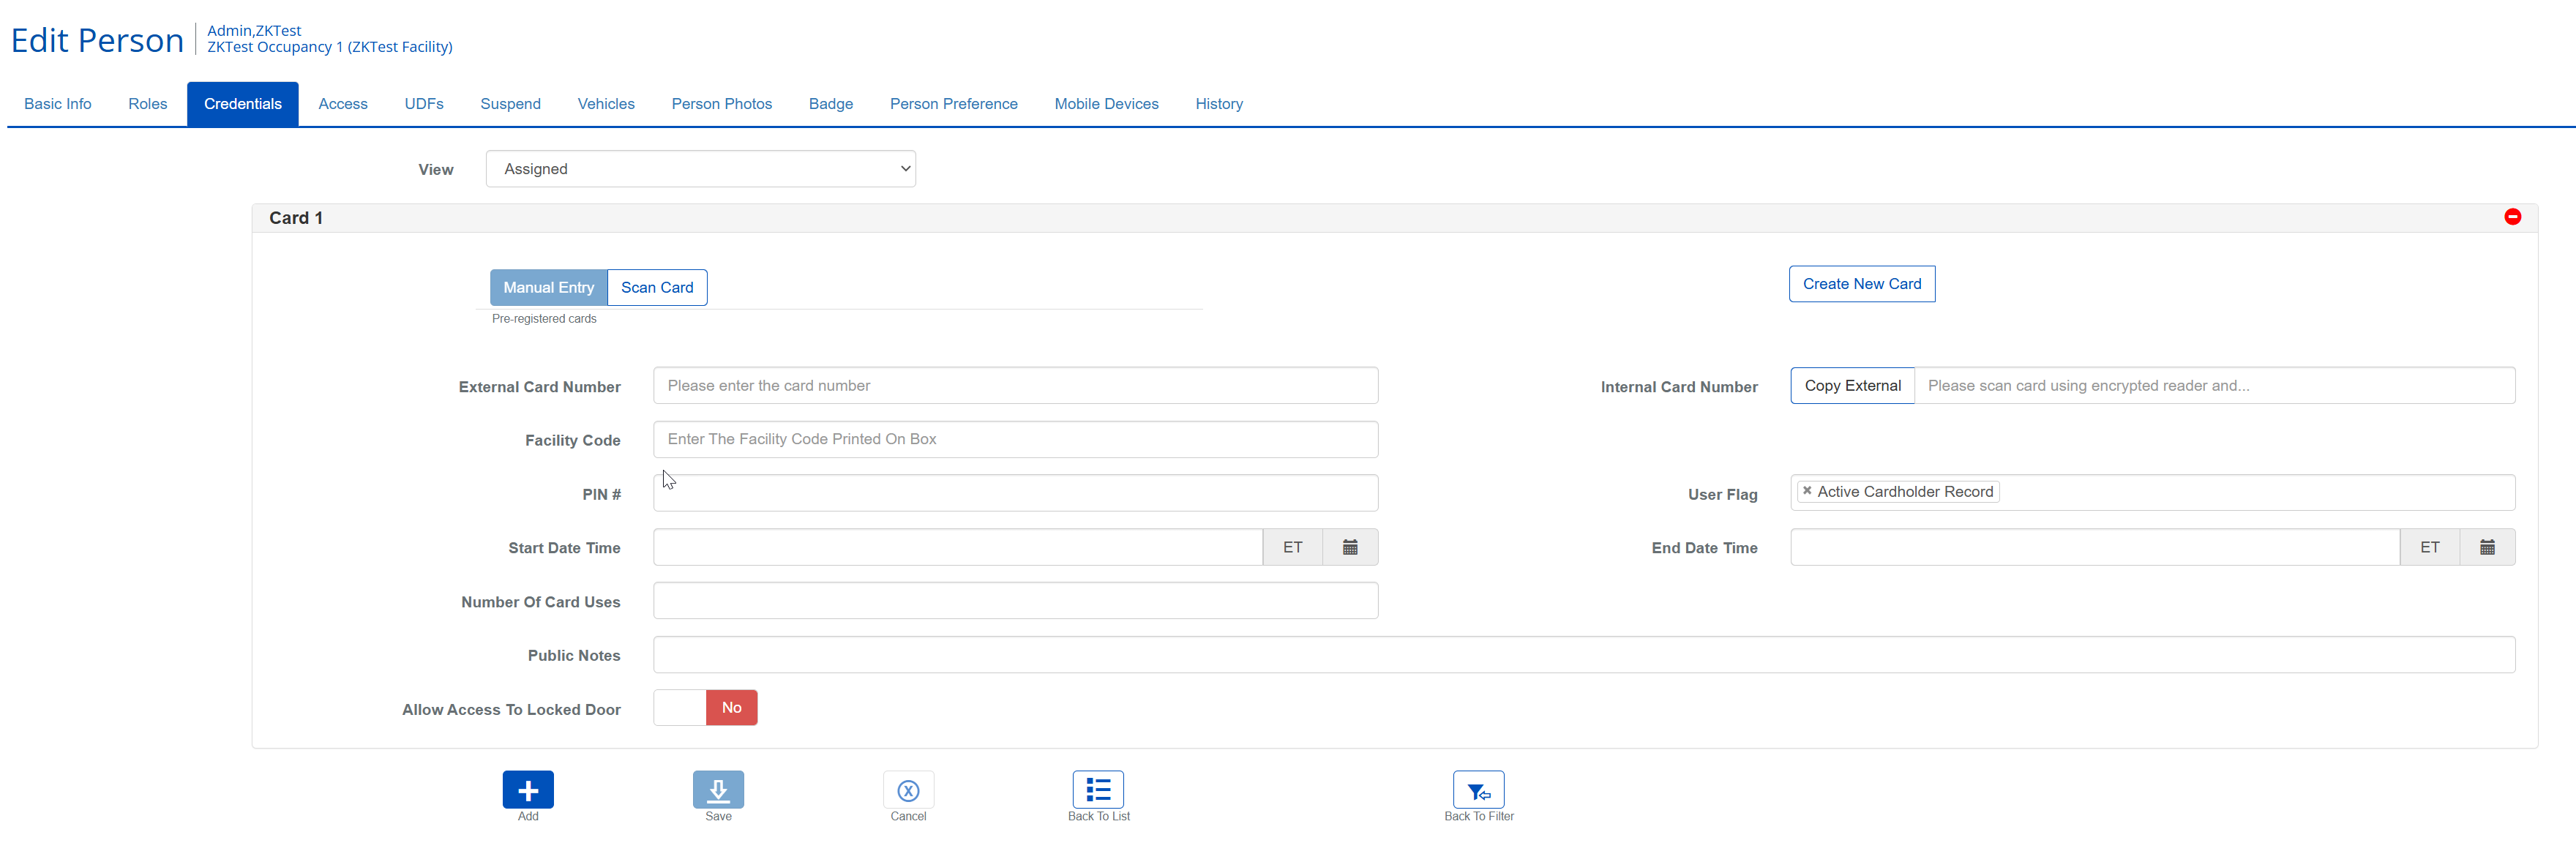
Manual Entry - Pre-registered Cards
- Begin by clicking the
 button. This will add the card input form to the current screen.
 - Begin entering the External Card Number, if the correct card shows up select it from the list.
- If no matching Card is found, you may need to enter the Card as a new card.
- Optional: Enter a PIN for the Person.
- Optional: Assign User Flags to modify how the Card is used.
- Optional: Enter a Start and End Time for the Card.
- It will default to immediately available if nothing is selected. This can be useful if the Card will only be valid during a specific period of time.
- Optional: Specify a certain number of uses.
- This can be useful in the case where a Person should periodically replace their Card or when there is a predetermined number of times a credential should work.
- Optional: Add a note to the assignment of the credential.
- Repeat this process for all the needed Card assignments, clicking the
 button to save the card assignment.
Scan Card
- Begin by clicking the button. This will add the card input form to the current screen.
- Scan the Credential on an unencrypted Reader.
- Enter the Facility Code, if not added for you.
- Optional: Enter a PIN for the Person.
- Optional: Assign User Flags to modify how the Card is used.
- Optional: Enter a Start and End Time for the Card.
- It will default to immediately available if nothing is selected. This can be useful if the Card will only be valid during a specific period of time.
- Optional: Specify a certain number of uses.
- This can be useful in the case where a Person should periodically replace their Card or when there is a predetermined number of times a credential should work.
- Optional: Add a note to the assignment of the credential.
- Repeat this process for all the needed Card assignments, clicking the button to save the card assignment.
Create New Card - Proximity - Brand-new Cards
- Begin by clicking the button. This will add the card input form to the current screen.
- Set "Credential Type" to "Proximity" to get the form for Proximity cards.
- Enter the External Card Number.
- Enter the Internal Card Number.
- Enter the Facility Code, if applicable.
- Enter the serial number.
- Select the Card Type from the drop down menu.
- Optional: Enter a PIN for the Person.
- Optional: Assign User Flags to modify how the Card is used.
- Optional: Enter a Start and End Time for the Card.
- It will default to immediately available if nothing is selected. This can be useful if the Card will only be valid during a specific period of time.
- Optional: Specify a certain number of uses.
- This can be useful in the case where a Person should periodically replace their Card or when there is a predetermined number of times a credential should work.
- Optional: Add a note to the assignment of the credential.
- Repeat this process for all the needed Card assignments, clicking the button to save the card assignment.
Create New Card - HID Mobile - Brand-new Cards
- Begin by clicking the button. This will add the card input form to the current screen.
- Set "Credential Type" to "HID Mobile" to get the form for HID Mobile requests.
- Select "Card Type" from drop-down menu. This list is generated when HID mobile credentials are added to the system by BluB0X.
- Select the "Request" button next to the "Mobile Card Number" heading.
- You will see a few messages appear next to the "Mobile Card Number" heading, once you see "Pending acceptance from User".
- "External Card Number" and "Facility Code" fields will be auto-populated
- You cannot proceed until the Person has accepted their credential.
- They will get an automated e-mail. They must perform the following steps described in the email. They will need to run all the steps from their mobile device.
- The email will be from "HIDMobileAccess@hidglobal.com" with Subject line: "Your HID Mobile Access Invitation code"
- Steps to be done by user on their mobile device. The email will have more details.
- Step 1: Download the HID Mobile Access App:
- From the App Store for iOS: \[http://appstore.com/hidmobileaccess](http://appstore.com/hidmobileaccess\\\)
- From Google Play for Android : [https://play.google.com/store/apps/details?id=com.hidglobal.mobilekeys.android.v3](https://play.google.com/store/apps/details?id=com.hidglobal.mobilekeys.android.v3\)
- Step 2: Enter the invitation code when prompted, and get your device ready for Mobile Access.
- Step 3: Your Security Administrator will issue a Mobile ID that will be visible when you open the HID Mobile Access app
- Step 4: Your Security Administrator will grant access rights.
- Your invitation code is XXXX-XXXX-XXXX-XXXX**, it expires on 2019-09-14T18:43:26Z**
- Optional: Enter a PIN for the Person.
- Optional: Assign User Flags to modify how the Card is used.
- Optional: Enter a Start and End Time for the Card.
- It will default to immediately available if nothing is selected. This can be useful if the Card will only be valid during a specific period of time.
- Optional: Specify a certain number of uses.
- This can be useful in the case where a Person should periodically replace their Card or when there is a predetermined number of times a credential should work.
- Optional: Add a note to the assignment of the credential.
- Repeat this process for all the needed Card assignments, clicking the button to save the card assignment.
Delete a Card from a Person
- Log in and navigate to People. Main Menu->Administration->People
- Use the search criteria feature, then select the entry you wish to edit from the list.
- Click the
 button in the lower left-hand side.
- Note: If the Edit button is not available to ensure that only one entry has been highlighted
- Choose from the list the appropriate Card to Delete and then use the
 in the upper right to Remove the Card.
 - Confirm changes with the button.