Edit a Person
BluSKY URL: https://blusky.blub0x.com/en-US/Person
Overview
People are the ones that utilize the access control system on a regular basis. This article will details the how to edit a Person's Access rights in BluSKY.
Add an Access Level to a Person
- Log in and navigate to People. Main Menu->Administration->People
- Use the search criteria feature, then select the entry you wish to edit from the list.
- Click the
 button in the lower left-hand side to open the Person Edit screen.
- Note: If the edit button is not available, ensure that only one entry has been highlighted.
- Use the tabs to select Access if not already on the correct page.
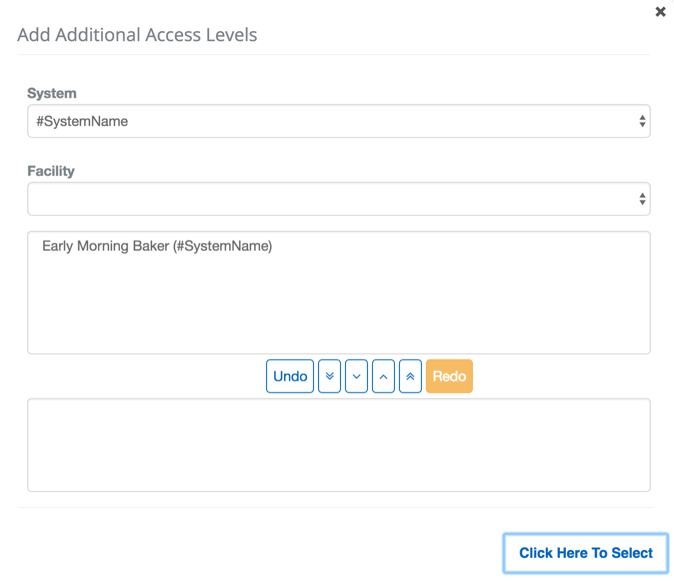
- Use the Add Access Level button below the list to add an Access Level**.**
![]()
- In the new popup menu, click all of the Access Levels you want to assign.
- Use the
 button to move them to the assign section of the menu. All Access Levels in the lower section field will be added to the Person.
- Note: If you have an Access Level assigned mistakenly use the
 button to move it to the unassigned section again.
- Add the selected Access Levels to the Person by clicking the
 button.
 - Commit changes with the
 button.
Add an Access Level Group to a Person

- Log in and navigate to People. Main Menu->Administration->People
- Use the search criteria feature, then select the entry you wish to edit from the list.
- Click the button in the lower left-hand side to open the Person Edit screen.
- Note: If the edit button is not available, ensure that only one entry has been highlighted.
- Use the tabs to select Access if not already on the correct page.
- Use the Add Access Level Groups button below the list to add an Access Level**.**
![]()
- In the new popup menu, click all of the Access Levels Groups you want to assign.
- Use the button to move them to the assign section of the menu. All Access Levels in the lower section field will be added to the Person.
- Note: If you have an Access Level assigned mistakenly use the button to move it to the unassigned section again.
- Add the selected Access Level Groups to the Person by clicking the button.
- Commit changes with the button.
Add Reader Access to a Person

- Log in and navigate to People. Main Menu->Administration->People
- Use the search criteria feature, then select the entry you wish to edit from the list.
- Click the buttonin the lower left-hand side to open the Person Edit screen.
- Note: If the edit button is not available, ensure that only one entry has been highlighted.
- Use the tabs to select Access if not already on the correct page.
- Use the Add Reader(s) button below the list to add a Reader.
![]()
- In the new popup menu, click all of the Readers you want to assign.
- Use the button to move them to the assign section of the menu. All Readers in the lower section field will be added to the Person.
- Note: If you have a Reader assigned mistakenly use the button to move it to the unassigned section again.
- Add the selected Readers to the Person by clicking the button.
- Once the Readers have been added use the Schedule drop-down menu to select the Access Schedule that should be used for this Readers.
- Note: Repeat this step until all Readers have a Schedule or use the copy options to apply to multiple Readers.
- Optional: Assign a start and end time for the access rights using the Access Rights Granted Start and Access Rights Granted End to select a date and time for the access rights to begin and/or expire.
- Commit changes with the button.
Add a Floor Stop to a Person

- Log in and navigate to People. Main Menu->Administration->People
- Use the search criteria feature, then select the entry you wish to edit from the list.
- Click the button in the lower left-hand side to open the Person Edit screen.
- Note: If the edit button is not available, ensure that only one entry has been highlighted.
- Use the tabs to select Access if not already on the correct page.
- Use the Add Floor Stop(s) button the list to add a Floor Stop.
![]()
- In the new popup menu, click all of the Floor Stops you want to assign.
- Use the button to move them to the assign section of the menu. All Readers in the lower section field will be added to the Person.
- Note: If you have a Reader assigned mistakenly use the button to move it to the unassigned section again.
- Add the selected Floor Stops to the Person by clicking the button.
- Once the Readers have been added use the Schedule drop-down menu to select the Access Schedule that should be used for this Readers.
- Note: Repeat this step until all Floor Stops have a Schedule or use the copy options to apply to multiple Readers.
- Optional: Assign a start and end time for the access rights using the Access Rights Granted Start and Access Rights Granted End to select a date and time for the access rights to begin and/or expire.
- Commit changes with the button.