How to Create a Visitor Invitation from the Visitor Admissions Page
Overview
How to quickly add new ad-hoc or walk-in visitors to BluSKY. There is a special screen focused for those people such as guards that have to create new visitor requests for a line of people quickly and efficiently.
How to get to the ad-hoc visitor invitation page
You can go directly to the Visitor Admissions Create Visitor screen or you can go to the Visitor Admissions page and select  .
.
How to add an Ad-Hoc or walk-in visitor to BluSKY quickly.
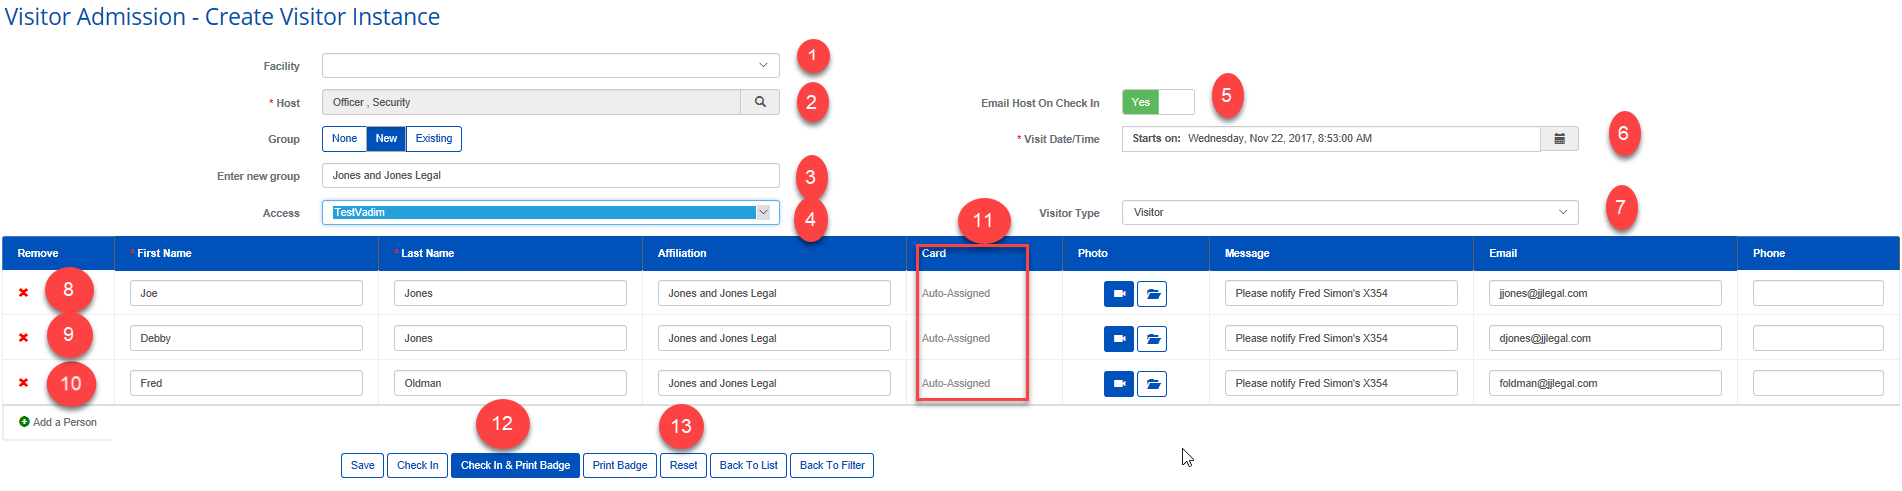
- Facility (Pre-populated) - Select the facility this visitor is going to visit. For most customers there will only be one, so it will already be selected.
- Host (Pre-populated) - The user, if he/she has the proper permission, can name a "Host" other than him/herself for the visitor. Click the looking glass
 to see a list of potential hosts.
 - Group (Optional) - It is sometimes practical to associate visitors with a certain Group. The default is NONE. You can click New to enter a new Group Name (like “Sales Seminar”). You can click Existing to associate this visitor with a Group that has already been defined.
- Having a group is a good idea if you might be checking in a group of people. It makes it easy to find the group of people from a smaller list.
- Access (Appears only in systems that feature access control for visitors) - (Pre-populated with the "default access level" that is specified for your visitors) - An "Access Level" indicates what doors or turnstiles can be accessed with a credential and at what time of day. Some organizations define more than one such access level for their visitors. If such is the this case, you can replace the pre-populated default access level with another from the pull down menu.
- Notification Toggle - This field determines whether a notification should be sent to the Host at Check-In.
- Note: There will be a similar button if the host and the requestor are not the same person. In this case you will also see an option for requestor get an email upon the visitor being checked in. This is good if the host is the manager and the requestor is an office admin.
- Visit Date/Time (Pre-populated) specifies the anticipated date/time of arrival of the visitor. By default, this is set to NOW. The content can be modified by clicking the calendar
 icon if the visitor is anticipated at a later date/time. If you click the calendar item:
- Start Date (Pre-populated with today's date) - Is the visitor's expected date of arrival. The date can be modified by clicking the calendar icon.
- Time (Pre-populated with the current time) - Choose a time from the pull-down menu. The arrival time does not need to be exact.
- Repeat (Pre-populated with None) - This pull-down menu gives you a recurrence option: when you choose one, a window appears with a series of questions that must be answered to specify the recurrence. This allows you to create more than one invitation at once for your visitor. We have put together an entire article on the Visitor Repeat Options.
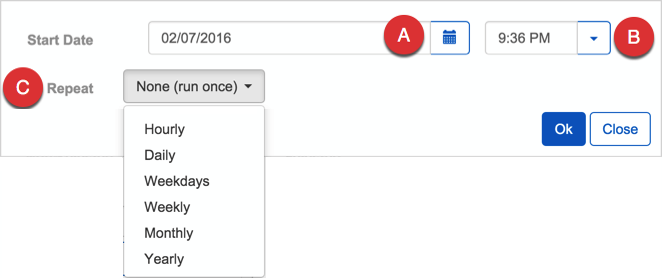
TIP: The policy in some Facilities is that the visitor must obtain a new credential for every visit that you have specified (because credentials are valid only for the day of the visit). In other Facilities, the credential that is issued on the first visit is valid for all the visits that you have specified in the invitation. Check with your Administrator if you need to know your Facility's policy on this matter.
- Start Date (Pre-populated with today's date) - Is the visitor's expected date of arrival. The date can be modified by clicking the calendar
- Visitor Type (Pre-Populated with "Visitor") - It is desirable to indicate the type of visitor being invited. Common types are: “Visitor”, “Vendor/Contractor”, "Delivery", Visitor VIP, or “Visiting Employee”…
- Add your first visitor.
- First Name (Mandatory) - This field captures the Visitor's first name. It can be entered manually or if you have a license scanner will populated when the license is scanned.
- First Name: This can be done manually or if you have a drivers license scanner you can scan or swipe the drivers license.
- Guest Last Names (Mandatory) - These fields capture the Visitor's last name. It can be entered manually or if you have a license scanner will populated when the license is scanned.
- Affiliation (Optional) - This field records the Visitor’s Company Affiliation.
- Take a picture or not depending on your organizations policy.
- Message (Optional) - Any text that you enter into this field will be shown to the Visitor Admissions Staff in the lobby when the invitation is pulled onto their screen.
- Guest Email / Guest Phone (Optional) - Some systems are programmed to send an e-mail or a text message to the Guest if a valid e-mail address or phone number is entered. The message is sent immediately after the invitation is completed; it confirms the invitation and provides instructions on how to proceed upon arrival.
- (Optional) Add another person by selecting "Add a person" below the "10" button in the picture above. Fill the fields in as you did for #8 above.
- (Optional) Add another person by selecting "Add a person" below the "10" button in the picture above. Fill the fields in as you did for #8 above.
- Cards: Depending on what features you have licensed you might not see this column, you might have the field auto populated, or you might have to add a card manually. If the field is auto-populated you will see a card number when you "Save", "Check In", "Check In & Print Badge", or you take a picture.
- "Check In" or "Check In & Print Badge". Both options check the visitor in to BluSKY, but the "Check In & Print Badge" option will also print a badge.
- Select "Reset". This is very important to select before you add a new visitor or group of visitors. If you just overwrite the "First Name" or "Last Name" you will overwrite the previous visitors settings with the next settings as soon as you select "Save", "Check In", "Check In & Print Badge".